Question
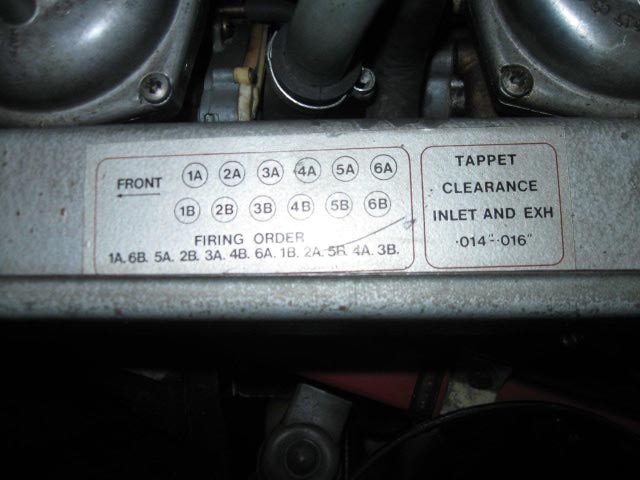 valve clearance sticke
 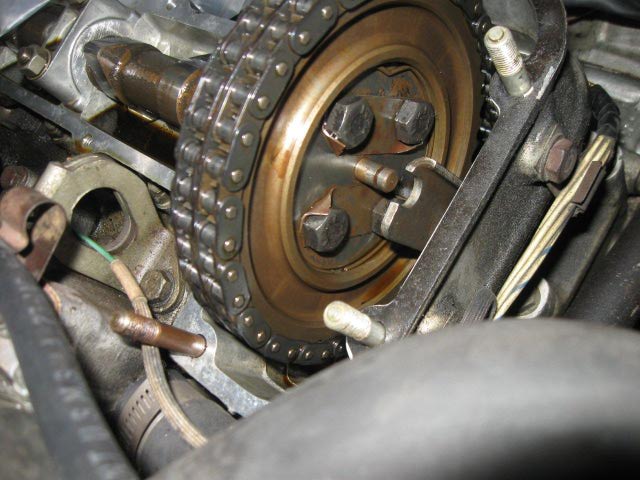 cam sprocket shaft
Hi Howard,
I'm checking the valve clearances, my manual says they should be 12 - 14 thou, but there is a sticker on my left air cleaner that says 14 - 16 thou - which do you suggest ? Also, any suggestions for a clamp to hold the cam sprocket - there is a Jaguar tool but I was thinking of a hair pin or e-clip or wire ? I guess I could try to make the Jaguar tool with some sheet metal...
Thanks again,
Steve
AnswerHi Steve,
In the dealerships we were always told that the sticker on the car always over ruled the books on the specs.
First you MUST check valve clearance on all the valves on the one bank you are doing and write down the clearances.
I never had to factory tool and always used safety wire to hold the center pin with the sprocket out to the support.
Look at the notch on the flange next the the first cam bearing and point it down towards the head and stuff a shop rag down in the came chain area and use a small chisel or such and undo the lock tabs on the bolts that you can access and remove the bolts that you can access. (the rag is so you can't drop a bolt or a lock tab down into the cam chain area.) This is extreamly important !!!!
What ever you do be careful NOT to dislodge the large wire clip on the inside edge of the sprocket!!!!!
After you have removed the two bolts and the lock tab, remove the shop rag and hand rotate the crank so that the notch in the cam flange next to the cam bearing is pointed exactly 90 degrees away from the cam cover gasket surface. Then stuff the rag back into the cam chain area and remove the last two bolts and the lock tab.
Now you can pry and tap the sprocket off of the cam flange and tie it out towards the front of the engine. I use the small groove in the center pin to tie a piece of safety wire and tie it off to the front.
Now it is very important to slowly loosen the cam bearing caps evenly. If you remove one at a time the valve spring can push enough against the cam to break the cam as it has no lateral strength. It is very britle. By raising all the bearing caps evenly it will not break the cam. When you get them most of the way out the cam may rotate and that is normal.
Do NOT get any of the lifter cups mixed up !!! They MUST go back in their own bore !!!
Now, measure the valve pad thickness and write it down and then get a pad that corrects the valve clearance of that valve. Sometimes the valve adjustment pad gets a worn center where it sits on the valve stem and you MUST take the pad measurement in that worn spot. You can not use a caliper in there so a Micrometer is needed. A caliper can only be used if there is no indentation on the adjustment pad where the stem had been riding.
Most of the time I find that I can reuse several adjustment pads in other positions, thus I only need to buy new pads on some.
ONLY do one bank at a time. When putting the cam back in be sure to put it in time as you put the cam in place and hold it in place so it don't try to rotate. I often put a piece of heavy cardboard on the cam shaft and clamp a pair of vicegrip pliers to hold the shaft so it don't rotate while I am putting on the bearing caps. The caps are numbered and must not be mixed either. You must tighten them down evenly a little at a time all the way down the line of caps so you don't put a strain on the cam shaft. You must not rotate the crank with the sprocket off due to the chain tensioner. Even if you are careful you still may need to use a pry bar to force the sprocket back onto the cam flange when you are done with the adjustment pads. Use the shop rag and just reverse the procedure in putting the bolts back in.
After you finish one bank you can do the other. Don't attempt to do both at once.
Let me know how it goes,
Howard