QuestionIs it possible and if so, how do I replace the damaged plastic rod connecting the ignition key lock to the ignition switch on my 93 Mercury Villager.
Answer
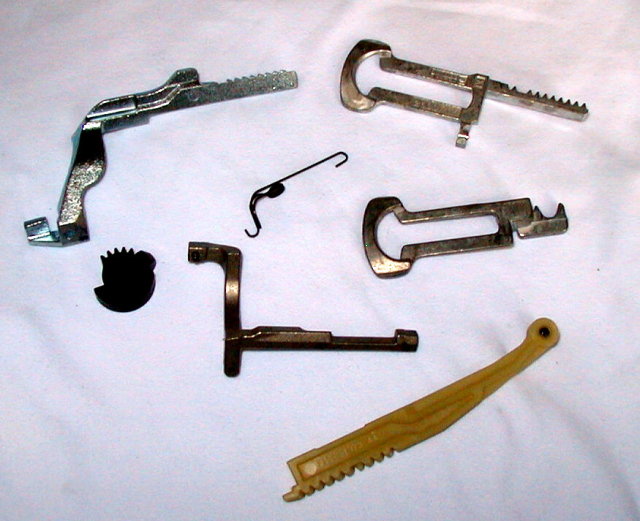 rack actuators
Hi John:
The part you are referring to is called the "rack actuator". There is a small pin on the end that falls out. It's a very common problem but requires a bit of work and experience to replace it. It is buried inside the column. The entire upper end of the steering column needs to be disassembled (tilt and non-tilt columns use the same housing) to access this rack. Once it's apart, the new rack needs to be shaved slightly to fit in properly. Then during assembly, the gears for the lock cylinder need to be realigned properly to hit all the key positions. If you miss by 1 tooth, it is very difficult to get the lock cylinder out again to correct it without breaking it. I would not recommend doing this one yourself unless you're confident in your skills.
A good repair shop should charge you about 2 hours labor to do it and the part costs about $17.00
The part has to come from Ford (or us) only, (not a parts store) & the part # is F2DZ 3E723 A. Your rack gear is the long yellow plastic one in the bottom of the photo.
If you would like to purchase this part from us, we would be glad to ship it to you.
As we are limited to the content and can only post 1 photo, if you want to continue with this dialog, need more photos of the housing removed, or want to order the part, please contact me through our company website at:
http://www.stolenandrecovered.com
Regardless, here is the step-by-step procedure for the repair.
Step by step (with airbag):
1. Disconnect the battery
2. Remove the airbag by removing to the 2 bolts that secure it (one on each side)
Disconnect the horn wire and the connector from the clockspring to the airbag
3. Remove the nut securing the steering wheel and remove the steering wheel.
4. From the bottom of the column, remove the 3-4 screws holding the 2 covers together.
5. Remove the lower cover.
6. Rotate the key to the “On” position and using a probe or punch, push in the release pin on the bottom side of the lock housing. This will allow you to remove the lock cylinder by simply sliding it out.
7. Remove the upper cover
8. With a small angle pick, remove the green plastic retainer--it simply snaps off, the next piece is called a thrust washer and rotates 90 degrees and then comes out. The last piece is the important piece; the gear. It will just fall out
9. Remove the clockspring and the key warning buzzer contact. The clockspring has snaps that need to be released. Let it hang.
10. Remove the turn signal multi-switch by removing the 2 screws that secure it to the housing
11. Remove the turn signal cancel cam—it slides off the shaft
12. Remove the snap ring, spring, spring seat and inner race retainer form the upper end of the shaft.
13. To remove the housing, you will need to remove the large spring on the lower right side of the housing (be careful-it's a strong spring), then remove the 2 pivot pins on each side of the housing (the pins that allow the tilt housing to pivot).
14. Once the housing is off, you will be able to remove the old rack. You will also need to find the pin that fell out so it does not jam or break anything by being left inside the column.
As always, getting it apart is the easy part. Putting these parts back together correctly and safely is the hard part.
Reassembly:
The new rack will slip into the lower piece of the actuator.
When installing the housing, you will need to seat the shaft inside the lower bearing. From under the column and between the upper and lower housing, using a large screwdriver, push the shaft up to seat into the lower bearing. Then you can get the pins to seat.
Putting the spring back in will give you a lot of trouble, but can be wedged into place with patience and caution.
Lastly, aligning the gears for the ignition lock ABSOLUTELY have to go in 1 way or you will never get the lock to hit all the positions and you won't be able to get it out again.
Here is the procedure for that part of the assembly
Push the yellow ignition rack actuator so the ignition would be in the "on" position (lights come on, but not started). Insert the gear with the notch of the gear facing upward and aligned parallel with the slots in the housing. Then insert the thrust washer, and rotate it 90 degrees to lock the gear in place. The two inner slots should then look perfectly aligned in place. Lastly snap on the green retainer.
Once all of that is in place, you can then insert the lock to make sure you have all the positions and then remove it again to finish the job.
Reassemble the rest of the column in reverse order.
I hope I've helped you. If you think it's too big a job, you can contact my company directly a stolenandrecovered.com & we can rebuild it for you and ship it back.
Good luck
Doug