If you pull on the left door handle on your Toyota Camry and nothing happens, it's time to replace it with a new one. Replacing the door handle is a fairly easy but time-consuming task. Allow about five hours for its completion. The process for replacing the door handle is similar for both front and rear doors on most Toyota Camry models. For more detailed instructions pertaining to the specific year in which your vehicle was made, refer to the factory service manual.
Start with the window fully up. With a Phillips screwdriver, remove the two screws under the inside edge of the door, the two screws under the door handle, the screw underneath the light, and the screw underneath the mesh cover in the middle of the door.
Press the two pins on the outer edge of the door with a flathead screwdriver. Pull the loosened pins out of the door.
Remove the trim around the interior door handle. Wrap the end of a flathead screwdriver with electrical tape. Insert it between the pull handle and the trim around the interior door handle, and press down. At the same time, pull on the outer edge of the trim at the same end until the clasp that holds it comes loose. Keep prying toward the other end until all of the trim is loose. Pull the door handle, as if you are opening the door, and slide the trim off.
Slide the flathead screwdriver or your pry bar around the bottom edge of the door panel. At the bottom, the panel is held on by plastic clips that will pop loose. At the top of the door, the panel fits into the window groove. Gently lift the panel up and off. The panel will still be connected to the car door by a few wires. Set it down carefully.
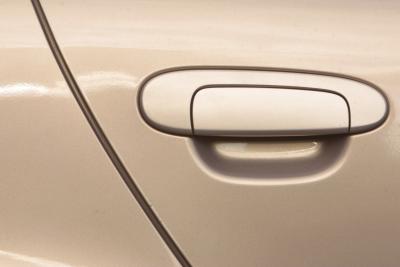
Peel the plastic liner away from the left side of the door. Using your straight-handled ratchet and 10 mm socket attachment, loosen the three bolts on the inside of the door that hold the handle in place. Finish unscrewing the bolts and catch them with your hand.
Wiggle the door handle to loosen the final bolt and rod that hold the handle and door key lock/unlock switch. Flip up the plastic clip that keeps the rod in place, then remove the bolt and rod from the outside with your hand.
Fit the new door handle into place. Using the ratchet tool, screw the three bolts that anchor it back into place. Insert the rod in its hole, and flip the plastic clip down over it.
Use your screwdriver to mimic the bar that engages the closed door, and test the new handle. When you pull the door handle, the latch should release the screwdriver. Insert your key and test the lock to make sure it is working.
Pull the plastic door liner back over the left side of the door. Set the door panel back in place. Turn the key in the ignition and test your window. If you hear scratching or scraping noises, put the window back up. Look for any obstructions keeping the window from moving smoothly up and down.
Replace the door panel screws, pins and clips. Make sure the wires for the light are sticking through the door. Plug the light back in when you reinsert it. Make sure the clips that attach the door panel to the bottom of the door are properly aligned. Push on them to engage them.
Pull the inside door handle and slide the trim back over it. Push on the end without the clasp first, then the end with the clasp. To engage the clasp, push down on it with your screwdriver.