Have you ever wanted to paint your own car at home, but the elements keep getting in the way. With a trip down to your local hardware store you could be getting perfesional results doing it yourself. The extra benfit if you need one, the whole thing is mobile. Painting your buddys car is a brease.
So your ready to get that beast painted up?
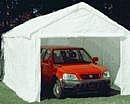
The start of your paint booth project is to get all of your materials together. Make sure you get a canopy that is large enough to fit your car/truck in side and allows at least 2 feet of space on EACH side. If you don't know how much space that you will need a good point of reference is your owners manuals. If you don't have it check online information about your car is out there.
Find a good flat spot to set up your booth. The best place would be away from your house on some concrete. Sometimes this isn't possible so if your stuck with a dirt yard its ok we will take care of that problem.
Now if your like most of us out there, then your yard is that of dirt. Dirt can be a bad thing when you start painting. The best way to get around this problem is simply to spray down the area around your booth nice and good the night before you plan on painting. Make sure you let it soak in good, this will compact the ground and keep it from coming up while painting. Just to be on the safe side in the morning give it a LIGHT mist over the dirt, LIGHT MIST!!! You don't want to have a muddy area while painting.
Using the instructions that came with your canopy completely set it up and double check everything at least once. You don't want a tarp or pipe coming loose when you start painting.
If your canopy DOSE NOT have windows with mesh screens or some other way of allowing filtered air in then some artificial light is going to be made using one of your heat lamps. If it dose have windows then the next step is optional.
Now for the heat lamp for some extra light. Most heat lamps found around town will have handles that are used for moving and holding on to the lamp. These will do nice for tying up the lamps. Using the rope or straps take one lamp and find a point of the canopy that has a pipe exposed strap it down. Make sure its on good so it dosen't fall off. The best place is to have it facing the area with the least amount of flat paint able area.
The rest of the lamps will be brought in after you finish painting the car/truck. If you have more then five lamps you can hang another lamp in similar fashion on the opposite side of the lamp hanging.
This step is only for those of you that are running air lines from a compressor to a spray gun. If you are using a hand held electric sprayer then just be careful with the cord. Spray cans are fine too.
For your air line to get around the car without having to drag it around picking up dirt you need to suppened it. Using some rope or straps tie a knot around the spray line giving enough slack on the knot that the line will side through pulled. Now there is two ways you can do this you can tie the line to a any "U" shaped object or a clamp similar in shape to a key chain that you have laying around the house (i.e. exhaust hangers work it a charm). Double knot it to the object to insure it dosen't slip off after a couple of tugs. If you are using a exhaust hanger or similar with a threaded end putting a washer and nut on the end is even better! This "U" shape allows you to hand the slack of your line to hang from the pipes holding above and sides back and forth as you need it. When you need to switch sides simply remove and replace. The second way to do this should be done only as a last chance kind of thing. Simply tie the line with the slack as above, instead of using something to hook up and remove, simply tie the rope/strap to the with enough slack in the knot to allow it to be undone when switching sides.
After everything is checked again to make sure its good and done right, paint the car/truck using your methods.
Once the car/truck is done being painted let the paint fumes out, just to be safe. Bring in the remaining lamps that you have place one at each corner of the car(as far away as you can without touching the tarps) and connect the lines into the surge protector.
Allow the heat and light from the lamp to do there job for a LEAST 2 HOURS before you try to check anything. The heat from the lamps is going to help the curring of the paint(resulting in very hot metal DONT TOUCH THE CAR YET!!!). I recommend that you allow a few hours of heat (like 2.5 to 4 hours) and then the same amount to cool and set before you remove masking and try to drive.
There you have it a paint booth at home that you could leave up or store away as you need it for a fraction of the price.