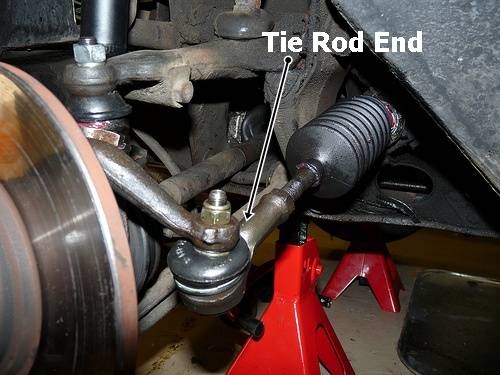
The tie rod ends are part of the steering linkage on your Chevy Blazer. Along with connecting arms, rods, ball joints and sockets, they help provide steering control of the front wheels when moving down the road. However, bad or worn out tie rod ends will cause steering play, making your Blazer unsafe for driving. Whether you need to install a new inner or outer tie rod end, it is not very difficult to replace.
Loosen the wheel lugs with a lug wrench on the same side of the tie rod end you need to replace.
Jack up the front tire using a floor jack until it clears the ground, and support it with a jack stand.
Remove the cotter pin from castle nut holding the tie-rod ball joint in place using a pair of nose pliers. Both--the outer tie rod end (attached to the steering knuckle) and inner tie rod end (attached to the relay rod)--are removed the same way.
Remove the castle nut from the ball joint stud using a wrench or ratchet and deep socket.
Pull the tie-rod ball joint out of the steering knuckle or relay rod using a pitman puller tool.
Measure the installed length of the tie rod end into the adjuster tube clamp using a measuring tape. Use this measurement as a reference during installation to help you keep wheel adjustment or toe. The clamp sits between the inner and outer tie rods, and over the adjuster tube.
Loosen the two adjuster clamp bolts using a wrench or ratchet and socket.
Unscrew the tie rod end from the adjuster tube counting the number of turns needed to remove it from the tube.
Screw the new tie rod end into the adjuster tube with the same number of turns needed to remove it from the tube.
Measure the tie rod installed length into the adjuster tube clamp using your previous measurement as a reference. Adjust if necessary. Then tighten the two adjuster clamp bolts using the wrench or ratchet and socket.
Install the tie-rod ball joint into the steering knuckle or relay rod.
Fasten the castle nut on the ball joint stud and tighten it with the wrench or ratchet and deep socket.
Install a new cotter pin on the ball joint stud and bend the pin ends to hold the castle nut in place. Use the nose pliers.
Mount the tire on the wheel assembly. Then fasten the wheel lugs with the wheel wrench.
Lower the vehicle and finish tightening the wheel lugs.
Check wheel alignment if necessary.