With all the spinning pieces a vehicle has, sometimes a problem is easy to notice after you start rolling. Bad bearings and misaligned parts announce themselves because you'll hear squealing and squeaking and feel a lurch. This occurs when missing bearings create openings where there should be a guide for the parts as they are in motion.
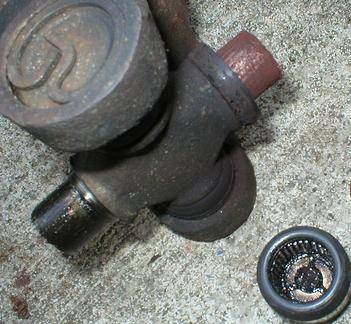
Universal joints act as a team. Each end of a four-post "+" is capped with cup bearings that allow the cup to rotate around the end. Inserted into the receiving ends of the drive shaft and rear gear housing, universal joints are secured into yokes with snap rings and U-bolts.
When your vehicle rolls with a shimmy, shake and wine, check the drive shaft to see if the time has come to replace universal joints first.
Drive the vehicle in reverse onto car or truck ramps so that the rear of the vehicle is lifted off the ground. Engage the parking brake and put the transmission into park. Grab a small wrench and a hammer and go under the vehicle by the rear axle and gear housing. Locate the universal joint of your vehicle by finding the junction of drive shaft to rear axle. The universal joint sits between the two yoke ends of the drive shaft and rear gear housing.
There will be two U-bolts that loop over two of the four posts of the universal joint. They lay over the cup bearings and are secured by two bolts that hold it in place to the rear gear yoke. Break loose all four bolts before removing each one. Pressure can be exerted onto a bolt that remains tight after the other one has been removed. Loosen all bolts first, then continue to loosen and remove them all. Two U-bolts have four fasteners that secure the universal joint in place. Keep each U-bolt together after removal. Pull the U-bolts from around the cup bearings on the universal joint.
It is not a good idea to mix and match the U-bolt parts, so keep all matching fasteners together to go back to their original locations during installation.
Separate the drive shaft from the rear axle by pitching the universal joint so that one end of the joint that has been freed from the rear axle yoke is pointed away from the rear axle, and the other is pointed closer to the rear axle. Put the vehicle in neutral and turn the drive shaft by hand.
As the drive shaft is turned, the position of the free cup bearings will allow for the drive shaft to turn away, and out, from the rear gear yoke. When free, hold the end of the drive shaft above the rear gear yoke and pull the drive shaft out of the back of the transmission. Once free from both the rear gear yoke and the back of the transmission housing, take the drive shaft to the work bench where there is a vise to work with.
Extract the universal joint from the end of the drive shaft yoke by first removing the fasteners that hold them in place. Some yokes secure the universal joint into position using snap rings that fit inside the yoke at the top of an installed cup bearing and does not allow it to exit. Another yoke clamp that may be holding your universal joint in place is a ring clamp. You need to either use the screwdriver to get the snap ring out or a pair of pliers to release the pressure of the ring clamp that holds the universal joint into the drive shaft yoke without nuts or bolts.
Squeeze out the cup bearings that are holding the universal joint in place after the removal of the snap or ring clamps from the yoke. It takes a great deal of pressure to push a universal joint cup bearing out of its seat in a yoke, but it can be done with a table vise and two sockets. Get one socket that is smaller than the opening of the drive shaft yoke that allows access to the top of the bearing, and another that is bigger than the opening on the other side of the yoke for the bottom bearing to be pushed into.
Inside the vise, you put first the small socket then the yoke with the universal joint then the large socket. As you push one cap down and out with the smaller socket as you tighten the vise, you will also be pushing the other end of the universal joint out of its seat. When one comes out, the other comes out too.
Replace the universal joint with new cup bearings or a whole new joint. To seat the bearings in place, grease the new universal joint and cup bearings and insert the "+" into the two openings that the bearing cups will be seated. Place one bearing cup on the "+" and insert into the seating hole. This cap will be pushed up into the space using the other bearing cup on the outside of the yoke. Tighten the yoke and bearing cups together so that the outside bearing is pushed into the seat and onto the other end of the "+." After the bearing seats onto the post, it will push the other bearing into place.
Use the small socket to continue pushing the universal joint into position after the bearing has reach inside the yoke and is even with the inside edge of the opening. Check that the joint is positioned so that the snap or ring fasteners can secure the universal joint into position.
Go back under the vehicle and hold the drive shaft in position for insertion into the back of the transmission. Hold the yoke end of the drive shaft above the yoke of the rear gear and insert the spindle end of the drive shaft into the opening in the back of the transmission. Push the drive shaft in as far as it can go and then lower the yoke end of the drive shaft down to the yoke of the rear gear.
Pitch the universal joint so that one cup bearing is pointed away from the rear axle and the other is pointed toward the rear axle. As the drive shaft is turned, position the loose bearing cups onto the yoke seats of the rear gear yoke. Replace the U-bolts around the open cup bearings and tighten securely.
Place the vehicle in park and release the parking brake.
Start the engine and drive off the vehicle ramps to complete the job. Check for vibrations or noise and lubricate or tighten where necessary.