The 1950 Chevy pickup was not only the last truck of its generation to be manufactured by Chevrolet with a rear bumper, but it also boasted 92 horsepower at 3,400 rpm with 176 foot-pounds of torque at a range of 1,000 to 2,000 rpm. It came equipped with tubular rear shocks, a Rochester carburetor and larger exhaust valves than its predecessors. This classic truck can make for an exciting and challenging restoration project, and with the proper tools and preparation this task can be successfully completed over time.
Subscribe to or purchase auto magazines containing information on restoring classic trucks, concentrating on Chevy models manufactured in the 1950s. Accumulate mass amounts of information specific to Chevy trucks of the late 1940s and early 1950s in relation to this project. Utilize these resources, along with websites and classic auto restoration books to ensure proper restoration.
Choose a large work space with adequate lighting, working electrical outlets and storage space. A disassembled Chevy pickup will require three times the space required by an assembled one. In addition, you will need space for tools such as an air compressor and power tools, as well as room to work. Prevent losing any pieces of the vehicle by keeping your work space in working order. For example, mark off space for all parts and accessories, and lay a tarp on the ground that can be secured in place and protect components during the restoration process. The goal is to keep a clean and organized work space, so set up labeled containers for small pieces as well.
Begin disassembly with large exterior parts. Remove the bumpers, lights, hood and trunk lid, the front grille, tailgate, doors and wheels. Use a jack to lift the pickup, then stabilize with jack stands. You will need basic tools such a rubber mallet, tire iron, ratchet and socket set, and other miscellaneous tools to complete this disassembly. Remove the axles, springs, and engine components such as the transmission, radiator, and the engine itself. You may need the assistance of a hoist to lift the engine and transmission out the body once it has been disconnected from the pickup. Lay all medium to large components, parts and accessories in an orderly fashion on the tarp, and store small pieced in the labeled containers.
Disassemble the Chevy's interior by pulling up the carpeting and discarding, removing the trim and disassembling the truck's console. Then remove the seats from the cab of the truck. All viable interior components should be set aside and restored individually before reassembly. After removing these interior components, remove the fenders from the front and rear of the pickup. Place these aside.
Survey all parts, components and accessories that have been removed from your Chevy's frame. All viable parts should be cleaned and restored individually, while damaged parts will need to be replaced. You can order replacement parts through restoration catalogs or through Chevy dealers. Remove all rust from metal components. Then begin reassembly for the exterior. Use your MIG welder to perform patchwork. This requires using healthy pieces of similar metal materials to repair holes or rusted regions of the frame or body by welding them in place. While welding, ensure that the body is smooth and straight. Examine the condition of the trunk, floorboards and smaller segments of the body for rust or damage and repair. Also examine the condition of the hood, trunk lid, fenders and doors. These parts can be replaced, if necessary, but if they are only slightly damaged by rust, patchwork and welding can possibly make them viable for reattachment.
Sand the exterior of your 1950 Chevy to ensure that it is ready for priming and painting. The best quality paint will look terrible on a body that is rough, ragged, damaged and or crooked. Be sure that the panels are properly aligned and that the body of the pickup is straight. After sanding and ensuring a quality appearance for the body, prime the pickup. After the primer has dried, spray a quality paint onto the body.
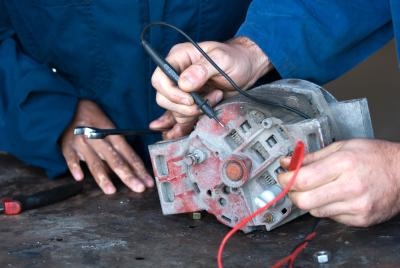
Restore or replace all power components to ensure that they are in working order before installation. These part include the engine, driveshaft, alternator, carburetor, starter, radiator, axles and transmission. Also, ensure that the brake systems are viable before assembly. You may need to use a hoist to lift the engine and transmission into the body of your Chevy, but once it has been placed within the frame, secure and install these components. Remember that installation will require roughly three times the amount of time that disassembly absorbed. Take your time to prevent damaging new or freshly restored components.
Rewire all electrical components after ensuring that these are all viable and in working order. You may need to install new wires. Install the headlights and taillights. Reassemble the brake systems and install beneath the vehicle. Reattach restored or new front and rear bumpers to the Chevy, then install a new windshield as well as restored or replaced windows and mirrors. If any of the trim has damaged or shows signs of rusting, re-chrome these pieces. Install new wheels to the wheel assembly, then remove the jack stands and lower the Chevy pickup to the ground.
Reassemble the interior of the Chevy. You may use a re-upholstery kit to repair the interior. The goal is to maintain the authenticity of your 1950 Chevy pickup, so install the seating with new upholstery and install new carpeting on the repaired floorboards and trunk. Replace the consoles, door panels, trim pieces and all small components of the interior. All replacement parts can be obtained through restoration catalogs or Chevy dealers.