The rotors on a 2000 Honda Accord are responsible for providing a smooth and solid platform for the brake pads to slow and eventually stop the car during braking. If the rotors are badly scored, the braking performance will be compromised, and the brake pads will wear prematurely. If your brake rotors are warped or cracked, the brake pads will not have a consistent surface to squeeze. resulting in a sharp decline in brake performance which could lead to brake failure. You can replace the rotors in under an hour with the right tools and instructions.
Place a jack under the Honda's frame near the rotor you will be replacing. Lift the vehicle and support the car with jack stands. Use at least two stands to provide a stable and safe platform.
Remove the lug nuts. Place the socket of the lug wrench over the lugs and rotate the wrench counterclockwise until the nuts move easily around the bolts. Remove the wrench from the lug nuts and complete the removal by hand.
Remove the wheel from the wheel bolts and place it away from the Honda.
Grab the sides of the rotor and turn it to access the back of the brake assembly.
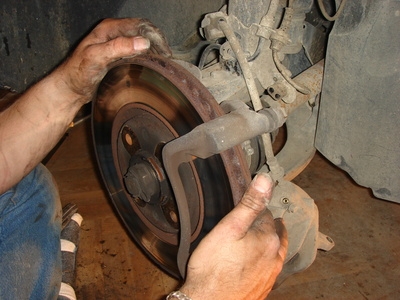
Remove the caliper bolts with the 13 mm socket and ratchet. The two bolts are on the backside of the caliper near its outer edges. Pull the caliper from the rotor. The caliper fits inside the caliper bridge, and the two sides (or walls) of the caliper straddle the rotor.
Remove the brake pads from both sides of the rotor. The pads sit in the slots created by the caliper bridge. Use a flat head screwdriver to pry the brake pads from the rotor if they are not easily removed by hand.
Inspect the brake pads to see if the wear indicators are visible or protruding from the brake pad surface. Wear indicators scraping against the rotors are the most common cause of rotor damage. Replace the brake pads if necessary.
Remove the two bolts on the backside of the caliper bridge with the 15 mm socket and ratchet. Pull the bridge from the rotor.
Spray WD-40 or chain lubricant on the outer and inner surfaces of the rotor. Allow the lubricant to remain on the rotor and surrounding assembly while you clean the new rotor.
Remove the rotor from its packaging. Spray the rotor with brake cleaner to remove the oil applied to rotor during shipping and storage. Leaving the oil on the rotor will cause the brakes to smoke once the newly installed rotor is put to use, and the oil can be corrosive to brake pads. Wipe the rotor dry with a towel.
Remove the two screws on the center ring of the rotor with a Phillips head screwdriver. The center section is called the "top hat" section and should always be facing outward.
Pull the rotor from the wheel bolts and set it aside. If you plan to reuse the rotor, do not strike the outer surface to remove it; lightly tap the top hat section if necessary.
Place the new rotor onto the wheel bolts with the top hat section facing outward. Reinstall the two screws that were removed from the replaced rotor.
Replace the caliper bridge and bolts. Return the brake pads to the slots on either side of the rotor. Place the caliper over the brake pads and screw in the caliper slide bolts.
Place the wheel onto the wheel bolts and screw on the lug nuts by hand. Lift the Honda with the jack to remove the jack stands then lower the vehicle to the ground. Tighten the lug nuts with the lug wrench.