 You don't have to bend or notch to make a custom exhaust. Even better, "kinky" tubing bends are now easily avoidable. Skilled 4x4 owners who can cut, grind, and weld can build a custom system from ready-made components. (Think Tin Man from The Wizard of Oz.)
The 4x4 Aftermarket Offers "bolt-on"-or at least "less hassle than making your own from scratch" solutions to many popular conversion dilemmas. But the further away from stock the vehicle gets, the higher the likelihood that no off-the-rack kits exist for connecting certain dots in their new locations.
Exhaust is one such area. Changing the powertrain and scrapping the OE suspension for something longer-travel often adds up to a total reroute of the exhaust system. Good exhaust shops are worth their weight in gold-and often charge accordingly. However, the average exhaust center isn't off-road literate and will likely choose the route of least resistance instead of factoring in suspension travel, ground clearance, and other parameters that don't apply to commuter cars.
The good news: 4x4 owners who have the skills to get themselves into conversion predicaments can often make their own custom exhaust systems. Readily available tubing and bends make the job possible without the need to invest in a notcher and bender. Brian Wallach of American Offroad shared a few pro tips that can help home-garage warriors achieve custom-exhaust success.
Tubing: Cut-and-paste (i.e., weld or clamp together) exhaust kits are available from some of the companies listed in the Sources Box. (Most common are stainless steel kits marketed for street rods.) Another option is to buy lengths of tubing and an assortment of premade mandrel bends. In larger cities, these parts are available from undercar suppliers; some mail-order sources are listed below.
The first decision is whether to use stainless or aluminized steel. The main differences are cost and durability. Stainless steel will theoretically last the life of the vehicle, but it's more expensive than aluminized tubing and harder to weld (requiring either the right wire for MIG welding or time-consuming TIG welding for highest-quality results). Wallach recommends seamless 304-grade stainless as the only real option for vehicles in coastal salt-air areas. A less-expensive stainless grade is 604, an alloy that falls between 304 stainless and aluminized tubing. If choosing cost-effective aluminized tubing, be aware that its seam is the most common rot point. Position the seam at the top whenever possible to minimize the amount of condensation that accumulates on it.
Tubing diameter is the next consideration. Bigger is often better, but too big can actually strangle power-air has mass that must be moved through the tubes. Excessive backpressure can result when ambient air significantly slows down exhaust velocity.
Magnaflow publishes general exhaust-diameter guidelines based on engine size and power (for systems with single in/out mufflers):
2- to 2.25-in 150-{{{200}}} CID {{{100}}}-150 hp 2.25- to 2.5-in 200-250 CID 100-200 hp 2.5- to 3-in 250-{{{300}}} CID 150-250 hp 2.5- to 3-in 300-350 CID 200-350 hp 3- to 4-in 350-400 CID 250-550 hpTubing wall thickness also matters. Industry standard is 16-gauge/0.65-inch-wall. For aluminized systems, Wallach recommends thicker 14-gauge tubing for greater strength and to allow more margin of error with welder settings.
Bends are available in a wide variety of radii and degrees. For tight bends, Wallach recommends using "donuts": complete mandrel-bent circles that can be sliced and diced as required.
Mufflers: Three criteria come into play here. Budget is one-stainless steel mufflers cost more but last longer; a polished finish jacks up the price even farther. Sound quality (clips are available on many manufacturers' Web sites) and available space are the other two concerns, and they're related. The rule of thumb is that shorter mufflers are louder. However, they offer greater mounting and routing flexibility. Glasspacks are enjoying a popularity resurgence, but their fiberglass packing retains moisture and rots faster than most "turbo"-style mufflers. Glasspacks also tend to hang lower and attract more rocks.
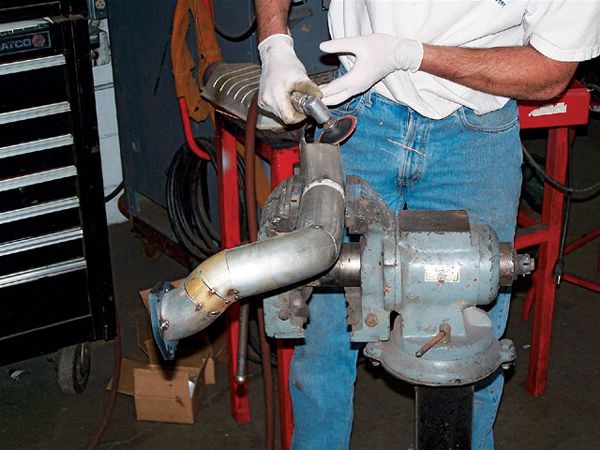 Lots of in-and-out is necessary for custom systems in tight confines. Wallach makes the cope in the passenger-side downpipe where it mates to the crossover pipe with a grinder.
Tailpipes: Resist the temptation to call it quits at the muffler (unless using glasspacks with integrated turnouts). Tailpipes should always be included: They channel deadly carbon monoxide away from the cab.
Headers/Exhaust Manifolds: Primary-tube clearance and collector dumping location are the main concerns. The three most common solutions to literally starting a custom exhaust are (1) finding an OE answer, (2) sourcing aftermarket "swap" headers, or (3) creating custom headers. In the OE realm, Chevy small-blocks are the ideal example of multiple manifold configurations for the same block: Car, truck, and Corvette manifolds vary in their dump locations. Research and possibly junkyard foraging are required. Less mind-numbing are swap headers. The aftermarket offers these for popular repowering combinations.
Odd-ball swaps can require starting from scratch. For example, someone who's dead-set on putting a Caddy big-block in a flatfender will likely face a few exhaust challenges. Luckily, header flanges are available for many engines. Existing headers can sometimes be modified and welded to these flanges. Alternately, build-your-own kits are available; a few companies even make custom headers.
Emissions: For vehicles that must pass "smog" testing, catalytic converters can add considerably to exhaust-system cost. Even ones that don't have to pass but have closed-loop computer-controlled engines need exhaust bungs for their O2 sensors.
American Offroad offers these hints, derived from 16 years of trying different approaches.
Tools: No bender or notcher is required. Wallach claims that tubing can be coped with a grinder in less time than it takes to set up a notcher. For cutting, he prefers a portaband or even a reciprocating saw over a chop saw.
Hardware: Use the thickest available flanges and hangers. Avoid parts-store exhaust hangers-source minimum 3/16-inch-thick hangers for durability. You'll also use fewer since heavier-duty hangers can support more weight.
Sealing: Prep flanges' mating surfaces on a belt sander with 80- or 100-grit paper. Use name-brand flange gaskets reinforced with Ultra Copper silicone gasket-maker. American Offroad double-nuts flange bolts as a third line of leak-defense.
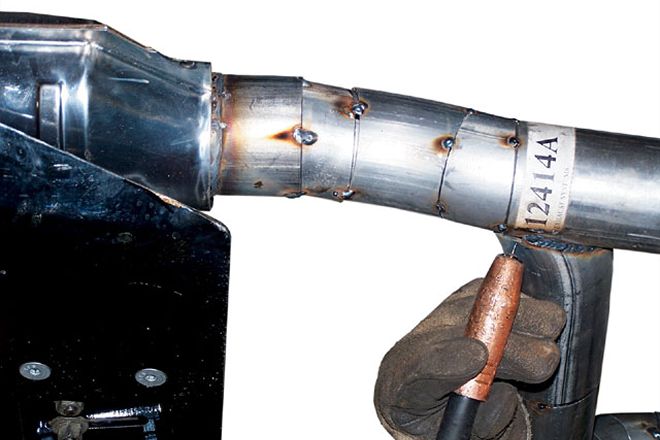
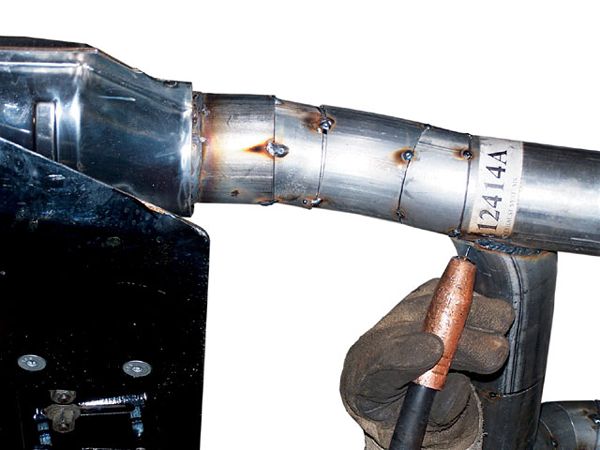
System Design: Wallach prefers the cut-and-tack approach: "Eyeball the angles and keep cutting until it's right." For optimal flow, he recommends butt welds, which require all gaps to be less than 1/16 inch. Otherwise, the joints are susceptible to leaks, and the welds create heat-stress points at the tubing's edges. If using slip-fit swedged joints, always go male-into-female following the exhaust path. Otherwise, leading edges slow down exhaust flow.
Contrary to traditional thinking, true "dual exhaust" systems-where both sides are independent of each other-usually don't work as well as systems that have a balance tube/"H" pipe/crossover pipe. Since compression and exhaust scavenging vary among cylinders, tying the sides together equalizes the pressure. Performancewise, this smooths flat spots in the powerband and also controls back-rap that can result from abrupt deceleration.
Finishing Details: Stainless steel is virtually maintenance-free. People who want to send out their systems for thermal coatings should add flanged joints at accessible locations. For custom headers that will be thermal-coated, Wallach recommends TIG-welding all joints for aesthetics. Otherwise, a coat of high-temp spray paint makes aluminized tubing look finished and helps retard rust.
The photos here show highlights of American Offroad's custom 2.5-inch exhaust for a YJ that has a swapped-in Vortec V-8, an AX-15 transmission with remote-mounted slave cylinder, and a Black Diamond X2 long-arm suspension system. Short-wheelbase Jeeps' tighter confines present more logistical puzzles, but the overall approach and execution apply to all 4x4 custom-exhaust jobs.


