Squeaky JK
Q I recently purchased a 2012 JK four-door Sahara with 55,000 miles on it. The previous owner had already installed an AEV 31⁄2-inch SC suspension kit on it, plus AEV wheels, front and back bumpers, a skidplate, a tire carrier, and 35-inch tires. I’m super-happy with it so far, but there is this squeaking. I’m new to this whole off-road thing, and I would think some sounds are normal when you change out a bunch of suspension parts. But my issue is that I will hear this loud squeaking at low speeds, like 5 to 10 mph, on city streets, so I assume the same thing is happening at highway speeds. In my experience, squeaks are usually bad and the beginning of a metal/metal failure if not lubricated. I am trying to figure out what the normal maintenance routine is on an aftermarket suspension. Any suggestions are appreciated
Scott D.
Via nuts@4wheeloffroad.com
A The first thing you need to determine is if the squeaking you are hearing is rotational or associated with hitting a bump. Do you hear a steady squeak-squeak-squeak that steadily picks up speed as you accelerate, or a squeak that’s occasional and only happens when you encounter a bump when pulling away from a light? If it’s the latter, the source could be any number of things. Check the track bars and suspension links for wear, especially around the suspension joints, and check to be sure the control arm drop brackets that come with the kit are tight. Also check the shock bushings, sway bar links, and anything else that moves when the axles move under the chassis. The AEV suspension kits (aev-conversions.com) are very well thought out and address everything needed, but if something is loose, then it’s going to cause squeaks any time the Jeep encounters a bump. Service anything that has a grease fitting, and check all of the fasteners to be sure everything is tight.
If the squeak is the former (one that steadily increases with speed), crawl under the Jeep and check the driveshafts, especially the front one. Your JK uses driveshafts with unconventional Rezeppa-style joints rather than regular U-joints. These types of driveshafts don’t respond well to the increased driveline angles associated with a lift, and failures are very common. They are even more common with front driveshafts and the 3.6L engine on your 2012, which places the drivetrain at a steeper tail-down angle in the chassis than normal. This in turn steepens the front driveshaft angle at the transfer case. If any of the driveshaft boots are ripped and there’s evidence of grease escaping, then it’s time to upgrade the driveshafts to assemblies that use conventional U-joints. Plus, your JK’s mileage is right around the time that you start hearing about driveline problems with the stock shafts. Don’t wait, as bad Rezeppa-style joints can explode with catastrophic results, like a broken transfer case. Several quality driveline companies like J.E. Reel (reel-driveline.com) and Tom Wood’s Drive Shafts (4xshaft.com) offer conversions that replace the factory shafts with quality upgraded versions that are both serviceable and capable of handling driveline greater operating angles than stock. The conversions can be expensive but are far cheaper than stock replacements and are also much stronger. In the unlikely event that the driveshafts are not the culprit of a rotational squeak, then check the front axle U-joints. Keep in mind that JKs don’t have locking hubs, so the front axleshafts and driveshaft spin even when the vehicle is in two-wheel drive.
Wired for Air
Q I’m in the process of converting the A/C compressor on my truck to onboard air so I can fill up tires and run air tools. I have the mechanical part of it pretty well figured out, but I’m stumped on how to wire the system up. How do I get it to cycle on and off so that it maintains pressure as I use it? I want the system to be safe, so I’d rather keep the smoke inside the wires and not blow the system up due to excessive pressure.
Kyle S.
Via nuts@4wheeloffroad.com
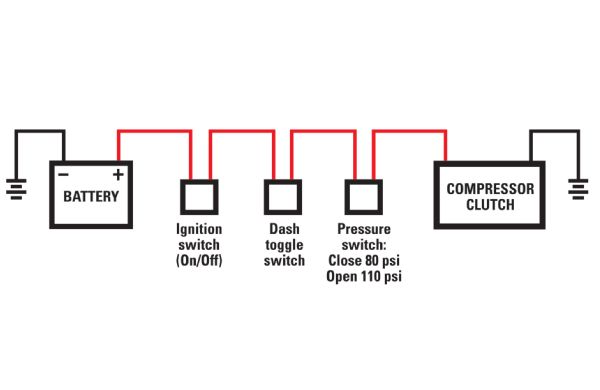
A Onboard air is a great addition to any trail rig, and fabricating a system is fairly easy as long as you have a compressor that lends itself to the conversion, such as a York or a Sanden. Like the mechanical side of things, the electrical part is also pretty straightforward. We’ve included a diagram, which should help you visualize how everything is hooked together.
First, the compressor clutch is an electromagnet. If you give the wire going to the clutch 12 volts, it locks up the clutch and rotates the compressor. Take 12 volts away, and it unlocks to disengage the compressor. This is how the original A/C system controlled the cycling of the compressor when it’s purpose in life was to make air colder. So to start, you need to find a circuit that has power when the ignition switch is on. Why switched ignition power? It helps prevent you from leaving the compressor clutch engaged with the engine off, which will eventually kill the battery. From the switched ignition lead you need to add a normal on-off toggle switch, which you can mount somewhere on the dash. This will allow you to turn the system on and off. From there, run a wire to one side of a pressure switch that is plumbed into the air system. The pressure switch is really the brains of the whole operation; it senses the pressure in the system, and when pressure drops below a certain preset pressure (usually 80 psi) the switch closes to energize the circuit. Once pressure rises to a certain point (usually around 120 psi), the switch opens and breaks the electrical connection. Connect the compressor clutch lead to the other side of the pressure switch, and you’re done.
Everything but the pressure switch is just common electrical supplies you can find anywhere. We’ve seen people use pressure switches from household air compressors, but those are pretty bulky and aren’t weatherproof. We’ve had the best luck sourcing 12-volt pressure switches from Grainger (grainger.com) that are compact, inexpensive, and available in whatever fitting size you need. Again, we recommend using one with an on-off setting of around 80 psi and 120 psi, respectively.
One last thing. Don’t rely on the pressure switch alone to control the pressure of the system. Be sure you plumb a mechanical safety valve into the system that’s preset to release pressure above a certain level (usually 150-175 psi). This will protect the system in case of a short or a pressure switch failure. Safety valves are available from wherever you source the pressure switch.
SAS for TTB
Q I have a 1987 Bronco and I would like to do a solid axle swap on the front. For the purpose of keeping my Alcoa wheels I would like to find a Dana 44. What axle should I look for, or is any late ’70s 1⁄2-ton pickup or Bronco OK? What parts should I use to install it under the truck? My Bronco has a mild 460, a C6 transmission, and 36x12.50 Super Swamper LTBs. The rear axle is getting upgraded to a 9-inch. This truck will see trail use around Arizona but nothing too serious. Any help would be appreciated.
Austin Winchester
via nuts@4wheeloffroad.com
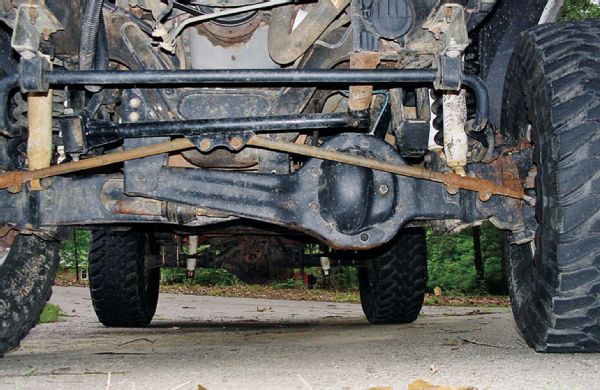
A While Twin Traction Beam (TTB) has a following in the desert racing world, many people have found TTB is not well suited for trail work and have scrapped it for a more tried and true solid front axle. There’s quite a bit of knowledge out there regarding this swap, so here’s an overview on what you should consider and the parts you are going to need.
The first thing to decide is what suspension you want to use. The most common choices are leaf springs or coil springs with radius arms. Leaf springs offer a great deal of simplicity, but the amount of fabrication work is going to be about the same as using the coil-spring suspension that’s already under your truck. I’ll get more into what is needed suspensionwise in a minute, but which suspension method you choose will also dictate the best donor axle to use. If you stick with coil springs and radius arms, then a donor Dana 44 from a ’78-’79 F-150 is best, as the axle is the right width, is equipped with disc brakes, has the differential on the driver side to work with your truck’s existing transfer case, and already has the radius arm mounts needed to retrofit earlier-style radius arms to your truck. The one drawback of the ’78-’79 axle is that the radius arm mounts are cast pieces that are an integral part of the axle tubes, so the mounts can’t be removed without retubing the axle. The earlier ’71-’79 Dana 44s from an F-150 also have cast radius arm mounts, but these are welded to the tubes and can be removed to make way for leaf-spring pads or custom four-link mounts. There are also Dana 44s from SuperCab F-150s with leaf springs that make good swap candidates for non-radius-arm suspension, but these can be hard to find. Keep in mind that the earlier axles are often equipped with drum brakes, but it is possible to convert them to discs without major hassles. There are a few other non-Ford donor possibilities, but it’s going to be hard to find a more suitable donor with the right width, wheel bolt pattern, and driver-side differential outside 1970s Ford 1⁄2-ton trucks.

If you choose to go the leaf spring route, then you’ll need to fabricate leaf spring hangers on the frame. This will require a fair amount of home fabrication, as there’s not an off-the-shelf conversion kit available to my knowledge. The front hangers will need to be positioned on an area of the frame that’s corrugated for a crumple zone, so this area of the frame will need to be strengthened before fabbing up the spring hangers because it was never intended to support vehicle weight. People have used a variety of springs for the swap; some have used leaf springs from an F-250, while others have adapted ’73-’87 Chevy front springs. The engine crossmember was an integral part of the TTB system and is both beefy and hangs low on the frame, so you will need to run a minimum of 4 inches of lift to clear the solid axle. Regardless of the lift amount, you will likely still need to do a fair amount of crossmember trimming.
If you choose to go the coil-spring route you will need to new radius arms, radius arm frame mounts, and track bar mounts for the axle and frame. The good news is that aftermarket support out there helps make the swap easier. Companies like James Duff Enterprises (jamesduff.com) and Jeff’s Bronco Graveyard (broncograveyard.com) offer extended radius arms and coil mounts specifically for this swap as well as track bar mounts for the frame. These companies can also help with an adjustable track bar and the radius arm frame mounts, or you can source a set of mounts from a donor ’73-’79 truck. James Duff even offers a steering linkage conversion. There appears to be some controversy about whether or not you can use the existing upper coil buckets on your Bronco because of different coil heights and shock positions between them and the coil buckets on the earlier trucks, so you might want to research this further and then make a decision based on your own priorities. Earlier or later coil springs can be used depending on what you decide with the coil mounts. Keep in mind that you will have the same crossmember-to-axle clearance issues as you would with leaf springs, so you’ll need to run a minimum of 4 inches of lift.
Though radius arms and leaf springs are probably the easiest options, you could also fabricate a four-link, run coilovers, or whatever you want—it just depends on how big a project you want to tackle and your level of fabrication skills. Regardless of which route you choose, when you’re done you should have a reliable vehicle for exploring the Arizona backcountry and beyond.
Disco Wheels
Q I find myself the proud new owner of a 2004 Land Rover Discovery II with less than 95,000 km. I plan to build it into a more capable overland-style rig that can handle road/backwoods trips with the kids and wheeling with the local club. Short-term plans include an OME lift, skids, sliders, and bumpers. And of course tires. It came with two sets of 18-inch wheels (summers and winters). I want to go to a smaller wheel diameter both to reduce cost and improve off-road performance. I know these trucks also came with 16-inch wheels. My question has more to do with what you have experienced with tire availability. If I went to 16s, would I be limiting my tire choices? Would I have more options with 17s? Also, what size tire do you think the stock drive train can handle? It’s got a 4.6L V-8 with an auto trans and stock axles. Thanks for any suggestions or advise you can offer.
Ryan Weselake
Ottawa, Ontario, Canada
via nuts@4wheeloffroad.com
A It’s great that your Discovery came with not one but two sets of 18-inch wheels, but as you’ve already found out, tires with 18-inch rim sizes are not plentiful or cheap. 18-inch wheels never caught on like some other plus-sized wheels have, so when you do find a tire that will fit an 18-inch wheel (which is not easy to do in remote areas), you pay a premium. You are correct that Series II Discos also came with 16-inch wheels, which means you can downsize the wheels without worrying about brake clearance. Your tire size options will improve significantly with 16-inch wheels, and I’d be willing to bet you could more than offset the cost of buying a set of 16s by selling the 18s you have now. Finding a used set of 16-inch factory wheels on Craigslist should be easy. However, if you want a nearly unlimited selection of tire sizes and manufacturers, you might consider going to a set of 17s. Though they were never offered from the factory, there are aftermarket 17s with the Disco’s 5-on-120mm wheel bolt pattern. 17s are the 15s of 20 years ago: They are everywhere and offered by just about every tire manufacturer in every size you can think of. Still, there are plenty of 16-inch tire choices, so if you find a set of stock 16s cheap, I’d probably go that route. 16s are also common enough that it would be easy enough to find a replacement tire in a small town if you needed to, and definitely easier than any 18-inch tire.
Since you are building an overland-style of vehicle and mentioned wanting to use Old Man Emu (arbusa.com) suspension, I assume you’re going to stick to the conservative end of the spectrum in terms of lift height. Old Man Emu offers a 11⁄2-inch lift, which should clear 265/75-R16s (32s) with no problem and might even clear 285/75-R16s (33s) with very little trouble. Keep in mind that actual tire sizes vary by manufacturer and are usually a little shorter than what the sidewall states.
Nuts, I’m Confused
Light Bar Woes
Q I am trying to mount a 50-inch LED light bar to a 1997 Chevy Z-71, but I’ve had a really hard time finding anyone who makes the mounts for it. One company said they could make them, but after several weeks of waiting I found out that their brackets require drilling holes in the roof (they originally said holes in the doorframe). Does anyone know where I can get mounts that I will not have to drill into the roof?
SS
Via nuts@4wheeloffroad.com
A LED light bars are all the rage these days, but as you’ve found, sourcing light brackets can be a challenge. Like you, we’re not big fans of drilling holes in a roof, and we too struck out on finding ready-made brackets that will bolt to the doorsills on your truck. The problem is that LED lighting is fairly new, so not many companies offer off-the-shelf mounting brackets for anything other than the latest vehicle models. This is further complicated by the variety of different mounting configurations that light bar companies use. Short of drilling holes in the roof of your truck, the only other option is to make your own or have a local shop fabricate a set for you. It’s going to be far easier to find a light bar mount for the bumper, so unless you absolutely must mount a light bar above the windshield, that’s probably your best bolt-on, no-drill option.
Submission Information
Confused? Email your questions to the address below with “Nuts, I’m confused” as the subject. Include a picture, if applicable, no smaller than 1600 x 1200 pixels (or two megapixels) as a TIFF, EPS, or maximum-quality JPEG. We also read the forums on (4wheeloffroad.com). Write to: Nuts & Bolts, 4-Wheel & Off-Road, 831 S. Douglas St., El Segundo, CA 90245 fax to: 818.566.8501 Email to: nuts@4wheeloffroad.com