Nuts, I’m Confused
Leveling Kit Woes
Q The other day I helped a buddy install a leveling kit on his ’05 F-150 4x4. It’s the kind that installs on top of the factory strut. I have the same lift on my truck, which is nearly identical to his expect mine is a 2007. I installed my leveling kit myself in less than two hours, but we had a terrible time with his truck. No matter what we did, we couldn’t get the lower control arm to drop far enough to install the strut with the leveling spacer on it. We fought it for a few hours and eventually gave up and put the truck back together stock. I must have read the directions 20 times, and like I said, I didn’t have any problems when I installed mine. What am I missing?
Brian P.
Via nuts@4wheeloffroad.com
A Spacer-style leveling kits for your truck generally require supporting the truck and letting the suspension go to full droop. You then unbolt the sway bar, separate the upper control arm from the knuckle, remove the brake line bracket, remove the three upper strut nuts, and then lower the lower control arm to pull the strut out of its tower. If you did all of those things, then most likely the front axle CV shaft was in a position that prevented the lower control arm from dropping enough to reinstall the strut with the leveling kit spacer on it. If you try installing it again and this happens, try raising the lower control arm a little and then rotating the wheel hub about 30 degrees. Lower the arm back down and see if it drops any more to facilitate installing the strut. During installation the CV joints on the axleshaft are beyond their maximum normal operating angle, and depending on where they are in their orientation, they can bind up and prevent the lower control arm from dropping enough to install the strut. If you rotate the wheel hub a few times, you can usually find a point where the CVs allow the lower control arm to drop a little more. This is one of those thousands of little tips you discover when working in a shop that rarely make it into the instructions. I’d be willing to bet that if you try again, you’ll be able to install the leveling in record time.
Leaky Axle
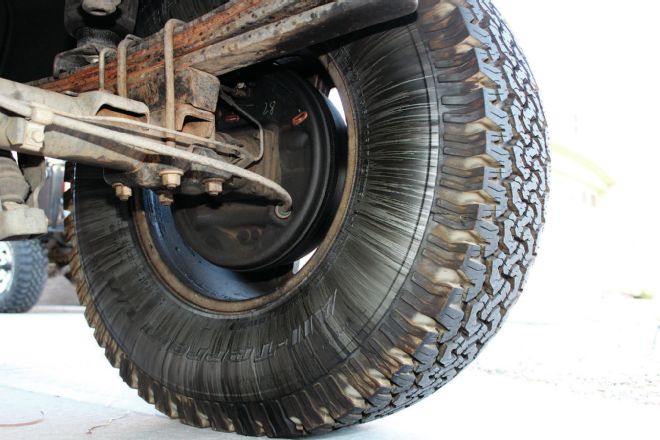
Q I have an ’05 Chevy Silverado 1500 4x4 with right around 100,000 miles on it. The other day I noticed that the inner sidewall of the back tire was a little wet-looking, but it was a dry day and I hadn’t gone through any puddles. I crawled underneath, and it appears that there’s some fluid leaking around the rear brake drum. Not a lot, but enough to make the inner sidewall of the tire look moist. I assume it’s coming from the axle, but how do I figure out what’s causing it and how do I fix it? I’m new to this, but I’d like to try and fix it myself since I’m on a budget.
Mark V.
Via nuts@4wheeloffroad.com
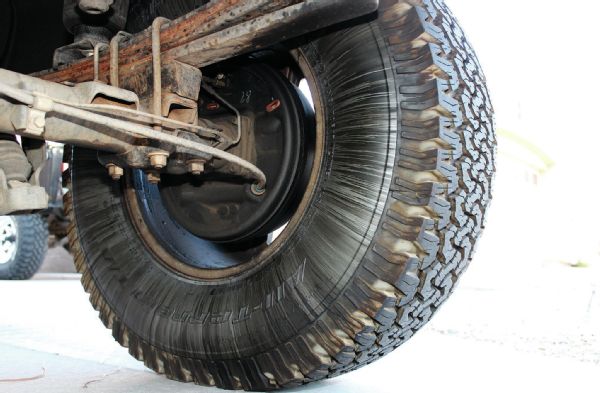
A Leaks around the end of a rear axle are caused by one of two things: either the outer axle seal (sometimes called a wheel seal) is leaking gear oil, or the brake wheel cylinder is leaking brake fluid. Though it may be difficult to tell when it’s not leaking very much, brake fluid is very thin and should be fairly clear, whereas gear oil is thick and darker. Regardless of what’s leaking, it’s import to address the leak sooner rather than later because both types of leaks can impact braking performance.
To know for sure which fluid is leaking, pull the tire and brake drum and have a look inside. Inspect the rubber boots on both ends of the wheel cylinder and see if either one of them is wet; that’s a telltale that the wheel cylinder is leaking. Fixing it requires disassembling the brake shoes and hardware (take pictures so you have a record of how everything goes together) and replacing the wheel cylinder. You can also take the wheel cylinder apart and rebuild it by honing it out and installing new seals, but rebuild kits can be hard to find and a hone will cost about as much as a new wheel cylinder anyway.
If the wheel cylinder checks out, then the culprit is most likely the outer axle seal. Replacing it is a bit more of a job. You’ll need to remove the brake backing plate, which can usually be done without disassembling the brakes. Your truck’s axleshafts are retained by C-clips, so you’ll need to remove the rear diff cover and drain the axle fluid. Remove the cross shaft in the differential carrier and then push the leaky axle inward to dislodge the C-clip. Slide the axleshaft out, then you can use a seal puller to pop the axle seal out of the housing.
While you have everything apart, inspect where the outer axle bearing rides on the axleshaft. If it’s pitted or grooved, then the outer axle bearing and possibly the axleshaft itself will need to be replaced. Sometimes an axleshaft can be saved by installing a speedy-sleeve, which is a thin sleeve that goes over worn surface of the axleshaft. Considering the mileage of the truck, even if the axleshaft is in good shape it wouldn’t be a bad idea to install a new outer axle bearing since you’re already right there. You’ll need a slide hammer to pull out the old bearing, which can be rented at most parts stores. Install a new bearing and seal, then button everything back up.
One last thing. Most likely the brake shoes have been coated with either brake fluid or gear oil and need to be replaced. Be sure to clean up the brake drum, hardware, and backing plate so that the new shoes don’t get contaminated.
Antiwrap for Samurais
Q I am running an ’88 Samurai with YJ springs (spring-over), Toyota axles (both equipped with Toyota factory E-lockers that have been converted to cable engagement), and Tom Wood’s CV driveshafts. I recently found that my weakest link is the lower rear driveshaft U-joint due to severe axlewrap, and it has become painfully obvious that I am in need of some sort of axlewrap prevention device. Unfortunately, I have not found anything that will cure what ails my Samurai. I can find traction bars all day long for Sammies running Sammy axles, and I can find the same for Toyotas running Toyota axles. I know my setup is a very common one, as every site that offers suspension for Samurais also seems to offer a Toyota axle swap kit. But no one that I have been able to find has a traction bar for a Samurai with Toyota axles. The Toyota axle is really just a larger, stronger version of the Samurai axle, so the setup would be essentially the same with the exception of needing a mounting plate to fit the larger Toyota diameter and bolt pattern. Have I missed something here? How come no one seems to have a traction bar for such a common upgrade? Or have I just overlooked one? What are other Samurai wheelers with long, soft leaves doing to prevent axlewrap in SPOA configuration?
As usual, thanks in advance for any help or guidance you can offer. Here is a picture of me and Sapperai just minutes before I learned about severe axlewrap.
Jakob B.
Via nuts@4wheeloffroad.com
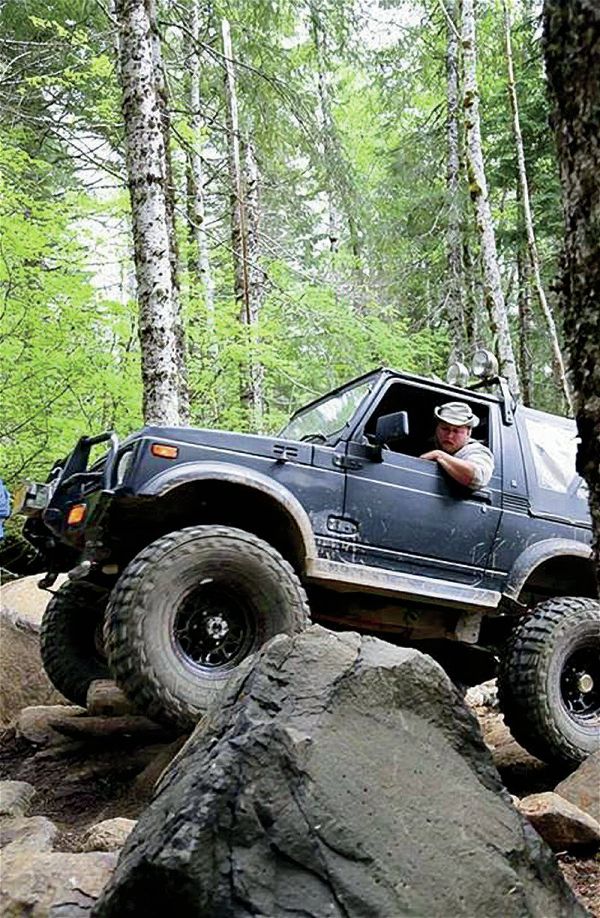
A Cool Samurai! While you are correct that swapping Toyota axles under a Samurai is a popular upgrade, unfortunately I was not able to find a bolt-on solution to your axlewrap dilemma. However, all is not lost. Some of the most effective antiwrap solutions involve adding a Y-shaped link to the rear axle. This link typically attaches above and below the centerline of the axle, and then the long end of the Y-shaped link is attached to a shackle, which in turn is attached to a frame-mounted crossmember. This is a proven design that provides effective antiwrap while still allowing the axle to articulate up and down without much restriction. Sky’s Off-Road Design (541.736.3743, sky-manufacturing.com) offers a well-thought-out, bolt-on traction bar (PN SUZ-TB-002) that utilizes this design and is built to fit your compact Samurai. But as you state, the axle brackets are intended to bolt to the stock Samurai axlehousing and are therefore not compatible with the larger Toyota axles under your rig. It appears, however, that the axle brackets could be made to work with your Toyota axles with some additional fabrication. The axle bracket grabs the dropout centersection bolts of the Samurai axle in an effort to keep the kit bolt-on, but if you remove this portion of the bracket and add some additional gusseting, it would be easy enough to make the brackets suitable for welding onto the Toyota housing. This might be the best solution for you since the traction bar itself and the crossmember are all compatible with your Samurai.
Another solution is fabricating your own traction bar from scratch. Trail Gear (877.494.8637, trail-gear.com) offers a traction bar mount (PN 111333-1-KIT) for Toyota axles along with the rest of the individual brackets, rod ends, and pieces needed to build your own traction device. Of course, going this route would require significantly more fabrication skills and know-how, but seeing as how you’ve already tackled the Toyota axle swap, you likely possess the necessary skills. Keep in mind that Toyota axlehousings are fairly thin stamped steel, so be careful when welding to the housing, as excessive heat can cause the housing to warp.
Submission Information
Confused? Email your questions about trucks, 4x4s, and off-roading tech using “Nuts, I’m confused” as the subject and include a picture (if it’s applicable). Digital photos must measure no less than 1600 x 1200 pixels (or two megapixels) and be saved as a TIFF, an EPS, or a maximum-quality JPEG file. Also, I’ll be checking the forums on our website (4wheeloffroad.com), and if I see a question that I think more of you might want to have answered, I’ll print that as well. Otherwise drop it old-school style with the envelope addressed to the address below. Letters published in this magazine reflect the opinions of the writers, and we reserve the right to edit letters for clarity, brevity, or other purposes.
Write to: Nuts & Bolts, 4-Wheel & Off-Road
831 S. Douglas St., El Segundo, CA 90245
fax to: 818.566.8501
Email to: nuts@4wheeloffroad.com