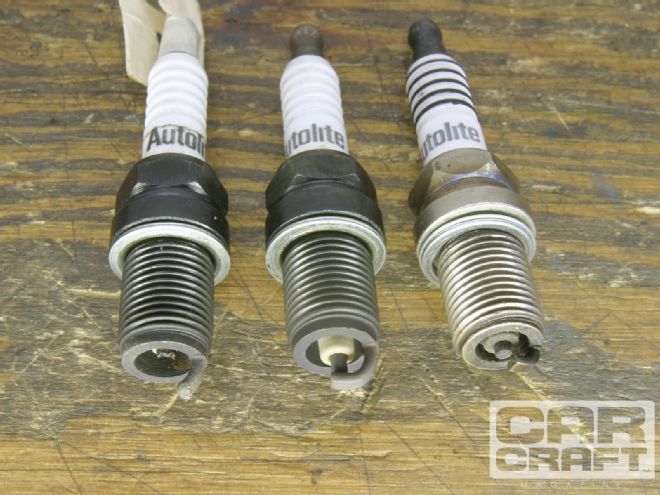
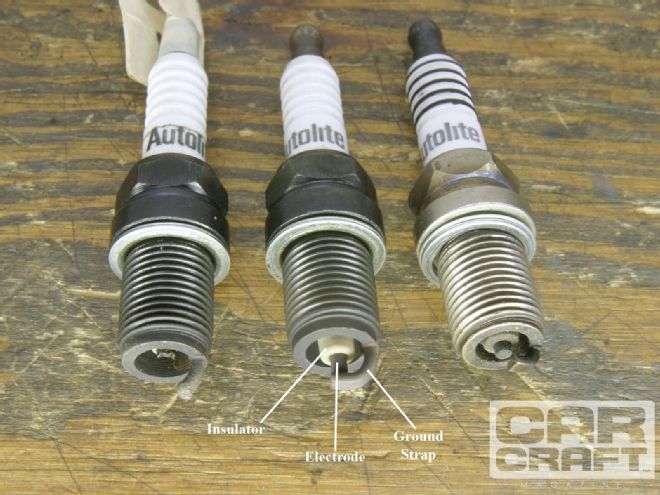
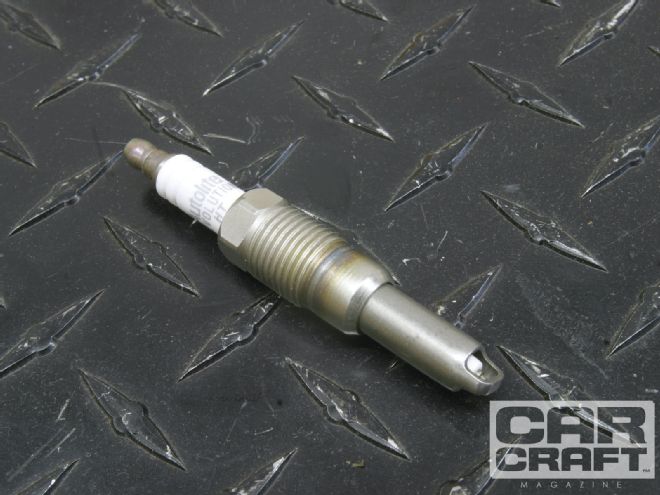
 The photo on the left demonstrates what happens when a projected-nose spark plug runs a little lean on a mild nitrous system. Excessive heat melts the long ground strap along with part of the center electrode and insulator. In the center is the same plug from one of the middle cylinders that did not run lean. For this application, we suggest using Autolite’s racing plug AR3933 or AR3932, which is a colder, nonprojected nose plug that will survive the nitrous environment (right).
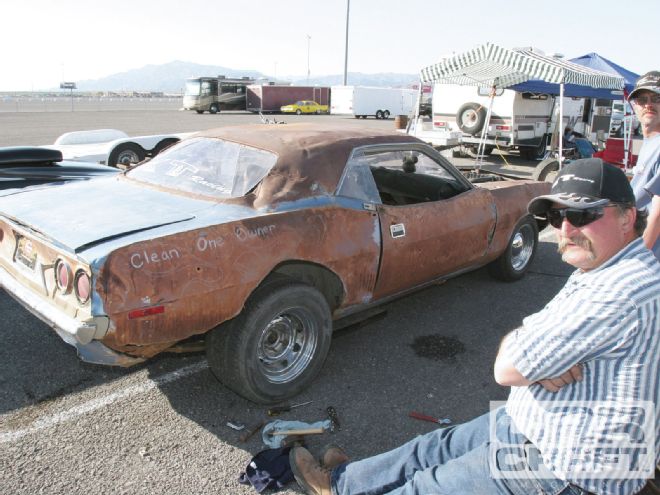
The engine is a 351W stroker at 393 ci. I'm running AFR 205 heads with a Comp Cams XR294RF-HR hydraulic roller cam with 242/248 degrees duration at 0.050 with 0.576/0.600 lift. The compression is 11.2:1, with SRP forged pistons, a Victor Jr. intake, and an 850 Holley double pumper (DP). I put the Holley 850 DP on when I changed the cam last year but was running a 750 DP before, and I think I'll go back to the 750. I'm running an Edelbrock single-stage nitrous system with the 150hp tune. Looks like the next step is to pull the motor and re-ring it. I also have two, 6-inch tubes running from my bright headlight openings straight to the carb for ram air. I read somewhere that ram air leans out the carb on the big end and was wondering if that would have any effect on the spark plugs burning up. Maybe I shouldn't use ram air with nitrous? Any suggestions?
Jeff Smith: You definitely have some problems, Dan, but they're easily rectified. Let's start with the bad cylinder and then move on to your tuning question. Clearly, the No. 4 cylinder is in trouble and is the main cause of your blow-by problem. The best way to pinpoint where the pressure is escaping would be with a leak-down test, but it's obvious that most of the cylinder pressure is pushing right past the rings. All that pressure is then pushing the oil out of the engine. More than likely, what you'll find is that the engine detonated under nitrous and pinched the top ring land and perhaps all three rings. When a ring land is compressed, it prevents the ring from twisting and sealing properly, but you may find that the piston is distressed beyond just a pinched ring land.
The better question is why the two front plugs died an ugly death. Our first clue is the good spark plug with its extended nose. This Autolite 3924 spark plug is what AFR recommends in its catalog. While this works well in normally aspirated applications, nitrous systems increase combustion heat and pressure, so they require spark plugs with nonprojected noses. The advantage of a projected-nose spark plug is that it places the business end of the plug closer to the center of the combustion chamber to enhance combustion efficiency. The problem is the very long ground strap. At high engine speeds with nitrous (or super/turbocharging), the additional cylinder heat turns this longer ground electrode into a glow plug. If you are lucky, the ground electrode melts. We say that's good because it's better to lose a spark plug than melt a piston. The melted ground electrode tells you there is probably too much heat in that cylinder, which means the air/fuel ratio is too lean. It's like a fusible link for the cylinder. In the worst case scenario, a glowing spark plug like this can cause very destructive pre-ignition. With pre-ignition, the glowing ground strap initiates combustion much earlier than normal spark timing. Imagine the damage that occurs when you start combustion only a few degrees after the intake valve closes. The piston is rising in the cylinder, increasing cylinder pressure. But combustion is also occurring and also raising the cylinder pressure very quickly. All this creates massive cylinder pressure way before the piston arrives at top dead center (TDC). This is virtually guaranteed to crush the piston. The first thing you need to do is change to an Autolite AR 3933 or AR 3932 spark plug ($3.50 ea, Summit Racing). These plugs use a much shorter ground electrode, as you can see in the photo (pg. 33), and they are cold enough to survive.
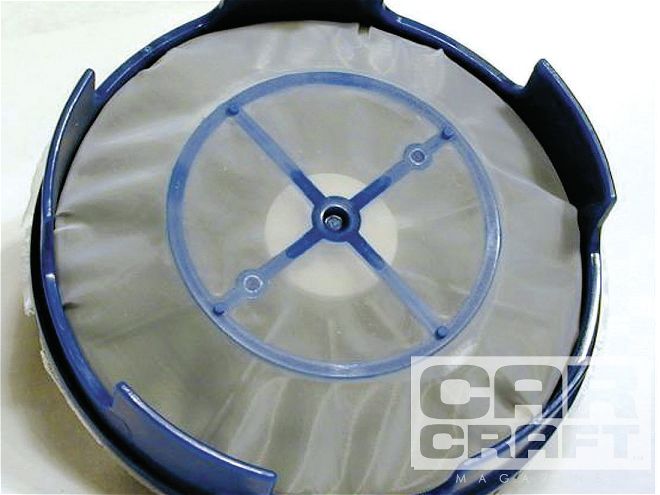
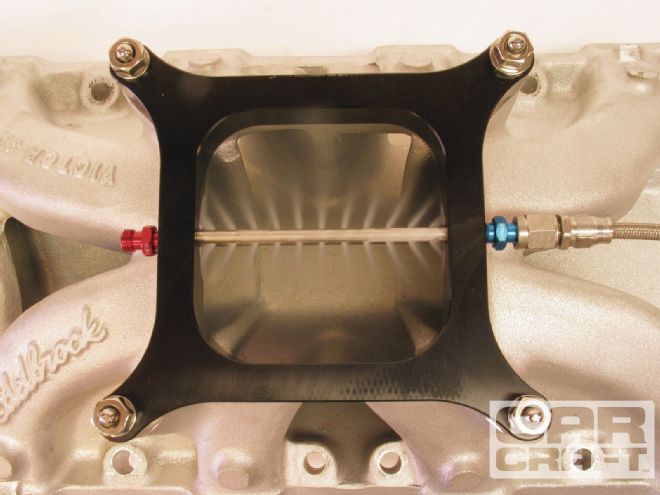 To avoid lean cylinders, try using one of Wilson’s Nitrous Pro-Flow single-stage nitrous plates, such as this one shown here. The Pro-Flow spray bars are drilled at angles to aim the nitrous and fuel shot directly into the cylinders on a single-plane intake manifold. We saw a more significant power increase with this plate than with the other plates we tested
Because both the front cylinders on your engine burned spark plugs, clearly the mixture is lean with the front two--and perhaps the front four--cylinders. Simply increasing the fuel pressure to the fuel solenoid will help, but that also makes the rear cylinders potentially too rich, which will hurt power. A better way to tune would be to increase the primary jetting by the equivalent of two to four jet sizes. If the Comet is purely a drag car, you could just increase the primary jet size, but if this is a street/strip car, I'd suggest increasing the power valve channel restrictor (PVCR). These are the two drilled passages that can be seen once the power valve is removed from the metering block. The PVCR size in a typical Holley 750-cfm mechanical- secondary carb is 0.062 inch. If you want to increase the flow area by the equivalent of 9 percent (or equal to about three jet sizes), then you would drill the PVCR to 0.065 inch. This will produce roughly a 10 percent area increase. Fuel flow will probably be different than the actual area increase, but this will get us in the ballpark. Drill both power-valve restrictors. By increasing the size of PVCR, we add fuel to the primary side only when the power valve opens under high demand. This will richen the A/F ratio under load when the nitrous is not engaged, but that's a small price to pay to keep the engine alive. If you need to jet leaner, you can go down in primary jet size to compensate for the larger PVCR sizes.
It's possible that a change to a better nitrous plate might also improve the mixture distribution so you don't have to play games with the carburetor. Way back in the Nov. '05 issue of CC, we did a major nitrous-plate dyno comparison in which it became clear that the Wilson Pro-Flow nitrous plate was measurably better in terms of both peak and overall power than any other single-stage nitrous plate we tested. Granted, this was several years ago, and it's likely a few (or perhaps all) of the nitrous companies have made improvements, but it's safe to say that adding a Wilson Pro-Flow nitrous plate (PN 300030, 1-inch thick with no burst panels, $266.95 from Summit Racing) would probably deliver 10 to 20 more horsepower for the same tune-up while also delivering a slightly improved mixture distribution. While this plate isn't cheap, neither is a burned piston. There's no inexpensive way to test for mixture distribution, unless you're willing to invest in eight separate wide-band oxygen sensors to place in each header primary pipe and data-log your run. Short of that, you can try to read the plugs, but with unleaded fuel, it's difficult to get an accurate read on mixture safety. Reading spark plugs is as much art as it is science. But at least it's an indicator.
As for your ram-air system, if the air inlet(s) over the carburetor creates greater airflow over the primary side of the carburetor, that could be the cause your problem. If the inlet area above the carburetor is not tall enough, high-speed air could actually stack up in the rear of the inlet bonnet, reducing the airflow through the primary side of the carburetor and increasing it through the secondary side. We're assuming the choke horn has been removed from your carburetors. If not, that's another thing you should do to improve air inlet uniformity across the carburetor. You can try running the car normally aspirated with and without the ram-air system and evaluate the difference. In most cases, there is very little difference in terms of trap speed and e.t., but it's worth the test. If you see a big improvement with the ram-air system removed, that tells you it needs to be redesigned. It's a good idea to run a high-performance air filter inside the bonnet to minimize the pressure changes across the carburetor. Be mindful to create an even radius inlet from the bonnet to the carburetor inlet. Avoid creating a step down from the bonnet to the carburetor. Pressurizing the top of the carburetor will not lean the mixture as long as the pressure is even across both the venturis and the bowl vents.
Jeff Smith: There's nothing un-American with wanting to swap in the later-model V6, other than the mediocre power this combination will deliver. The smaller the engine, the less fuel it will demand, which might lead you to choose the little 229ci engine versus the later 262ci (4.3L) version. I drove an '88 GMC Jimmy Blazer for a while for the same economic reason, but I can tell you these V6 engines are not known for their power or economy. The '88 to '92 4.3L TBI engine was rated at 160 hp and 230 lb-ft of torque--not spectacular numbers, but the engine is limited by the stock throttle-body injection and exhaust manifolds. Edelbrock offers a non-EGR Performer, dual-plane carbureted intake for these engines (PN 2111, $205.95 Summit Racing), which would help on the induction side along with either a Q-jet or a small 600-cfm Holley vacuum-secondary carburetor. I would suggest going with the larger 262ci V6 rather than the smallish 229ci motor simply because the smaller engine was rated at only 110 hp stock when it was new, with an underwhelming 190 lb-ft of torque. When you consider that the Iron Duke four-cylinder was rated at roughly the same horsepower (yes, the torque was only 135 lb-ft), those smaller V6 engines may not really be worth the hassle. Additionally, fuel mileage in my TBI '88 S-15 Jimmy rarely hit more than 18 mpg. The early V6 engines were not as efficient as they should have been, and, frankly, while the 4.3L V6 is an "even-fire" engine with 30-degree offset rod journals, it shakes badly even with spongy engine mounts. Bolt that engine into your Camaro with typical small-block Chevy mounts, and you will notice a distinct vibration that will be difficult to eliminate, especially at idle. One advantage to the 90-degree V6 engines is that they are super plentiful and carry over many small-block engine parts as well as standard small-block-style bellhousings and starters. That will help keep the cost down on your conversion.
If the idea is to improve mileage yet still have a good-performing car, consider a small V8. The base V8 engine for the mid-'90s Caprice was called the L99 and was also referred to as the "baby LT1," because externally it looks just like a typical 350ci LT1 V8 engine. In fact, the L99 used a 3.73-inch bore and a very short 3.00-inch stroke to produce 262 ci (4.3L), but it was rated at 200 hp and 245 lb-ft of torque. This engine was also fitted with an LT1-style intake manifold, which is why it is often mistaken for its 350ci cousin. With its smaller displacement, it could easily be capable of similar (if not superior) mileage to the 4.3L V6. But more important, it would run smoother and with more power. Retaining the EFI would deliver better mileage but might require a significant investment in sensors and a wiring harness that will drive up the overall cost. But no worries, this engine could be easily converted over to a carburetor, which would also eliminate the front-mounted Opti-Spark ignition. Because these LT1-style engines were still Gen I small-blocks, they used a stub drive off the cam's distributor gear to run the oil pump. All you have to do is remove the stub drive, bolt on a typical small-block Chevy intake, and use a standard, small-block distributor--then you are in the game. While the V8 would be heavier by 70 or 80 pounds compared with the V6, it gives you the ability to use inexpensive small-block Chevy parts, including a world of intake manifold, exhaust, and distributor options. The big plus is a little more power (L99 stock torque is 245 lb-ft versus 230 for the 4.3L V6), and you have the potential to easily make more horsepower with camshaft, exhaust, and induction changes. Just remember this is a reverse-flow coolant engine, so the heads are different.
Jeff Smith: This is a great question, Clayton, because contrary to what many enthusiasts believe, there are some minor differences between these bearings. The small-block Chevy is a great example to use for this discussion because all these bearings are available for the venerable Mouse motor. However, if you have a nailhead Buick, you might discover there are only stock replacement bearings.
Engine bearings, especially rod bearings, are subjected to some pretty serious loads, so the material they are made from and their shape becomes critical. Clevite has created a design it calls Tri-Armor, which is a series of layers as shown in the illustration on the next page. It starts with a steel backing that creates strength, followed by an alloy layer of copper and lead, and finally by a material called Babbitt. This material was originally formulated back in the early days of the automobile and was named after its inventor. The Babbitt alloy is very soft and made out of a combination of lead, tin, antimony, and arsenic (so don't lick it), which allows the bearing to absorb or embed smaller pieces of metal or dirt. Finally, a thin layer of moly graphite is applied to make the bearing slippery and to reduce friction. This is why it's important to never use any abrasive on a bearing. You may have seen old magazine stories in which the builder would use a Scotch-Brite pad to "polish" a rod bearing. Under no circumstances should you do this on any modern bearing. It's just not a good idea for a whole bunch of reasons.
Clevite says a standard replacement bearing will work fine in a street engine that makes up to 10 to 15 percent more power than stock. Above that level, performance bearings are a better idea. According to Clevite's Bill McKnight, "Clevite's P-Series stock replacement bearing is a good choice for street-driven engines using the stock crankshaft with up to a 25 percent increase in horsepower. The P is the Clevite 77 tri-metal material, utilizing factory geometry, and is a drop-in replacement for the OE bearing. It has a long history of performing very well in a variety of applications from passenger cars to Mack trucks. You'll notice that when you remove the bearings from the box, they have a pretty, silver look to the surface. This is called 'flash tin plating,' and is a couple of millionths [of an inch]thick. It is designed to keep the bearings looking good, even if they sit on the shelf for a year or three. Savvy engine builders take a piece of newspaper and polish off the tin plating as they assemble the motor. If you've ever used the Clevite H bearings, you know they have a mottled brown surface appearance. That's what the Babbitt looks like without the tin plate. You won't get your P bearings to look like that, but polishing the tin plate with the newspaper will get you close enough."
H-Series Clevite bearings are designed for competition engines making 650 hp or more. These bearings are narrower than stock but are designed to be used for applications in which the engine builder is aware that high rpm and high loads will distort the housing bores of either the rods or the mains. These bearings have a medium amount of eccentricity and high crush along with enlarged chamfers to be used with crankshafts with larger radii to create sufficient clearance. Ultraperformance cranks often enlarge the fillet radius (where the rod journal meets the vertical part of the crank known as the cheek). Large-fillet radii improve crankshaft strength but also reduce the journal width. The H bearings are designed narrower to fit this application. These bearings probably aren't necessary for use in a street engine. You will find them in NHRA Competition Eliminator, NASCAR engines, and the like. We spoke with Kenny Duttweiler, and the Clevite H bearings are what he uses in the 347ci twin-turbocharged small-block Chevy that just ran 462 mph out the back door of the measured mile at Bonneville during a September 2011 FIA-sanctioned record attempt. The Speed Demon, driven by George Poteet, unfortunately broke several driveline pieces and wasn't able to set the record with a backup run, but we are talking about a short-deck Dart-block small-block Chevy that is making upwards of 2,200 hp. Kenny says the engine was spinning 9,000 rpm with 40 psi of boost for an excruciatingly long time. George Poteet, Ron Main, Ken Duttweiler, and the rest of the Speed Liner crew are all now Gold Card members in good standing of the Car Craft Haul of Fame. That pass, while not official, is an astonishing accomplishment when you consider that the current piston-engine record is 415.896 mph held by Tom Burkland and set in 2008!
 This drawing shows how the different layers of a Clevite Tri-Armor bearing are configured.
Armed with all this information, which bearing is the best? We'd suggest going with the P bearing, since it offers strong load capacity and good crush, so if the engine detonates it won't beat up the bearings. If you've ever disassembled an engine that has been hammered with detonation, the bearings will literally fall out in your hands, which means the crush is gone. You didn't mention the rpm the engine will see, but assuming we're talking about a 6,000- to perhaps 6,500-rpm engine, the P bearing will be the best. You also didn't mention clearance, but the standard recommendation is 0.001 inch for every inch of journal diameter. For a small-block 350ci Chevy with a 2.10-inch rod journal diameter, that would be a bearing clearance of 0.0021 inch. This will work, but most street engine builders I have questioned prefer the clearance to be closer to 0.0025. If the engine is a big-block with huge 3.5-inch main-journal diameters, something closer to 0.0030 to 0.0035 is a good idea, especially on the thrust bearing to ensure plenty of oil lubes to the side of the bearing. Bearing clearance is a balancing act between load capacity, oil flow, and bearing temperature. Tighter clearance improves the load capacity to a certain point but also reduces oil flow, which in turn drastically increases the temperature. So the compromise is increasing the clearance, increasing the oil flow, and reducing the temperature at the bearing. This is where the 0.001 inch per inch of diameter figure originates. You can move these clearances around to fit your particular application. For a relatively simple engine part, this is a lot of information, and we've only just scratched the surface. If you want to learn more, check out 30 pages of bearing information in the Clevite catalog, which that you can find online at MahleClevite.com/publications/ EB-10-07.pdf.
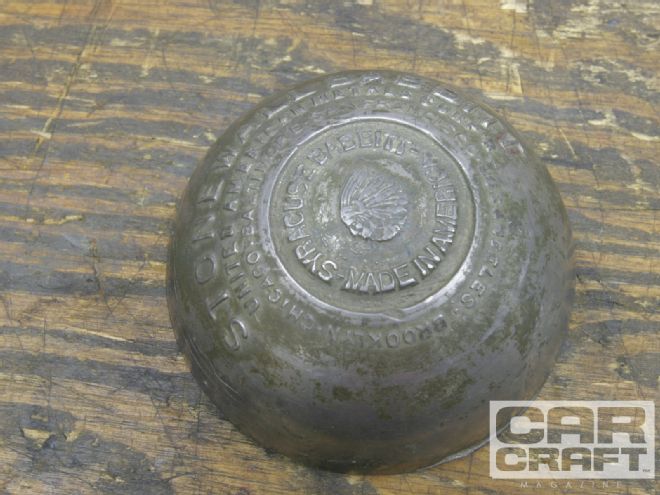 Did you know that back in the Model T days there were no bearing inserts? A machine shop melted down spheres like this one and poured the Babbitt into a fixture for the rods or mains. Once solidified, the inside diameter was machined to the proper clearance. Actual bearing inserts didn’t come into fashion until the early ’30s.
Jeff Smith: Mark, the spark plug issue with the three-valve heads is very serious. The problem is with the design of the spark plug. Because there is very little room for the spark plug in the chamber, Ford extended the length of the ground electrode shield way past the end of the threads. This creates what Autolite calls a high-thread spark plug. If you look at the photo of the three-valve plug, you can see how far the ground electrode extends beyond the end of the threads. Since spark plugs are warrantied for 100,000 miles, they are often not removed until well beyond the end of the warranty cycle. The problem is that after this many miles, carbon collects between the extended ground electrode and the very small channel in the head leading into the combustion chamber. It can get so plugged with carbon that, when you yank on that spark plug hard, it breaks, leaving the shank in the head. Once this occurs, you have to remove the head(s) to remove the remains. Autolite's Technical Training Manager, Jay Buckley, recently completed a thorough YouTube technical training video that shows the very specific procedure Ford has created to remove spark plugs from a three-valve motor. I strongly suggest you watch the video (do a YouTube search for "How to change spark plugs on Ford three-valve modular engines--Autolite"). With this procedure, you should be able to remove the plugs without drama.
The first step is to work with a cold engine that has been sitting for at least eight hours. Remove the coils and wires and use compressed air and a nozzle to blow out any dirt collected in the spark plug wells. Using a thin-walled 9/16-inch spark plug socket, carefully loosen each plug no more than 1/8 of a turn. Next, shoot about 1/2 to 3/4 of a teaspoon of carb cleaner into each spark plug well. Loosening the spark plug slightly allows the carb cleaner to soak past the plug seat and begin to soften the carbon buildup on the plug. The next step is the most critical: Allow the cleaner to soak, preferably overnight. After soaking, use a beam-style torque wrench and carefully loosen each spark plug with no more than 33 ft-lb of torque. If you get to 33 ft-lb, stop and soak the plug again. Work the plugs back and forth carefully. You can hit the plugs with a second shot of carb cleaner, but if you have to soak them more than twice, you will need to spin the engine over to clear the liquid to prevent hydro-locking the cylinder. The key to this is to work slowly and carefully. Finally, use antiseize on the new spark plug threads and the shield area but be careful not to get any of the antiseize near the ground strap or it will immediately cause a misfire. It would also be a great idea to yank the plugs at 30,000 miles just to clean off any carbon and make it easier to remove them later. Yeah, it's a hassle, but it's a far better alternative than yanking the heads after the plugs break.
 The difficulty with the three-valve head spark plugs is that the spark plug’s extended nose (arrow) is positioned in a very small passage in the head. This area becomes packed with carbon, which makes removing the plugs difficult, especially after 100,000 miles of use. This is an Autolite HT plug.
As for your questions about an alternative cylinder head swap, it appears you already have a pretty good cylinder head with the three-valve package. The early Lincoln Mk VIII four-valve heads look attractive, but from what we've learned talking with the guys from Modular Mustang Racing (MMR), there isn't a huge power advantage to switching to the Mk VIII four-valve heads. For a mild, normally aspirated street engine, MMR says you would be better off modifying the existing three-valve engine with classic induction and exhaust modifications. This is because you would have to invest quite a bit of money to convert a three-valve engine to the four-valve configuration and the power improvements may not justify the cost.
Jeff Smith: Holley originally offered these goodies, but they have since disappeared from the catalog. We then discovered that Walbro makes pickups that can be placed in multiple locations in the fuel tank for a constant supply of fuel for the pump. These are roughly 3 inches in diameter and are barbed for a 5/16-inch inlet hose. The pickups use a fine mesh 70 micron screen over the inlet, so if the pickup is uncovered, fuel still in the screen will help block air from entering the pickup, assuming that another pickup is still pulling fuel. These pickups are rated at 40 gallons per hour, so having three in the tank should offer more than enough capacity to feed a large pump, since even 80 gallons per hour is equivalent to sufficient fuel to feed 900 hp.
 These Walbro remote location fuel pickups will convert a stock muscle car tank into a fully compatible EFI tank for very little money.
According to the Auto Performance Engineering (APE) website (AutoPerformanceEngineering.com), these pickups come in several configurations including with and without bleed holes. The bleed hole prevents the screen from blocking the inlet, but obviously it also bleeds a small amount of fuel. Without the bleed hole, it's possible that the screen could cover over the inlet and block flow. The pickups are also available in single inlet, a flow-through horizontal style, and a flow-through 90-degree inlet. APE sells these pickups for $26.00 apiece.