
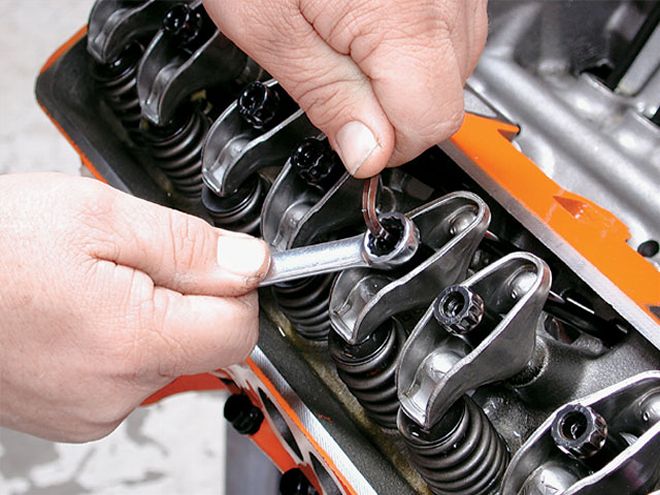
 Hydraulic lifters maintain a preload between the lifter and the pushrod to prevent clatter, but an aggressive high-performance lobe can still be noisy even with the lifters properly adjusted.
Valvetrain Clatter
71BigBlockNova, via CarCraft.com: Perhaps it's because I don't have an experienced ear yet, but I think my valvetrain is making too much noise. How much noise should you hear from a hydraulic lifter engine with the valve cover off? Should the rockers be silent or should there be a little clatter?
Jeff Smith: This is an interesting topic. Original-equipment engines have to do more than just be durable, they also have to be quiet. Assuming all the valvetrain pieces are installed and functioning properly, there should be no noise emanating from a hydraulic lifter-equipped engine. Generally, a loose adjustment, where there is clearance between the rocker arm and the pushrod and/or valve tip, will create this clatter. This is what you hear on a mechanical-lifter engine that relies on a small amount of clearance or lash to accommodate expansion as the engine warms up.
An interesting thing happens with aftermarket, high-performance camshafts. As camshaft profiling has progressed, designers have gradually created much more aggressive cam lobes. This means the lobe shape accelerates the lifter much more quickly compared with stock profiles. This is one way to increase the amount of valve lift compared to the duration. The price for this more radical lobe profile is valvetrain noise. Even with proper preload on the lifter and high-quality parts, a more aggressive lobe will tend to clatter, even at low engine speeds such as just off idle. Not all current high-performance cams are noisy. For example, every cam manufacturer offers several levels of camshafts that appear to have similar specs. The more aggressive the cam profile, the more lift it will generate for the same amount of duration at 0.050 inch of tappet lift. These cams will also produce the most noise.
Another point worth mentioning is the zinc and phosphorus levels in current production engine oil have been reduced in the last five years or so to meet increasingly stringent requirements from the OE companies. This requirement is intended to reduce the levels of these additives to improve catalytic converter life in the face of 100,000-mile warranty standards. Zinc and phosphorus are two high-pressure additives that are important to help prevent wear, especially in engines with flat-tappet lifters. Break-in procedures for a new cam should include a bottle of antiwear additive that is sold through the major cam companies like Comp and Crane.
But the problem doesn't stop there. Many cam companies now suggest using engine oils with higher levels of zinc and phosphorus for engines equipped with flat-tappet lifters. Shell Rotella T is diesel-engine oil that offers these increased antiwear additives and is safe to use in gasoline engines. Another alternative is using one of the high-performance oils from Quaker State, such as the Q racing oils, which also contain higher levels of antiwear additives and can be used safely in street engines. The oils cost a little more, but they may also prevent a flat-lobe problem down the road.
A Question Of Balance
Crusher via CarCraft.com: I want to get my 383 balanced. I know the pieces needed are the crank, pistons, rods, flywheel, and harmonic balancer. What kind of harmonic balancer do I need to buy and what flywheel do I need? I am using a cast Eagle crank. I don't know if the harmonic balancer I need is external or internal and if I need one for a 350 or a 400? Is an 8-inch balancer sufficient? Are there differences for flywheels for a 350 versus a 400? Also, the car this engine is going into has a Muncie four-speed and a 350. Will I still be able to use the transmission in my '71 Nova if I need a 400 flywheel (assuming the flywheels are different)? I know I will need a new-size clutch if a new flywheel is needed.
Jeff Smith: This is a great question, since Eagle makes both an internally and externally balanced stroker crank for the small-block Chevy with a two-piece (old-style) rear main seal. Since it is difficult to identify the difference, you should call Eagle and give them your crank part number to make sure you know which style of crank you have.
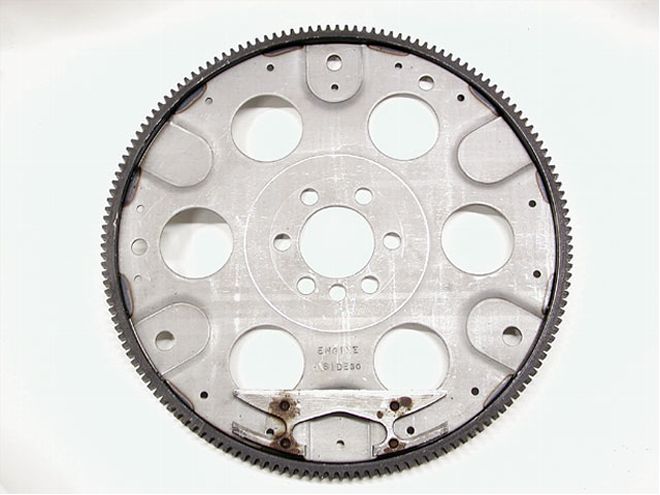 This flexplate shows the additional weight added for an externally balanced stroker 383 crank.
When Chevy originally built the 400 small-block, the longer stroke demanded more counterweight mass, but the engineers decided to add this additional offset weight to the harmonic balancer and the flexplate/flywheel. This is referred to as an externally balanced assembly that was only used on the factory 400 engines. All other small-block Chevys were internally balanced, where there is no offset weight (zero balanced) on either the damper or the flexplate/flywheel. Internally balanced stroker crankshafts move this additional weight onto the crankshaft counterweights. There are two different internally balanced Eagle ESP cast stroker cranks: one that requires at least a 5.700-inch rod and one that can be used with 5.850-inch or longer rods. These cranks add counterweight material, so they require a longer rod for the counterweights to clear the piston skirts when the crank is at bottom dead center (BDC) for that cylinder.
We're going to assume you're using the externally balanced-style crank, which will require a 400-style flywheel and externally balanced front damper. The 400 flywheel is really not much different from a normal flywheel, since the external offset weight is just drilled out of the opposite side of the flywheel. A 383 could use the larger 168-tooth flywheel (11-inch clutch) compared with the Nova's 153-tooth flywheel (10.5-inch clutch). This large flywheel will also require a different starter, one with the offset bolt holes. Check to make sure the block is drilled for the offset starter bolt pattern.
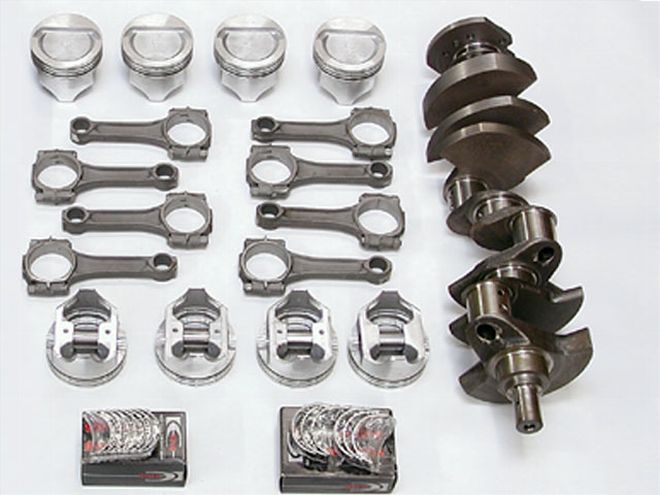 Buying a complete stroker package with the crank, rods, pistons, rings, and bearings is often a good deal because the company has already worked out all the balance details.
As for an externally balanced harmonic balancer, an 8-inch balancer will work as long as it has the offset weight designed into it. There are several companies that offer low-cost, high-quality balancers including Pioneer and Professional Products. Large, heavy balancers are not necessarily a good idea. According to crank manufacturers we've spoken to on this subject, a heavy weight twisting out on the end of the crankshaft tends to add twist to the crankshaft and can often cause cracking problems at the crank snout. A smaller, lighter, 6.5- or 7-inch balancer offers less mass while still producing the desired damping effect.
It also sounds like you may have purchased the crank, rods, and pistons separately in an attempt to save money. Keep in mind that if your rotating package has been pieced together, it still must match the "bob weight" of the crankshaft. The bob weight is the effective weight (in grams) of one piston, its ring set, wristpin, and the small end half of the rod. The crankshaft counterweights are sized to accommodate a given bob weight. The externally balanced Eagle ESP cast cranks require a bob weight of 1,855 grams, which means the bob weight of your components should, ideally, weigh the same. If they weigh less, the balance shop can merely drill holes in the crankshaft counterweights to balance everything out. But if your reciprocating assembly weighs more than 1,855 grams, the heavy Mallory metal must be added to the crank. Adding Mallory metal to your crank for balancing can quickly exceed the cost of the crank itself, so we'd suggest weighing everything ahead of time to ensure the system will balance properly. This is why purchasing an entire rotating assembly from one company is a good idea, since the pistons, rods, wristpins, and rings are carefully matched to minimize balance problems. This was a bit of a drawn-out answer, but it highlights some of the difficulties you face when scratch-building a stroker motor. Hopefully, we've helped you avoid a few of the more difficult problems.
John Jamison via CarCraft.com: I own a '66 Pontiac Tempest with a 389 and a four-speed, and I want to improve the handling on my car. I've heard some talk about something called negative roll, but I don't know anything about it. I've heard it may have something to do with the frontend alignment. These cars are not the best-handling cars on the road (especially compared with a fourth-gen Firebird), but I think it could be better. Can you help me?
Doug Norrdin, owner Global West Suspension Systems: We get this question all the time, John. The term negative roll refers to improving the suspension geometry on most '60s and '70s cars' front suspensions to produce a better front-tire contact patch under high-cornering loads. Most factory cars from the musclecar era when pushed hard through a corner tend to understeer. This is a condition where the front wants to continue to go straight through a corner, even though the steering wheel is turned. In many cases, when the body rolls as the car turns the corner, the top of the outside loaded tire (such as the right front in a hard lefthand turn) will tend to tip outward, producing excessive positive camber. This situation lifts much of the tire tread off the pavement, reducing traction and creating that understeer or "push" condition.
It's a bit complicated to get into the specific geometry changes that Global West creates in building a negative-roll system, but in the case of your '66 Tempest, it is generated by combining a taller front spindle with a custom-designed tubular upper control arm. With these components in place, along with a higher-rate front coil spring, a good shock absorber, and a larger front antiroll bar, we can create a situation where we minimize the amount of body roll. Combined with the front geometry changes, the top of the outside loaded tire tends to tip inward slightly, creating a small amount of negative camber, which maximizes the tire contact patch to the pavement, increasing traction and improving the speed at which the car can now safely take the corner under complete control.
This negative-roll idea can be applied to many different front suspensions beyond the typical GM design. For example, our first negative-roll package was for early Mustangs, since the original OE Ford design places the spring above the upper control arm instead of between the two arms. The Ford negative-roll system requires a few minor pickup point changes to be optimal but overall still uses the same front-suspension design combined with much more durable components that won't flex under load.
For your Tempest, Global West has created a combination of parts, including the upper control arm, shocks, springs, and antiroll bars, that creates a very reliable and durable package and greatly improves handling and steering response with simple bolt-on parts. Of course, once you improve the front suspension, there are a few simple modifications that need to be made to the rear suspension in order to take maximum advantage of all the changes. But we'll save those recommendations for when we have space to talk about the rear suspension. Hope this helps you, John.
 Doug Norrdin has been designing and building musclecar suspension components since 1979 and is just now putting the finishing touches on his centrifugally supercharged '65 GTO.
It's All In The Ratio
Gigunseen via CarCraft.com: I'm new to the car scene, and I was thinking about putting a TH700-R4 in my '71 Cutlass because of gas prices and the fact that I have to drive it 70 miles a day. My problem is that I have 2.77 gears. I checked on a speed calculator, and it said at 67 mph I would be at about 1,600 rpm. This would be great for gas, but is it too low? I was once told that 1,500 rpm should be the lowest rpm recommended on the highway, but I'm not sure if that's true. I have a stock torque converter, and the car is running 205/65R15 tires.
Jeff Smith: Your math is right on target. The formula for determining engine cruise rpm is as follows: RPM = mph x gear ratio x 336 / tire diameter RPM = 65 x (2.77 x 0.7) x 336 / 26RPM = 1,628
You can try it to see how it works, but what you will find is that on level ground, it might cruise okay, but you will need to really crowd the throttle to get it to accelerate up a decent grade or hill. This will eventually downshift the trans out of Overdrive. Plus, very low engine speeds may not necessarily deliver better fuel mileage. However, you are on the right track. We have a slightly different suggestion.
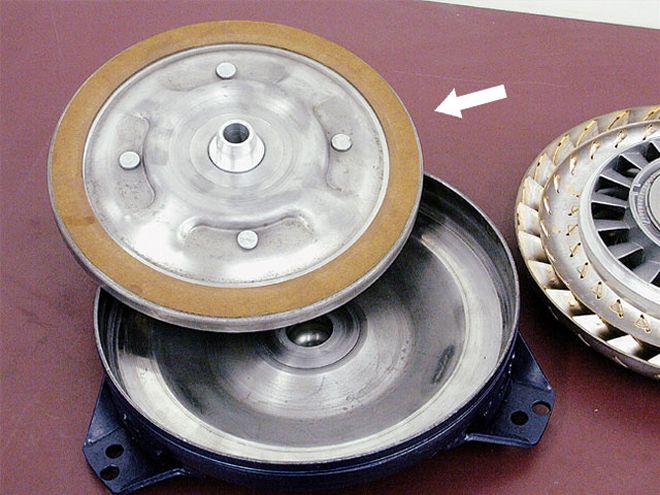 A lockup converter uses a clutch plate (arrow) with friction material that locks up against the converter housing while the plate is splined to the transmission input shaft. This eliminates torque-converter slippage and improves mileage.
Go ahead and swap in the TH700-R4 overdrive trans, but also upgrade the rear gears from those salt-flats gears to a 3.42 gearset. This will drastically improve your off-the-line acceleration and still deliver a decent 2,000-rpm engine speed at 65 mph, assuming you'll employ a lockup converter. A nonlockup converter tends to slip and will add roughly another 200 rpm to the cruise engine speed.
Combining a 3.42 gear with the TH700-R4's 3.06 First-gear ratio will give you an overall excellent launch ratio (overall ratio is trans ratio times rear-gear ratio, or 3.06 x 3.42 = 10.4:1). Your current overall First-gear ratio, assuming a TH350 trans, is 2.52 x 2.77 = 6.98:1. Of course, with a much deeper overall First-gear ratio, you will be able to fry those puny 205/65R15 tires, but that's cool. Then you could send us some burnout photos!
Heads To Go
Leroy Brigman, Abilene, TX: I just installed a 350 into an '83 El Camino that has a 0.040-over block with four-valve relief pistons, and I believe the block has been decked 0.010 inch. It has an Edelbrock RPM Air Gap intake and a Q-jet with a 1-inch adapter for the carb, a Melling high-volume oil pump, and a Melling cam with 277/288 advertised duration and 204/214 degrees of duration at 0.050 inch of tappet lift with 0.442/ 0.445 lift. The car has a Turbo 350 now, but I have a TH700-R4 in the works. The car also has a stock rearend with 3.08 gears and 295/50/15 tires on the back.
It had 882 heads on it, but it blew a head gasket the first time I drove it. I have some 487 heads that need rebuilding. Would these be worth the investment? I want a pair of heads that will run good with what I have.
My good friend has some old-style, double-hump 64cc fuelie heads. Would this bump my compression up too much for the street? Or what is a good head for what I have that will run well? This car is just gonna be driven on the weekends and to the eighth-mile strip here in Abilene, Texas. Any suggestions would be helpful in which way I go from here.
Jeff Smith: The 487 head is a relatively decent casting used in several 350 engines in 1970-71 with one of the better applications being a 330hp Camaro-and-Corvette 350 with a 76cc chamber and 2.02/1.60-inch valves. These LT-1 heads also used screw-in studs and guideplates. We'll assume you have the slightly less desirable 270hp version equipped with the same 76cc chamber but with 1.94/1.50-inch valves. We've never flow-tested a set of these heads, but they appear to be a good match for the short-block combination you described.
We'll also take a stab at the compression ratio. With the flat-top pistons and assuming a 0.015-inch deck, a 0.041-inch-thick composition head gasket, and a 76cc chamber with the 487 heads, the compression should be around 8.7:1. If all you did was change to those 64cc chamber heads, the compression would jump up to 9.90:1. This is a bit high, although not excessive, considering you have a fairly large cam that will bleed off a little cylinder pressure and perhaps keep you out of detonation. The added compression would be worth some power (roughly 3 to 4 percent) but probably isn't worth the risk.
Another difficulty with running this much compression is the 3.08 gears, which put more load on the motor. If you were running a set of 3.42 gears with the TH700-R4 and those tall tires, that would put less load on the engine and perhaps help keep it out of detonation. The other variable is that you live in Texas, where it gets mighty hot in the summer. We'd stick with the 487 heads.
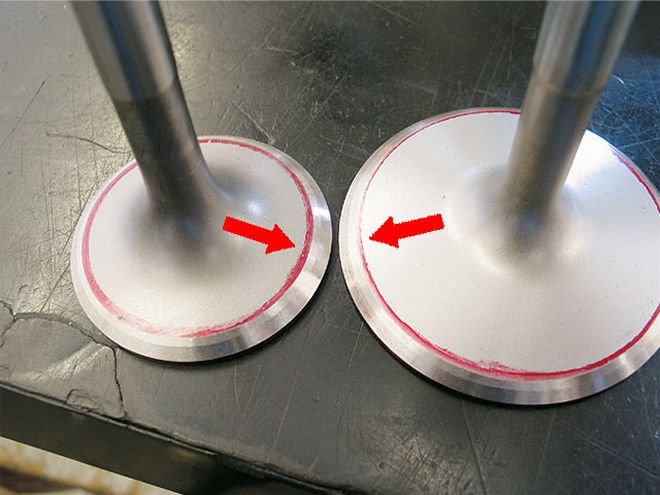 Just adding a 30-degree back-cut (arrows) to both the intake and exhaust valve will really improve flow, especially at the low- and midlift levels, where it can really help power.
We also have a couple of suggestions as you rebuild those 487 heads. Think about adding larger 2.02/1.60-inch valves, especially if you have to buy new valves since the cost difference is minimal. The larger valves will help flow. Either way, be sure to ask the machine shop to add a 30-degree back-cut to both the intake and exhaust valves. This little technique helps flow across the board on almost all small-block Chevy heads, especially on the exhaust side. This will help torque and top-end horsepower, and the cost for the machining operation is cheap. If you want to try some simple bowl work, just radius the sharp edge underneath the valve seat on both the intake and exhaust. This will help flow-but don't get carried away or you could ruin an otherwise decent-flowing head. Do these little tricks, and that'll wake up your small-block.
 Ancient Tech Tip Rehashed Here for Your Convenience Want to know which way your distributor rotates? Just point right at the nipple of the vacuum advance and you'll point the way. In this case, it's counterclockwise.
The Guide To Seals
John Langner, somewhere in Wisconsin: After 30 years of being a backyard mechanic, I finally decided at 46 years of age to build an engine right. I hired Ken Brewer at Pacific Performance Racing to build a Pontiac 455 that would give me a solid 500 hp. He did just that. The engine came in at 505 hp and 558 lb-ft of torque. Not sparing any expense, I went with Edelbrock aluminum heads.
After driving the car all last summer and not experiencing a single problem, I wanted to dress up the engine compartment by switching to a polished intake. I had to wait three days for the gaskets I wanted, so one night out of boredom I shone a flashlight down the intake ports only to find that all eight valve stems looked like they had 100,000 miles on them. The valves that were completely closed actually had a small puddle of oil on them. These heads were preassembled and installed out of the box. They are the 87cc, chambered heads, and the cam is under the maximum lift allowed by Edelbrock. The engine runs at 175 degrees F and has never been above 190 degrees. I have about 4,000 miles on the engine and change the oil every 800 to 1,000 miles with Kendall 10W-40.
I contacted Edelbrock and spoke with two separate technicians. They are not aware of anyone else with this problem. I have not taken them apart yet, but when I shine a light through the springs, none of them seems to be broken or out of place. I do not have the notorious puff of blue smoke that normally comes with bad seals, but I have been a reader of Car Craft long enough to know this isn't always the case. Also, although the color of my spark plugs is almost perfect, I've always had oil on the threads when I take them out to inspect, and now I suspect it's been the seals all along.
If the seals aren't defective, why did this happen? If I change them with the same style that's in them now, who's to say it won't happen this summer? If there was a problem during assembly, what are the chances that all 16 were damaged? (I'm assuming the exhaust seals are bad, too.) Do you have a recommendation as to what brand or style of valveguide seal I should use? I was running open breathers on both valve covers instead of a PCV valve. I have since installed a system with check valves. Even if I were getting some vacuum back through the breathers, would this actually cause this?
If it helps in your response, I am running a hydraulic roller with roller rockers. One of the Edelbrock techs warned me about the top four valve-cover bolt holes being drilled all the way through into the intake port, and that there had to be thread sealant on them. This was done from the beginning, and it also wouldn't explain the other four. Any input on this would be greatly appreciated. I will be in a cushioned room with a pillow duct-taped to my head eagerly awaiting your response.
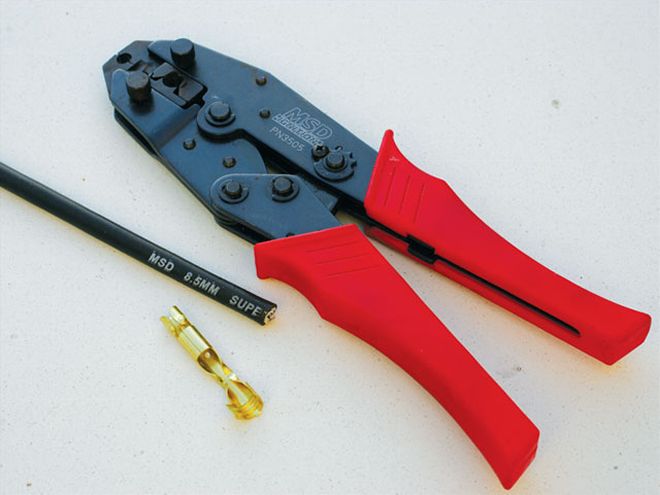 Save Yourself Douglas Glad insists on badly crimping his plug wires with his ancient Taiwan wire stripper. Meanwhile, in the civilized world, this MSD Pro-Crimp tool is the salvation of plug-wire assemblers nationwide, and it'll do windows, too. It's MSD PN 3505, available from Summit Racing for $51.95. Someone have mercy and send one to Glad.
Jeff Smith: Several things could have happened here, John. The first is that the valveguide seals are just plain worn, which is somewhat unlikely given the limited number of miles. Another possibility is the engine has been over-revved, causing the valves to float and possibly bang the retainers into the intake-valve seals, thereby damaging them. From your age and the obvious care you've taken with the engine, it also seems unlikely. Next is the possibility that the valve-to-guide clearance is unusually wide, causing the valve to move around, which could hurt the seal and allow oil into the cylinders.
At first it seemed odd that you didn't say you had an oil-control problem, but if you are changing the oil every 800 to 1,000 miles, you probably wouldn't notice a low oil level after such a short amount of time. The next possibility is that the guide material is weak and in a short period of time has created excessive clearance. Edelbrock has a good reputation for using quality parts, so this is probably not the case. The best test for this would be to use air pressure to keep the valves in place while you remove an intake retainer and valvespring to carefully inspect the seal for wear or damage. To check for excessive valveguide clearance will involve removing air pressure from the cylinder (hold on to that valve!) and attempting to move the valve laterally in the guide. If you can feel the valve move excessively in any direction except up and down, you have a problem because intake valve-to-guide clearance is generally only about 0.0015 inch.
Precision Engine Parts (PEP) offers a ton of different positive valveguide seals, but in terms of temperature, the Viton seals are the best, with a peak temperature limit of 475 degrees F, which is far more oil temperature than your engine will ever see. We couldn't find a replacement part number in Edelbrock's catalog for the seals, so we have to assume the guide diameter is 0.530 inch, which is somewhat of an aftermarket standard. Given that the valves used in the Edelbrock heads are 111/432-inch-diameter stems (0.343 inch), PEP offers a Viton rubber positive seal as PN 343530, but you should verify the guide size before ordering any seals. You can contact PEP, but it does not sell retail. Contact your local machine shop to purchase these seals.
Ask AnythingAsk Anything is the portion of What's Your Problem where readers send questions for industry bigwigs, and we get the answers. So pick a hero, come up with good questions, and send them to CarCraft@primedia.com.