Back when I was a wee lad, I never hesitated to disassemble any and everything in my path. Much to my dear mother's dismay, the majority of those items remained in their state of undress for the remainder of their existence with me (dad didn't care much, as long as I put his tools back). As time wore on, that would change--mostly because mom and pops weren't so willing to provide me with the goodies to tear apart--but my ability to put things back together definitely improved.
While the same still holds true to this day (mainly the disassembly part), the challenge of successfully rebuilding something is greater than ever. Take, for instance, carburetors: While the inner workings oftentimes cause mild headaches, I still put forth every effort to familiarize myself with not only "how" the parts go together, but "why." Other things, like stainless body trim, are a whole different story.
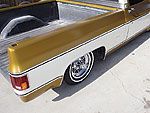
As simple as it may appear to be, dealing with trim/molding is almost an art form. Sure, anyone can do it, but to do it right takes a lot of patience and, most importantly, a careful hand. When dealing with fresh paint, the last thing you want to do is make more work for the painter by scratching his recent hard work. The other important thing is to not damage the trim as it's being installed, as most of the metal (new and old) is fragile and likes to bend or kink with little effort on your part. In the past, dealing with body trim was like rebuilding a New Departure brake hub on my Schwinn when I was five years old--things came apart, but stayed apart! That was about to change.
After getting my '75 C-10 two-tone painted recently (see sidebar), I was faced with two options: Pay the bodyshop or someone else to install the new trim package from Chevy Duty, or do it myself. Not having the extra dough at the time was a big factor, but moreover, the fact that I wanted to give it a shot weighed heavily on the final decision--and I'm glad I took the opportunity! Not being a very patient person to begin with was the only real obstacle I had to deal with...well, that and the fact that I neglected to duplicate the trim holes in the new doors and fenders "before" the truck was painted! The aid of digital photos of the placement and type of fasteners/clips used on the original trim came in real handy, but I was still faced with having to drill through fresh paint, risking the chance of causing damage that would be visible beyond the trim's borders. As you will see, that was not the case.
With the complete side trim kit (PN#62-571) from Chevy Duty in my possession, the only thing I needed was a day to myself to attack the installation. With a cordless drill, a fresh roll of safe-release masking tape, and miscellaneous handtools--plus the obligatory stash of cold ones--I clocked in somewhere in the neighborhood of 8 a.m. or so and was tightening down the last finish screw long before the sun had set. Had the mounting holes been transferred when they were supposed to be, it would easily taken no more than a couple hours, tops. Each piece of replacement trim is provided with all the necessary clips (snap-fit, stud, and adhesive-backed) and polished stainless screws, so all you have to do is line the trim up, attach, and go!
Personally, '73-80 C-10s look too much like a modern truck without the complete set of stainless. Despite what many say, this is a classic, and it relies heavily on features like this to keep it so.
Gold Suede Hues
The photography might not do justice in revealing the actual "finish" on the '75 C-10. While both the PPG California Gold Metallic and Oxford White are sealed in clear, the final finish of each is a difference of night and day. For reasons still "unclear" to many, the main color was always intended to have a "suede" or matte finish. The easiest way to achieve this is by leaving the basecoat as-is, but the problem is that the paint is not protected, thus would not remain that way for long. The other realistic approaches are to either flatten regular clear (adding a flattening agent), color-sand the glossy clear down in grit succession until the finish is the desired sheen, or do like we did and seal the color with a clear like PPG's Flexed 'N' Flat, which was originally designed for use on things like Mercedes bumpers and side panels. Reduced properly (the more reducer used, the shinier the finish), the outcome is perfect suede. The best part is, the finish will last as long as you take care of it--washing, spray-waxing, etc.--which is something that can't be said for primer or non-cleared finishes.