
Now that your Pontiac has been thoroughly looked over and you have all the proper equipment ready for the track, it's time to get out there.
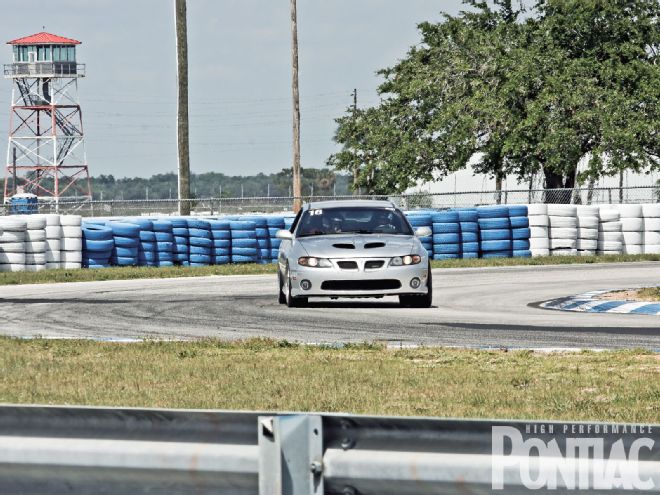
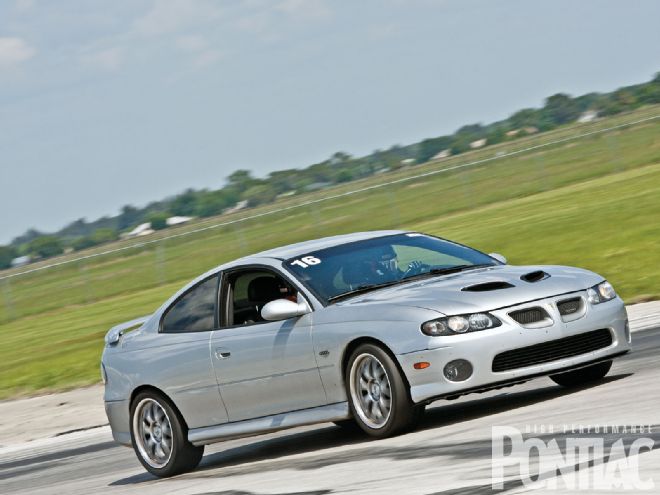 D-Day has come! We throw our '05 GTO into the corners at Sebring International Raceway at more than 135 mph!
Jeff Lacina and Dell Hughes from Track Guys Performance Driving Events invited us out to participate in their "PDE," held at Sebring International Raceway from May 21-23, 2010.
Many clubs and groups hold these PDEs, but the training and safety that Track Guys provides impressed me. I was in Group 1-Novice. This put me on the track with beginners and in the classroom between sessions. Throughout the weekend, I learned a lot about my driving skills, and I left the event an all-around improved driver.
To start things off, all drivers attended a mandatory drivers' meeting Saturday at 8 a.m. sharp, so it's suggested that you have your car registered and inspected by tech the day before. See "Open Track Packin'" (Nov. '10) for a checklist. During this brief discussion, Jeff and Dell went over the agenda for the day, the do's and don'ts, as well as some basic etiquette.
At the meeting, I met my instructor, Jonathan Blevins, Track Guys' chief of Tech and Safety. We talked for a little bit about my driving experience before getting into the GTO. For the first few laps, the instructor took the wheel under caution to guide me through the track. Caution laps do not allow passing and are to be driven slowly. Drivers don't wear their helmets this go-around so that they can easily hear each other.
I listened to Jonathan carefully as he made suggestions for every inch of the track. Once the pair of laps was complete, we switched off and he guided me through the course, this time with me behind the wheel. Soon, we were heading off the track to go to school.
In The Classroom With Jeff Lacina
Track Guys Performance Driving Events are not designed to be a racing school for competitive licensing requirements. It was founded as a way to get car owners out on tracks with their performance vehicles and introduce them to the basics of performance-driving techniques and etiquette, while maintaining a high level of education, safety, and fun.
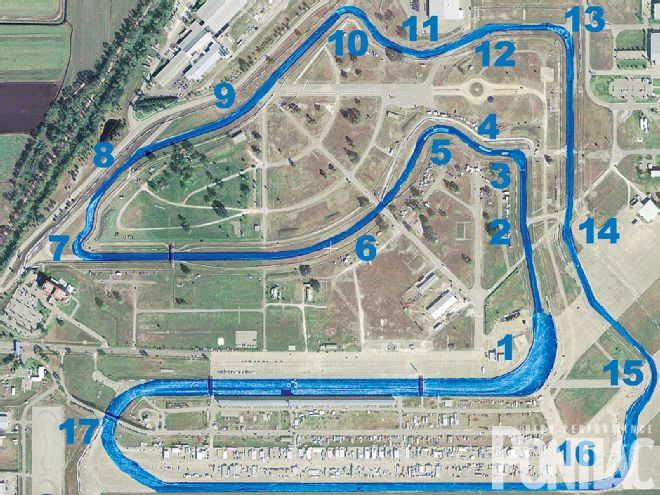 Here is the layout that we used at Sebring. It's 3.7 miles long and has 17 turns with long straights, high-speed corners, and very technical low-speed corners. The course still runs on old sections of World War II-era landing fields that were constructed of concrete sections with large seams that can be quite rough on suspension systems. Thankfully, we had our KW coilover setup tuned up just right.
To accomplish this, class sessions focus on the basics of car control, safety, and performance driving. This is more than enough to keep participants and their cars out of trouble, infect drivers with the performance-driving "bug," and put smiles on their faces. The combination of classroom learning and track instruction will stay with you for the rest of your driving career.
Cornering Terms Explained
The Line: The path your vehicle takes through a corner. You'll hear racers say, "I had a good line on that corner," or something similar. You're always hunting for the best line.
Each of the following terms describes different sections of the turn.
• Braking Zone: The area you will designate for scrubbing the car's speed to turn-in.
• Turn-In: This is where you will begin your turn. If you have turned in too early or too late, it will change your apex and track-out.
• Throttle/Power-on: You want to be back on the throttle at the earliest point you can for each corner; it will be different for each one.
• Apex: The part of the turn where you are closest to the inside. You will begin to return to straight after this.
• Track-out: After you have hit your apex, you will begin track-out, where you leave the turn and complete it.
Vehicle Dynamics
Before I could learn how to incorporate these terms into my turning, Jeff discussed car dynamics-the physics of how your car will behave on the track. Since this was a novice class, only fundamental driving techniques were discussed, but we will also touch on a few more advanced techniques.
Jeff held a model car with a marker in the middle "pivot point" to display what a car does under braking, accelerating, and cornering. The visual clearly illustrates how the vehicle reacts to the forces placed upon it. For example:
Braking: Reduces speed and transfers weight to the front tires. In more advanced techniques, drivers can use the brakes for what's called "trail braking," where the brakes are applied conservatively to help the front tires dig into an aggressive low-speed corner, thereby helping with vehicle rotation.
Accelerating: Increases speed and transfers weight to the rear tires. Accelerate as early as possible to carry the most speed out of a corner. Where and when to apply the throttle will be different for each turn.
 We reserved a garage area in the paddock. This kept us out of the sun and right in the action of the track. It was great to interact with other drivers and hear their comments on the GTO.
Steering/cornering: Transfers weight onto the opposite side of the vehicle from the direction you are turning.
Shifting: Increases or decreases vehicle speed and momentarily "rocks" the car from a rear-weight bias to neutral-something to keep in mind mid-corner. Generally, the fewer shifts you make, the smoother your lap times will become, however, downshifting in certain corners can be advantageous to your lap time. Gear selection also affects the throttle-on point.
Jeff emphasizes the importance of knowing how and when each of these variables can work to your advantage, either independently or in combination. Understand the physics behind the car before you attempt to take a corner at more than 100 mph or it can be pretty risky business.
Once you know how the vehicle is going to react to a tap of the brakes or a quick blip of the accelerator, it's back to the track for the first "hot" session. The instructor sits in the passenger seat throughout the weekend and coaches you through the track, turn-by-turn. It's pretty intense as you start to learn the when and where of power-on-it's much earlier than I anticipated.
Steering Wheel Grip
Your hands should be at the 10- and 2-o'clock position with your elbows bent slightly. Position your seat so that you're comfortable holding the wheel this way-no relaxed gangster lean! Make steering inputs by pulling down on the wheel, not up, and all steering movement should be smooth, not jerky. Keep two hands on the wheel at all times. The only time one hand is acceptable is during a shift, but it should then immediately return to the steering wheel.
Theoretical Apex-Largest Possible Radius
The larger the radius of a turn, the more speed that can be carried through it. With this in mind, you begin to rethink how to take a corner, since the largest possible radius is the fastest way around it. Your turn-in location determines where you apex the corner; a late apex line effectively lengthens the straightaway, allowing you to build more speed.
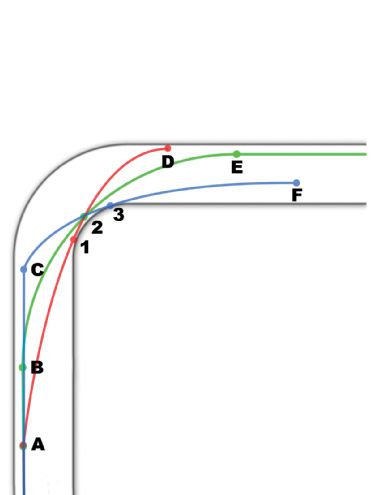 Here is a diagram of "the line" through a corner and the effect turn-in has on the apex and track-out. A shows the red line's early turn-in and apex at 1 ; D is track out. In order to make this turn, speed must be dramatically reduced after the apex. B shows the green's ideal line through the corner with a good apex at 2 and track out at E. The blue line starts off at its turn-in at C to a late apex at 3 and a track-out that is further off at F. This is much more aggressive and involved deep braking into the corner and may possibly lead to more speed into the next corner.
Early Apex
If the sharpest part of your turn occurs after the apex, you have apexed early. This means you can't carry the same speed that you had earlier in the turn, so you must slow down. Early apexing can be dangerous as you will have to reduce speed while you're turning the car, and you can run out of track quickly. Modulating the throttle and brakes properly can get you out safely, but it can be hairy stuff, especially on Turn 1 at Sebring, which can be taken at 80 mph or more in some cars. Early apexing also gives you less straightline braking distance.
Braking And Threshold Braking
Use only the brakes to slow the car down, as they are the most effective and are cheaper than the transmission and clutch. When applying the brakes, squeeze the pedal instead of pounding on it. I had to work on this area-I was braking too hard and near the point of ABS activation. Once I began to apply the brakes smoothly, I was able to feel their limits. This is called threshold braking-braking to the point just short of lockup (or ABS actuation). You will get the best performance out of your brakes this way. Jonathan suggests that only about 80- to 90-percent of the brakes be used because that last 10- to 20-percent may be needed in case of an emergency.
Braking Points
To get the most out of the braking points, use threshold braking. Slow the car enough to initiate turn-in on the proper line that will allow you to get on the throttle as early as possible. This is where the connection of each part of the corner begins. Always brake early and move your braking point closer to the turn-in as you get more comfortable.
Downshifting
Engaging the proper gear before entering each corner is very important. It will alter your throttle-on point and help carry more speed into the next corner. An advanced downshifting technique is called "heel-toe shifting," where you use the heel of your right foot to blip the throttle for a rev match while still pressing in the clutch (with the left foot), and brake with your right toe at the same time. Blip the throttle so that the revs climb a few hundred rpm above what the resulting rpm will be after the shift is made, and then downshift. When done correctly, the balance of the car will be maintained during the shift because it won't lurch and transfer weight unnecessarily as it would with a typical no-throttle downshift.
Acceleration
Once you have committed to your turn-in and the car is headed toward the apex, you can begin to accelerate with a gradual increase in throttle pressure. Don't mash on the pedal-be smooth. Jeff's rule of thumb is to gradually accelerate from your turn-in and be at maximum throttle position at or just past the apex.
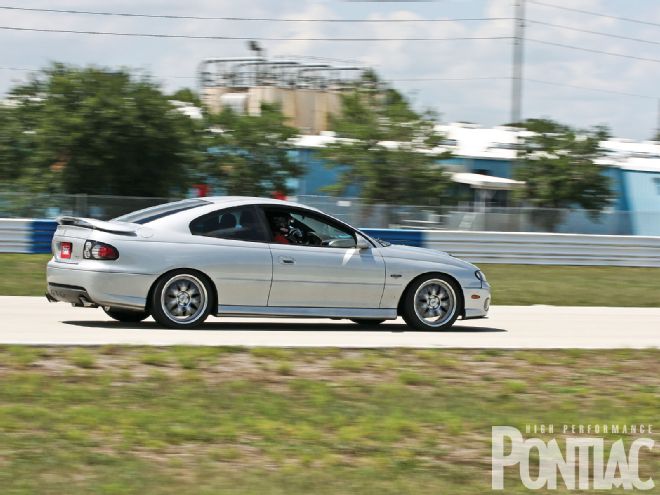
 As the weekend progressed, I began taking more and more elapsed time off my laps. There was no timing equipment because it wasn't a competition, but Jonathan commented on areas: "We were carrying some serious speed through there." Here, I'm entering "The Carousel"-corner 14-which was by far my favorite section of the track because the GTO was traveling at more than 100 mph through a series of corners with my foot to the floor.
Slip Angles
Slip angles are the difference between the direction the tire is pointed and the path the tire (and vehicle) is actually traveling. Knowing how the slip angle affects where the car is going is important before entering a corner and reaching its limits.
Understeer/Oversteer
Understeer (pushing): To the driver, it feels as if the car won't turn-in. You have less traction with the front tires than the rear tires. Understeer/pushing increases the turn radius.
Oversteer (loose): To the driver, the rear of the car wants to come around. You have more traction with the front tires than the rear tires. Oversteer/loose decreases the radius of the turn.
Trail Braking
Trail braking is an advanced technique in which you continue to apply the brakes after turn-in. This helps to keep weight transferred on the front tires, making the rear end lighter. It can be used to assist in rotating/turning the car on low-speed, tighter turns, such as Turn 7 at Sebring. The laws of physics will work against you on a high-speed turn, however, and you risk the back end stepping out. Gradually squeeze on the throttle to transfer the weight back to the rear tires to help stop the car's drift/rotation.
Trailing Throttle Oversteer
Lifting your foot off of the accelerator during the turn will transfer weight off of the rear tires. This will reduce traction and increase oversteer. If done properly, it can help you get out of an early apex situation, where you may have too much speed for the latter part of the turn.
 The Nitto NT01 tires performed brilliantly and were wearing very cleanly at 32 psi. My brakes, on the other hand, were starting to show signs of fade in the late parts of my Sunday sessions. Jon suggested that I look into some brake coolers to help keep the rotors' temperatures down.
Skid Control
Learning to detect when your tires are losing traction or feeling like it's "coming around" is very important, and knowing what to do will keep you safe. Maintain constant throttle application while keeping the front tires pointed in the direction you want.
In more extreme skids, often called "less than total loss," ease slowly out of the accelerator and keep the tires pointed the direction you want to go. Note: This steering correction will catch the car from further skidding, while keeping you on the preferred driving line.
Agricultural Driving
The fear of driving your car off the track is usually the cause of any serious car damage at PDEs. If your car is going to drop two or even four wheels off-track, don't fight it. Just drive it off. The biggest risk of an incident comes when you violently try to correct. Gradually ease off the throttle and allow it to settle. Once you have regained control, check for oncoming traffic and smoothly re-enter the track surface.
Total Loss
Let's face it, there is a risk of a total loss, but you shouldn't fight it if you do lose control of your car. Jeff advises you to put both feet in-left foot clutch, right foot brake-to help control it. "Locking the brakes during a spin helps stop the spin, and that means your car will travel in a more predictable direction," he says.
Passing
Since this isn't a competition, passing can only be performed in designated passing areas. It's strictly forbidden to pass in corners or without signaling. The car being passed must signal to the driver trying to pass as to which direction he or she wants to be passed. In order to show this, the driver sticks his or her arm out and above the car, and points to the direction in which they wish to be passed. Once they have done this, the car being passed must let off the throttle and then hold their line until the other car has cleanly passed.
If the slower car does not acknowledge the faster traffic, a corner worker may throw out a passing flag. If that is also ignored, the driver may risk being black-flagged and will be forced to pit-in so he can get an earful from someone on the track staff. So just let other cars pass you if you're going slower or don't feel comfortable being close to another car on track.
Pit-In
Clearly, you have to reduce your speed to safely make it into the pits. To let everyone around you know that you wish to pit-in, raise a fist out the window and hold it above the roofline. The car behind you will see it, and the corner worker near the pit will wave in acknowledgement.
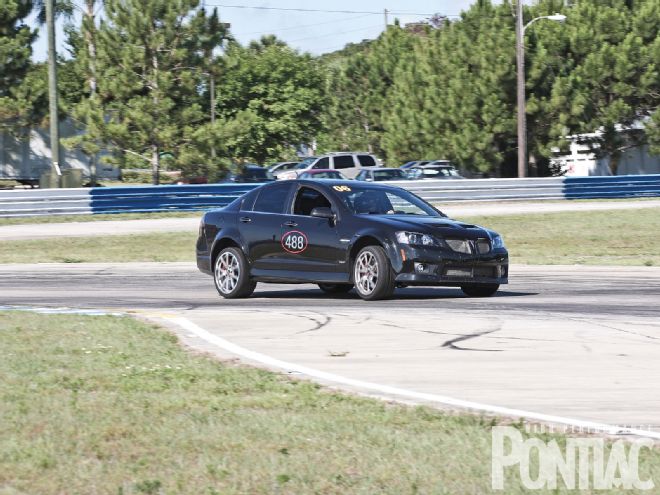 It was nice to see that my GTO wasn't the only Pontiac out there. Here is an '09 G8 GXP being driven by instructor Mike Buono.
On Track
This is where you apply what you learned in the class and your instructor can assess your level of skill. Jonathan gave me simple things to work on as we went around the historic circuit. At times, it seems overwhelming, but your knowledge continues to build until you're just doing what you're told naturally instead of having to think about every action.
Jonathan used simple hand gestures for braking, throttle-on, and how to approach the next corner. He also explained what instructors look for to assess the drivers' progress throughout the weekend. Slowly everything comes together and you start to become smoother and smoother with your hands and feet, as they try to work together with your eyes, hands, and brain. Since you normally have five 20-minute sessions a day, there is a lot of time to make adjustments to your driving.
Conclusion
Since childhood, Sebring International Raceway has mesmerized me. My uncle's office and garage were dressed with photos and posters from Sebring's vintage races that showcased some incredible machines. I would spend hours dreaming about piloting a Porsche 962 GTP around the high-speed corners of Sebring.
When I learned that any car could go out there and do it, I knew I had to take my Trans Am. I had the chance to take it out a few times for parade laps when I photographed several racing events down there. That fueled my passion more, and I decided to hunt down a new GTO for its IRS suspension and manual transmission (my T/A was an automatic), and make the Pontiac handle as well as I possibly could.
As you have presumably read in the pages of HPP, the GTO has come a long way. Once I was invited out and my car was ready for the track, it finally hit me-this has been one of my lifelong dreams. Your dreams of driving on a famous road racetrack in your Pontiac can come true, too, thanks to Track Guys Performance Driving Events.
Thanks to Jeff Lacina and Dell Hughes for helping me achieve my dream while teaching me how much fun I can have behind the wheel of a Pontiac. Also, special thanks to Jonathan Blevins for being a terrific, well-educated instructor. What he taught me over the weekend will apply to all future driving.
Visit www.highperformancepontiac.com to view the "Open Track Packin'" video, recorded with a GoPro Motorsports camera.
"Hanging the Laundry"
Identify where every corner worker is while you proceed through the opening caution lap. They will be your eyes and ears around the track as they display the flags. It's very important that you understand each of the flags and what they mean. Without them, corner workers, track staff, and sometimes even other drivers have no easy way to communicate with you. A simple showing of a flag can let a driver know if their car has a mechanical failure, someone is trying to pass, debris is on the track, or to proceed with caution. It's also very important that you know where each of these flags is located, and it's proper etiquette to acknowledge the corner workers when you can-a simple wave will suffice.
Instructor's Notes
One of the first things you learn as an instructor is that every student is different-different backgrounds, natural skill levels, and ways of learning. So the first thing is to get to know the student, and his or her background and car. It's hard to push a student to the limit if you don't have any info on the car. One also needs to know how much experience the student has with the car in its current condition. Take Kevin's car as an example. Knowing it had the suspension and brake upgrades allowed me to push him harder and trust the car would continue to perform throughout the weekend.
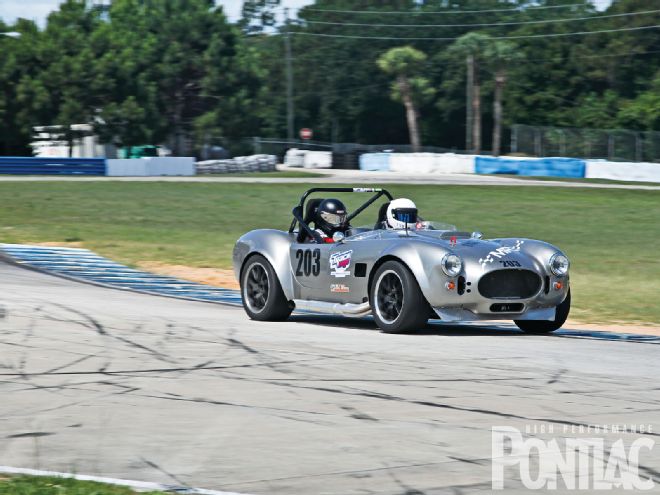 One of the more memorable moments of the weekend was when were told to ride along with our instructor in his own car. As it turns out, Jonathan had an uber-cool Factory Five Cobra racer that would pull your face off in the corners.
Once behind the wheel, we started out with the basics-look ahead; be smooth with steering, brakes, and throttle, and of course, the line. Kevin, having some previous experience, was already doing most of this well. We did have to work on braking. Saturday morning he was a little too aggressive with the pedal, braking too hard and not releasing the brakes smoothly. We also had to work on his line, shifting, and being consistent with his entry speed. All of that sounds like a lot, and I'm sure at times for him it seemed like a lot, but he was actually doing quite well and was getting to pass some very nice hardware.
Throughout the weekend, we tackled most of these issues and Kevin's confidence continued to grow. Sunday afternoon I began to evaluate whether Kevin could be solo certified, giving him less and less coaching, letting him make mistakes, and seeing if he would identify and correct his errors before he got in over his head.
I was also watching to make sure he was seeing the flags and working well with the other students, both in passing and being passed. He was doing very well; if we had another session, I would have let him take at least part of the session solo. He could definitely be solo next time, although I would recommend an instructor for the first session just to make sure it is the same Kevin we had at the end of the weekend.
For next time, Kevin needs to work on heel-toe shifting and getting every corner right every time. He was beginning to learn about the effects of getting one corner right and how that additional speed would affect the next section of track. Basically he just needs seat time.
As for the GTO, the next step I would like to see is safety equipment. At the speeds the car can achieve, it really should have a four-point rollbar and maybe some nice race seats. Both of those are really big steps for a street car, but when heading into a corner at 135 mph, you begin to think maybe the inconvenience would be worth it.
Brake cooling would also be nice-during some of the longer sessions we were starting to run out of brakes. This will really come into play as Kevin gets faster. After that, everything is a compromise.
Of course, this is from an instructor-I want the car to be safe and consistent so the student can get as much seat time as possible. Everyone always wants to go faster and the GTO would handle and enjoy another 30-50 hp, but any more than that and you have to start thinking of the effects. You throw 100 hp at that car and then it will need a bigger radiator; possibly an oil, trans, and diff cooler; and most likely bigger brakes. It is truly a slippery slope. For track duty, you always have to look at the big picture. - Jonathan Blevins