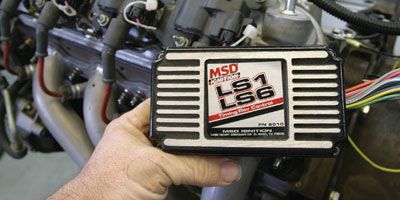
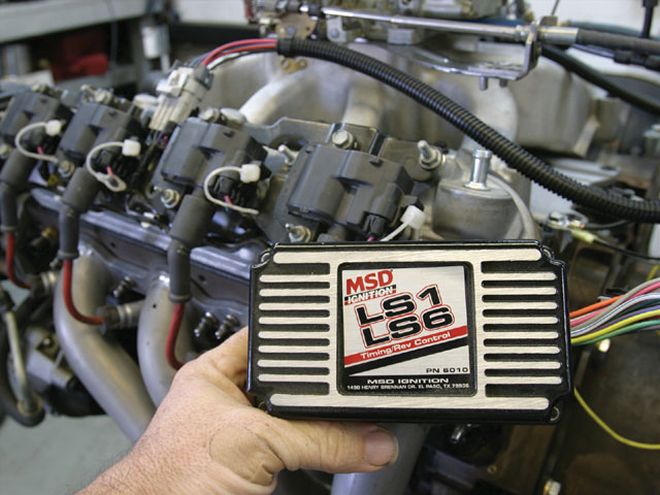
 This little box is an extremely powerful controller for any retrofit carbureted Gen III/IV engine swap.
'The new darling of the engine-swap set is the GM Gen III family of small-blocks that includes everything from the lowly 5.3L truck engine to the LQ9 6.0L all the way up to the swarthy Corvette LS7 427. But not everyone demands EFI sizzle with his Gen III steak. Capitalizing on that concept is the amazingly simple MSD Ignition conversion box that allows you to stick a carburetor on an LS1 or LS2 while still employing the very accurate GM distributorless ignition system (DIS). We've rubbed our greasy paws over this system several times, and it is so incredibly easy to use that there's no excuse for even considering adding a cumbersome distributor to the Gen III/IV engines. You don't even need a laptop computer if you don't want to get into that. If you can fog a mirror, you can plug in one of these boxes and supply accurate spark to any Gen III/IV engine. We'll run it down, and you can decide if it's cool.
The Background On DIS
Any good race-engine builder will tell you that a distributor is not the best way to accurately assign spark timing to a multicylinder engine. A computer triggering a coil per cylinder is far more accurate, which is what GM did with its Gen III-and-later engines. This type of electronic spark requires a few additional sensors, including a crank sensor to tell the box when the No. 1 cylinder has arrived at top dead center (TDC) and a cam sensor that tells the box when the No. 1 cylinder is on its firing stroke (remember that a piston on a four-cycle engine passes through TDC twice).
For those car crafters who would rather run a carburetor on a Gen III/IV engine, MSD created the original LS1/LS6 timing control box. Later, when GM upgraded the Gen IV engines by converting its original 24x crank-trigger wheel to a 58x, it required a new box, which MSD calls the 6LS-2 controller. Both of these boxes do essentially the same thing, creating finite control over the spark advance, vacuum or boost retard, multiple rev limiters, and even custom advance curve, all with a few minor keystrokes. Or, for those who have never overcome their fear of computers, the MSD boxes also come with six different plug-in chips, each with its own basic timing curve. On this level, the MSD conversion box is plug 'n' play at its finest.
The Hookup
OK, if this works so slick, it must take a computer science major to hook it up, right? Well, if a mere eight connections scare you (10 if you want the two-step and nitrous-retard features), perhaps that might be true. But this is really easy. Five of the connections consist of GM-style Weatherpak connectors with two that plug into each of the two coil packs, a three-pin connector to the cam sensor, another three-pin to the crank sensor, and the last Weatherpak connection to a manifold absolute pressure (MAP) sensor. Each connector is designed to plug into only its intended sensor so that they're goof-proof. The last three wires consist of a ground, a switched 12-volt power lead, and a tach lead. Hook those up, and the installation is complete except for mounting the box. Then just plug a basic timing-curve module into the side of the box and you are done. The only way this will get any easier is if somebody does it for you.
Custom Tuning
Assuming you're a card-carrying car crafter who prefers to create your own timing curves, and you're not afraid of using a computer, this little timing sojourn should show you how quickly you will be able to fine-tune your engine. There are two MSD timing graphs on a single screen. The lower screen is the mechanical advance curve where you set the initial timing, the rate, and the amount of total advance at wide-open throttle (WOT). The upper screen configures both the amount and rate of vacuum advance, which occurs at part-throttle with manifold vacuum. The MSD software also offers a three-pod gauge package that indicates engine rpm, total ignition timing, and engine manifold pressure in psia (pounds per square inch absolute). For normally aspirated systems, we would have liked to see the gauge and graph in inches of mercury rather than in psia, but the gauge does work well when working with boost pressures from a supercharger. To keep all this straight, we've included a simple conversion table.
By changing sensors, this same system can also read positive manifold pressure for boosted conditions. The term "bar" refers to barometric pressure (14.7 psi at sea level). A 2-bar MAP sensor, for example, can read up to 14.7 psi of positive manifold pressure (boost). Using a positive pressure MAP sensor, the MSD software can be easily configured to create a simple boost retard. This allows the tuner to create an aggressive ignition curve until boost is obtained, and then a given amount of timing retard per psi of boost pressure can be achieved.
The MSD control boxes also offer a two-step rev-limiter system with a low-rpm limiter that can be used for burnouts or as a launch limiter along with a high-rpm limiter. The low-rpm limiter for the two-step simply uses a blue wire connected to a switched 12-volt source. The upper-rpm limiter works anytime the engine is running, and both of these rev positions are completely adjustable. There's also a step retard (a pink wire connection) that is adjustable from 0 to 15 degrees in 1-degree increments when 12 volts are applied to the wire. It works as a single-stage retard feature when nitrous is triggered.
In the past, you would have had to purchase multiple MSD modules, retard boxes, and window switches to get all the features that this one box offers, not to mention the accuracy of DIS plus the ease of using a laptop to configure all these data points. It's the beauty of electronics that a simple little box half the size of an MSD-6A can perform all these cool functions.
CONVERSION TABLE Pressure in psi absolute Inches of mercury 5 10.2 10 20.3 15 30.6Ignition Curve Basics
Basic ignition timing can be a bit confusing, so let's dig into the meat of all this to make it less intimidating. We'll start with initial timing. This is indicated on a timing light on the harmonic balancer with the engine at idle. For most performance engines, initial timing is around 10 degrees before top dead center (BTDC). Next, we'll address mechanical advance. Most mechanical-advance distributors can generate around 25 to 26 degrees of total mechanical advance. This is created by a pin moving in a slot in the advance plate of the distributor controlled by a combination of weights and springs. When you add an initial-timing figure of 10 degrees with 26 degrees of mechanical advance, you get a total advance of 36 degrees.
The springs and weights in a mechanical-advance distributor determine the rpm at which the advance curve begins and ends. Basically, heavy weights with light springs begin and end the advance curve at a lower rpm. The same weights with heavier springs require more rpm to eventually create the same total mechanical advance, which requires a higher rpm to achieve maximum timing. The total mechanical is determined by the length of the slot and diameter of the pin. For most street engines, a good curve should have achieved total mechanical advance by 2,800 to 3,000 rpm.
Vacuum advance is used to create additional ignition timing at part-throttle, light load conditions when there is very little cylinder pressure. Low cylinder pressure requires advanced ignition timing because the air and fuel in the cylinder are less dense, which means it burns slower. A vacuum-advance canister located on the outside of the distributor is connected to a ported manifold vacuum source on the side of the carburetor that sends manifold vacuum to the canister only after the throttle is opened slightly. This prevents creating vacuum advance at idle. The travel created by the vacuum-advance canister pulls on a plate in the distributor that advances the ignition timing. Adjusting the amount of travel is one way to adjust the amount of vacuum advance. This timing is only added at part-throttle. As the throttle opens and load is applied, manifold vacuum drops, reducing the amount of vacuum advance. At WOT, there is minimal manifold vacuum and no vacuum advance.
Each engine is different in terms of when and how much timing it needs. This is where tuning comes in. By messing with total advance for maximum power and vacuum advance to optimize cruise efficiency and fuel mileage, you can create a very happy street engine that runs better and uses less fuel, all without spending much money.
PARTS LIST DESCRIPTION PN SOURCE PRICE MSD 6LS-2 controller 6012 {{{Summit}}} Racing $357.10 MSD LS1/LS6 controller 6010 Summit Racing 312.70 MSD extension harness 60101 Summit Racing 184.10 MSD handheld monitor 7550 Summit Racing 154.{{{80}}}