There’s something about a stock flat hood on a scary fast street car that puts a smile on our face. The flat-hood look preserves the car’s stock proportions, but more importantly, it sends the signal that nothing very important is going on below deck. A fast car with a flat hood will catch the competition napping, and while it might not always be the fastest car on the street, it damn sure will be the most surprising.
We’ve always wanted a flat hood for our ’68 Plymouth Valiant, but despite our best effort, hiding a 500-inch Indy Wedge with dual-quad induction below the stock bonnet proved impossible. Running the fat block with no air filter would’ve technically made it possible, but the rapid engine wear this would’ve created would be mechanical suicide. Instead, we caved in and cut a hole in the hood for an Edelbrock dual-quad air cleaner. Bye-bye, flat-hood dreams…
We moved on to improve other areas of the car, vowing to fix the hillbilly hood hole later on. In the meantime, we searched for options, looked to see what others had done, and asked for opinions. In the Mopar world, there are lots of choices, with various stock and modified versions of Max Wedge, Six-Pack, and Hemi hoodscoops available. Since there never was a high-performance version of the Valiant to draw inspiration from, we were at a fork in the road—either do something appropriate for 1968, or do something appropriate for a Duster, the logical successor to the Valiant.
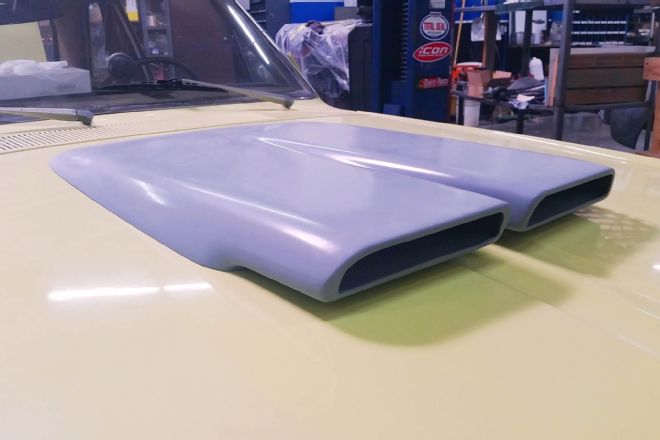
In the end, we chose a dual-snorkel Duster-style scoop from Stinger Fiberglass. The reality is, the body lines of a ’67-’69 Valiant are identical to a ’70 Duster up to the B-pillar door post, and the dual-snorkel hood is the least intrusive of all the choices. In speaking with Stinger, we managed to convince them to build a product they didn’t yet offer. Stinger’s existing bolt-on Duster dual-snorkel scoop is contoured to fit a peaked hood, while the Valiant has a recessed channel in the middle. Stinger owner Artie Schricker liked the idea of a Valiant-specific version and agreed to mold one to fit the Valiant’s recessed hood contour using a Valiant hood they already had.
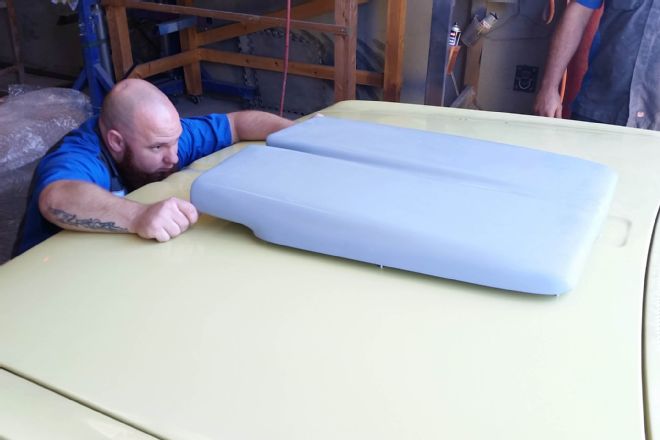
Once our scoop arrived, we unboxed it and set it on our Valiant’s hood. We noticed two things: the build quality on it was superb with the Valiant center channel properly filled, and the dual-snorkel’s lines were going to nicely complement the Valiant’s shape. Unfortunately, we also noticed that even with the scoop, our super-tall Edelbrock air cleaner was still going to interfere. The tall Indy Mod Man intake, deep-breathing dual-quad Edelbrocks, and ample dual-quad air cleaner was indeed a formidable combination to mask from public eye, but we were determined. A taller Hemi or Six-Pack scoop would certainly work visually and clearance-wise, but the smaller, shorter dual-snorkel scoop looked so good, we decided to figure out a work-around for the air cleaner.
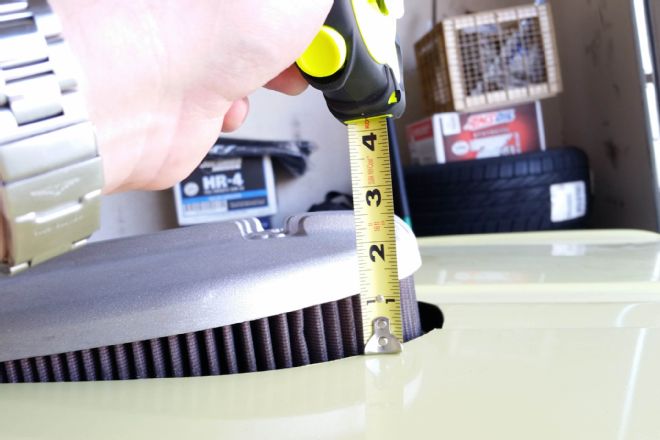
A close-up look at the Edelbrock air cleaner and a bunch of measurements later, we calculated that we needed the top of the air cleaner lid to be 1.25 inches lower for it to safely clear the dual-snorkel hood. As it so happens, we had Aaron Bedrosian, a good Mopar buddy with a machine shop, who you might remember as building the ’39 Willys gasser on our Mar. ’16 cover. Aaron took the base and lid of the Edelbrock dual-quad air cleaner to his Bridgeport and machined the cast-in ribs off the lid and 3/8 inch off the bottom of the base, then mediablasted the top. The finished piece looked stock and cleared the throttle linkage with an eighth inch to spare. Kudos to Aaron for helping a fellow Moparite out!
Since we are still a year or three away from a full-on paintjob for the Valiant, yet we still wanted the scoop to match the rest of the car in the short term, we needed an easy paint solution for the scoop that didn’t cost bank. Right about that time, we heard of a new company in Louisiana called AutomotiveTouchUp.com (ATU). ATU has built a neat little boutique business around mixing custom micro batches of urethane enamel aerosol spray paint in 12-ounce cans, and their forte is matching factory paint codes. (Their website pushes a two-stage color basecoat/clearcoat strategy, but they also do high-gloss single-stage paint by request, which is what we wanted to better match our pre-1980 car.) We figured we had nothing to lose—at the worst we’d have to live with a minor color mismatch for three years. We called them up, gave them the SS1 Sunfire Yellow code off our body tag, and a couple weeks later we got four 12-ounce cans of high-gloss single-stage enamel at $19.95 each. We also ordered a variety pack of wet-sand abrasives, a flexible sanding block, a handy spray can trigger, and four cans of build primer at $7.95 each. Our total bill for paint supplies from ATU: $123.45. That’s slightly less expensive than dropping the scoop off at a body shop, but we’d also planned to have some extra touch-up paint for the doorjamb repair we’ve got coming up.
At this point, things were ready to rock; mark the hood for drilling the holes (the Stinger hood already has threaded studs built-in), test-fit the scoop, scuff it, prime it, sand it, then shoot it with single-stage color. All this can be done in your home garage in half a day, but the need to capture photos and video footage meant your author needed some help to document it all. When we approached Motech Performance in Murrieta, California, to help us, their response was understandable. (“Sorry, but we don’t do spray-paint jobs!”) Motech is the real deal, so their help was only secured with the promise that we tell you they do not do this kind of work!
Still, the scoffing and undisguised contempt for the ATU spray paint in the morning eventually turned into begrudged admiration—if not praise—by lunchtime when the color coat was drying. No, Motech isn’t going to paint a Mopar with spray paint anytime soon, but they were surprised how well it matched our 20-year-old cheapo acrylic enamel repaint. All agreed that the slight color variance seen was a product of the earlier el cheapo repaint, not the ATU paint.
We rolled video as the scoop was bolted in place the final time, and wondered if the dual snorkel would pass the sniff test. It kind of looks like grandma’s Valiant mated with a small-block Duster (original snorkel hoods strictly fed small-blocks). A Hemi or Max Wedge scoop would certainly arouse more suspicion, with a Six-Pack scoop eliciting almost as much scrutiny. Yes, the dual snorkel hood will raise a few eyebrows, but we think it maintains much of the ubiquity of the stock hood. They’ll suspect a breathed-on small-block, not a 650hp Wedge. Mission accomplished!
 Our first fork in the road came the fall of 2014: Do we discard the Indy Mod Man intake and dual-quad Edelbrock carbs, and put a less-potent, shorter induction setup on, or cut a hole in the hood and let it all hang out redneck style? You see what we chose!
 After some searching, we selected a bolt-on dual-snorkel hood scoop from Stinger Fiberglass for $325. Out of the box, we discovered it still wasn’t tall enough to cover the huge big-block and its Edelbrock Classic Series dual-quad air cleaner kit (#41199).
 Rather than give up on the cool Duster-style scoop, we decided to do surgery on the air cleaner base and lid. In these before-and-after shots, you can see how the cast ribs and Edelbrock script on the air lid stood too proud before being machined flat.
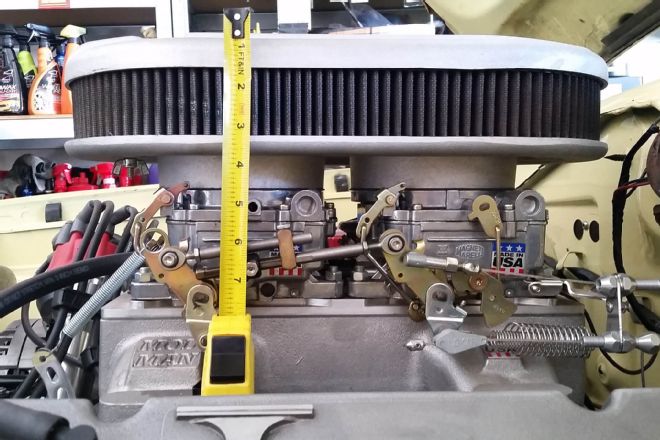
 The air cleaner base before amd after: Notice again how much space there was between the carb linkage and the bottom of the lid. In milling the air cleaner base 3/8 of an inch, it was critical not to cut too much and create interference with the carb linkage—a potential safety issue.
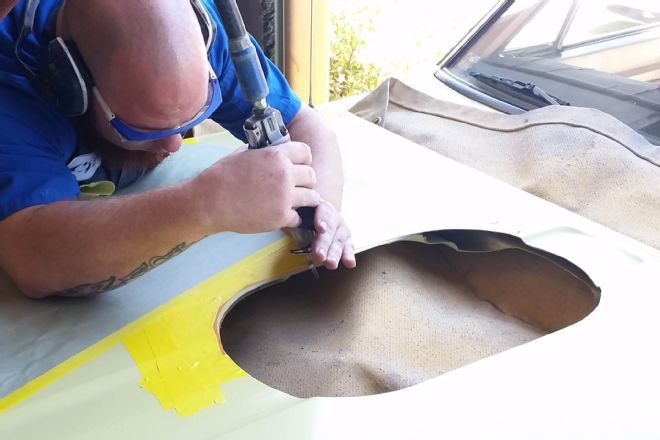 In lowering the air cleaner, the lid (which is wider than the air cleaner by a quarter inch) came into direct interference with the edge of the hood during episodes of engine torque, so it was widened.
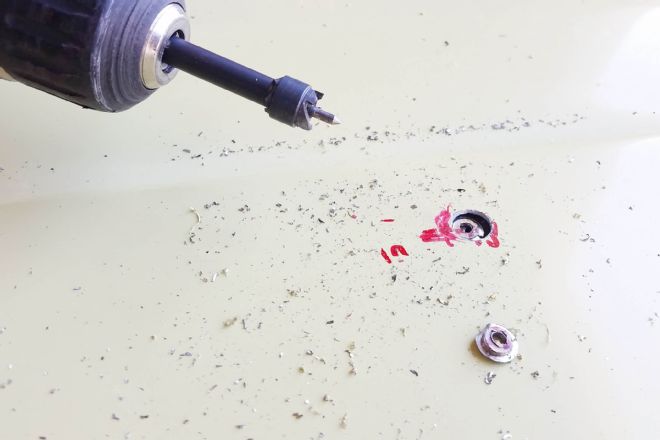 We went the bolt-on route with the Stinger dual-snorkel scoop, which means creating a series of holes in the hood. Set the scoop on the hood in its final position, mark the stud positions with a Sharpie, drill small pilot holes, then use a 3/8-inch hole saw to cut the holes (shown). The idea here is to not cut all the way through the underlying support.
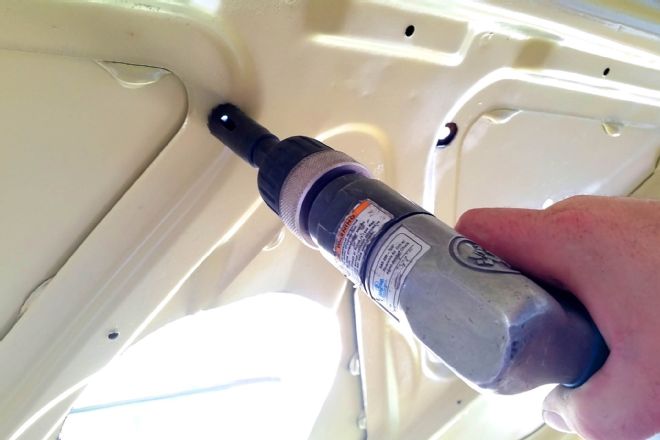 From under the hood, use a ¾-inch hole saw to cut the support structure holes. We chose this size so that a socket could fit comfortably inside. Some of the hood scoop fasteners will need this while others won’t—it will depend on your hood, your engine, and the location of your scoop.
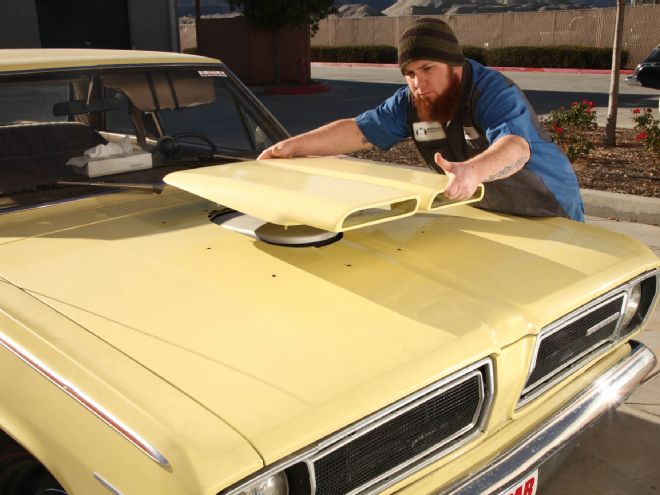
 Using some flat washers from the bottom, we bolted the hood to the Valiant for the first time to check the fit and overall presentation. We still needed to check the air cleaner clearance, and barring any problems, lay on some color.
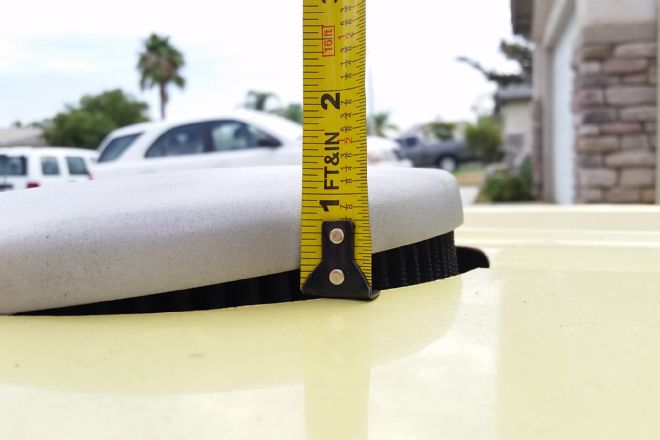
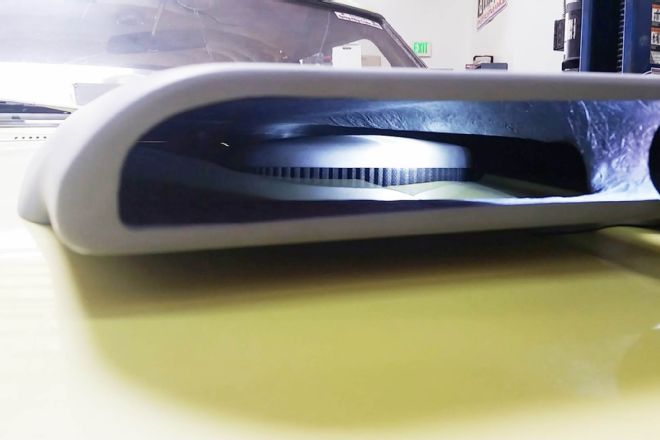 Our hard work massaging the Edelbrock dual-quad air cleaner paid off as we had a quarter inch to spare. We’d love it if Edelbrock would build a low-profile version of their 41199 kit for situations like this. All the other air cleaner solutions we found didn’t have enough filter height, filter circumference, or overall surface area to support our power level.
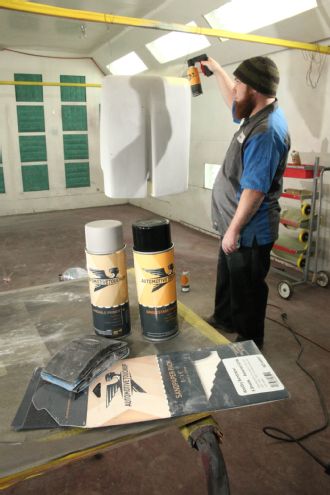
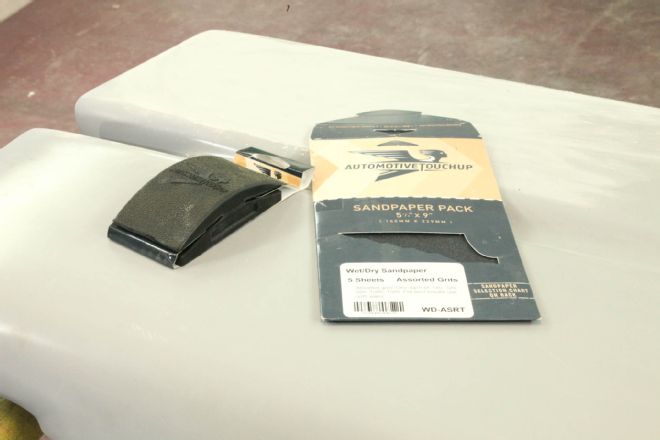 Although our Stinger scoop came in a smooth gelcoat primer, we decided to scuff it up for better adhesion for the build primer and color coat that was to come. AutomotiveTouchUp.com (ATU) sent us a multi-pack of abrasives and a rubber sanding block to do the job right. Some 320-grit dry paper gave us the bite we needed for the primer coat.
 Motech’s head body shop guy, Casey, is not a spray can fan, but the ATU stuff sprayed out beautifully, thanks to a flat fan spray nozzle and the ergonomic gun trigger. One criticism we had of the ATU primer is that although it’s billed as such, it’s not really a high-build primer, which would be far better for filling in the imperfections of a fiberglass piece like this. We did eventually get enough primer on.
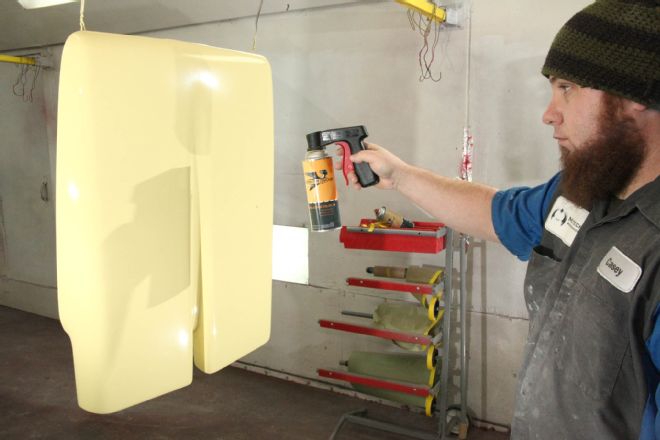 This doesn’t show it as good as the video, but the ATU nozzle has a nice wide fan spray pattern. After a slight fog coat over the sanded primer, Casey laid two full coats of Sunfire Yellow, the last one as heavy as possible to maximize the gloss. (A heat gun aided this effort as well.) We did not want to wet sand the finished product.
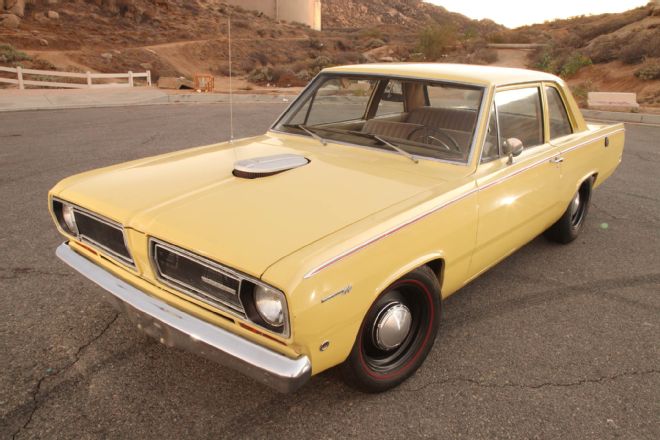
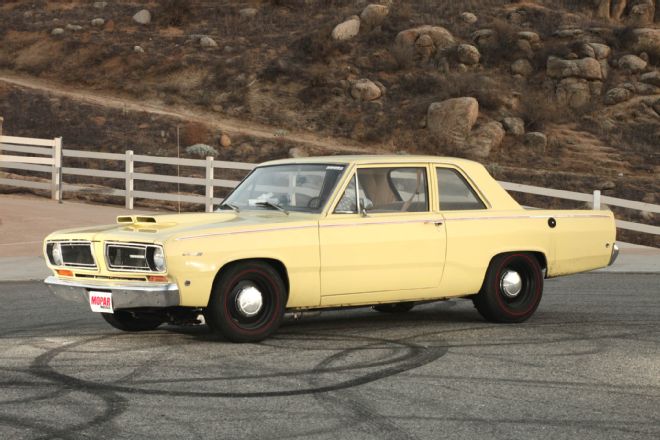 Considering our Valiant is a main street mauler, not a car show baller, it looks pretty good now with the painted scoop. The casual observer can’t notice any color difference, but most people who know Mopars say the ATU spray paint is closer to the OE Sunfire Yellow color than our car’s 20-year-old repaint. Based on the result, we’d certainly do it again. The Stinger Fiberglass scoop adds to the car without looking goofy or calling too much attention to itself.