
 While one person can apply the majority of the decals, the hood bird requires at least two. The biggest trick to correctly applying automotive decals is soapy water on a clean and degreased surface. It serves as a barrier between the decal's adhesive and the car, temporarily deactivating the glue. This allows you to slide the decal in place without it sticking. Once the position is set, the water solution gets worked out (along with bubbles) of the decal. Spraying a little on top of the decal will also help lubricate the plastic spreader, making sure the decal doesn't tear or snag. No amount of soapy water will resurrect a crease, so be careful. If you do get a small wrinkle, snag, or bubble, don't freak out-there are fixes. But a really bad wrinkle can ruin a decal job, and replacement may be the only option.
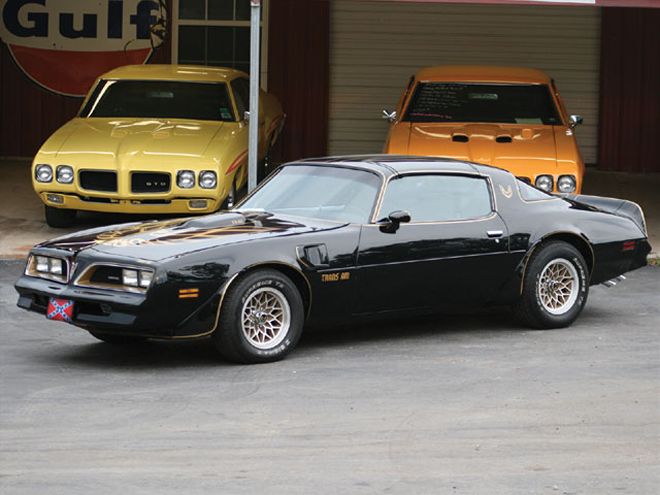
What makes a Trans Am a Bandit? While the general public believes any black late-'70s Trans Am to be a Special Edition Bandit car, in reality, Pontiac never made even one. The moniker came from the car's movie association with Smokey and the Bandit in which black Pontiac Trans Am SE (Special Edition) cars were used for flipping, pitching, and the wooing of cutesy girls in cutoff shorts.
The SE cars, coded Y82 for T-tops and Y81 for standard-roof models, were built from 1977 to 1978, while Y84 represents the '79-'81 SE models. There were two primary colors: black and gold. The gold SE models, which were coded Y88, used the same stripes and trim as the black cars. There was also a silver SE model in 1979 to celebrate the 10th anniversary of the Trans Am. The black cars, however, are the only ones associated with Smokey and the Bandit. An interesting side note is that while most of the cars in the movie were SE models, a few non-SE cars were slipped in.
With the increasing popularity of these cars, especially since the 30th anniversary came around, restoring an SE car has never been easier. Specialty restoration stores such as Original Parts Group and Year One have tons of parts to help with body panels and interior, but what about the distinct graphics? The SE cars were heavily garnished with gold stripes covering every panel, not to mention the giant screaming bird on the hood, so to be cool, you're going to need to get them right. We've found that Phoenix Graphix offers what most consider the most complete set of correct TA graphics on the market. We say correct because most other kits come with multipiece hood birds. Placing the hood graphic is difficult enough without having to match three pieces together. The original hood decal was one piece, so it should be replaced with a one-piece bird.
Installation is only part of the process. There are things you need to know before ordering a kit. There are two styles of SE graphics: '77-'78 and '79-'81. The early SE used an Old English script, and the later SE used block-style lettering. In addition, the engine originally installed in the car makes a difference. The hood Shakers were marked with either T/A 6.6 or 6.6 Litre. The T/A 6.6 was used on cars installed with the Pontiac 400 engines, which have a Z listed as the fifth digit in the VIN. For those who lived in California or high-altitude locations, the Oldsmobile 403 engine notated by a K as the fifth digit in the VIN was offered and marked with the 6.6 Litre decal. The Olds 403 cars are quite rare, with only about 1,200 T-topped Y82 SE cars produced in 1977. You can also have the 6.6 Litre decal with the optional L78 400 engine.
The factory didn't specify a measured placement for the decals, though there are some general guidelines. The hood bird should be centered on the hood, and the Phoenix Graphix decal uses notches in the paper to locate the centerline. The front-to-rear placement is a little different. The tail feathers should rest about 1 inch above the front of the hood. The bumper and fender lines are more generic; these are placed in approximate locations. The rear decklid decals are centered, side-to-side on the panel. The hood Shaker decal should be placed just below the radius of the top and about 1/2 inch past the back of the Shaker (toward the windshield). The double-line striping will take the longest, as there are a couple hundred feet of it on the car.
We followed along with Fred Murfin and the guys at Red Line Auto Sports in the process of striping a '79 Y84 SE Trans Am. The car had been repainted and was in need of fresh decals. The entire process took about four hours. These guys have done quite a few of these jobs, so experience shaves time off a project like this. Expect to take a full day if it is your first time applying decals.
Yipes, StripesRight after we finished the work on this project, Phoenix Graphix told us about a new version of the SE stripe kit. This kit simplifies the installation by providing the stripes in a placement-style layout, where each piece is laid out on a single sheet with placement and positioning instructions-something that was not previously available. By the time you read this, the new kit should be readily available from Phoenix Graphix.