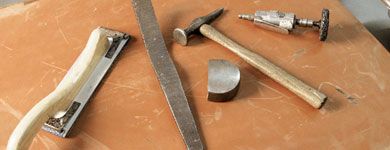
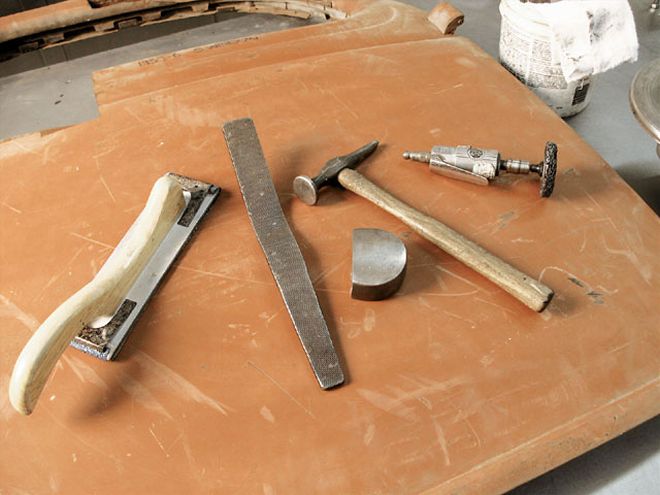
 We could come up with a list a mile long outlining all the various tools related to bodywork, but unless you have the room for storage, let's stick with the basics: Sanding blocks (long/short, solid/flexible), body files, hammers and dollies, and a good pneumatic grinder will get you started.
Removing a dent doesn't seem all that difficult, does it? Well, you'd be amazed at how many so-called professional bodyworkers there are in the world today who don't quite understand what it takes to properly repair a damaged metal surface. Even with the best tools and equipment, if you don't have a good understanding of the situation at hand to begin with-that being the particular distortion of the metal-you might as well just stock up on plastic body filler and sheets or rolls of sandpaper.
Having set the workbench, so to speak, this is the first in a series of stories we hope to bring the readers of Street Rodder. We have enlisted the help of Cole Foster of Salinas Boys Customs for this help. The idea behind the series is to show you average rodders how to do your own bodywork. You may not be ready to chop a top, section a body, or channel over a pair of framerails, but you can learn the easy stuff, which surprisingly makes up a great deal of effort in any street rod.
For every action, there's a reaction. Don't just remember that; permanently etch it in your brain, because that's the basic principle you're working with when repairing a dent. The first action is the actual creation of the dent itself-that action not only resulted with a visible recess in the surface but most likely stretched the metal, as well. Additionally, when the metal was pushed in, it could have also caused the outer perimeter of the surface around the impact to push out. In essence, the reaction is that the composition of the metal's molecules has been disrupted; your job is to restore order and return the molecules to their original position. So, your first reaction is to pound that dent back out. Unfortunately, that's where many people stop, relying on body filler to handle the rest. That initial reaction may have brought the dent back up, but if the metal was stretched in the first place, the surface needs to be shrunk in order to achieve the same plane that existed before the dent occurred-and without the use of excess Bondo.
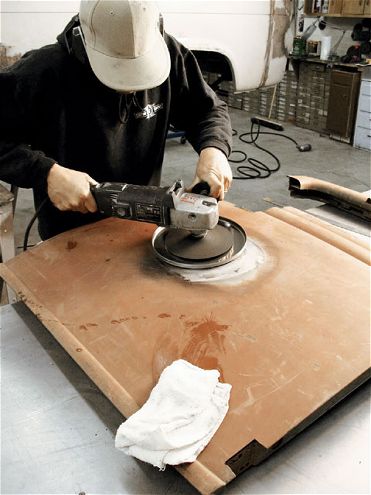
The shrinking aspect of dent removal is probably the most important, but it's obviously probably the most least understood among nonprofessionals. Up until recently, heat from a torch, along with intermittent cooling from a wet rag and/or use of a hammer and dolly, was the common practice used for shrinking. Many metalworkers still prefer to use a torch, as they find some of the new methods can remove metal in the process of shrinking. Another option is using a shrinking or friction disc-but just as with a torch, providing too much heat can create problems, so it's vital the user be very familiar with how the disc works. But, because modern shrinking discs are effective, easy to use, and fairly economical, that's what we'll demonstrate. Many folks may be familiar with Sunchaser Tools' Friction System (www.sunchasertools.com), but you should also be aware that you can obtain shrinking discs at autobody supplies and even online, on eBay and the like, for less money. Either way, avoid going with the smaller-diameter discs (4-1/2- and 5-inch), as those are meant primarily for working with small areas-stick with the 9-inch discs, which obviously means you'll need a 7- or 9-inch grinder, too.
Regardless what method of shrinking you chose, you'll still need a good hammer and dolly set. For occasional use, the inexpensive sets you find at places like Harbor Freight are OK, but invest in better-quality tools if you plan on doing more than just a couple jobs a year. While the cheap ones may appear to be the same as the more expensive ones, the difference is in the metal; softer metal will succumb to repeated use a lot quicker than harder metal. Additionally, consider outfitting your tool arsenal with a slap file (also known as a body file), pneumatic tools, and sanding pads and abrasive discs.
To what level you take you metalworking skills is solely up to you. However, just by learning how and why metal does what it does, you can control the outcome of what it does for you. Whether you're working with contoured, high-crown surfaces or flat panels, take the time to understand the metal before you start pounding on it. That knowledge is the best bodyworking tool you could ever obtain.