The '67 Camaro seen here was in pretty decent shape before it went into the paint booth for a new coat of red, so its owner carefully removed the grille, RS headlight doors, taillights, emblems, molding, and other trim pieces, figuring he'd remount them when the paint job was finished.
Guess what? When the car came out wearing its fresh paint, those "decent" trim parts looked like, well, crap. There were a few pieces still good enough to re-use, but for the most part, the 40-year-old trim looked old, worn, and dingy next to the car's days-old color. The owner had planned to replace the Camaro's weatherstripping; rubber turns all kinds of dry, cracked, and flat after four decades. Now, though, that list grew to include new trim to complement the paint and not detract from it.
As you're taking apart your own paint project and deciding what to toss and what to upgrade, keep this in mind: Assessing the condition of trim has a lot to do with the condition of the car it's attached to. Bring up the quality of one, and the other could very well suffer by comparison.
If you're refurbishing a Camaro, Chevelle, Mustang, or other fairly common car, reproduction parts sources are plentiful, so finding replacement trim won't be too tough. If, however, you're on the Dare To Be Different track, think twice before tossing away that dented chrome spear or door escutcheon; you may have to have the original part restored or even remade, and even a poor-quality original part makes a better starting point than none at all. Even if you have a car as popular as a Camaro, check with your repro house of choice to make sure it stocks every gasket and fastener you'll need. Those late-night wrenching sessions are a heckuva time to find out that some important little widget is missing.
 We'll start our trim-installation story at the rear of Michael Goacher's '67 Camaro. Here, Goacher assembled a taillight using an OER bezel, lens, housing, and OER seals from Classic Industries. The seals are from Classic's Paint Seal Kit, which includes all the rubber needed for the taillights, mirrors, door handles, and locks. Note the difference in condition between the original light on the right and the repop parts. The original parts were in good shape, but they looked worn next to the spanking-new paint.<BR><BR>
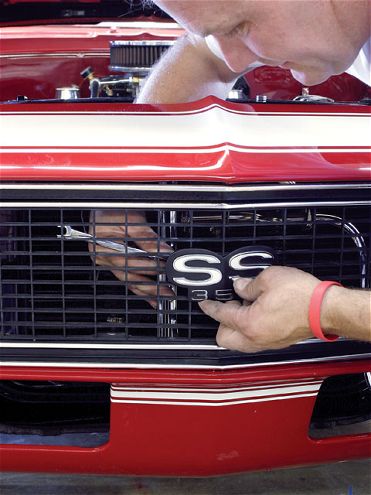
In this case, the Camaro's owner, Michael Goacher, filled his trim and weatherstripping shopping list at Classic Industries. Classic is a GM parts specialist with a deep and wide inventory of original and reproduction components for Camaros and Firebirds, Novas, fullsize cars, and even trucks. The folks at Classic have put some pieces together in prepackaged kits so you'll have all the miscellaneous parts you may need for a particular job, even those you might not know you need. Many of the parts Goacher got from Classic were from the Original Equipment Reproduction (OER) line. These pieces are designed just like GM did it back in the day, and they're manufactured to the car's original specs. Most OER parts, in fact, are licensed by GM as authentic restoration products. As we watched Goacher spend a day installing OER pieces all over his car, we noticed that he faced very few struggles with fitment issues.
Goacher is the manager of Paint n Place, a busy Southern California custom paint shop (we've lost count of how many magazine cars have come out of PnP) that hosted our parts-installation photo shoot. He showed us how to install these pieces, and he also revealed good tips about keeping the new paint free of scars and scratches when the parts are going on.
One valuable thing we learned: This isn't a job to rush. Goacher and his son Dylan spent eight solid hours doing the work you see on these pages, and the job wasn't yet complete; there were still parts to install on the Camaro's driver side. Doing it right-test-fitting pieces before installation, assembling component packages, tweaking a part's alignment, touching up metal made bare by drilling-takes time. But the results are well worth it.