This will be the final installment in our series discussing purchasing an unfinished street rod-updating it, modifying it, and finishing it to your (our) desires. The goal was to do this for less than the cost of building from scratch, purchasing a finished street rod, or hiring a professional rod shop to build your dream car.
Our past efforts included updating the dashboard with a machine-turned, stainless steel dash panel, updating the engine with a few cosmetic changes-including installing a set of Sanderson Limefire headers-and finally, installing an EZ Boy Rod Interiors interior kit.
We will discuss the finishing touches-the touches that add personality to a street rod; the touches that separate your street rod from someone else's street rod; and a few other touches that just make good sense: paint, hood, top, mirrors, and weather stripping, to name a few.
Since paint is a major step in any street rod buildup, and the finishing process has been covered many times over the years in the pages of SRM, as well as on www.streetrodderweb.com, we chose to limit the paint process in this manuscript. Besides, we did a down-and-dirty black suede number.
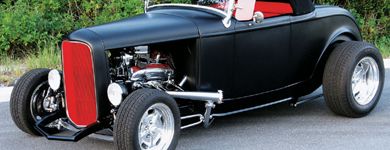
Before we did the interior installation and the engine updates, we popped the body off, did a quick block sand, tacked the parts off, wiped the parts down, and coated the body, hood, grille shell, and headlight buckets in PPG DP90 flat black epoxy primer. We applied three coats, adding an additional 25 percent of reducer to the final coat for a bit more sheen to the finish coat-the counter guy at the local PPG paint retailer tipped us off to that trick. Remember, the plan was a traditional hot rod and a daily driver. Black suede is about as traditional as it gets. In addition, black suede is easy to apply, takes less body preparation, and is very economical. If your desire is a more finished look, a shiny finish, or maybe flames-go for it; it's your dream car.
We decided a hood top would add a more finished look to our highboy, and if we preferred to run without the hood, it could easily be removed. The car came with an unfinished, Speedway Motors fiberglass hood top. Our task was to trim the hood top to fit and figure out a method to mount the hood. Before trimming and fitting the hood, we attached the SoffSeal hood seals on the cowl and the grille shell. When fitting body parts, you must keep in mind that seals can affect the final fit. With the seals in place, we trimmed and fitted the hood.
Next, we secured 1/2-inch square steel tubing to the inside of the lip on each side of the hood with machine screws and locknuts. For mounting the hood top at the cowl, we elected to form two bullet-shaped round steel pieces that could be welded to the 1/2-inch square steel tubing and protrude beyond the hood line. The firewall was marked where these bullets would meet the firewall, and holes were drilled in the firewall. The hood was then slid into the holes and the rear hood mounts were complete. In the front, we welded small steel tabs to the 1/2-inch square tubing and mounted tabs from the radiator mounts that slid under and lined up with the tabs on the hood. Quarter-inch holes were drilled through both tabs, and 1/4-inch hitch pins were used to secure the front of the hood. The hitch pin is slid through the two holes and a spring clip is then pushed through the hole in the hitch pin. Flat washers can be used as spacers if the hole in the hitch pin does not pull the hood down enough to align the hood with the grille shell.
While we are topless-car fans, we also know that having a top, preferably an easily removable one, has many advantages. After reviewing several options, we chose the Sid Chaver's Bop Top. The Bob Top has the lines we were looking for, is easily removed, can be stored in the trunk, and is easy to install.
When we say easy to install, we mean it. The hardest part for us was installing the brackets required to mount the top. The Bop Top mounts to the original-style '32 Ford top brackets, but in our case there were no top brackets. We found two, chrome-plated, original-style top brackets in a box of parts that had come with the car. With the brackets in hand, we covered the body area with masking tape and marked the shape of the slot to be cut. Utilizing a die grinder at very low speed, we carefully formed slots in the already painted body. After packing the area with dampened towels, we carefully welded the brackets to the steel subframe. We made small welds and kept cooling the area to prevent blistering the paint. With that nerve-racking task successfully completed, we moved on to the top installation.
We followed the video instructions supplied with the Bop Top. The header brackets were attached to the windshield posts and the oak header bow was put in place and marked for attaching the header brackets. After the brackets were attached to the header bow, the top frame was assembled and mounted to the top mounting brackets. With the top frame in place, the two side top bows were cut to the length required to fit them into the header bow brackets. With the side bows trimmed and in place, we snapped the top cover to the rear of the top frame and, following the instructions, we pulled the top material tight and stapled it to the header bow. We attached the hide-em strip after trimming the excess top material. A hide-em strip is a piece of material that is placed over the staples that holds the top material to the top bow and is then closed up, thus hiding all of the staples.
In about two hours, the Bob Top was installed and we were motoring down the road. The design of the Bop Top prevents the top from actually contacting the body of the car; the top is very stable under speed, and does not blow up like many convertible tops. While we are very pleased with the top, we plan to store it in the trunk and save it for a rainy day.
Continuing with the weather and wind-protection phase, we ordered a set of wind-wing brackets and a pair of Lexan wind wings from Speedway Motors. The stock-height wind wings were cut down to fit the 2 1/2-inch chopped windshield stanchions and the stanchions were drilled and tapped to accept the wind-wing brackets. The wind wings add a touch of that "old-timey look," and they help keep some of the wind and rain out of the cockpit.
We copied what we had seen in many early hot rod magazines for our rearview mirrors with the use of door-mounted mirrors. We ordered two inexpensive peep mirrors from Speedway Motors. We removed the supplied clip that mounts the mirror to the doorframe to direct-mount the mirrors. That clip was replaced with an aluminum piece that fit inside the mirror-mounting pad and contained a countersunk through-hole in the center to mount the aluminum piece to the mirror with the same screw that had held the clip in place. The aluminum piece also had two 1/4-20 tapped holes. Two 1/4-20 setscrews were placed in the two tapped holes, and, after carefully drilling two holes in the door, the mirror was attached from the inside with flat washers, lock washers, and nuts. The aluminum piece was machined on a small milling machine by a friend, but the same piece could be manufactured with a hacksaw, files, and a drill.
Earlier, we mentioned SoffSeal weather stripping. A telephone call to the tech guys at SoffSeal resulted in the discovery that SoffSeal produces weather seal kits for specific fiberglass bodies. Kilborne manufactured our body, and SoffSeal had a complete kit for a Kilborne '32 Ford roadster. The kit consisted of the previously mentioned hood seals, along with trunk seals and door seals. The rubber seals have an adhesive already applied and are of the peel-and-stick variety-no more "gorilla snot" required to glue the seals in place.
We are very big on safety and it is important to us to have a quality, UL-approved fire extinguisher aboard our street rod where it can be seen, since it may be someone else who grabs your fire extinguisher and saves your street rod. We chose a 1.4lb, compact, clean-agent fire extinguisher manufactured by H3R Performance, available from Parr Automotive, Yearwood, Jeg's, Total Performance, and others.
H3R also manufactures dry-chemical fire extinguishers. They are less expensive and they will do the job; however, we were sold on the idea of no mess, no cleanup, and no damage to sensitive electronics offered with a clean-agent fire extinguisher. Stick with UL-approved, American-made, quality fire extinguishers to protect your investment and for piece of mind.
Six months of part-time work and our unfinished street rod is completed, updated, and modified to our desires. We racked up about 3,000 miles on the odometer in that six months, and our rodding friends were always waiting to see what we did next. We obtained our dream of building a traditional hot rod for far less than the cost of building from scratch, buying a finished street rod, or hiring a professional rod shop to build our car. The satisfaction and pride of doing it ourselves greatly enhanced the experience.
If you don't have a street rod, but you always wanted one, get out there and go for it. There are deals to be had on unfinished cars and you can do it yourself-we did.