Many of you are already aware that the quality of your paint will be mostly determined by the quality of the prep work done before the color even touches the car. Paint doesn't have the ability to hide flaws and will actually magnify any mistakes left behind in the bodywork. It's absolutely critical you don't cut any corners and do the best job you can in preparing your body for paint.
There is also one final process you have to get right if you want paint that's enough like a mirror you can see yourself clearly in it. We're talking about color sanding and polishing. This is one of those procedures that is less about skill and more about patience. Still, you need to be using the right materials, and there are few tips that will help keep you out of trouble.
One thing you might not know about fresh paint is that it shrinks as it dries. As the volatile compounds in the paint evaporate, the paint will shrink onto and into the surface, and that is how it can magnify any surface imperfections (e.g., scratches and blemishes). Another time this is evident, is when you have applied painted-on stripes to the surface, and you want the clear to even out the height difference between the stripe and the base surface. It might appear that you have accomplished this when applying the clearcoat, but as the paint dries you later find you can feel a small ridge has formed.
That was the case with this 'Cuda hood, plus one other factor that was unexpected. This is a one-off, carbon-fiber hood made by the guys at Muscle Car Restorations (MCR) in Chippewa Falls, Wisconsin. Its form was taken from an AAR hood that was modified with a larger scoop to give it a more aggressive look. The crew at MCR applied their usual five coats of clear over the paint, and sanded and polished the hood to a mirror-like finish. It looked beautiful, but after going to a few shows and spending some time in the sun, the edge between the yellow paint and the unpainted carbon fiber started to become (slightly) evident. Since this did not happen on any other part of the car, the theory is the carbon fiber was drawing solvents out of the clear from below, while the black color drew more heat from the sun than the bright yellow paint, which caused the two areas to cure unevenly.
Whatever the reason, the easy fix was to lightly sand the hood again and apply some more clear. That wouldn't mean we were done; we would then need to sand and polish it again. But what's involved with the process? Won't sanding put scratches in the paint? What kind of compound to use? And how do you use a buffer? We'll get into all this, but first, we'll give you a heads up about the process.
Sanding and buffing paint is nothing new. Quality restoration shops have been doing it for years, and that's what gives many of the restored cars you see at shows an "over-restored" look. The factory never took the time to make the paint mirror smooth; if it was covered it was good. That's why a lot of unrestored cars have runs, sags, and other paint imperfections; it just wasn't feasible to make them perfect on the assembly line.
Color sanding, or buffing, is the process of smoothing out minute imperfections in the paint, such as orange peel (orange peel is when the paint literally has the texture of an orange peel), or even dirt that mysteriously attached itself to the car before the paint dried. The first thing is to remove these imperfections. Sure, 80-grit paper would definitely remove them, but that's a bit harsh. Typically, a bucket of water and some 1,550- and 2,000-grit wet/dry sandpaper is where you begin. a good sanding block is a must on larger surfaces such as the hood, trunk lid, roof, and sides of the car-pretty much everywhere. If you try to use just your hands and no block, things may not turn out the way you want. An important part in the sanding process is making sure the area you're sanding stays wet. Dry sanding will make deeper scratches that you may not be able to be remove.
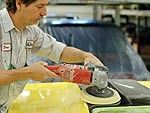
After you have properly sanded the panel to a dull sheen, it's time to get out the power tool. A good buffer will be one you can either control the rpm of the pad by setting a dial or by varying pressure on the switch. Either way, this job can't be done without one. When it comes time to decide which buffing wheel to use, there are several choices. choose a pad based on your car's finish after it has been wet-sanded. After sanding, if you have some minor sanding scratches to remove, a more aggressive wool buffing pad will be needed at first. If your paint shows no imperfections, just the sanded, hazy look, you may want to use a finer foam pad. For our job, we're going to stick with a foam pad because it's the easiest to work with. Start by applying some compound to the sanded area, and work the compound with the buffer by starting at a slow speed, moving the machine back and forth. Don't push down hard with the buffer or use the edge of the pad, let the weight of the buffer apply the pressure. The compound will slowly bring the sanded area to a brilliant shine, and the results will be noticeable.
After buffing the panel with a wool pad, it's time to switch pads. We switched to a much softer foam buffing pad. The foam pad is far less aggressive than the wool pad, and teamed up with our compound, it generated a highly polished final look.