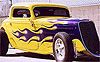
Few hot rod painters are as experienced as Dennis Ricklef. At age 15, he was already pinstriping everything in his garage, including his dad’s new car–without the old man’s permission. In the ensuing 40 years, Ricklef has distinguished himself as one of the acknowledged masters of flame painters. Indeed, whenever the So-Cal Speed Shop needs to add flames to one of is projects, the call goes into Ricklef. What follows here is how he laid his licks on a ’34 Ford.
In addition to providing some step-by-step instructions, Ricklef also passed along a few tips to make the flame process easier. First, check with your local body shop about renting a spray booth on the weekends. It is usually sitting idle and for $50 to $100, they might be willing to let you use it. Painting outside in the driveway is illegal in most parts of the country and the amount of dirt and dust that ends up in the paint is beyond saving by color sanding. A spray booth will save untold hours of labor and is well worth whatever you have to pay to rent one.
Try to use only one paint manufacturer’s product line. It is better not to mix one company’s primer with another’s reducer because there is no way of knowing what the chemical reaction might be when mixing two brands. Each company formulates its products to be compatible up and down its product line.
Use a top-quality masking tape. It will stick firmly to the body and not let paint bleed underneath. It is best to paint the car as soon as possible after masking the car. If it is more than two days between taping and painting, go back and press down the tape to assure it is still sticking tightly to the car. The tape will loosen up if too much time passes between the original taping and paint spraying.
Use a metal test panel painted with the same base color as the car. Then apply two or three different color flame patterns on it. Most flame jobs involve two or three colors. With the test panel, you can see how the finished flames will look on the car.
When painting, start on the bottom of one side and work you way up to hood. In this way, when you come over the top of the hood and start on the other side of the car, the paint on the hood is still wet so it will flow together. Then work your way down the other side. The idea is to paint the car by walking around it. There may be fenders or reasons it cannot be done that way. You want to eliminate as much as possible the overspraying of a section of the car you just painted. Overspray increases the chance of producing a run because of a build up of paint.
Pull off the tape and paper to 20 minutes after the final coat of paint is applied,. The sharp edges of the tape will cut the paint leaving a sharp edge. If you leave the tape on until the paint dries, it does not pull off consistently and leaves a ragged edge, and you’ll then have to trim the edge. Of course, since the paint should be still wet when you remove the tape, you’ll have to exercise some caution to prevent smudging.
Let the car sit for about two weeks before color sanding it. Absolutely do not sand a car that has not had at least one week of drying time. The reason the extra time is so important is the paint will shrink and scratches and flaws will mysteriously appear. The idea of color sanding is to remove all the orange peel and dirt that may have found its way into the paint. Before color sanding, tape off all the joints or seams. This will save on the clean up time.
Because there is less paint on the edges of body panels, tape the edges so that when buffing you do not go through the paint. After the main part of the body is buffed, you can pull the tape off and run the buffer on them separately. Do not stay in one spot to long or you will burn the paint. Keep moving.
Don’t worry if your first efforts look a bit rough. A lot of the early rods were like that, too. So you shouldn’t expect your car to look like one done by Dennis. After all, he’s been at this a whole lot longer than most of us.