 | Brace Yourself
Keiichi "Dorikin" Tsuchiya screams incredulously, "Maji ka yo?" which translates to "Are you serious?" as he and Suzuki Manabu gleefully carry on like a pair of giddy school children during recess. Tsuchiya, passionately known as the drift king, hugs Suzuki, the commentating voice of the D1 Grand Prix. Both men quickly spring to their feet in unison and chant "Oh my goodness" in a crude "Engrish" accent. Opposing competitors bow their heads in obvious defeat, knowing the day's competition belongs to Ueo Katsuhiro and his AE86. Thick blankets of smoke pour out from the wheel well as the 2003 D1 Grand Prix champion pushes his Corolla to the ragged edge. A mere man or immortal, Ueo is a godsend. He executes the perfect clipping point and pitches his AE86, literally sliding parallel into Turn One of Ebisu Circuit. To onlookers, he is seemingly bound to induce an uncontrolled spin, but he remains calm, collected and in control.
"Wait a minute," I mumble to myself as I fumble for the remote and quickly rewind the videotape. I pan the screen in slow motion looking for a magical string pulling a scaled model or some cheesy video alteration to bolster my conclusion that Ueo's drift angle and speed isn't humanly possible. Much to my dismay I find none. This man, known in Japan as the king of the AE86, is the real deal.
Ueo began his career as a gymkhana specialist, where he dominated the competition and consistently placed first. In early 2004, Ueo began designing AE86 suspension products under his label Desukara Desune Brand (Ueo Style). The Corolla's shortcoming is power. Realizing this, Ueo used his chassis knowledge and years of track experience to compensate for the lack of power, creating braces and suspension components that greatly improve the 20-year-old vehicle's handling. 2NR breaks down each of the components and discusses the main functions. Buying Ueo products won't make you an overnight D1 champion, but hey, you've got to start somewhere, right?
 | Brace Yourself
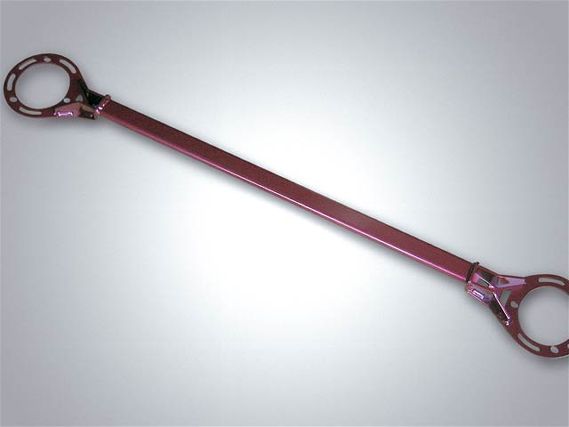
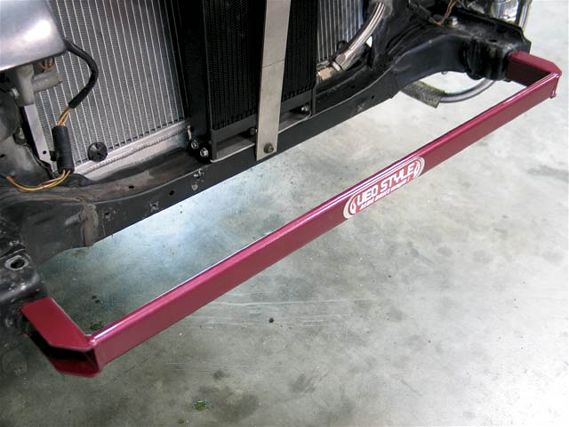
Saikyo Front Tower Bar
If you, like many import enthusiasts, look for quick modifications to reduce chassis flex, chances are you'll want to purchase and install a front and rear tower bar. While it remains to be seen whether or not strut bars serve any useful function, bars typically consist of a solid or hollow bar with two 14mm bolts attaching the end pieces to the top mounts. While the bar itself resists flexing, the bolts at the end points move back and forth. The Ueo tower bar deviates from tradition because it's one piece. There aren't any moving parts or bolts that will come loose or flex under load. Not to mention it looks pretty dope on your crusty-ass ride.
 | Brace Yourself
Details
Weight: 5 pounds
Part Number: XUT044F
Price: $185.00
 | Brace Yourself
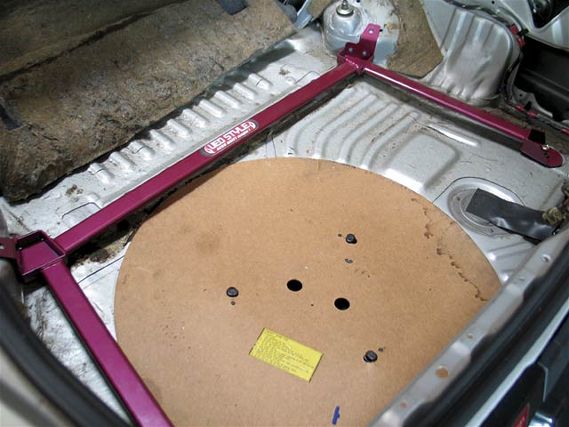
Saikyo Rear Tower Bar
Similar to the Saikyo front tower bar, the four-point rear bar is a solid, one-piece design with no moving parts or bolts. The AE86's factory design makes it difficult to stabilize and reinforce the shock towers and rear. The Saikyo four-point rear tower brace ties in both sections of the rear chassis to increase stability. We asked Taka Aono (the former SCCA Solo2 champion, and Formula Drift and Drift Association member) what the advantages are when using a rear tower brace. "A Hachiroku using a four-point tower bar and one without becomes apparent--even more so on hatchback-style vehicles sporting JDM bumpers. Those who drive through the canyons or drift with no rear tower bar have, or will encounter, what I like to call the 'ghost in the car.'" Relax folks; it's not an actual ghost. Aggressive cornering on twisty roads such as touge causes the vehicle's dome light to flicker on and off as if there were a ghost. The rear hatch moving and twisting along with the chassis causes the flickering, as the movement triggers the dome light.
Details
Weight: 10 pounds
Part Number: XUT044R
Price: $230.00
 | Brace Yourself
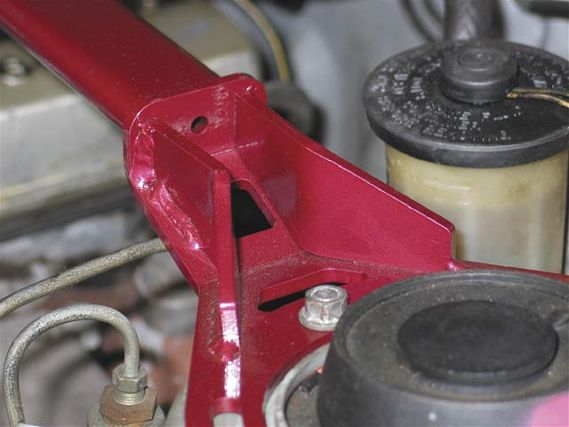
Gacchiri Fender Brace Support
"Hachirokus are notoriously weak in providing rigid chassis support. A stiffer chassis setup will benefit experienced drivers more than the typical novice," said current RS-R S2000 drifter and respected 4AG guru, Alex Pfeiffer. When drivers lift the car from the front corner and try to open the door, it's almost guaranteed that the door will bind with the door trim, making it difficult to open. The Gacchiri support mounts onto the door hinge and inner fender, creating a triangular support that ties the main frame to the engine bay. While the main job of most fender braces is to completely eliminate flex, the fender brace was designed to allow a slight flex for drifting but continues to maintain the correct amount of frontal flex for more advanced drivers. Included in the kit is a set of guide inserts to assist with bracket assembly, making installation a snap.
Details
Weight: 8 pounds
Part Number: XUG0044
Price: $230.00
 | Brace Yourself
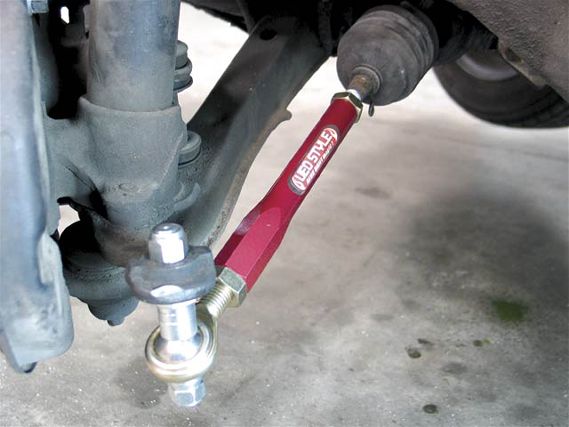
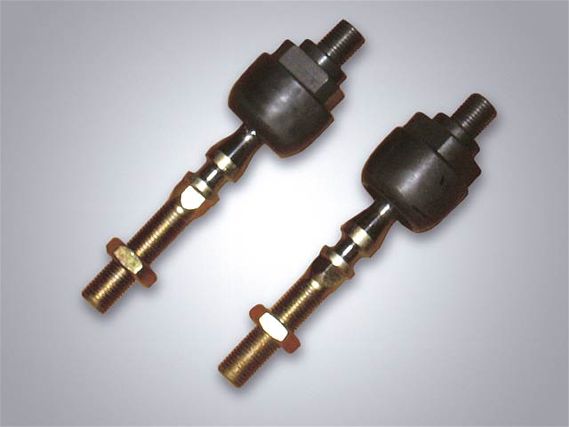
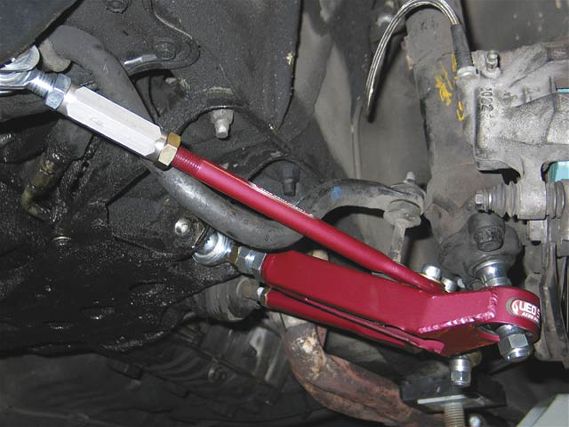
Outer Tie Rod End
Lowering your vehicle to the point where sparks fly from your chassis might look cool, but the more you slam your car, the more out of whack your suspension becomes. The Ueo Style outer tie rod moves with the suspension, creating the correct geometry for a lowered car. Bump steer is affected when you lower a vehicle on factory tie rods. Ueo Style tie rod ends allow dual adjustments of up to 20mm of toe setting and correction, as well as the ability to adjust the steering angle by 20mm. The pillow-ball mount ends on the Ueo Style tie rod end not only replace the worn factory bushings but also returns bump steer to an acceptable level while increasing the lock-to-lock steering angle. This is a must when drifting.
 | Brace Yourself
Details
Weight: 6 pounds
Part Number: XUE0044
Price: $280.00
 | Brace Yourself
Front Bomber
Hiro Sumida used to compete in SCCA's Pro Solo events and represented Club 4AG while drifting his 20-valve AE86 (he's currently driving a Toyota Chaser [JZX90]). He felt the AE86's JDM bumper support was a weak point. "Expect a lot of frontal body flex anytime you own an AE86 with JDM front bumpers and support beams. This also pertains to any aftermarket body kit that requires removing the bumper support." For those who aren't in the know, the U.S.-spec bumper support serves as a connection from the left and right side of the frontal chassis while the JDM bumper uses a separate two-piece left and right unit, which does nothing to support the frame besides holding it up. The Ueo front bomber serves as a simple yet effective chassis reinforcement bar. Installing the bar lowers chassis flex by strengthening the front portion of the frame while creating a more positive steering response. Three different Hachiroku drivers noted that they could literally feel the body twisting excessively, especially when taking high-speed corners. "If the bomber had been available three or four years ago, Taka and I wouldn't have had to weld a bar on my car," stated Sumida.
Details
Weight: 5 pounds
Part Number: XUB0044
Price $115.00
 | Brace Yourself
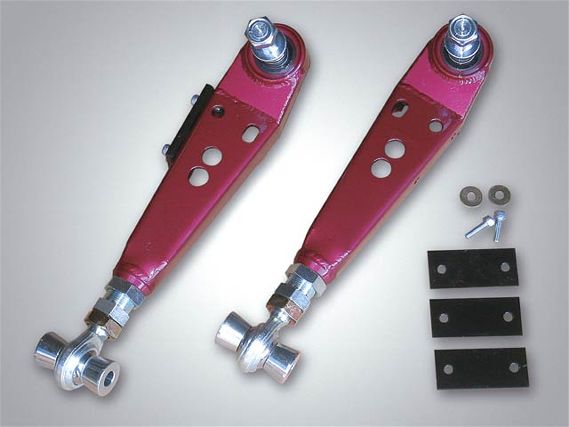
Front Lower Arm
Front lower control arms are necessary for advanced driving and suspension setups. "Suspension arms make a huge difference. Think about it: a 20-year-old car with 20-year-old bushings. I can guarantee those factory bushings are worn-out and pretty much useless. Using solid pillow-ball joints creates a more predictable setup as far as the movement of the car, but has potential for a rougher ride," said Pfeiffer. Using an adjustable front pillow ball, the Ueo Style lower arm completely replaces the factory lower control arm. Built to withstand the rigors of track usage, this tig-welded product sports multiple, removable shims to adjust roll center. It can alter outward camber up to 25mm to fine-tune your suspension.
 | Brace Yourself
Details
Weight: 10 pounds
Part Number: XUA0044
Price: $540.00
 | Brace Yourself
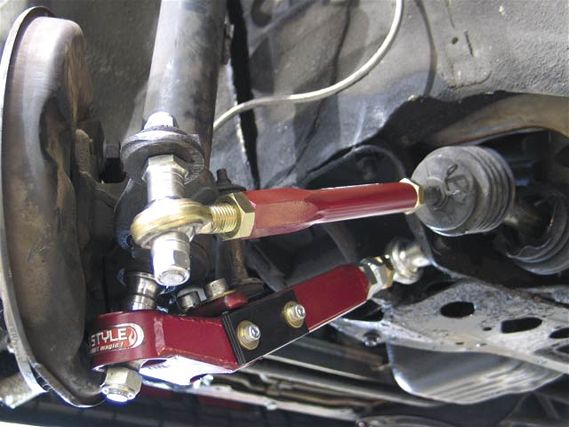
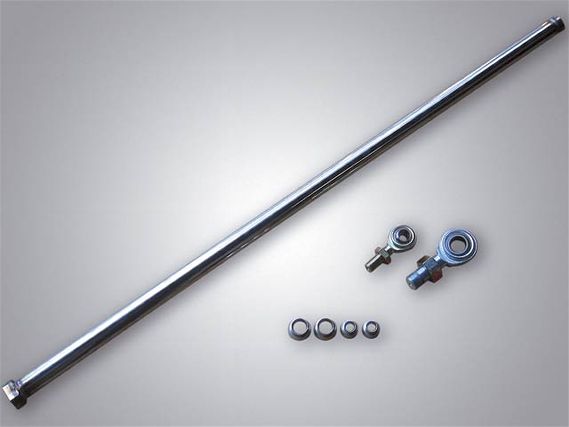
Over Angle (inner) Tie Rod
Ueo inner tie rods allow you to further adjust the steering angle when used in combination with the tie rod ends. The Ueo inner tie rod allows for an additional 20mm of steering angle adjustment. It's a must for anyone serious about drifting successfully. "The more angle the better. Getting that extra steering angle makes it a lot easier to drift," said Aono.
Details
Weight: 3 pounds
Part Number: XUU0044
Price: $158.00
 | Brace Yourself
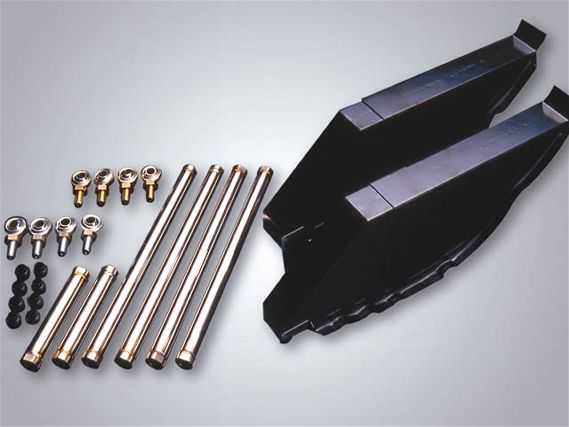
Entry-level Traction Kit (rear four-link)
AE86 owners are at a disadvantage, because the solid rear-axel setup limits any rear toe or camber adjustments. As the car launches forward, the forces generated push against the lower rear arms creating a leveled or downward position, which forces the rear end into an undesired squatting position. As you lower the car, the suspension arm loses a degree of freedom. This also affects the geometry because the suspension binds. The Ueo entry-level kit, in conjunction with the pillow lateral rods, readjusts the rear differential housing back to its proper position while moving the lower control arm. One goal of the traction bracket is to lower the control arm to regain the suspension motion lost on a factory, lowered vehicle. Traction brackets change the position of the rear link; reducing vehicle squat and promoting a more stable suspension feel when driving through the middle of a corner or through chicanes. "Traction brackets help the car understeer into corners and oversteer out of corners; a normal, neutral car works just the opposite," said Pfeiffer.
Details
Weight: 7 pounds
Part Number: XUTE44E
Price: $460.00
 | Brace Yourself
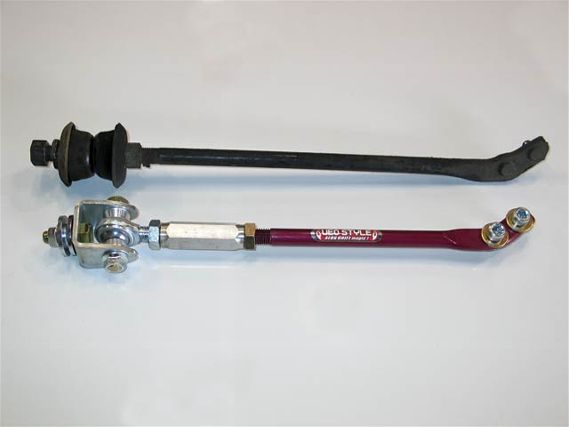
Pillow Lateral Rod
Lateral rods are necessary when you lower any AE86. When the factory suspension is altered, the rear end tends to shift from left to right, causing the axels to bind. This binding causes an uneven ride height and offsets the rear wheels to sit closer to one fender than the other. The Ueo Style pillow lateral rod allows you to properly center the rear end and maintain the correct suspension geometry.
Details
Weight: 4 pounds
Part Number: XULR044
Price: $148.00
 | Brace Yourself
Pro-level Traction Kit (rear four-link)
The pro-level kit includes all the components in the entry-level unit and adds equal-length control arms. This is the ultimate modification to the rear suspension. It's not for those who are squeamish about cutting into the body. This kit includes a custom-built box that will further reinforce and extend the rear control arms. "A standard traction bracket moves the lower arm bar. Vehicles such as the AE86 tend to lose suspension balance between the upper and lower bars," stated Sumida. Because this kit modifies the suspension geometry and pick-up points from their original positions, this kit is illegal in some competitions and race-sanctioned events. To install the kit you must remove and section off metal in the rear seat section. Additional mods include extending the arms into the rear cabin and welding brackets, making this kit better suited for the serious enthusiast.
Details
Weight: 18 pounds
Part Number: XUTE44P
Price: $790.00
 | Brace Yourself
Pillow Tension Rod
Factory tension rods are equipped with rubber bushings that often twist and flex, causing unstable cornering and excessive movement when performing techniques such as clutch-kicking. Using a pillow-ball end link, the Ueo tension rod connects to the lower control arm and eliminates excessive wheel hop and binding of the otherwise-factory bushings while increasing vehicle stability. "You can really feel the aftereffects between the factory unit and the pillow tension rod under hard braking," stated Sumida. Ueo pillow tension rods allow owners to tailor up to 15mm of suspension adjustment for their AE86s.
 | Brace Yourself
Details
Weight: 6 pounds
Part Number: XUR0044
Price: $320.00