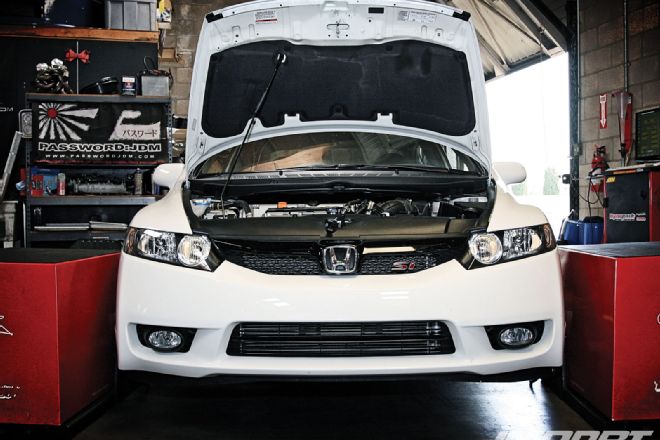
The Honda Civic brags a rich automotive heritage dating back to the first generation '72 model, with its 1.2L engine delivering 60 hp. Eight generations have passed since the Civic's debut, and the most current and arguably best Civic Si comes equipped with a 2.0L K20Z3 i-VTEC engine that produces 197 hp and 139 lb-ft of torque. Coupled to a six-speed manual transmission with a helical limited slip differential, the Civic is anything but a practical four-door sedan, and handles more like a sports car than a daily commuter. While 197 hp is nothing to sneeze at, when a good friend approached us with the prospect of adding more horsepower to his Si, we couldn't resist. His car already boasting bolt-ons, after a little research, we learned rumors of a certain JDM intake manifold/New Zealand camshaft combination rumored to bring monster gains. We sourced the parts, installed them, and hit the dyno.
 |
JDM Intake Manifold and Kelford Cam Install - Honda K-Power
|
JDM Intake Manifold and Kelford Cam Install - Honda K-Power
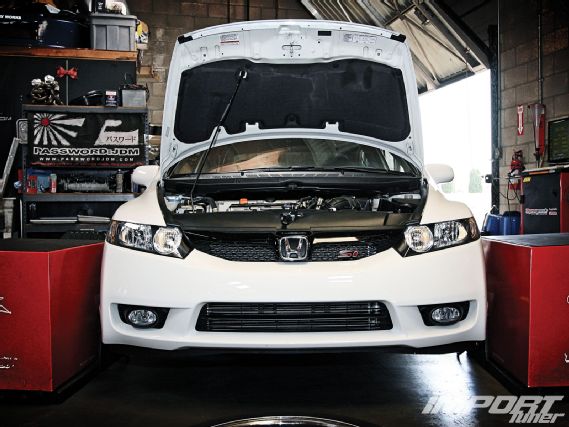
Prior to installing our new intake manifold and camshafts, our '09 Civic Si was already equipped with a DC Sports 4-2-1 long-tube cat-delete race header, DC Sports SCS (Single Canister System) 2.5-inch exhaust, K&N panel filter, and Hondata Flashpro-programmed ECU. With modifications thus far added to it, the Civic netted baseline power figures of 211.7 hp and 149.5 lb-ft of torque at its brakes (testing with two Dynapack dynos).
 |
JDM Intake Manifold and Kelford Cam Install - Honda K-Power
|
JDM Intake Manifold and Kelford Cam Install - Honda K-Power
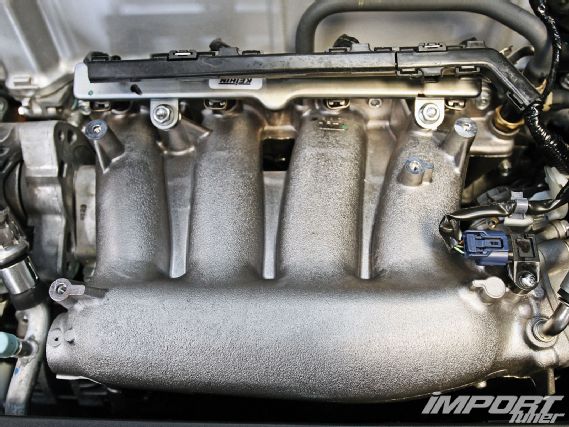
JDM '06-'10 Civic Type R Manifold
The "RRC" intake manifold found on the JDM '06-'10 Civic Type R (FD2) K20A engine is considered a hidden jewel among Honda K-series owners looking for more power, and was talked about on internet forums as the next big thing. Testimonials were written swearing that this was the best OEM intake manifold ever released.
 |
JDM Intake Manifold and Kelford Cam Install - Honda K-Power
|
JDM Intake Manifold and Kelford Cam Install - Honda K-Power
Factory USDM Civic SI "RBC" Manifold vs. Type R "RRC" Intake Manifold
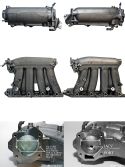
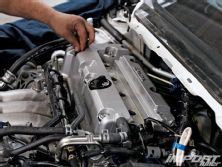
At first glance, the factory USDM '06-'10 Civic Si RBC and JDM Type R RRC intake manifolds look nearly identical, but upon closer inspection, you'll notice the RRC is more compact due to shorter, fatter runners with less curvature than the RBC's. You'll also notice a larger plenum on the RRC, along with the number four runner's (farthest to the right in our photo) smoother flowing transition with less dramatic angle from the throttle body inlet. The RRC throttle body inlet measured 2mm larger in diameter, and lacks the airflow impedance of the RBC's Idle Air Control Valve (IACV) ports; the RRC utilizes a drive-by-wire (DBW) throttle body (TB) in which the ECU controls the throttle plate to open and close at idle as needed instead of using an IACV. For those who plan to use the manifold with cable-type TBs, we suggest either machining an IACV port into the TB mounting flange or purchasing an aftermarket adapter that allows plug-and-play operation.
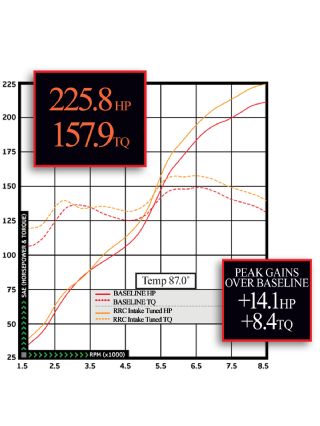
Because our Civic uses a DBW system, the RRC manifold was a direct bolt-on that required no modification when installed. With ambient temperatures measuring 87 degrees Fahrenheit in the dyno facility, the newly installed RRC manifold was tuned with a Hondata Flashpro by Erick Aguilar of Erick's Racing, located in Baldwin Park, CA. The engine made 225.8 hp and 157.9 lb-ft of torque-a gain of 14.1 hp and 8.4 lb-ft of torque over our factory manifold. The RRC manifold made five to eight hp and lb-ft of torque from 3,500 to 5,000 rpm, while top-end power from 5,000 rpm to redline gained eight to 10 hp and lb-ft of torque over our factory manifold.
 |
JDM Intake Manifold and Kelford Cam Install - Honda K-Power
|
JDM Intake Manifold and Kelford Cam Install - Honda K-Power
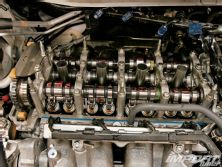
Kelford Cams Stage 1 Camshaft
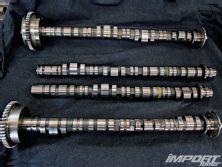
While Kelford Cams is a relatively unknown name in the U.S. Honda market, they are by no means new to the camshaft industry. Since 1968, Kelford Cams, located in Christchurch, New Zealand, has specialized in custom camshaft design and manufacturing for all types of engines, and currently supplies cams to the infamous AMS Performance time-attack EVO X. Kelford Cams' Stage 1 camshafts for the Honda K20A, K20Z, and K24A2 engines are considered the mildest and most streetable of three camshafts offered, with primary and intermediate cam lobes fractionally larger than those of the factory TSX. The main lobes on the camshafts are engineered to feature more surface area, increasing mid- to top-end performance for mildly tuned K-series motors equipped with aftermarket bolt-ons like an exhaust, header, and intake. Designed with a cam profile that's easy on valvetrain components and timing chain systems, this drop-in cam works well with OEM valve springs and retainers.
We called upon the installation services of Autowave tech Mike Lapier as we documented the process, before returning to Erick's Racing to test and tune the cams (the site where baseline testing had commenced). Located in Huntington Beach, CA, since 1985, Autowave has 25 years of experience performing Honda/Acura factory maintenance, as well as high-performance engine and transmission builds. We counted seven modded NSXs on hand the day we visited.
 |
JDM Intake Manifold and Kelford Cam Install - Honda K-Power
|
JDM Intake Manifold and Kelford Cam Install - Honda K-Power
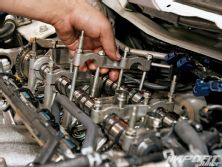
1. Set the motor to Top Dead Center (TDC) by manually overturning the motor using a 19mm socket and breaker bar on the crank pulley bolt until the white mark on the crank pulley lines up with the arrow on the timing cover.


2. Remove the passenger side tire to access the tensioner cover (black cover) located on the timing cover. Before removing the tensioner, place an Allen wrench or thumb tack into the key hole to prevent the tensioner from expanding and tightening up the timing chain, which could eliminate the extra slack needed to remove the cam gears. Preventing the tensioner from expanding can save hours of unnecessary time removing the front timing cover, chain, and chain guides.
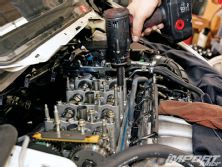
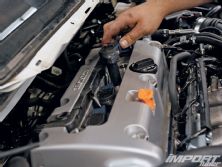
3. Remove the ignition coils and 10mm bolts holding the valve cover, then gently pry the metal washer and rubber O-ring off of each valve cover stud. Remove any remaining vacuum hoses or lines that would prevent you from removing the cover.
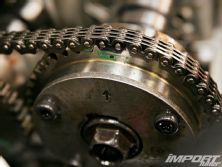
4. Upon removal of the valve cover, be sure to check that each cam gear's TDC dash marks are lined up and facing each other and that the VTC cam gear arrow is in the "up" position. If the arrow is facing downward or the hash marks on both camshafts are improperly aligned, manually rotate the crank pulley 180 degrees to position the cam gears correctly.
5. Before removing the cam caps, loosen both cam gear bolts (located on the back side of each cam) and the cam trigger bolts with an 8mm Allen wrench. Remove the cam bolts and cam caps in the proper sequence listed in the factory service manual.
6. Carefully disassemble the cam gears from the camshafts one at a time by lifting the camshaft from the back to slide the chain away from the sprocket. With the camshafts removed, use a bungee cord or coat hanger to keep tension in the chain to prevent it from losing slack and dislodging from the lower pulley. A skipped tooth or offset chain can cause the reinstallation process to become much more difficult.
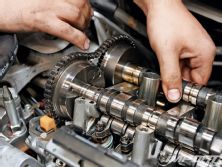
7. Using a 17mm (intake) or 14mm (exhaust) socket and an adjustable wrench, reinstall the cam gears onto the Kelford camshafts. Tighten the intake cam gear bolt to 83 ft-lbs and the exhaust cam gear bolt to 51 ft-lbs of torque.

8. Install the camshaft, making sure to match the line and the dot on both cam gears to the colored link on the chain. If the cam doesn't line up, or the chain is offset, readjust the cam gears. Cam timing can be affected if both cams are not aligned properly.

9. Mike suggests always cleaning and chasing the insides of the bolt-hole threads in the block and cam cap journals to ensure proper thread engagement and accurate torque readings. "I found that properly removing oil from a threaded bolt hole can prevent stripping the bolt's threads, or can give false readings when torqued back to specification. Cleaning the holes is important because lubricants reduce friction when a bolt is tightened, and increased torque loads can overload and stretch a bolt too far, causing it to break or strip the threads." Using an oil scavenging vacuum is effective in removing oil, but for DIY mechanics, Mike recommends using a can of brake cleaner to blast oil from the holes, followed by wiping it down with a clean rag.
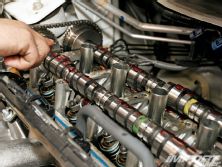
10. Use assembly lube on all the lobes and journals to protect the cam and lifters from damage upon initial start-up. With both camshafts installed, begin hand tightening the cam caps in sequence to ensure the cams are properly seated. Use a torque wrench to tighten the cam cap bolts to 16 ft-lbs of torque.

11. The final step before reinstalling the cover is to adjust the camshaft valve lash. Use the service manual to address the proper sequence, and remember that adjustment should only take place when the engine is cold. The factory K20Z3 valve lash tolerances for the intake cam are 0.20 - 0.25 mm (0.007 - 0.010 in) and 0.25 - 0.29 mm (0.010 - 0.011 in) for the exhaust cam. The stage 1 Kelford cam requires 0.20 mm of intake and 0.25 mm of exhaust valve lash.
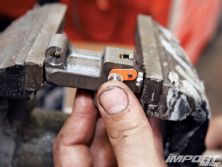
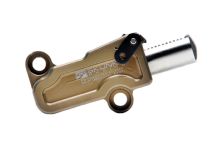
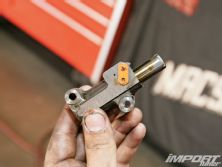
12. Depending on your engine's mileage or how hard you drive your car, now is the perfect opportunity to replace the factory timing chain tensioner. Aftermarket tensioners like Skunk 2's use an upgraded 16mm diameter piston (1.5 mm larger than factory) and a larger ratcheting mechanism featuring deeper and wider hardened-steel ratcheting teeth to guard against excessive piston travel. The Skunk2 tensioner uses a stiffer spring to eliminate chain slap, while allowing K-series engines to take advantage of using larger camshafts and stiffer valve springs. Notice the difference in teeth size when comparing the two tensioners.
13. Before reinstalling the timing chain tensioner, use a razor blade to clean off any previous gasket sealant on both the timing cover and tensioner. Before reinstalling the wheel/tire, reseal the cover with Hondabond to prevent any future oil leaks.
14. Install the valve cover and ignition coils and start the car to check for any leaks or noises. If you hear a rhythmic ticking sound coming from your engine, this could be a sign of an overly tight or loose valve adjustment. If your car has a rough idle followed by a check engine light, it's a safe bet the cams were improperly installed. Use a scan tool to verify any error codes the engine is throwing. A P0341 code signifies a cam timing error due to a misalignment of the cams.
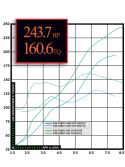
Upon our return to Erick's Racing, the Kelford-equipped Civic was once again reacquainted with the dyno and we began phase three of testing, this time without altering our previous Flashpro map, to better expose the importance of tuning. The Civic idled rough, struggled on the dyno, and made only 193.1 hp and 130.6 lb-ft of torque-a loss of 32.7 hp and 27.3 lb-ft of torque over our previous run! Erick quickly went to work and smoothed out the idle by removing seven percent of fuel from 1,000-2,000 rpm before focusing his attention on fine tuning cam phasing and overlap. From 5,000 to 8,000 rpm, Erick advanced timing an additional 20 degrees on the low cam setting, and added eight degrees of advance on the high cam setting. With some final tweaking of the maps, Erick raised the VTEC crossover from 4,800 rpm to 5,200 rpm, and added an additional seven percent of fuel at higher rpm to compensate for the increased air flow of the cams. The Civic responded with 243.7 hp and 160.6 lb-ft of torque-a peak gain of 18 hp and 8.3 lb-ft of torque.


The Kelford Stage 1 cams might be advertised as a mild cam, but deliver like a race cam, offering good response and lots of power through the entire rpm range. Asking Erick his impressions of the cams, he had this to offer: "Factory cams begin to lose power after 7,800 rpm but these cams want to make more power, even past our final 8,698rpm run. I wouldn't be surprised if they made more power past 9,000 rpm, but the factory Civic valve springs limit how high we can safely rev the car." Although these cams don't require aftermarket valvetrain upgrades, Erick recommends anyone revving past 8,500 to change springs and retainers, regardless of the type of cam being used.
Just one day's work installing the intake manifold, camshafts, and tuning rewarded our friend's Civic with a gain of 32.0 hp and 11.1 lb-ft of torque over baseline. This unassuming four-door "commuter" now flexes close to 250 whp and 165 lb-ft of torque by its own devices.

Kelford Stage 1 Camshaft Specifications
Exhaust0.20MM
0.25MMSet Cold At
Set Cold AtThe Valve
The Valve Cam LiftIntake7.33MMExhaust6.74MM Rocker RatioIntake1.7Exhaust1.7 Nett Valve LiftIntake12.26MMExhaust11.21MM Advertised Duration @ 0.10MMIntake302Exhaust302 Duration @ 1MM Valve LiftIntake260Exhaust256 Timing @ 1MM Valve LiftIVO
IVC--
--EVO
EVC50/BBDC
26/ATDC Suggested CenterlinesIntakeVARI/ATDCExhaust102/BTDC Valve Lift @ TDCIntake--Exhaust3.22MM