Listen up, kids. Uncle Drew caught us detailing our rides with Turpentine and Murphy's Oil. After a brutal paddling, he gave us a severe lecture about car care. What follows is a condensed, friendly version of the lyrical beat-down we endured. Now excuse us while we finish our time-out.
 | Car Detailing - All About Car Care
1. When evaluating your paint, don't just look it over. Run your hand across the finish. If it's not glassy smooth, chances are good there are surface contaminants on the paint that need to come off.
 | Car Detailing - All About Car Care
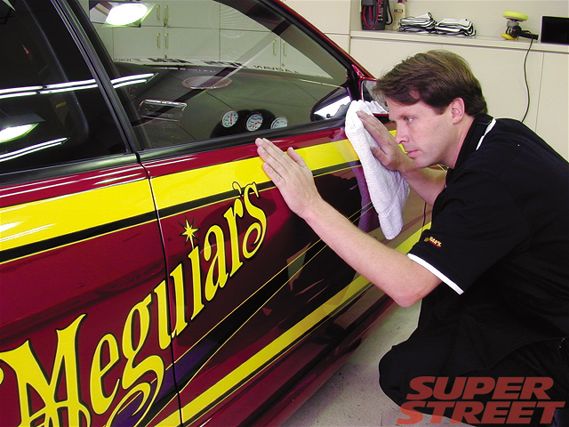
2. Details make a difference when evaluating your car-care needs. For example, if your car has vinyl decals or pinstriping on top of the paint, you should not use a polish, rubbing compound, or bug/tar remover on these graphic elements, as they could damage the vinyl or deteriorate the adhesive. Treat them gently with a mild cleaner and wax. And be careful when rubbing around the edges of the vinyl or you could lift it off.
 | Car Detailing - All About Car Care
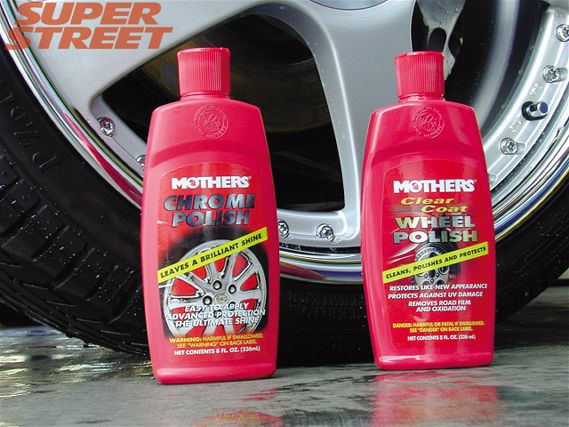
3. During the evaluation, take note of what kinds of surfaces you'll be working on. This wheel, for example, has a chrome-plated hoop and a clearcoated center, and each surface type has its own treatment product. A polish for plated metal has a different chemical makeup than one for a resin-based clearcoat.
Step 1: Evaluate
One car-care mantra we heard over and over again was, "Use the right product." That means don't use vinyl dressing on leather or glass cleaner on paint. But it also means you should evaluate your car's condition to see what it needs to produce the ultimate shine. For example, a freshly painted show car that's covered unless it's on the fairgrounds won't need the same kind of care as a 10-year-old beater that's parked outside all the time. A car with vinyl graphics over the paint needs different treatment than one with painted and cleared graphics. A chrome-plated rim will need a different treatment than an aluminum rim with clearcoat over it. And so on.
Look closely at your paint's condition. There are two kinds of problem areas to look for: those above the paint surface (bugs, tar, tree sap) and those below the surface (swirl marks, scratches, oxidation). The below-the-surface issues you can usually see, but some of the above-the-surface stuff can be hard to spot. Run your hand over the paint. Any bumps you feel are contaminants that should be removed.
Mike Pennington, the director of training for Meguiar's, recommends walking around your car with a note pad to write down the problems you find before going out to buy any sort of car-care product. Then you can hit the store with a particular goal in mind.
Step 2: Wash
Everyone knows how to wash a car, right? Not necessarily. Here are a few tips to be as effective with the bucket and hose as you can.
Always wash your car in the shade and when the car's surface is cool. (In fact, you should do all your car-care work in the shade.) You don't want sunlight or hot sheetmetal to prematurely dry the water and leave spots. Rinse the car off with a hose first, to loosen the dirt and further cool off the metal. And always wash a car from the roof down. Water runs downhill (duh!), and you don't want to be dragging dirty water over a clean area.
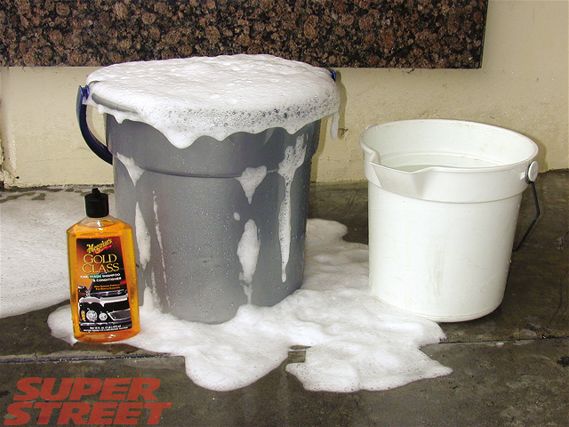
For the suds, use a wash solution that's formulated for cars, not for dishes or clothes. The degreasing agents in household detergents will strip away protective wax on the paint.
Make sure you rinse the soap off completely, then dry the car with a high-quality, 100-percent-cotton terry cloth towel or a microfiber towel. These will remove water without scratching the surface. You may want to dry large areas with a big towel first, then follow up with a smaller towel to remove any leftover water. Don't forget to dry the doorjambs, under the trunk lid, and under the hood.
 | Car Detailing - All About Car Care
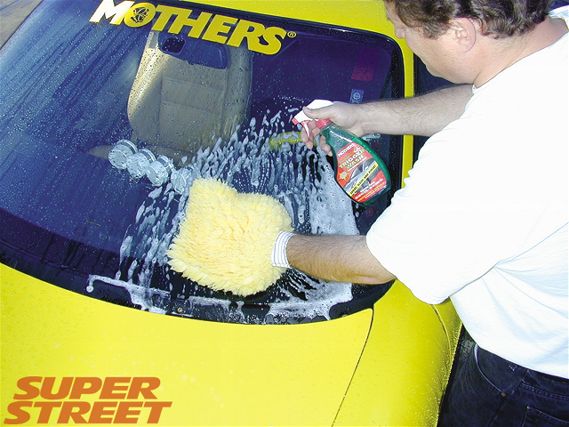
4. Mike Pennington recommends the two-bucket car-wash method. Fill one bucket with water and the appropriate amount of soap (always use a special wash formulated for automotive paint, not a household detergent). Fill a second bucket with plain water. Soak a wash mitt in the soapy water, wipe the car, and then rinse the mitt in the clear water. That way, the second bucket catches all the dirt coming out of the mitt so it won't get wiped back onto the car.
 | Car Detailing - All About Car Care
5. Then there's the no-bucket approach. Mothers makes Trigger Wash that you squirt directly onto a wet-wash mitt. When it's time to rinse the mitt, you do it with a hose, not in a bucket. Plus, you use less wash solution with the Trigger Wash than you typically do pouring soap into a bucket of water.
 | Car Detailing - All About Car Care
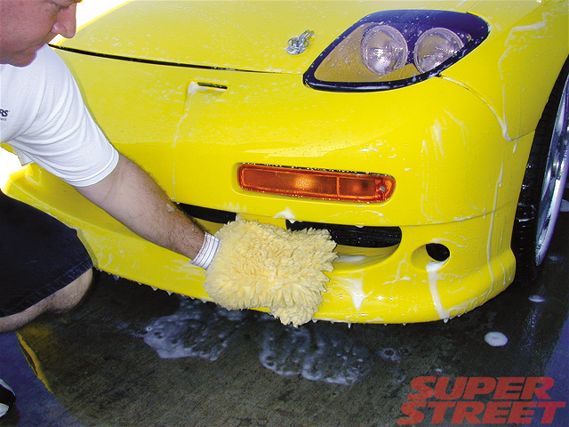
6. Ken Holland and Craig Burnett at Mothers had several good washing tips. One was to pay a lot of attention to the lower parts of your car, as these will pick up the most road grime. Also don't forget to wash areas that you can't readily see, like inside spoiler ducts and under wings.
 | Car Detailing - All About Car Care
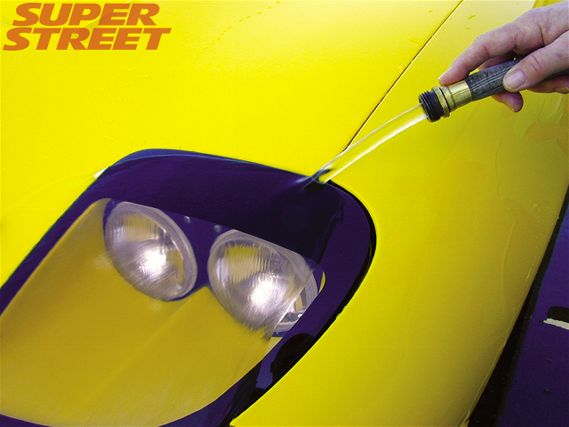
7. Another good tip from Mothers: A wide, soft spray pattern from the hose is best when you start the wash, as it will loosen the dirt from a large area. But when it comes time to do the final rinse, use a low-pressure stream like you see here. It will help sheet the water off the car, leaving less water to towel off.
Step 3: Going Inside
According to Meguiar's, it's a good idea to move to the inside of the car for cleaning right after the wash step. It gives the sheetmetal further time to dry before you do any surface prep; and if you have to do things like shampoo the carpets or the upholstery, they will be drying when you're back at work on the exterior.
Interior surfaces have their own "environmental issues," Mike pointed out. They can get sprayed when you spill coffee or a Big Gulp, vents suck in dust and pollen, and your shoes will track in all sorts of dirt, mud, and small rocks. In fact, Mike believes interior care can be harder than exterior work, since there are so many small nooks and crannies to clean.
The basic rule of thumb for the interior is to use, as we've heard before, the "right product." Vinyl gets treated differently than leather, suede you should pretty much leave alone (maybe roll a lint brush over it), painted parts can be treated just like exterior paint, and fabrics have their own cleaning solutions.
Mothers' Craig Burnett believes you should do as little as possible to leather, other than treating it to keep it supple. "Leather is a skin, and you don't want to abuse it," he pointed out. So stay away from harsh cleaners, and use conditioners instead to get the surface dirt off and add emollients and oils to protect the hide.
Craig had this tip regarding cleaning carpet: After vacuuming the carpet or mat, spray liberally with carpet cleaner, scrub with a soft brush, rub the carpet dry with soft towels, and after the carpet has dried, vacuum again. "As the liquid dries it captures dirt. The second vacuuming will get rid of that."
Mike (and Eagle One's Chad Heath) had a good glass washing tip: Wipe the inside of your windows in one direction (horizontally, for example) and the outside in another (vertically). That way if streaks show up, you'll know which side of the glass they're on. And never use ammonia-based glass cleaner on tinted windows. A non-ammonia cleaner and microfiber towels are the best bet.
 | Car Detailing - All About Car Care
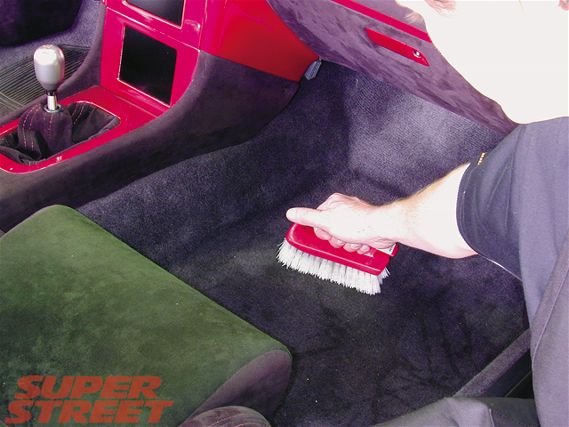
8. Mike suggested rubbing carpet or mats with a stiff brush before vacuuming, to stand the fibers up and loosen dirt.
 | Car Detailing - All About Car Care
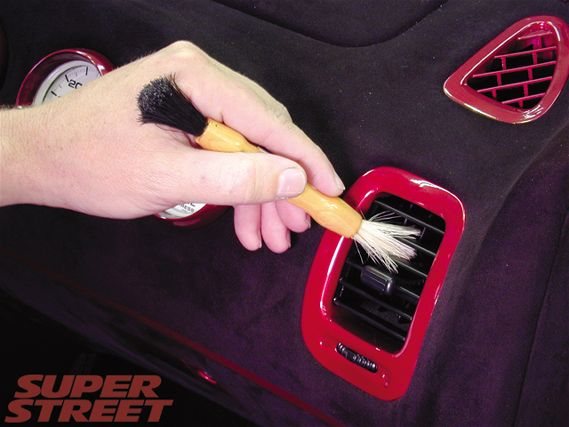
9. A small brush with soft horsehair bristles will help you clean an interior's small spaces, like inside vents and around gauges. A good brush kit should contain a brush like this. Or, according to Eagle One's Chad Heath, you can make your own detailing brush by cutting down a small horsehair paint brush and wrapping the metal part in electrical tape.
 | Car Detailing - All About Car Care
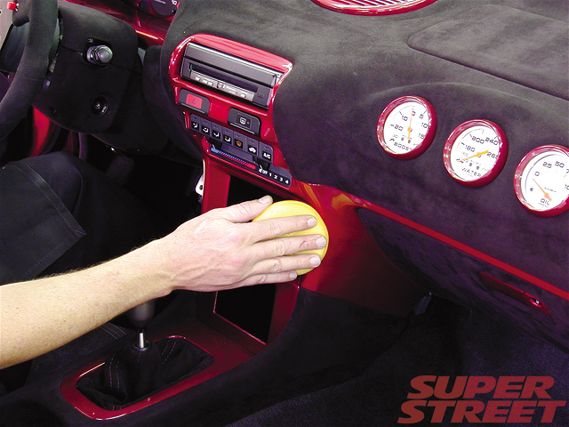
10. If you have painted dash surfaces, as in the Meguiar's Integra, treat them as you would exterior paint. Here, Mike uses a foam pad to apply wax.
Step 4: Surface Prep
This is where your evaluation is going to help you sort through all the stuff that fills store shelves. Not every product in this category is suitable for every car, and few of these products will be used every time you wash. The goal here is two-fold: to thoroughly clean your car's surface (the wash was just the first step) and to treat the paint for specific problems before you protect it with wax.
A liquid cleaner will remove contaminants below the surface of the paint that the washing didn't, like grease, oil, water spots, and oxidation. Some cleaners contain abrasive compounds that will take out swirl marks and light scratches as well. (Some polishes do that, too; more on that later.) Now, a cleaner can damage above-the-paint vinyl graphics and striping, so be careful. It will also remove any wax you previously put on the car, so this is one of those products that you may only need to use every six months or so.
For above-the-surface contaminants, like those you felt when you rubbed your hand over the paint, the pros recommend using a clay bar product. It's time-consuming, but it will give your paint that glasslike finish. You should be able to do a small car four times with a single clay bar, depending on how bad the car was to begin with. But if you drop the clay, toss it. Don't risk picking up dirt or small rocks off the ground and rubbing them into your paint.
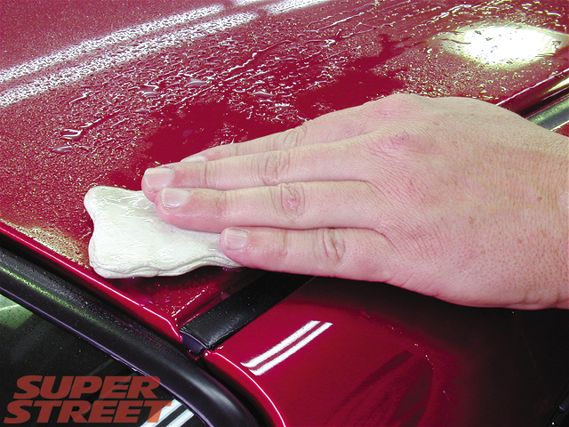
And then there's polish, sort of an "odd category," admitted Mothers' Ken Holland. "Some companies call cleaners a polish, while some call wax a polish." And then there are polish/wax products on the market to add to the confusion. A true polish has compounds in it to remove small surface imperfections, but it also contains oils and other chemical nutrients to condition the paint. A true polish only has to be applied about once a year, but polish has no protective qualities, so always wax over a freshly polished surface.
Sealers and glazes fill and hide surface imperfections that haven't been worked out with the cleaners and polishes. They contain what Mothers' Craig Burnett calls "optical enhancers" to restore shine. Like polish, sealers and glazes don't have any protective qualities. In fact, a polish will remove a sealer. So this should be the last product applied to the paint before waxing.
 | Car Detailing - All About Car Care
11. A liquid cleaner should be applied like the other car care products: Use just a little on a foam applicator pad. Always use a different pad for each type of product. If you've got some hard-to-reach areas, you can cut the foam pads into smaller pieces to reach those tight places, said Eagle One's Chad Heath.
 | Car Detailing - All About Car Care
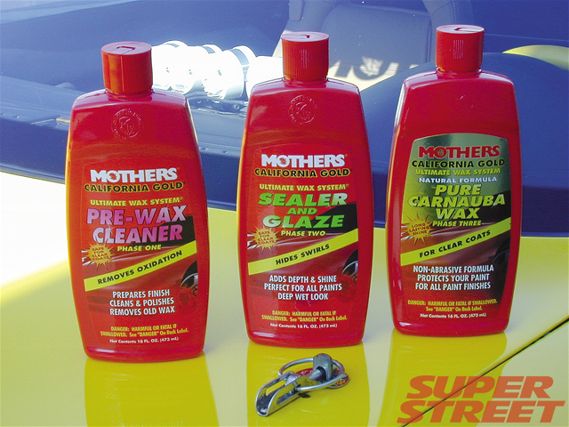
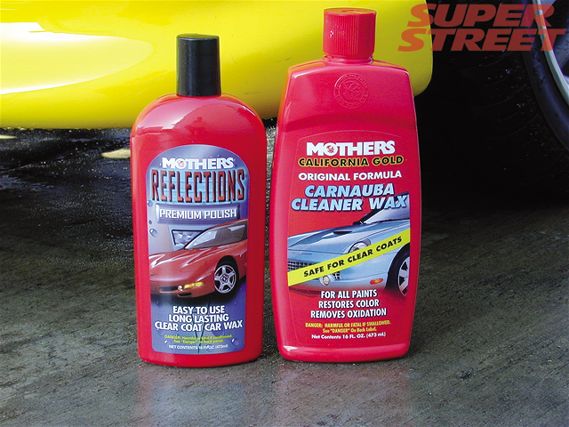
12. Some companies offer surface-prep kits that take the guesswork out of choosing a product. Mothers Ultimate Wax System, for example, is a three-step kit that includes a cleaner, sealer/glaze, and carnauba wax. According to Mothers, dark cars especially benefit from a multistep process like this, as dark colors have a higher reflective index-the amount of light that bounces back to your eye off the surface-and so need the extra care. A white or light-colored car would look fine using a one-step cleaner wax, says Mothers.
 | Car Detailing - All About Car Care
13. Got seagulls? Use a product like Mothers Bird, Bug & Tar Wipes to get rid of the nasty stuff. Just remember not to wipe the droppings, despite the product's name. Put it directly on the spot, let it sit so the chemicals will work on the mess, then squeeze it to pick it up. Wiping bird droppings could scratch the paint, as it contains little rocks and other abrasive stuff like sand castles and Doritos. Ewww!
 | Car Detailing - All About Car Care
14. Everyone makes some sort of clay bar product (this one is the Quik Clay from Meguiar's), and they're great for removing the surface imperfections you can feel with your hands. To use the bar, wash the car first, then lubricate the surface with an instant detailer type of product before rubbing the bar across the paint. You'll be able to actually hear the bar picking up gunk. When one side of the bar gets dirty, fold it in on itself and knead it to bring up a clean surface. A bar this size should do a small car four times before it needs replacing. But do replace it, otherwise when the bar gets saturated with contaminants, they'll stay on the bar's surface and scratch the car.
Step 5: Wax
OK, we're in the home stretch. Now it's time to protect all the hard work you've done. There are a lot of wax products on the market, but they seem to fall into two broad groups: natural carnauba waxes and synthetic blends. Carnauba wax comes from a Brazilian palm tree and is considered the "hardest wax known to man," according to Mothers. Both Mothers and Meguiar's base their carnauba wax products on No. 1 yellow carnauba, the top carnauba grade. A synthetic wax is just that, a man-made product formulated to protect painted surfaces.
Carnauba gets the nod from the pros for its deep shine and protective qualities, but synthetics are just a bit easier to work with. You need to apply carnauba wax in the shade, as direct sunlight will harden it and make it difficult to buff off. A synthetic wax, on the other hand, can be applied in direct sunlight (like at a show) and not harden too soon.
As for the difference between a paste wax and a liquid, it all boils down to personal preference. Some feel the liquid is easier to use, but pastes are pretty soft these days, too. A can of paste may last longer than a bottle of wax, as it's easier to use more product than you really need when you're squirting it out of a bottle.
Application tips follow the same lines as the products we've already talked about. Put the wax on with a foam applicator pad and wipe it off with a terry cloth or microfiber towel. Don't use too much wax; a thick layer won't protect your car any better, and will actually be tougher to work with. The ideal thickness of a coat of wax is about the same as a sheet of paper, says Craig Burnett.
Mike Pennington did cite two examples of cases where a second coat of wax is beneficial: on the lower fenders and rocker panels during winter months, for added protection against the elements (and road salt); and on the top surfaces during the summer months to protect against sun exposure.
Where wax differs greatly from other car-care products is in the frequency of application. While you may need to surface prep only once or twice a year, the experts recommend you apply wax more often-every two to three months for a light colored car, and 8 to 12 times per year for a dark color. Why so often? Wax is your first line of defense against all those environmental contaminants we mentioned earlier, and regular washing will degrade the wax coat over time. Think of it this way: The more often you wax and the better protected your paint is, the less often you'll have to go through all the surface prep steps mentioned above.
How do you know when it's time to re-wax? If you rub your finger along the paint and it squeaks, it's time. Or if the paint detailers mentioned in the next section are slow to wipe off.
 | Car Detailing - All About Car Care
15. Waxes fall into two broad categories: synthetics and natural carnauba wax. Here's an example of each from Mothers, with the synthetics on the left and natural carnauba on the right. Both of these are one-step products that surface-prep and protect paint with the same application. In general, one-step products are recommended for light-colored cars or for cars that aren't exposed to much environmental contamination, like trailered show cars.
 | Car Detailing - All About Car Care
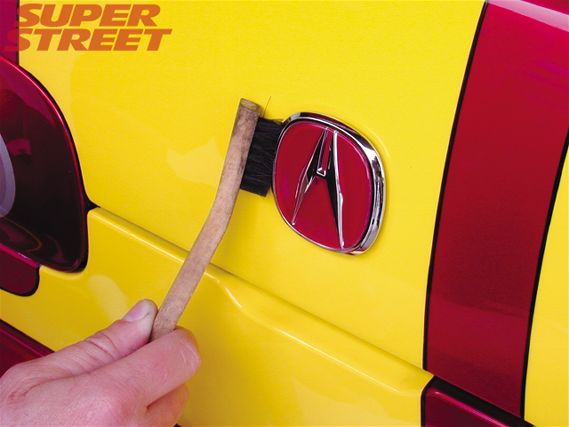
16. Wax can get caught in tight spaces, like around emblems and badges, and leave an unsightly residue. A small, soft brush like this one, which should be a part of a good brush kit, is good for cleaning around those areas.
Step 6: Maintain
Keeping a protective coat of wax on your paint is the best way to maintain its shine and prevent environmental damage from marring the finish. Between waxes, you can use any number of bottled detailers on the market, like Meguiar's Quik Detailer, Mothers Showtime, or Eagle One Wet Wipe & Shine, to remove fingerprints, light layers of dust, tree sap, bird droppings and other contaminants. None of these should be used in place of a wash, though.
So, is that "all about" car care? Hardly. We could go on for days (and it sort of feels like we already have). But this information is a great place to get started. And as Mothers' Craig Burnett says, "It's OK to experiment. Don't be afraid to find a care product that works for your car and your paint."
Paint Chip Care
If you've ever used touch-up paint to fill in stone chips, you know the paint brush, no matter how small, can leave little blobs of paint on your hood or fenders. Mothers has developed the Paint Chip Repair kit that will remove those blobs while leaving the paint in the chip. Here's how it works:
 | Car Detailing - All About Car Care
1. After using rubbing alcohol to clean the area around the chips, dab on the touch-up paint as sparingly as possible. You'll still get blobs, but minimize them as best you can at this point.
 | Car Detailing - All About Car Care
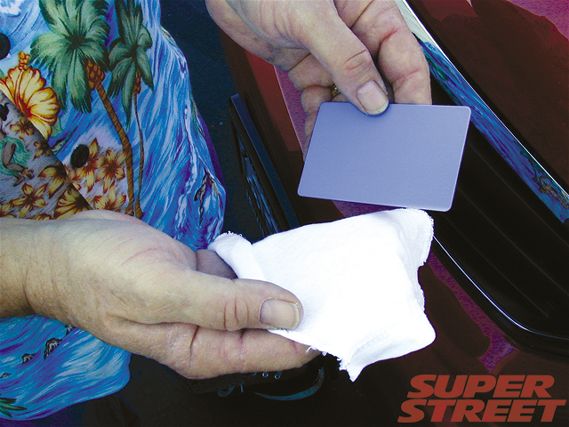
2. The repair kit comes with a credit card-sized piece of plastic that you wrap with a scrap of old T-shirt or similar soft cloth.
 | Car Detailing - All About Car Care
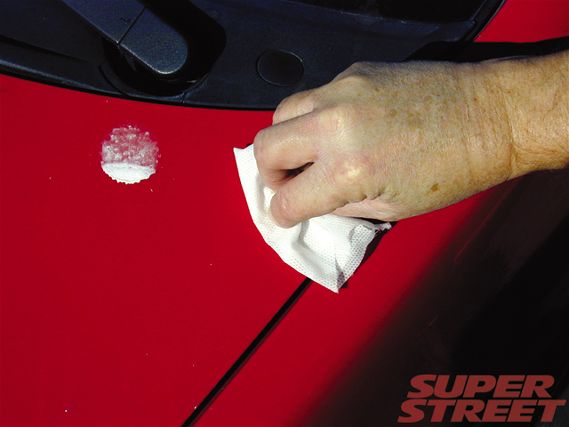
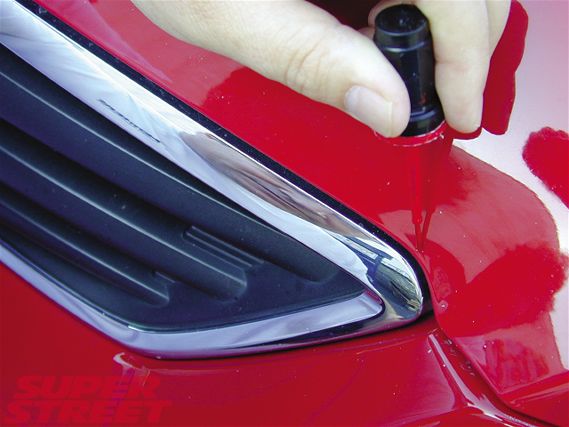
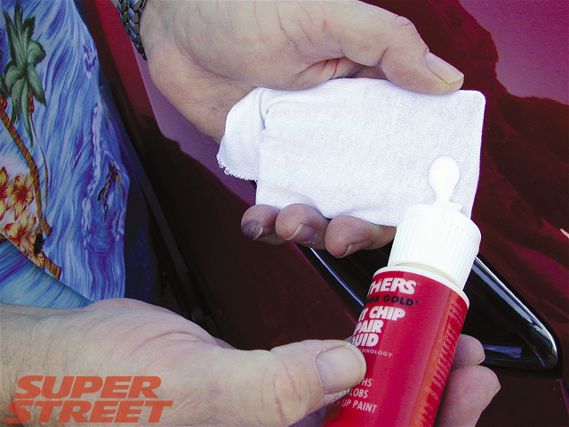
3. Apply some of the paint chip repair fluid directly to the touch-up paint if you're working on a horizontal surface like a hood. For a vertical surface, put a dab of the fluid on the cloth-wrapped card and then wipe it over the paint.
 | Car Detailing - All About Car Care
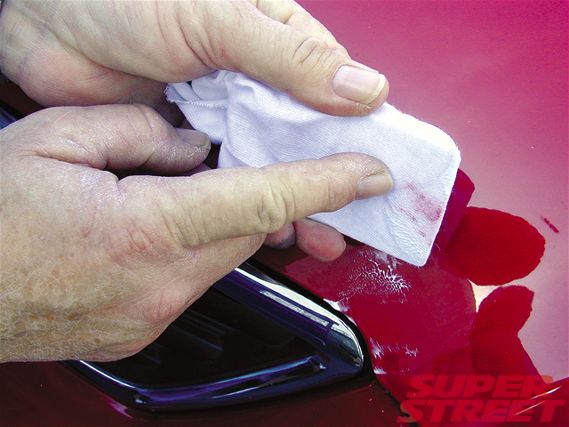
4. The fluid will soften the paint, so after a few minutes' time a gentle rub with the card will remove excess paint over and around the chip while leaving the chip full of paint. Here you can see the excess paint on the cloth.
 | Car Detailing - All About Car Care
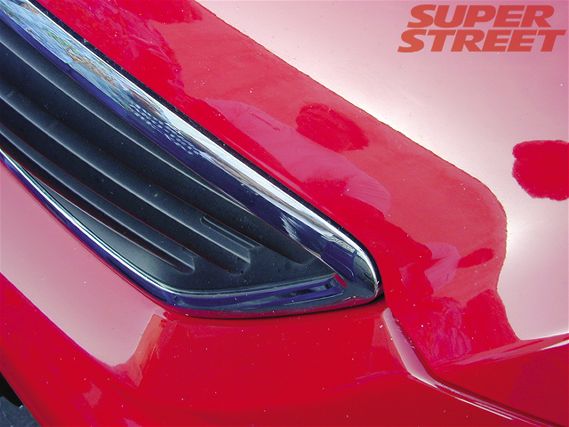
5. After letting the softened paint sit for a couple of hours to dry and harden, wax over it to protect it. Mothers says it may take a couple of tries to learn how to wipe with finesse, but as you can see, it works!
Tire Care
 | Car Detailing - All About Car Care
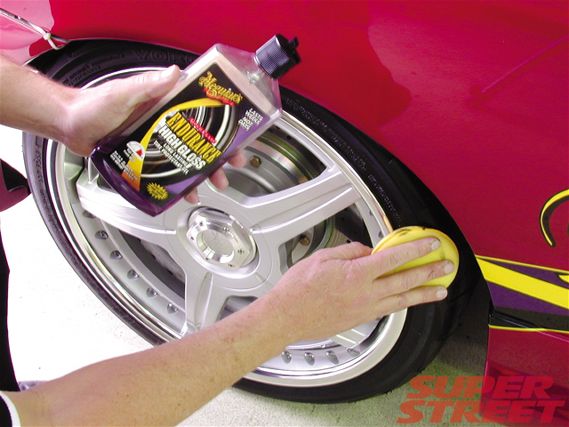
Much has been written about tire dressings and the potential for them to crack and damage tire rubber. We don't want to open that can of worms, except to say that you shouldn't think that all tire dressings are bad for your tires. Generally, a premium brand will be formulated to protect, not damage, tire rubber. Dressings come in two types: Solvent- or petroleum-distillate-based dressings give tires a high gloss, while water-based dressings give tires a more "natural" wet look. To properly apply a tire dressing, don't just spray it out of the bottle onto the tire, or you'll get dressing overspray all over the paint you just worked so hard to clean and protect. Instead, spray the dressing on a foam applicator and then wipe the applicator on the tire.
Non-Painted Surfaces
 | Car Detailing - All About Car Care
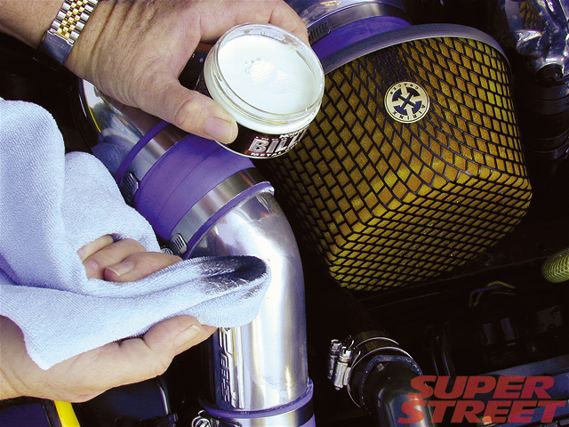
Like your paint, your car's various metallic components need care too. But no single product works best on all types of metal. Under the hood of Mothers' RX-7 drag car, we found chrome-plated metal, stainless steel, and aluminum parts. Mothers Mag & Aluminum polish works fine on the aluminum and stainless parts, but the chrome needed its own polish. That's because when you're polishing chrome you're basically just cleaning the metal, but when you're polishing aluminum or stainless, you're actually removing microscopic amounts of nickel from the metal. That's why the polish rag turns black when you polish aluminum. A tip from Craig Burnett: "Always polish metal in straight lines, not the circular motion you'd use on paint, as the circles would create visible lines in the metal."