 | Project CR-Z - Big Brake Kit - Tech
Honda’s CR-Z has been hit with both admiration and loathing from the enthusiast community due to a lack of K-power, but one thing is for certain: With its short wheelbase and responsive handling, this is a car that begs to be driven on roads chock full of corners and switchbacks. As more of these vehicles hit the road and their owners search for more power options, one critical area that will need to be upgraded is the braking department. Spirited driving on curvy backroads and track days can severely tax the stock system. This becomes painfully evident when one realizes that more cars are passed under braking than anywhere else on the track. Wilwood Disc Brakes now has the ultimate solution to control your CR-Z under race-like conditions!
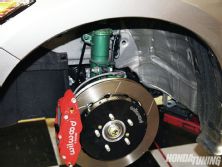
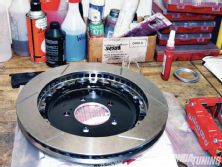
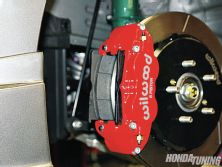
Developed using the first-generation, 2011 model year, the base kit (PN 140-11978) features Wilwood’s Superlite six-piston differential bore radial-mount calipers that clamp down on oversized 12.88-inch GT slot-pattern, vented rotors. The kit comes with aluminum hats, mounting brackets, and all hardware for an easy bolt-on installation. BP-10 high-performance street pads round out the kit, though other brake pad compounds for off-road applications are available. Optional items include SRP drilled and slotted rotors, and/or red powdercoated calipers.
As you read through the installation procedure below you will see that it is basically a bolt-on kit, just as Wilwood advertises, with only having to drill a single hole in the brake line bracket. Kits include everything necessary for an easy and complete installation. However, the stainless steel braided brake line kit (PN 220-12016) is a necessary item and must be ordered separately. You’ll be amazed as to how much better the Wilwood brake kit performs over the factory brakes.
A complete set of mechanic’s tools, including torque wrenches, will be necessary, along with a bottle of red Loctite 271, Teflon tape, and Wilwood’s Hi-Temp 570 racing brake fluid or Wilwood EXP 600 Plus Hi-Temp racing brake fluid for extreme temperature applications.
Note: The installation of this kit should be performed only by persons experienced in the installation and proper operation of disc brake systems. If you are not sure, get help or return the product. Install this kit to one side of the vehicle at a time. You may obtain additional information and technical support by calling Wilwood at 805-388-1188, email for technical assistance at: support@wilwood.com, or visit their website at www.wilwood.com.
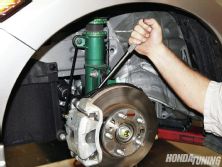
1 Raise the front wheels off the ground and support the front suspension according to the vehicle manufacturer’s instructions. Remove the lug nuts and slide off the wheel.
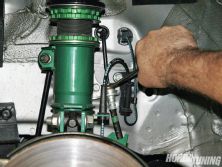
2 Break loose the rotor hat locator screws using an impact screwdriver, then remove the screws.
3 Loosen and remove the bolt securing the hose bracket to the shock support, and lift the hose and bracket out of the way.
4 Disconnect the rubber brake hose where it connects to the hard line. Try to keep fluid leakage to a minimum.
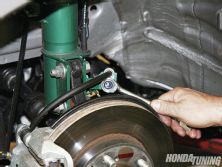
5 Remove the hose bracket that secured the rubber/hard line junction from the inside of the wheelwell.
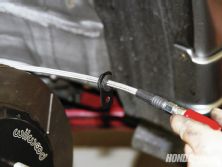
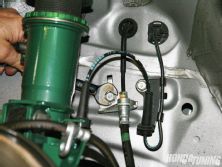
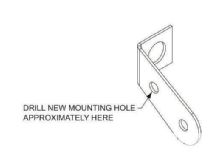
6 Attach the new Wilwood flex line kit (PN 220-12016) to the hard line and secure with a new bracket (PN 250-9349/50). Position the bracket so the hard line has no kinks. Drill a hole approximately as shown (arrow) and attach to wheelwell using OE bolt.
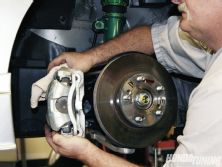
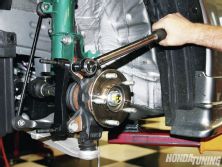
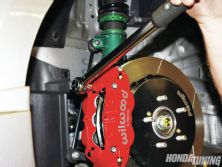
7 Using a breaker bar and socket, break loose the mounting bolts from the back side of the caliper.
8 Lift off and remove the caliper. Remember there is still some fluid in the rubber hose attached to the caliper.
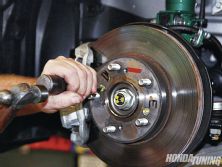
9 Slide the rotor off of the hub. If it’s stuck, it may be necessary to tap it a few times with a rubber mallet to break it loose.
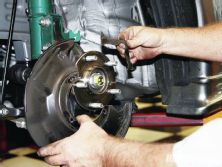
10 Remove the screws that secure the dust shield in place.
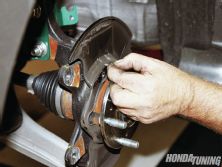
11 Using a pair of tin shears, cut the dust shield at its two smallest diameter locations and pull apart. Remove and discard the dust shield.
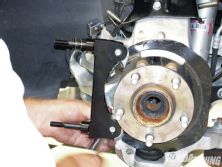
12 Install the caliper mounting bracket bolt and washer from the outboard side of the caliper-mounting ears.
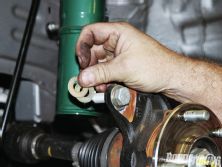
13 Initially place one 0.015-inch-thick shim, and one 0.033-inch-thick shim between the mounting ear and the caliper-mounting bracket.
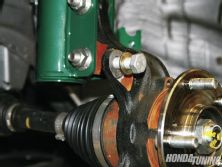
14 Attach the Wilwood caliper-mounting bracket to the OEM mounting ears from the back side. Temporarily tighten the mounting bolts. Note: The bracket must fit squarely against the mounting ears. Inspect for interference from casting irregularities, burrs, etc. Grind as necessary. Do not Loctite at this time.
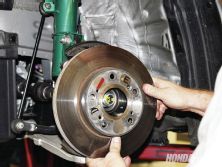
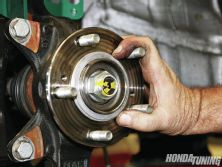
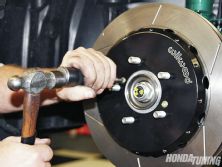
15 Install the rotor registration adapter onto the axle register against the hub face with the larger outer diameter facing inward toward the hub face.
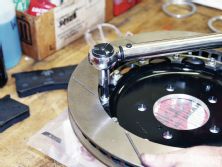
16 The hat needs to be bolted to the rotor. Orient the rotor over the hat in the configuration shown.
17 Place one flat washer over each hole on the rotor mounting tabs. Coat the mounting bolts with red Loctite 271 and slide through the washer and thread into the hat. Using an alternating sequence, torque bolts to 155 in-lb.
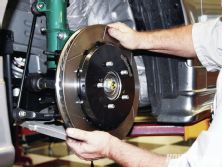
18 Install the hat/rotor assembly over the studs on the hub assembly. Note: The hat/rotor must fit flush against the axle hub flange or excessive rotor runout may result.
19 Reinstall the hat locator screws using an impact screwdriver to keep the hat/rotor in place while continuing with the rest of the installation.
20 Lubricate the caliper-mounting studs with lightweight oil. Initially place two shim washers on each stud between the bracket and caliper.
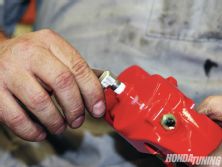
21 Remove the protective sticker from the caliper fluid inlet. Coat the inlet fitting with Teflon tape and screw into the caliper with the 90-degree angle perpendicular to the length of the caliper.
22 This kit includes distinct right- and left-hand calipers. Mount the caliper onto the bracket so that the larger pistons are at the rotor exit end of the caliper, in relation to the direction of rotor rotation. (Left-hand installation shown.)
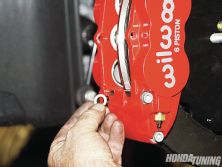
23 Secure the caliper with a washer and a locknut, temporarily tighten. View the rotor through the top opening of the caliper. The rotor should be centered in the caliper. If not, adjust by adding or subtracting shims between the bracket and the mounting ears. Once the caliper alignment is correct, remove the bracket bolts one at a time, apply red Loctite 271 to the threads and torque it down to 65 lb-ft.
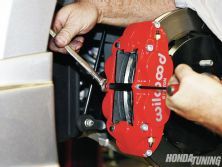
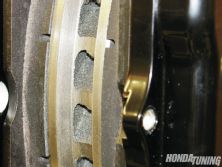
24 Having already removed the caliper center bridge pad retainer bolt, nut, and the tube from caliper, insert the brake pads into the caliper with the friction material facing the rotor.
25 Check that the top of the brake pad is flush with the outside diameter of the rotor. If not, adjust by adding or subtracting shims between the bracket and the caliper.
26 After the pad height is set, install the center bridge pad retainer tub, bolt, and locknut using an Allen wrench and open-end wrench. The locknut should be snug without play in the bolt or tube. Be cautious not to over tighten. Finalize the caliper mounting by torqueing the caliper mounting locknuts to 35 lb-ft.
27 Slice a grommet so that it can be slid over the Wilwood flex line that is already attached to the hard line. Install the flex line into the OE bracket and attach the bracket using the OE bolt in the original location.
28 Connect the other end of the flex line to the fitting installed in the caliper. Secure the line as necessary to prevent contact with moving suspension, brake, or wheel components. Bleed the entire brake system; refer to the instructions provided in the data sheet as necessary.