 | Project S2000 - Preparing For Paint - Tech
When examining different race and track car builds, it’s evident there are many different levels of preparation and involvement — from completely stock street cars, to ALMS GT2 class cars. The goal with our S2000 build is to showcase the steps required and the tools and techniques used to produce a first-rate race car. This month’s story marks a very important step in this process, as we have completed the trial assembly and have disassembled the car to complete final fabrication and preparation for paint.
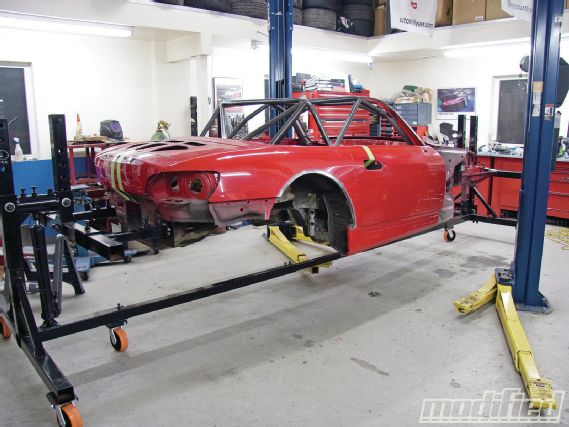
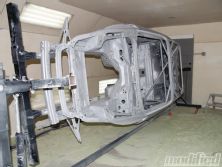
We ordered a Direct Lift rotisserie to allow full access to all parts of the chassis for both stripping, welding and painting. Assembly was straightforward and the included mounting plates mated nicely to the rear re-bar mounts; welding the front mounts to the front re-bar proved to be the best option. The rotisserie features adjustment rods to position the car’s center of gravity above the rotisserie’s pivot point. This makes for safe and easy operation, allowing for one-hand positioning of the vehicle. There are also hydraulic bottle jacks at each end so the vehicle can be raised and lowered to a comfortable working height, as well as high enough to rotate the vehicle a full 360 degrees. It’s amazing how spots that were near impossible to reach without the rotisserie can now be comfortably worked on.
 |
Removing the tunnel reinforcement is a time-consuming task, but it dropped a substantial 22 lbs.
|
Removing the tunnel reinforcement is a time-consuming task, but it dropped a substantial 22 lbs.
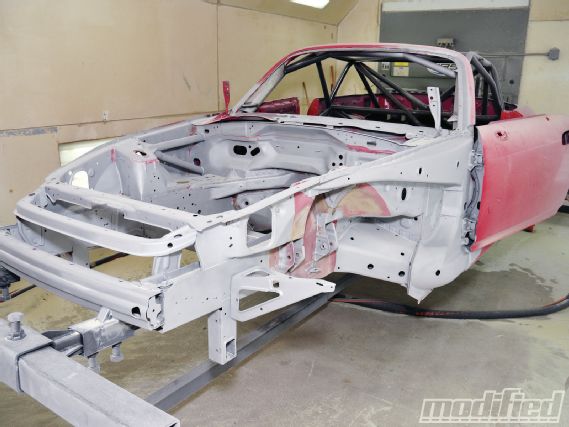
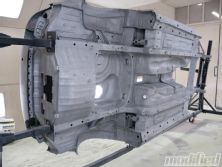
With the chassis secured to the rotisserie, we loaded the complete assembly in our 20-foot enclosed trailer and transported it to The Soda Pros, media blasting specialists who are experienced with the removal of automotive paint and finishes. The Soda Pros carefully selected the correct media using a more aggressive material to remove the underbody and seam sealer, while opting for a more gentle material for the exterior panels, ensuring minimal heat build-up and no panel warping. The rotisserie allowed The Soda Pros to reach every nook and cranny, stripping the complete chassis to bare metal. One big advantage of media blasting compared to chemical stripping or acid dipping is the galvanized coatings on the hidden panels remain in place to ensure corrosion protection in areas that paint is unable to reach. The rotisserie also makes it easier to remove the media that collects in difficult-to-reach places. We recorded the weight of our chassis before and after blasting, and measured a 5-lb reduction. Considering the majority of the underbody coating was scraped off earlier in the build and there’s still some media to vacuum out of some hard-to-reach places, we’re content with the weight savings.
 |
One benefit of blasting, as opposed to chemical dipping, is that hidden panels retain their anti-corrosion coatings, increasing the chassis’ lifespan.
|
One benefit of blasting, as opposed to chemical dipping, is that hidden panels retain their anti-corrosion coatings, increasing the chassis’ lifespan.
If you’ve worked on a painted chassis, you know that stripping surfaces is difficult and welding anything is often a smoky, toxic mess. If you haven’t, consider yourself fortunate — it’s not fun. However, following the media blasting, it’s possible to seam- and stitch-weld with ease. We seam-welded the door openings and stitch between spot-welds on parts of the chassis that experience high loads to help increase the chassis-bending stiffness and torsional rigidity.
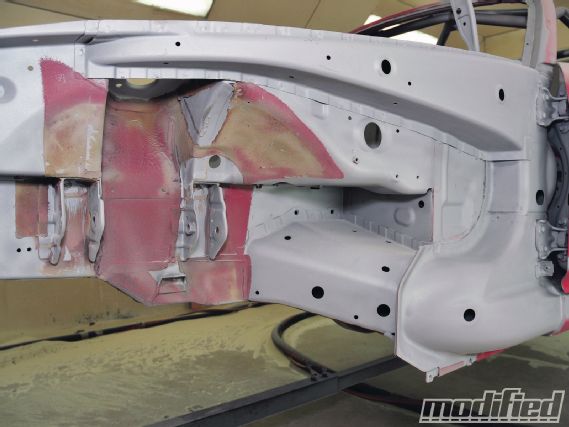 |
While the paint is easily blasted away, the rubber undercoatings require more aggressive media and patience. Be sure to scrape as much as possible before blasting to minimize cost.
|
While the paint is easily blasted away, the rubber undercoatings require more aggressive media and patience. Be sure to scrape as much as possible before blasting to minimize cost.
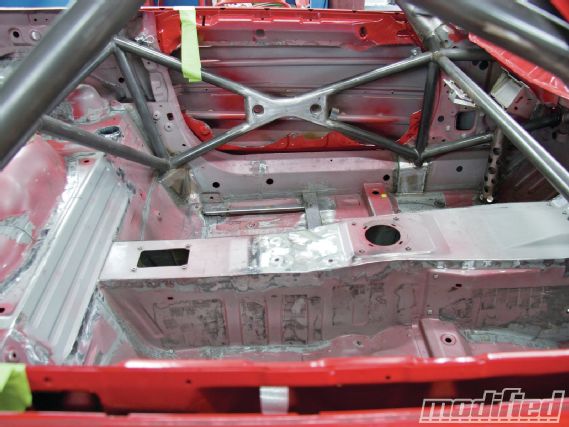
This is also the perfect opportunity to drop unnecessary weight. Our O’Brien Motorsports cage negates the need for the OEM center-tunnel reinforcement (made to compensate for the lack of bending stiffness a convertible offers by design). This center-tunnel removal dropped an astonishing 22 lbs, much more than I had estimated — although removal is extremely time-consuming because there are what feel like an infinite number of spot-welds to drill out. Any unnecessary brackets like the OE exhaust hangers, hood prop rod mount, spare tire mount and more have also been removed at this point.
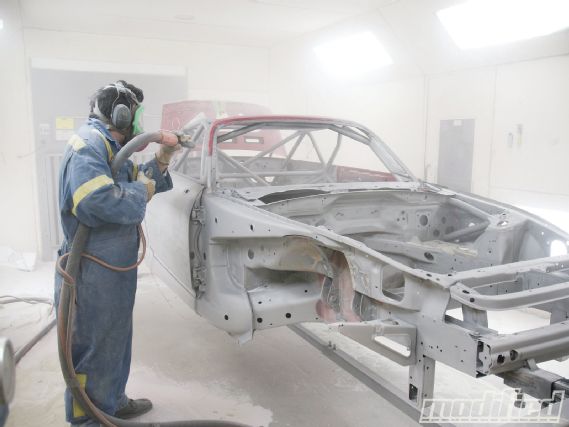 |
The right safety gear ensures only the car gets blasted, not the operator.
|
The right safety gear ensures only the car gets blasted, not the operator.
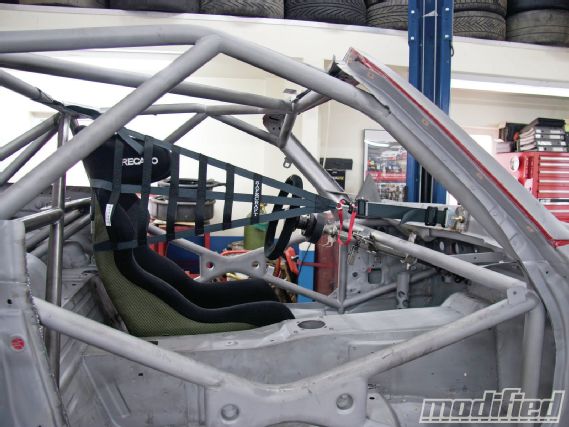
In an effort to improve our left/right weight distribution, driver safety and elbow-to-door bar clearance, I’ve relocated the seat over 2 inches to the right to take advantage of the newly found room with the tunnel reinforcement removed. This also required the relocation of the steering column, which, with some custom fabrication work, turned out great. The seat frame is fully welded to the floor pan and uses custom aluminum 6061-T6 side mounts to secure the Recaro Pro Racer SPG Hans. With the seat so close to the tunnel, it’s no longer possible to use a conventional belt with the adjuster located beside the seat — there isn’t enough room to twist it to back the belt off.
 |
Be sure the right-side net is positioned to support your helmet’s center of gravity.
|
Be sure the right-side net is positioned to support your helmet’s center of gravity.
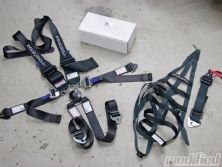
Fortunately, Safecraft racing, headed up by a top-level pro racing driver and all-around great guy, Charles Espenlaub, understands the mounting difficulties that can arise and has a set of belts that meet all of our needs. The Safecraft belts feature a pull-out adjuster that is located just off of the cam-type release mechanism. By locating the adjuster in this position, it’s easy for the driver or crew to tighten the belts, even in our cramped cockpit. The belts also feature 2-inch laps that are proven to offer more secure loading of the hips/pelvis and hybrid 2- to 3-inch shoulder belts for HANS compatibility. The belts are SFI rated and include a free re-web by Safecraft at the two-year mark.
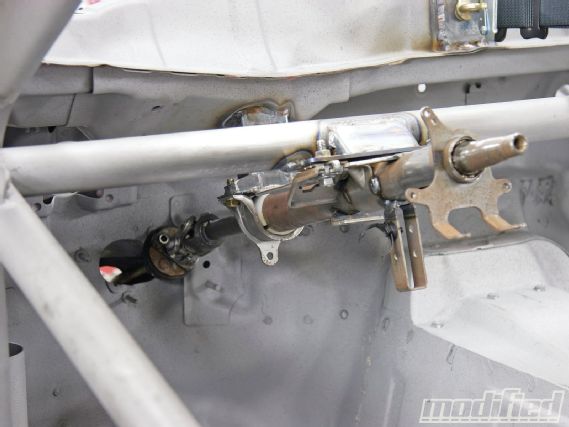 |
The steering shaft was relocated 2 inches inboard to match the seating position and improve elbow-to-door bar clearance. Relocating the seat inboard improves driver safety and weight distribution.
|
The steering shaft was relocated 2 inches inboard to match the seating position and improve elbow-to-door bar clearance. Relocating the seat inboard improves driver safety and weight distribution.
In addition to the new belts, we also fitted Safecraft’s right-side net. This system prevents the driver’s head from ending up on the wrong side of the head support in a diagonal-type front collision.
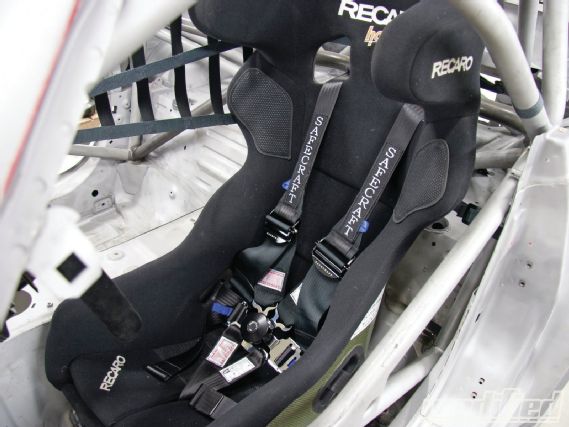 |
Here you can see how the right-side net cradles the back of the seat and helps provide improved rearward and lateral support. The Safecraft shoulder belts are available in the 2–3-inch hybrid, as shown for HANS use, or the regular 3-inch size.
|
Here you can see how the right-side net cradles the back of the seat and helps provide improved rearward and lateral support. The Safecraft shoulder belts are available in the 2–3-inch hybrid, as shown for HANS use, or the regular 3-inch size.
When installed, it also acts as a support for the seat by limiting movement and increasing the ultimate load it can withstand. Make sure to verify that the net is installed so the helmet will be cradled by the net (helmet’s center of gravity at center of net) in the unlikely chance that it’s needed. Also be sure to choose mounting locations that can withstand 1,500 lbs of force.
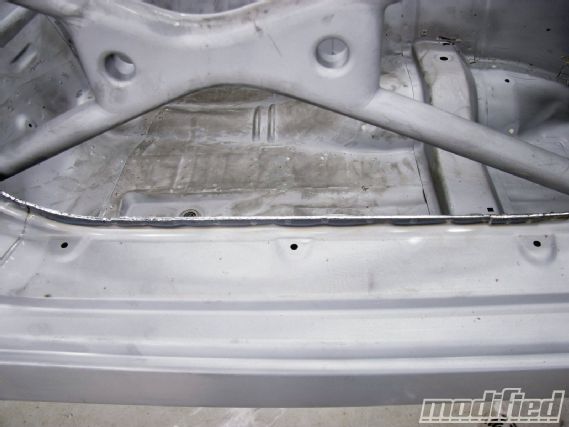 |
TIG-welding the seams helps improve chassis stiffness. The key to a nice, smooth finish is to grind the individual pieces of sheet steel down to one even height.
|
TIG-welding the seams helps improve chassis stiffness. The key to a nice, smooth finish is to grind the individual pieces of sheet steel down to one even height.
Safecraft is the only company to equip its right-side nets with a compact, lightweight ratchet mechanism. This piece is top quality and belongs in a race car, unlike the competitors that are equipped with a bulky and heavy tie-down, strap-type ratchets.
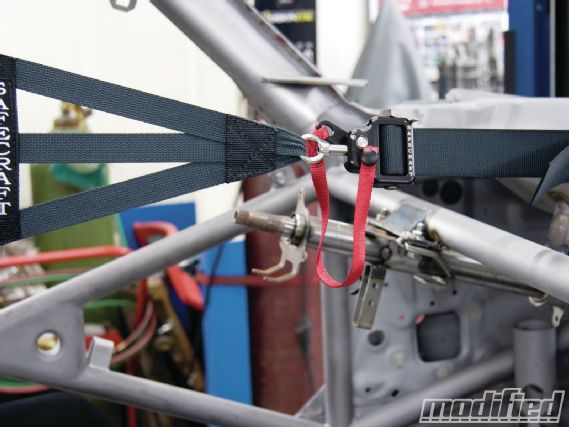 |
Safecraft’s exclusive billet ratchet on its right-side net is well made and by far the best on the market. The red strap is for emergency quick release.
|
Safecraft’s exclusive billet ratchet on its right-side net is well made and by far the best on the market. The red strap is for emergency quick release.
Stay tuned as the final weld work and fabrication continues in preparation for powder painting of the chassis. Once the paint is applied, things are really going to heat up.
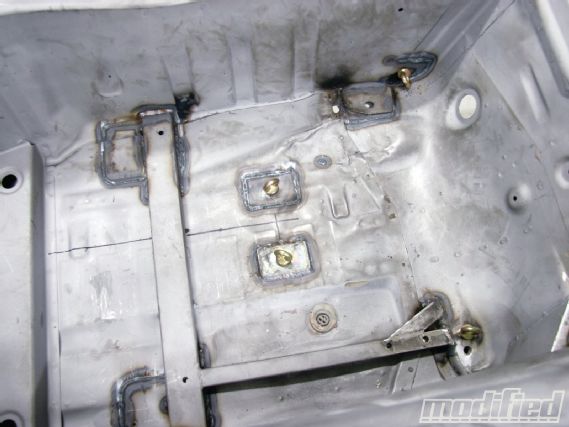 |
Proper harness mounting is critical for your safety! Be sure to check out the SCCA Pro Racing rule book (sccaproracing.com) for an excellent guide on proper harness mounting. Only use forged eye bolts designed specifically for this application.
|
Proper harness mounting is critical for your safety! Be sure to check out the SCCA Pro Racing rule book (sccaproracing.com) for an excellent guide on proper harness mounting. Only use forged eye bolts designed specifically for this application.
Sourcebox
Safecraft Racing
Safecraftracing.com
813-758-3571
The Soda Pros
Sodapro.com
905-593-0684
Direct Lift
Directlift.com
866-347-5438