 | Project Toyota Corolla GT-S AE86
Corolla tuners are strange people, weirdos obsessed with making 22-year-old cars go fast. It's not much different from trying to retrofit an old black-and-white TV with Dolby 5.1 surround. Why don't Corolla tuners just buy modern cars? Because they're strange. And often cheap. Many Corolla tuners try to find speed with a budget that would shame a 15-year-old high school student.
As much as we'd like to save money, using half-ass budget parts won't cut it for a car that has to make up for two decades of advances in automotive technology. Now the car is running reliably, we're addressing the most critical issue: keeping the tires planted. Even though the AE86 Corolla chassis is known for its balance and user-friendliness, the suspension has some inherent drawbacks when compared to modern designs. Take the front set-up. The MacPherson strut lay-out has minimal camber gain, especially when the car is lowered significantly-one of the first modifications executed by Corolla owners. For this reason, most tuned Corollas run an obscene amount of front camber in order to maximize the contact patch in cornering. The front suspension also combines the spindle with the bottom of the strut housing, meaning any suspension updates involve removing and disassembling the entire front wheel and hub, so the stock spindle and strut housing can be sent off for modification.
 | Project Toyota Corolla GT-S AE86
The rear suspension is a solid live axle with four unequal-length lateral links, combined with a Panhard rod that constrains movement solely to vertical motion-a similar thing is found in most muscle cars, new and old. Two short lateral links connect the chassis to the top of the axle casting on each side, while two longer links connect the chassis to brackets protruding from the bottom of the axle. The springs sit farther inboard on the axle than the dampers.
While this design is great for putting up with gobs of torque with no camber change as the car squats, it is an immense lump of steel-unsprung weight that can potentially bind as the axle rotates when the car rolls. These links also have a tendency to resist squat the more the rear suspension swings up. Not good when planning to lower the car a couple of inches.
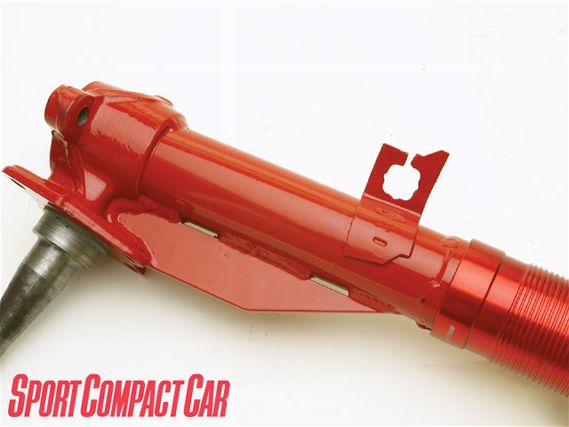
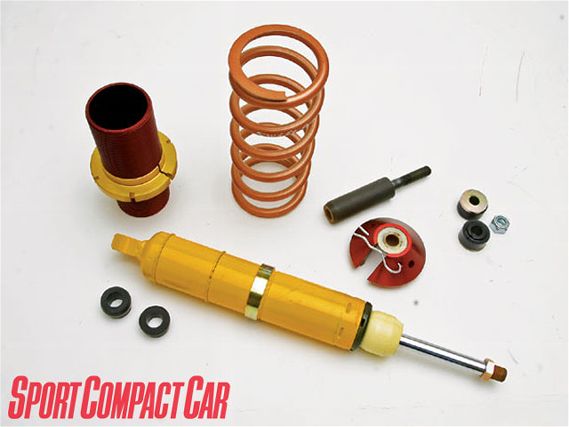
 | Ground Control's new front coilover uses the stock strut upright and spindle, but is shortened for more shock travel, fitted with a threaded spring perch sleeve and reinforced with thick-gauge steel brackets to distribute the bending loads from the axle.
Add all this to the fact that the rear camber and toe are non-adjustable, and you end up with a car that should thoroughly suck in terms of road racing. But it doesn't for some reason, and racers still love this nimble cult classic.
Picking Your Rates
The foundation of our suspension update is a set of custom coilovers built by Ground Control around some Koni race dampers. We started off with spring rate selection using existing coilover springs available through Swift Springs. Most Japanese Corolla tuners will recommend 8kg/mm (447lb/in) and 6kg/mm (335lb/in) spring rates for the front and rear, respectively, for an aggressive street/track set-up. Assuming our gutted Project Corolla weighs a somewhat light 2200 pounds and has a distribution of 54 percent front and 46 rear, these spring rates would be appropriate for a weight distribution range of 57/43. This is a good ratio, since a little less rear spring will keep the rear suspension better planted.
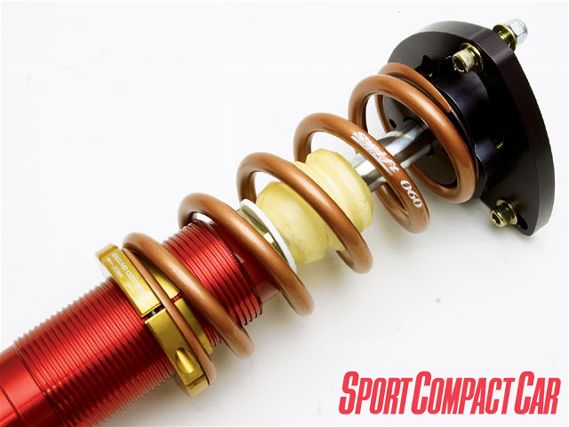
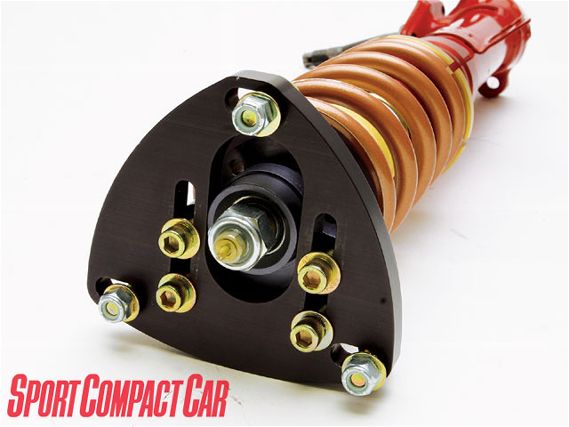 | Squishy and rusted upper mounts on the stock suspension were ditched for these adjustable camber and caster plates fitted onto a pillowball upper mount.
However, we're not in Japan. Our roads are definitely not the same. Keeping in mind that Project Corolla currently still runs stock pizza-cutter wheels and street tires, we decided to proportionately downgrade as best as we could and settled on a combination of 6kg/mm (335lb/in) and 4kg/mm (220lb/in) springs in front and rear, respectively. This corresponds to a weight balance of 60/40, not bad considering the nature of the tires and that most of the stripped-out weight came from the interior's rear. Assuming a motion ratio of 1 for the front and soon-to-be coilover rear suspension, this gives us a natural ride frequency of roughly 2.4Hz for the front and 2.16Hz in the rear. Most regard 2Hz as a good ballpark for a well-tuned street car. Ferrari Challenge cars have a ride frequency of roughly 2.5, so Project Corolla will have a rough ride to the track for sure.
Just to be sure, we did some back-of-the-book calculations to see how much each corner would compress with the assumed vehicle weight at front and rear. Some suspension tuners will use a factor of 1g to 1.5g of vertical acceleration on top of the weight already supported by each corner, to simulate extreme suspension inputs and ensure adequate compression travel for the spring rates chosen.
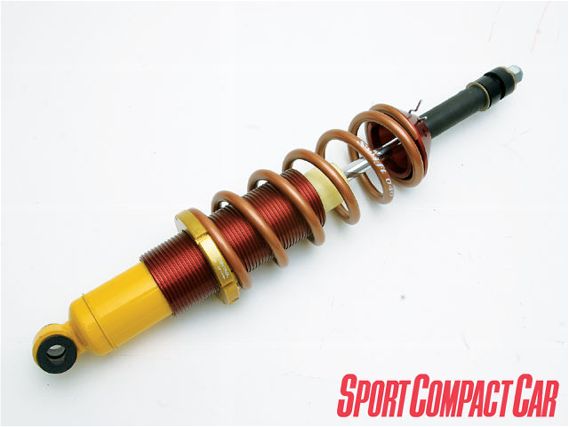
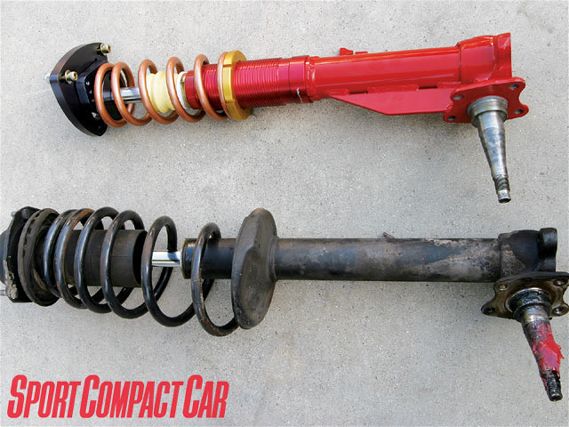 | Shortened and painted red, the rebuilt front suspension is a stark contrast to the leaky strut and cut springs we removed. It also made us realize just how pointless any baseline numbers with the old suspension would have been.
Assuming each rear corner supports roughly 440 pounds when static, if you take out the unsprung weight, 1g of compression force would mean 880 pounds of force, which would compress the spring four inches from its free length, a significant amount of travel for a lowered car. The fronts would compress 3.3 inches in total or 1.6 inches from the car's static ride height. This will give us a ballpark figure for the amount of compression stroke needed in the dampers we choose.
Proper Damping
Ground Control (GC) worked with Koni to pair up the appropriate dampers and the required spring rates. We chose Koni for its wide range of monotube and twin-tube motorsport dampers. Depending on the model and the money you're willing to spend, Koni offers both single-rebound only or independent compression- and rebound-adjustable shocks valved with linear, digressive or progressive damping profiles.
 | Project Toyota Corolla GT-S AE86
Taking overall stroke length into consideration, sufficient compression and droop travel is absolutely critical when building a custom set of coilovers. A good starting point is to add the required amount of compression travel (from the calculation we just made) to the desired amount of droop travel. Add the bumpstop length on top of that to get the total stroke length.
The optimum amount of droop travel is often a matter of opinion. For example, some front-wheel-drive race car drivers like minimal droop in the rear suspension to lift an inside wheel off the ground in cornering. This will make a typically understeering car rotate better. Having a good deal of droop on rear-drive cars is a good thing, because rotating a rear-drive car is a whole other ball of wax, and you want to keep all the wheels on the ground at all times.
 | The rear suspension comes as all these screw-together pieces. No welding is required, so changing out different shocks or springs can be done at the track in a matter of minutes.
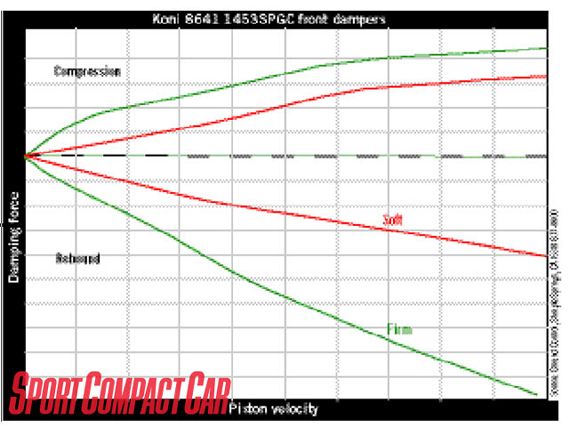
Jay Morris, the mastermind behind GC suspension, picked a single-way, rebound- and compression-adjustable, twin-tube damper for the fronts (Koni part number 8641-1453 SPGC. The GC in the part number means that it's only available through Ground Control). Morris worked with Koni to have the damper valved in three digressive phases for low-, medium- and high-speed compression damping, while keeping the rebound profile fairly linear.
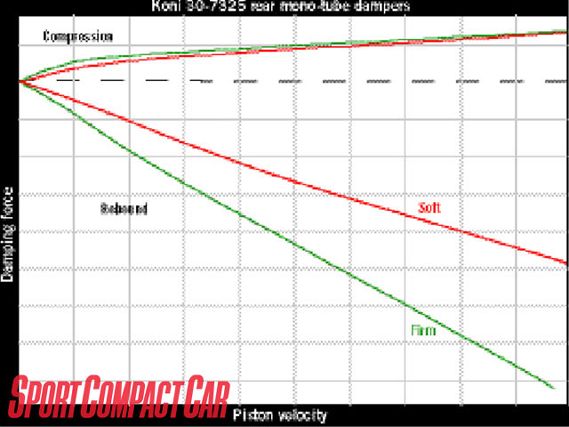
The new rear coilover (Koni part number 30-7325), was derived from a proven GC design used on the Datsun 510. The four-position, rebound-adjustable only, high-pressure monotube damper has a total stroke of seven inches and was originally intended for circle track and road racing. According to Koni, the linear damping profile is well suited for shorter-stroke suspensions with motion ratios near 1.
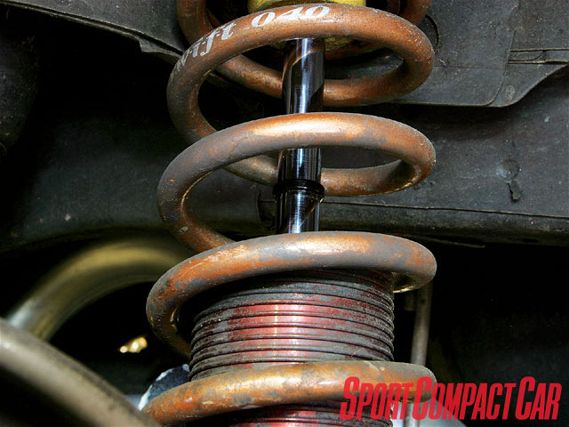
 | The rear suspension now uses a coilover design, which means the single layer sheetmetal and 10mm stud on the bottom are all that's supporting the car's weight. We'll be reinforcing this mounting system later with some custom fabrication. But in the meantime, the mounts have shown no signs of fatigue after six months of road and track work.
Building A Coilover
Building adjustable-height coilovers for the AE86 Corolla is not easy. As mentioned earlier, the front axle spindles are part of the strut housing. It's no wonder suspension manufacturers rarely offer off-the-shelf coilover kits, since the stock front suspension housings are no longer made. Those that do typically require a core exchange or cost significantly more than your average MacPherson strut adjustable suspension. We temporarily borrowed a set of front strut housings from a fellow Corolla-phile and sent them to GC, along with the Swift springs.
In order to give the new sport dampers enough space for their full stroke length, the strut housings have to be shortened by up to two inches. This requires two precision cuts: one to remove the top portion that has the machined threads and ridges for the cap holding the inserts in place. And a section cut out to shorten the tubing. Then the top must be concentrically welded back on. GC also hacked off the stock spring perch and welded in a seat for the threaded coilover sleeve to sit on. The spindle was also reinforced with a thick steel plate, welded in to distribute the bending load from the axle. Top it off with a CNC'ed pillowball adjustable camber and caster plate, plus a coat of bling-tastic red paint, and you have a set of coilovers worth more than the car.
 | Project Toyota Corolla GT-S AE86
Setting It Up
You haven't done a real suspension install until you've done it on a Corolla. Half the effort involves pulling off the brakes, rotor and bearing assembly-just to free up the bottom end of the front suspension. We also had to slot the bolt-holes in the strut tower sheetmetal, so the camber plates (originally intended for another application) would fit properly. By the time you read this, GC should have a proper adaptor plate available.
The rear suspension is much easier to bolt in. Pick up the rear with a floor jack on the rear axle and support the car with jack stands. Unbolt the bottom of the shock from the axle and drop the jack. The rear springs will pop right out.
 | Project Toyota Corolla GT-S AE86
The new GC coilovers, which also come with custom-turned polyurethane bushings, eliminate the stock springs by concentrically mounting the new spring on the dampers. This is the easiest way to obtain rear height adjustment for corner balancing.
The drawback is that the single-layer sheetmetal used for rear strut towers was never designed to support the rear of the vehicle's weight. Nor were the dinky studs on the axle that the bottom of the damper bolts to. Some Corolla tuners assure us this is safe, but we'll eventually reinforce the lower mount and strut towers by tying in some type of crossbrace or roll bar-even though the mounting points have shown no signs of fatigue after several track days. We also kept the rear springs, just in case the shocks ever decide to rip through the strut towers.
 | With each corner installed, we need to set a rough ride height. And it's not based on looks. Using zip ties on each piston rod, we measured the piston position at static ride height. Everything above the zip tie to the bumpstop is compression travel. Everything below is droop. We raised each corner so that at no point did the zip tie bury itself into the bumpstops. The trade-off is a loss in droop travel.
Another advantage of GC's rear suspension is its modular component design, making it easy to disassemble when changing springs, or even shocks. Corolla tuners divide into distinct camps, some preferring to use conventional lowering springs in the stock location, others swear by rear coilovers. Either way, we're covered. If the new geometry doesn't work, we'll just take the springs out and use replacements in the stock location.
After fumbling all these parts onto the car, we needed to sort out a ballpark ride height that allows the suspension to compress and droop properly. Initially, we set each spring perch at a free-length height of the spring, which avoids both pre-loading the spring and also utilizes as much droop travel as the spring will allow. It's a good starting point for setting any coilover's ride height, but this will limit compression travel if there is insufficient total stroke.
We can figure out total stroke by measuring the length of exposed piston rod between the top of the shock housing and the bottom of the bumpstop. Using zip ties wrapped around each piston rod and pushed all the way down to the top of the insert body, you can measure how much the suspension compresses from its free-air position. When the car is lowered, the zip ties will be pushed up to the static ride height. Lift the car up again and measure how far the zip tie has moved up. This will be the amount of droop travel. Everything above the bottom of the zip tie and under the bumpstop is the compression stroke.
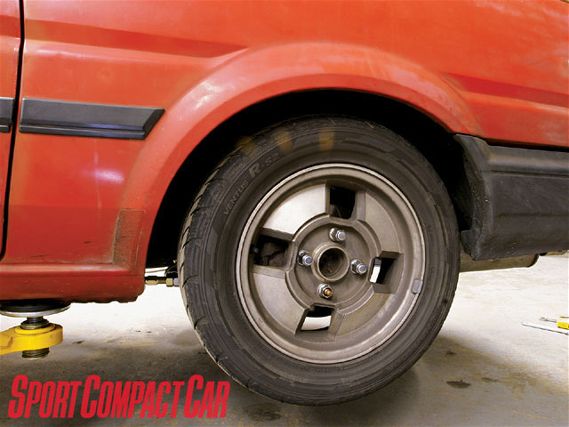 | Even in free air, it's obvious our current set-up doesn't have enough droop travel to keep the tire on the ground.
To make sure the car doesn't hit the bump-stop in compression, we picked up each corner of the car so only one wheel supported the weight of the car and jumped on that corner. Based on where each zip tie ends up, the spring perches might have to be raised to get enough compression travel to clear the bumpstops.
Our original free-length settings still pushed the zip ties into the bumpstops, so each corner was raised appropriately. Considering there's a finite amount of total stroke, it's probably better to compromise droop to maximize compression stroke. It's far better to have a wheel lift off the ground in cornering than having the suspension bury itself into the bumpstop. The car is still lower than we like, but does the job on track for now.
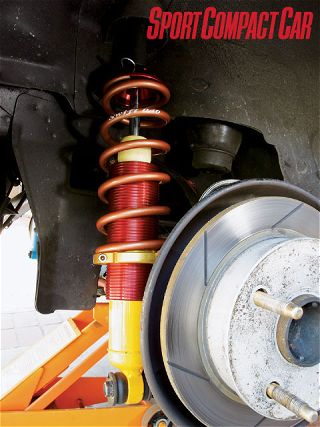
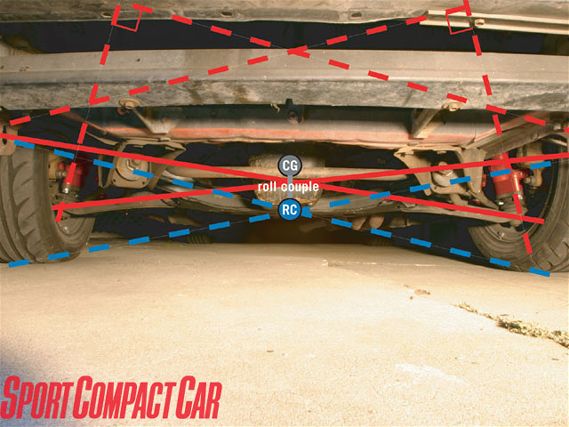
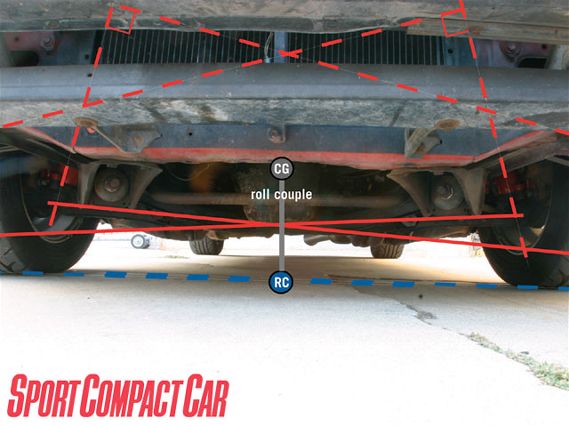 | With the car two inches lower than stock, the front lower control arms have assumed a scary upward angle, which lowers the roll center to almost ground level and increases the front roll couple.
The dampers give a total useable stroke of only two inches in front and three inches in the rear. Given that we had to compromise one way or the other, we settled on 1.5 inches of compression and the remaining 0.5 inches for droop in front.
In the rear, we ended up with 2.25 inches of compression and 0.75 inches of droop, not nearly as much stroke either way as we'd like. It will work for now as we consult Koni about alternatives that give us more damping and stroke, while still fitting in the existing parts. We're also contemplating a last resort of trimming the progressive bumpstops that came with the suspension.
Fixing A Lowered Car
With Project Corolla sitting almost two inches lower than it was ever designed to, we now have to deal with all the issues that plague an overly lowered car. On the front end, the lower control arms are now pointed up by around five degrees. This moves the roll center a good deal lower than stock, which makes for a much longer roll couple acting on the front of the car. The roll center for the solid axle geometry doesn't change with lowering, which makes for a sharply angled roll axis.
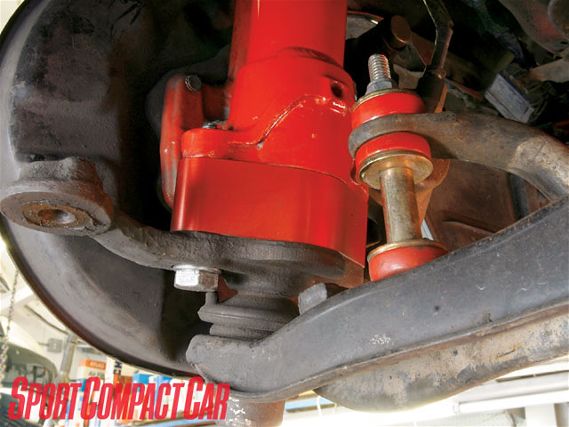
 | Techno Toy Tuning's roll center adjuster (RCA) spaces the lower control arm further down from the stock mounting location, which returns the arm to a proper downward angle and moves the roll center back up toward the center of gravity, reducing the roll couple.
Relocating the front roll center is a simple fix with roll center adjusters (RCAs) now readily available. In the case of the unique Corolla front suspension, it's just a simple two-inch aluminum spacer that shims between the lower control arm and the bottom of the strut housing, pointing the lower control arm back in the right direction.
Techno Toy Tuning (T3), the tuners that brought out a Honda S2000-powered Corolla for our Junkyard Dogs shootout (SCC, Jan 2007) supplied its RCA kit. A nifty perk of the Corolla's quirky front knuckle is that the steering arms are attached to the lower part of the upright. So with the RCAs installed, not only is the front roll center returned to its original height, the steering arms retain their original geometry, eliminating any bump-steer issues. This is why these RCAs are also called bump-steer spacers.
T3 also makes a negative-camber RCA, which, unsurprisingly, adds negative camber and widens the front track. We passed on those to keep a consistent scrub radius in front and rear, and also because the GC camber plates already provide enough negative camber adjustment.
 | The RCAs are sometimes referred to as bump-steer adjusters. For the Corolla, which has its steering knuckle attached to the lower control arm, the RCAs will also return the steering tie rods back to their original angle, compensating for additional bump-steer caused by lowering the car.
Track Time
Being able to control and feel each tire's motion makes a night-and-day difference when compared to the tired stock suspension and cut springs. With the front camber set at minus 2.5 degrees (for even tire wear) and zero toe, Project Corolla now pulls a consistent 0.91g on each end of our figure-eight test and runs the course in 27.7 seconds, a couple of tenths shy of a stock all-wheel-drive WRX, which has two more drive wheels and twice the power. Numbers aside, the biggest difference is the dynamic response on track. The spring and damping rates we chose are nicely compatible with the Hankook Z212 street tires currently on the car, and also keep the front and rear roll response well synched. Dive is practically eliminated, but we still do have some issues with the rear suspension squatting, and its laggy response on account of the unsprung weight and uneven lateral links. Next time, we'll further update the suspension with adjustable anti-roll bars, a temporary fix for the rear lateral links, and other handling tricks we're still experimenting with.