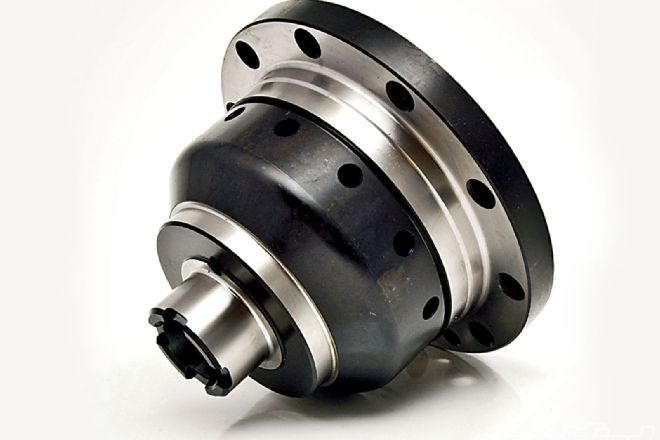
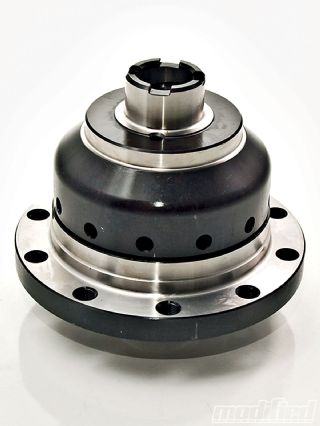
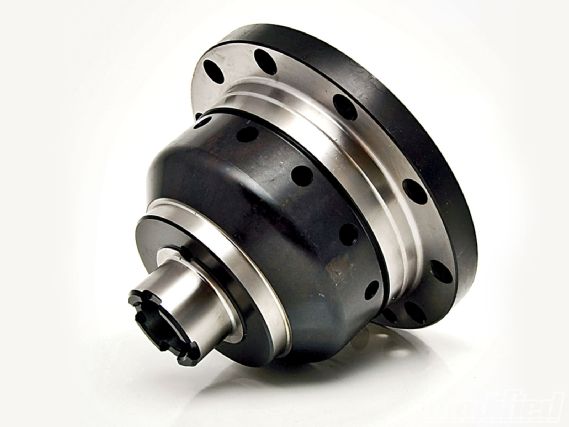
We recently showcased the benefits of a limited-slip differential upgrade on our RWD Project G35, so we thought it would be useful to do the same for the FWD crowd, this time using a Wavetrac LSD. Wavetrac differentials use helical gears that are torque-sensitive, locking together more and more aggressively as torque delivered to the driveshafts increases. In this way, Wavetrac's approach is very much like Quaife's Automatic Torque Biasing (ATB) differential or a Torsen differential (like those offered in LSD-equipped Hondas such as the Integra Type-R).
 |
Wavetrac LSD Installation - A New Way To Get A Grip
|
Wavetrac LSD Installation - A New Way To Get A Grip
With a standard torque biasing gear-type LSD, if both wheels are firmly planted on the ground the diff is able to transfer power to the wheel with the most grip very effectively. But if one of the drive wheels is lifted (say during hard cornering) to the extent that it has very little load on it, the differential loses its ability to transfer power to either wheel. This is also true during the transition from acceleration to deceleration, where there is near zero torque on the axles.
To overcome this limitation, Wavetrac has developed a patent-pending device at the center of its new LSD that responds during low or zero axle-load conditions. Precisely engineered wave profiles are placed on one side gear and its mating preload hub. As the two side gears rotate relative to each other, each wave surface climbs the other, causing them to move apart.
Very quickly, this creates enough internal load within the Wavetrac to stop the zero axle-load condition, allowing the differential to transfer torque to the wheel that still has traction. The Wavetrac LSD also works well during a transition between acceleration and deceleration-the waved design of the side gears effectively eliminates the delay associated with ordinary gear-type LSDs. What this means for you as a driver is that power is delivered to the wheel(s) with the most traction, providing more consistent power delivery and more predictable handling.
 |
Wavetrac LSD Installation - A New Way To Get A Grip
|
Wavetrac LSD Installation - A New Way To Get A Grip
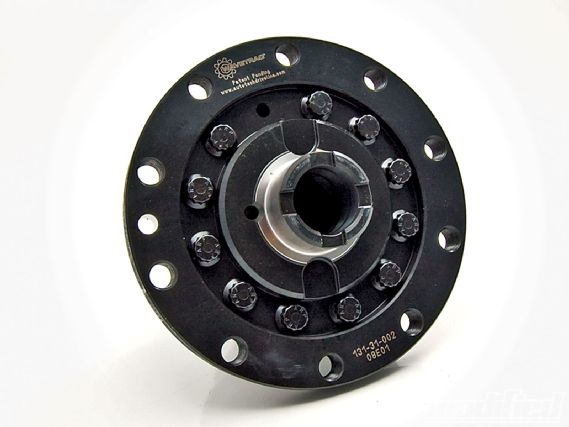
Unlike traditional gear-type LSDs, the Wacetrac diff comes with carbon-fiber bias plates, which allows you to adjust the bias ratio (how aggressively the diff transfers torque from the wheel with less traction to the wheel with more traction). This means you can fine-tune the differential's behavior by using bias plates with different friction coefficients. Other key features include a smaller gearset that reduces overall mass, yet the gears are still very durable thanks to the tooth design and high-quality 9310 alloy steel used to construct them.
As you'll see from the step-by-Step installation guide provided by Russ Garehan from Hybrid Racing, you can install a LSD into a FWD transmission on your own with a decent set of tools and some patience. This install features a Wavetrac LSD going into a 5-speed RSX transmission, but the process is virtually identical for any Honda transmission and very similar for other FWD transmissions. The only tools required are a basic metric socket set, a torque wrench, retaining ring pliers, a 27mm socket, a 14mm Allen wrench, a small pry bar and a hammer or mallet.
 |
Wavetrac LSD Installation - A New Way To Get A Grip
|
Wavetrac LSD Installation - A New Way To Get A Grip
Installation
To properly disassemble the transmission, it should be placed on a clean workbench with the input shaft facing down. Use wood blocks to lift the bellhousing up so that the input shaft is not touching the bench. (Note: Make sure that the transmission is in neutral and that all fluid has been drained from it before disassembly begins.)
Follow the text in steps 1-16 for disassembly. For reassembly, follow the steps in reverse and refer to the reassembly tips for torque specs and other important information.
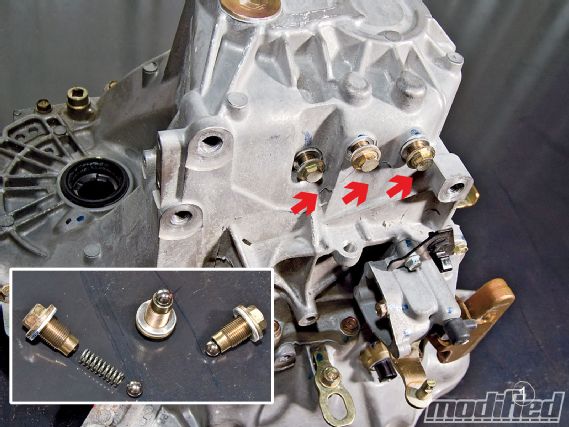
Step 1
Remove the ball spring detents (3) using a 12mm socket. These are what keep the transmission in gear after you've shifted. Handle with care because they tend to fall apart when removed.
 |
Wavetrac LSD Installation - A New Way To Get A Grip
|
Wavetrac LSD Installation - A New Way To Get A Grip
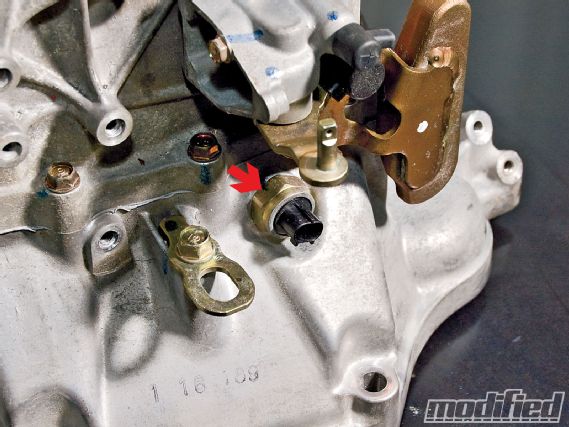
Step 2
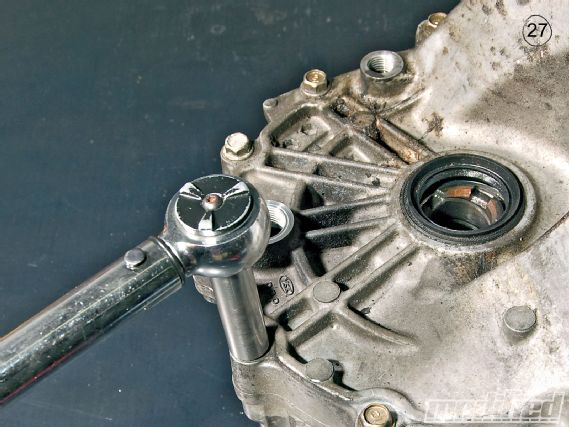
Remove the backup light switch using a 27mm socket.
 |
Wavetrac LSD Installation - A New Way To Get A Grip
|
Wavetrac LSD Installation - A New Way To Get A Grip
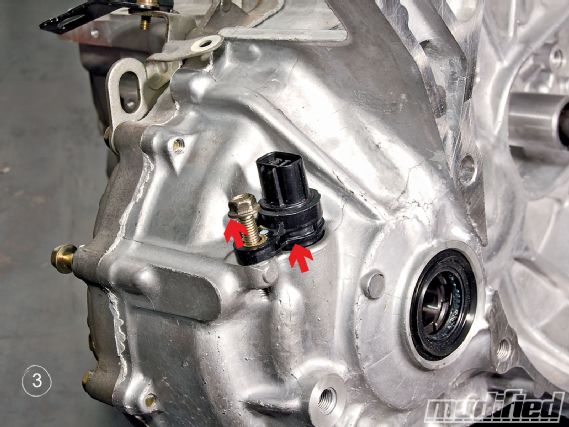
Step 3
Unbolt (using a 12mm socket) and remove the vehicle speed sensor and its O-ring. You may have to twist the speed sensor back and forth a bit to get it loose.
 |
Wavetrac LSD Installation - A New Way To Get A Grip
|
Wavetrac LSD Installation - A New Way To Get A Grip
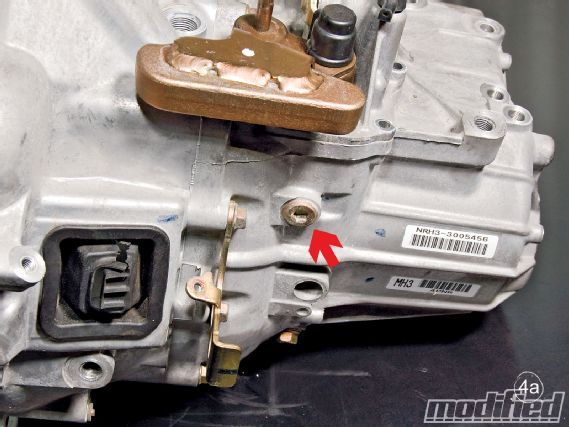
Step 4a
Remove the interlock bolt using a 7mm Allen wrench.
 |
Wavetrac LSD Installation - A New Way To Get A Grip
|
Wavetrac LSD Installation - A New Way To Get A Grip
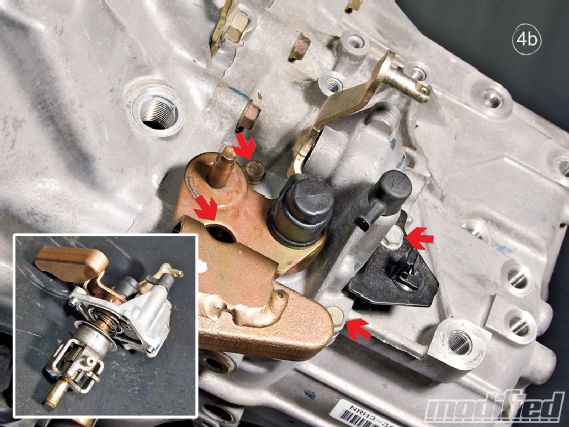
Step 4b
Unbolt (using a 12mm socket) and remove the shift lever assembly and the two dowel pins that line it up with the transmission case. There should be four bolts all together. Again, you may have to twist this part back and forth to get it loose.
 |
Wavetrac LSD Installation - A New Way To Get A Grip
|
Wavetrac LSD Installation - A New Way To Get A Grip
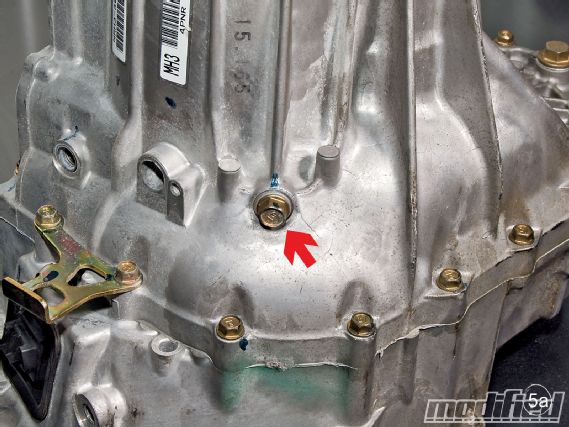
Step 5a
Remove the flange bolt using a 14mm socket.
 |
Wavetrac LSD Installation - A New Way To Get A Grip
|
Wavetrac LSD Installation - A New Way To Get A Grip
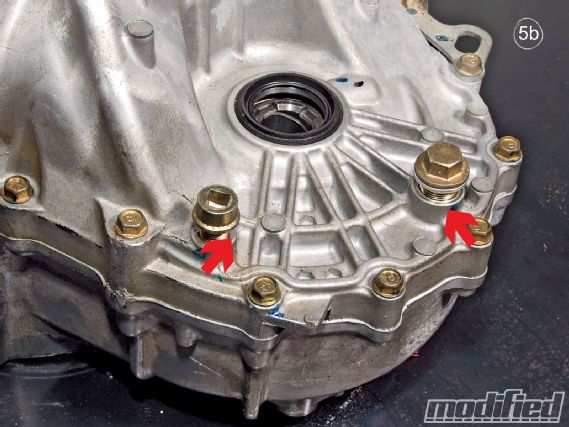
Step 5b
Remove the drain plug (using the end of a 3/8-inch socket wrench or extension) and filler plug (using a 17mm socket).
 |
Wavetrac LSD Installation - A New Way To Get A Grip
|
Wavetrac LSD Installation - A New Way To Get A Grip
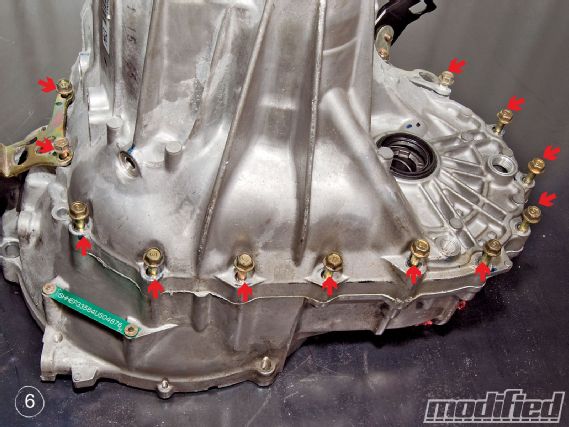
Step 6
Using a 12mm socket, remove all 8mm flange bolts that hold the two halves of the transmission together. All the bolts should be loosened in several steps before any are removed. The bolts should be loosened in a criss-cross pattern to avoid unnecessary stress on the bolts that are still tight.
 |
Wavetrac LSD Installation - A New Way To Get A Grip
|
Wavetrac LSD Installation - A New Way To Get A Grip
Step 7a
Remove the 32mm sealing cap using a 14mm Allen wrench. Scrape off any Honda Bond (gray sealant) on the mating surfaces between the sealing cap and the transmission.
 |
Wavetrac LSD Installation - A New Way To Get A Grip
|
Wavetrac LSD Installation - A New Way To Get A Grip
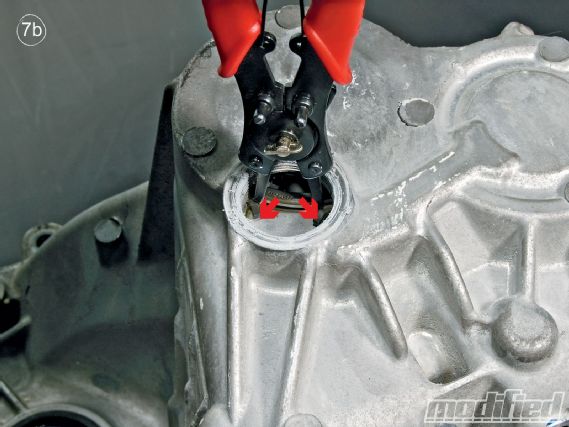
Reassembly Tips: Remember to put the 72mm snap ring back in the groove on the countershaft bearing before screwing the 32mm sealing cap back in. Also, apply Honda Bond to the threads of the cap before reinstalling it.
Step 7b
Use a set of snap ring pliers to expand the 72mm snap ring and remove it from the groove it sits in on the countershaft bearing. The snap ring cannot be removed from the transmission at this point. It only needs to be removed from the groove it sits in.
 |
Wavetrac LSD Installation - A New Way To Get A Grip
|
Wavetrac LSD Installation - A New Way To Get A Grip
Reassembly Tips: Remember to put the 72mm snap ring back in the groove on the countershaft bearing before screwing the 32mm sealing cap back in. Once installed, there should be a 3.3-6mm gap between the tips of the spring clip.
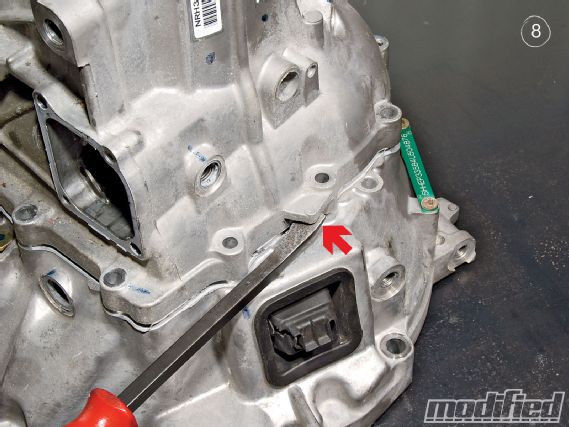
Step 8
Using a pry bar, gently pry the two halves of the transmission case apart. Lift and remove the upper half of the case. Before moving on, use a razor to scrape off the Honda Bond that was sealing the joint where the two halves of the case met.
 |
Wavetrac LSD Installation - A New Way To Get A Grip
|
Wavetrac LSD Installation - A New Way To Get A Grip
Reassembly Tips: Reinstall the three 14x20mm dowel pins that align the transmission case. Before mating the two halves of the transmission back together, apply Honda Bond to both mating surfaces. Make sure to apply the Honda Bond around each bolt hole to avoid possible leaks. Also, make sure to place the 72mm snap ring back onto the secondary shaft before putting the case back together. The two halves will not seal completely until the 72mm snap ring has been put back in place.
Intermission
Now that you have your transmission opened up, take a moment to check for anything out of the ordinary. If you find things such as excessively worn synchros, garden gnomes, metal shavings or tube socks full of batteries, you may want to consider bringing your transmission to a professional to see if anything should be replaced before you put it back together.
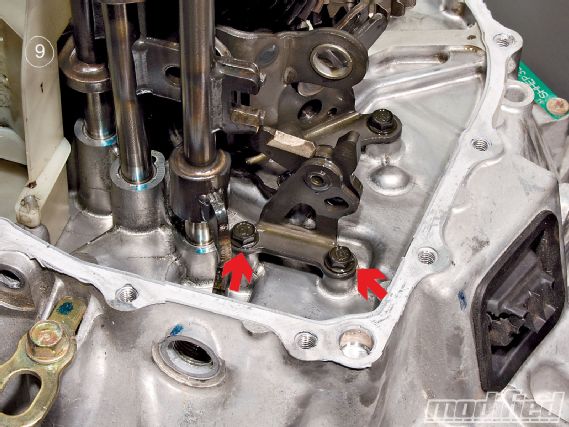
Step 9
Unbolt and remove the reverse lockout cam using a 10mm socket. This only applies to the K20 5-speed model that's shown here. Six-speed K20/K24 models don't have this part.
 |
Wavetrac LSD Installation - A New Way To Get A Grip
|
Wavetrac LSD Installation - A New Way To Get A Grip
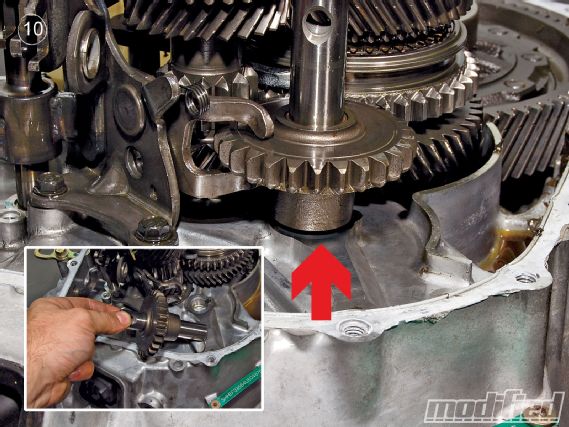
Step 10
Remove the reverse gear idler and reverse gear shaft.
 |
Wavetrac LSD Installation - A New Way To Get A Grip
|
Wavetrac LSD Installation - A New Way To Get A Grip
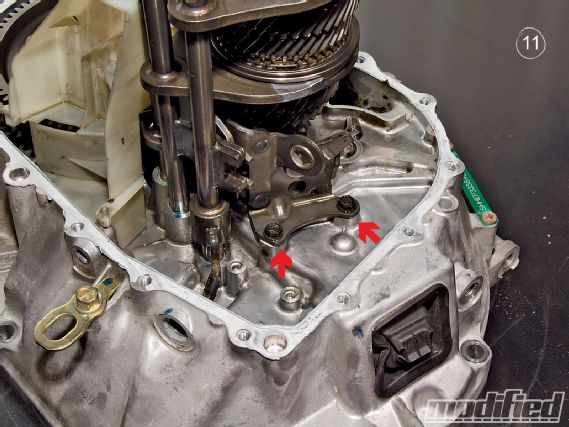
Step 11
Unbolt and remove the reverse shift fork using a 10mm socket.
 |
Wavetrac LSD Installation - A New Way To Get A Grip
|
Wavetrac LSD Installation - A New Way To Get A Grip
Step 12
Remove the oil gutter plate.
 |
Wavetrac LSD Installation - A New Way To Get A Grip
|
Wavetrac LSD Installation - A New Way To Get A Grip
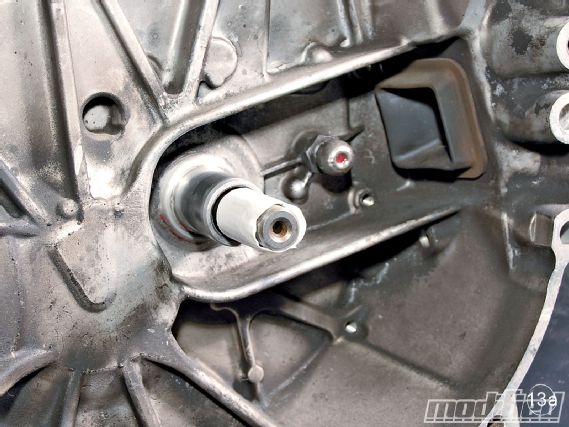
Step 13a
Wrap the input shaft splines with masking tape. This is done to avoid damaging the input shaft seal as the gearset is removed.
 |
Wavetrac LSD Installation - A New Way To Get A Grip
|
Wavetrac LSD Installation - A New Way To Get A Grip
Step 13b
Hold the gearset and shift forks, as shown in figure 13b, and gently lift the gearset and shift forks out of the transmission case.
 |
Wavetrac LSD Installation - A New Way To Get A Grip
|
Wavetrac LSD Installation - A New Way To Get A Grip
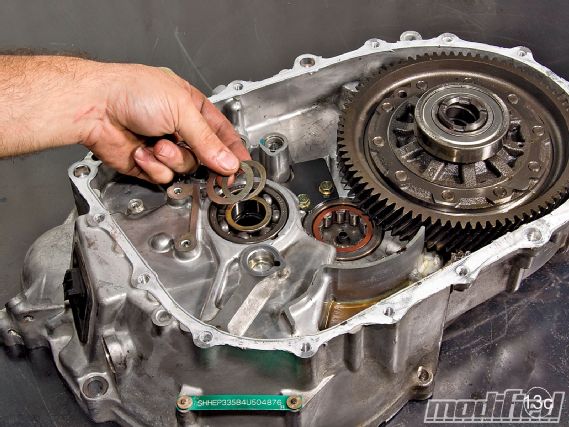
Step 13c
Remove the 28mm spring washer and the 28mm washer that were sandwiched between the mainshaft and the mainshaft bearing.
 |
Wavetrac LSD Installation - A New Way To Get A Grip
|
Wavetrac LSD Installation - A New Way To Get A Grip
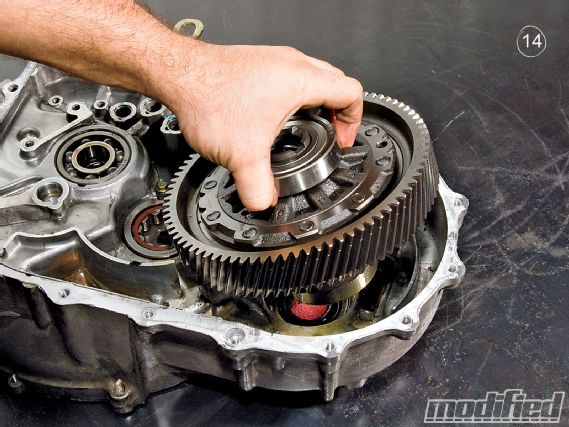
Step 14
Lift the differential assembly out of the transmission.
 |
Wavetrac LSD Installation - A New Way To Get A Grip
|
Wavetrac LSD Installation - A New Way To Get A Grip
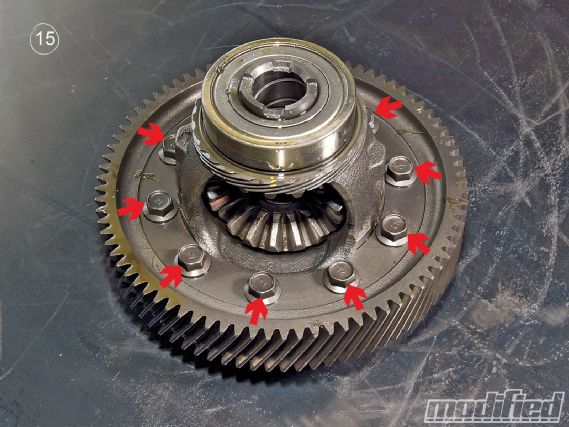
Step 15
Remove the 10 bolts that attach the final drive to the differential. Note that the bolts have a left-hand thread and should also be removed in a criss-cross pattern.
 |
Wavetrac LSD Installation - A New Way To Get A Grip
|
Wavetrac LSD Installation - A New Way To Get A Grip
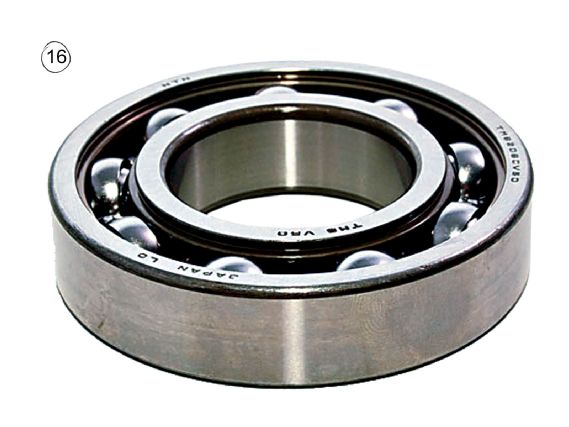
Step 16
The bearings on the differential can be removed using a standard commercial bearing puller. If you don't have access to one of these, you can just purchase new carrier bearings from Honda. Carrier bearings run around $40 each (you'll need two) from Honda, but can be had for about $30 from acuraautomotiveparts.org. The Honda part number for RSX 5-speed carrier bearings is 91005-PPS-003.
 |
Wavetrac LSD Installation - A New Way To Get A Grip
|
Wavetrac LSD Installation - A New Way To Get A Grip
You will also need to remove or purchase a new speedometer drive gear. I have never actually seen anyone remove a speedo drive gear from a K-series differential without destroying the gear. On that note, the part numberfor the gear (on an RSX 5-speed transmission) is 41312-PPP-000. The gear will cost about $30-40, depending on where you purchase it.
Reassembly
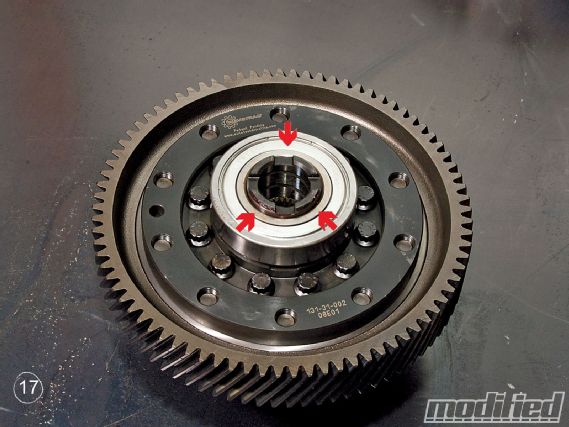
Step 17
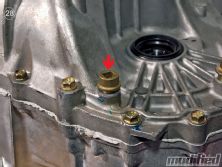
Honda uses a special tool and a hammer for pressing carrier bearings back onto differentials. However, the tool can be substituted with pipe that is the right diameter to rest on the bearing's inner race (this is indicated by three arrows in figure 17). Don't apply pressure to the outer face, as it will destroy the bearing by forcing it apart. Install the speedo drive gear before installing the carrier bearings.
 |
Wavetrac LSD Installation - A New Way To Get A Grip
|
Wavetrac LSD Installation - A New Way To Get A Grip
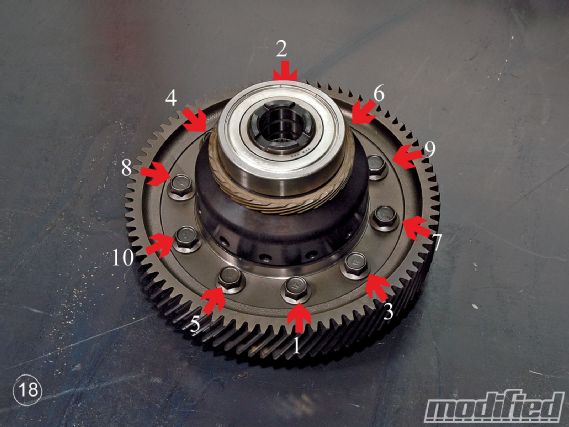
Step 18
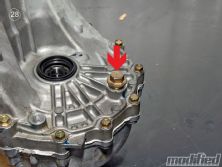
Now that you've installed the speedo drive gear and carrier bearings on your new Wavetrac LSD, you can bolt the final drive gear on. There are 10 bolts in total, and they are all left-hand thread. First, hand-tighten all 10 bolts, then torque each bolt to 89 ft-lbs (121 N-m) in a criss-cross pattern (as shown in figure 18).
 |
Wavetrac LSD Installation - A New Way To Get A Grip
|
Wavetrac LSD Installation - A New Way To Get A Grip
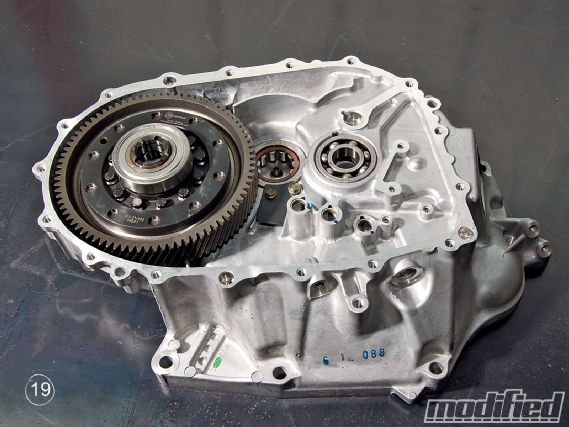
Step 19
The differential can now be installed back into the transmission. Make sure it's oriented correctly (see figure 14).
 |
Wavetrac LSD Installation - A New Way To Get A Grip
|
Wavetrac LSD Installation - A New Way To Get A Grip
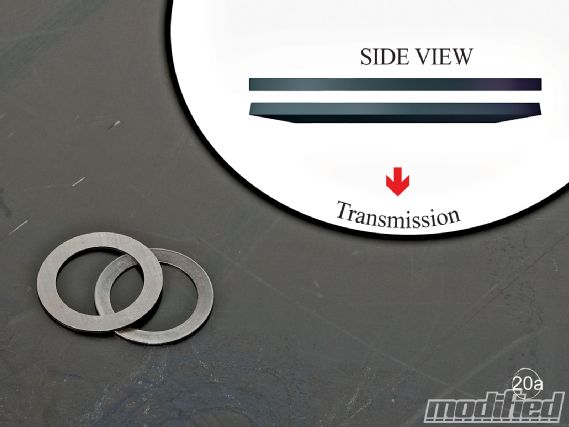
Step 20a
The two washers that were removed in Step 13c can now be placed back on the input shaft bearing. The cone-shaped spring washer should be installed first, with the narrow end against the transmission.
 |
Wavetrac LSD Installation - A New Way To Get A Grip
|
Wavetrac LSD Installation - A New Way To Get A Grip
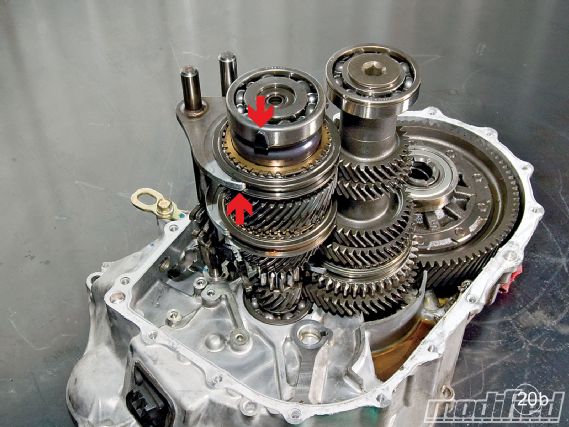
Step 20b
Reinstall the gearset, being careful not to move the shift forks. Don't remove the tape from the main shaft spline until after the gearset has been reinstalled. This will help to protect the oil seal during reassembly. Turn the tapered cone ring (indicated by the upper arrow in figure 20b) until it lines up with the shift fork below it (indicated by the lower arrow in figure 20b).
 |
Wavetrac LSD Installation - A New Way To Get A Grip
|
Wavetrac LSD Installation - A New Way To Get A Grip
Step 21
Reinstall the oil gutter plate that was removed in Step 12.
 |
Wavetrac LSD Installation - A New Way To Get A Grip
|
Wavetrac LSD Installation - A New Way To Get A Grip
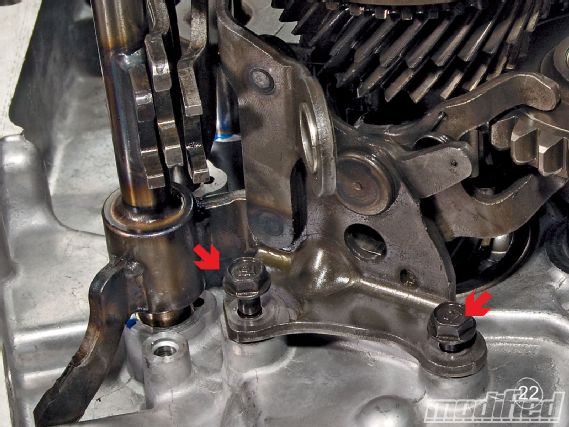
Step 22
Bolt the reverse shift fork back in using a 10mm socket. Torque both bolts to 11 ft-lbs (15 N-m).
 |
Wavetrac LSD Installation - A New Way To Get A Grip
|
Wavetrac LSD Installation - A New Way To Get A Grip
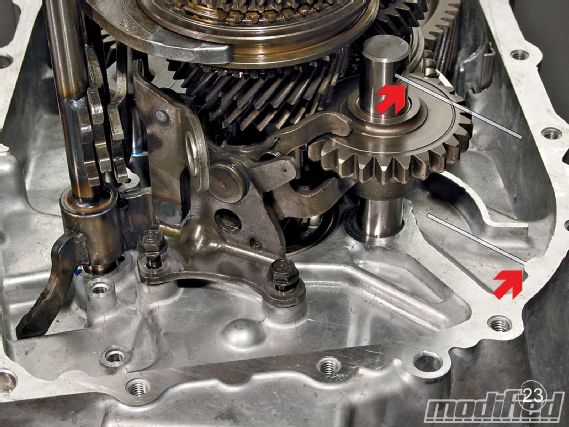
Step 23
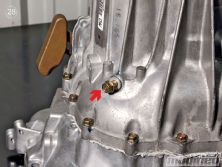
Install the reverse gear idler and reverse gear shaft. Align the hole in the shaft with the arrow on the transmission case, as shown in figure 23. (White lines are shown in the image to indicate the direction of the arrow on the transmission case and the direction for the hole in the idler gear shaft).
 |
Wavetrac LSD Installation - A New Way To Get A Grip
|
Wavetrac LSD Installation - A New Way To Get A Grip
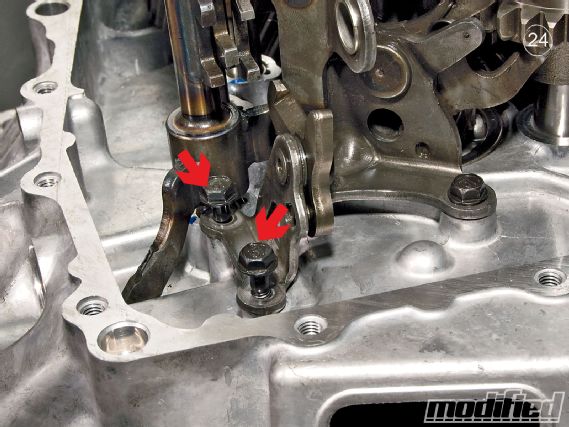
Step 24
Reinstall the reverse lockout cam. Torque the bolts to 11 ft-lbs (15 N-m) using a 10mm socket.
 |
Wavetrac LSD Installation - A New Way To Get A Grip
|
Wavetrac LSD Installation - A New Way To Get A Grip
Step 25a
The two halves of the transmission case can now be reassembled. Start by applying a bead of Honda Bond to one side of the flange; apply the Honda Bond around each bolt hole and dowel pin hole.
 |
Wavetrac LSD Installation - A New Way To Get A Grip
|
Wavetrac LSD Installation - A New Way To Get A Grip
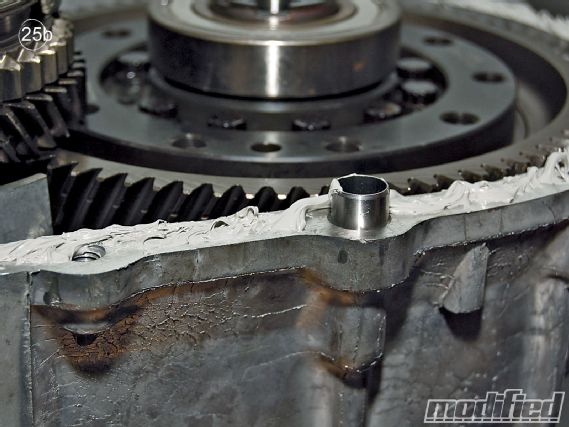
Step 25b
Make sure that all three dowel pins have been put back into their holes on the lower half of the transmission case. Next, lower the other half of the transmission over the gearset and align the two halves using the dowel pins.
 |
Wavetrac LSD Installation - A New Way To Get A Grip
|
Wavetrac LSD Installation - A New Way To Get A Grip
Step 25c
Finally, expand the 72mm snap ring until the upper half of the case falls into position (indicated by the bolt flange on each half of the case mating up). The gap between the tips of the snap ring should be between 0.13-0.24 inch (3.3-6mm). Figure 7b shows the snap ring in its expanded state.
 |
Wavetrac LSD Installation - A New Way To Get A Grip
|
Wavetrac LSD Installation - A New Way To Get A Grip
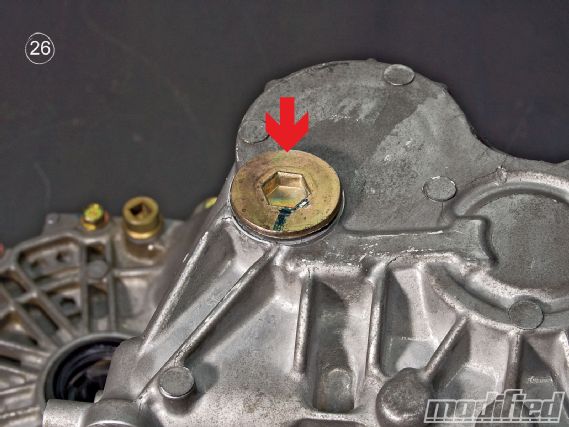
Step 26
Apply Honda Bond to the threads on the sealing cap before reinstalling it with a 14mm Allen wrench.
 |
Wavetrac LSD Installation - A New Way To Get A Grip
|
Wavetrac LSD Installation - A New Way To Get A Grip
Step 27
Install and hand-tighten all the flange bolts that secure the two halves of the transmission case together. Then use a 12mm socket to torque the flange bolts to 20 ft-lbs (27 N-m) in a criss-cross pattern (similar to the pattern shown in figure 18).
 |
Wavetrac LSD Installation - A New Way To Get A Grip
|
Wavetrac LSD Installation - A New Way To Get A Grip
Step 28
Install the drain plug, fill plug and flange bolts. Torque specs are as follows: drain plug to 29 ft-lbs (39 N-m) using the end of a 3/8-inch socket wrench or extension, filler plug to33 ft-lbs (44 N-m) using a 17mm socket, flange bolts to 33 ft-lbs(44 N-m) using a 14mm socket.
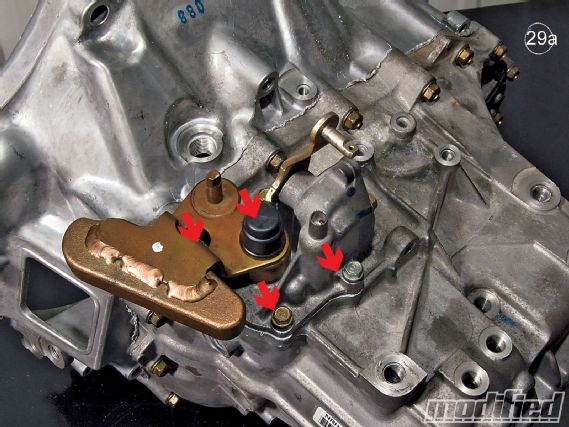
Step 29a
Install and bolt down the shift lever assembly that was removed in Step 4b. Remember to install the two dowel pins that are used to align the shift lever assembly with the transmission case. Torque the bolts to 9 ft-lbs (12 N-m) using a 10mm socket.
 |
Wavetrac LSD Installation - A New Way To Get A Grip
|
Wavetrac LSD Installation - A New Way To Get A Grip
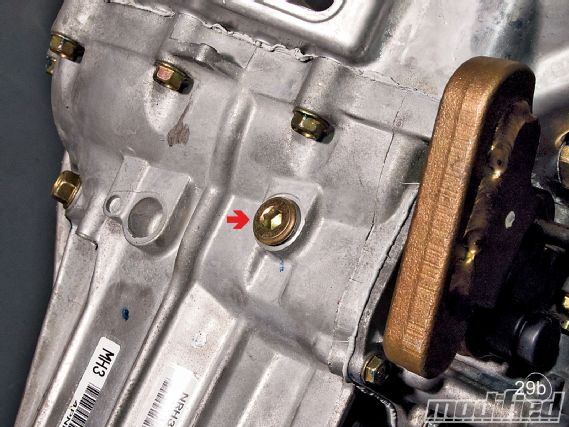
Step 29b
Apply Honda Bond to the threads of the interlock bolt that was removed in Step 4a. Screw the interlock bolt back into the transmission case. Torque it down to 29 ft-lbs (39 N-m) using a 7mm Allen wrench.
 |
Wavetrac LSD Installation - A New Way To Get A Grip
|
Wavetrac LSD Installation - A New Way To Get A Grip
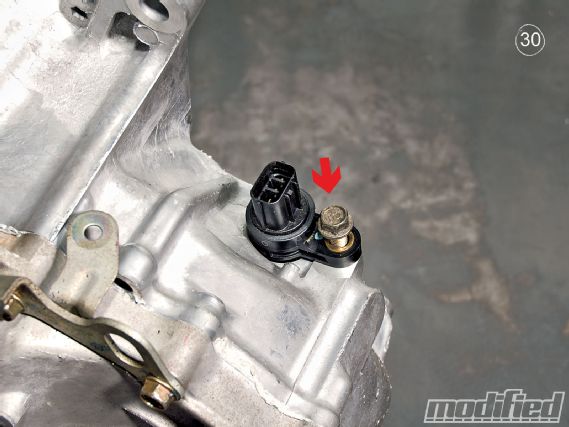
Step 30
Reinstall the speed sensor and the bolt that retains it. Torque the 12mm bolt to 16 ft-lbs (22 N-m) using a 12mm socket.
 |
Wavetrac LSD Installation - A New Way To Get A Grip
|
Wavetrac LSD Installation - A New Way To Get A Grip
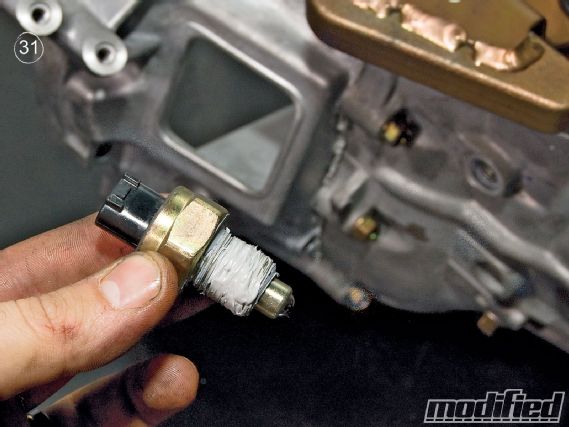
Step 31
Reinstall the backup light switch. Apply Honda Bond to the threads before reinstalling. Torque to 22 ft-lbs (29 N-m) using a 27mm socket.
 |
Wavetrac LSD Installation - A New Way To Get A Grip
|
Wavetrac LSD Installation - A New Way To Get A Grip
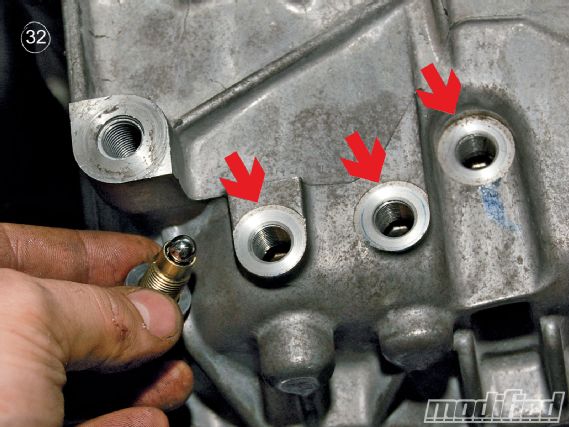
Step 32
Install the three ball detents that were removed in Step 1. Torque to 16 ft-lbs (22 N-m) using a 12mm socket.
 |
Wavetrac LSD Installation - A New Way To Get A Grip
|
Wavetrac LSD Installation - A New Way To Get A Grip