| alternators high Performance Alternators
Regardless of a vehicle's application, alternators face a challenge in their job of delivering required amperage output both in terms of performance and durability. Heat, electrical draw, contaminants, and vibration all play a role in trying to cause problems, whether the truck is blasting down a paved desert highway at warp speed, cruising the boulevard on a Friday night, or waiting in line to enter a show on a hot summer's day. The quality of the alternator can make or break your day in the fun.
Bosch has developed three alternator lines for light trucks and SUVs that improve the reliability and performance of the stock equipment. These include the direct replacement for the GM CS-series alternators, the direct replacement for the Ford IAR alternator, and a serious-duty universal high-output (H.O.) performance alternator for those willing to perform minor installation mods.
Universal One-Wire High-Output AlternatorIf you're building an '85-or-earlier sport truck, are considering an alternator upgrade or engine swap, and are willing to perform a minor bit of customizing, Bosch offers a Universal One-Wire High-Output (H.O.) Alternator design, available under part numbers AL9971N and AL9972N.
The AL9971N is a 95-amp unit, while AL9972N offers a 120-amp output. The Bosch ratings reflect real-world amperage capabilities as opposed to pie-in-the-sky theoretical design ratings, so you can rely on the numbers. Also, since most OE alternators are rated (depending on application and part number) at a range of 60 to 90 amps, moving to either of these new universal alternators will benefit electrical system performance and reliability. These new, slightly larger-bodied alternators feature all Bosch high-quality components, and are designed to withstand high-heat conditions and to prevent vibration-related failures.
All Bosch universal high-output alternators feature a sealed brush box, heavy-duty high-tolerance bearings (a big plus in terms of durability and high-rpm performance), superior-duty diode rectifier plates, greatly enhanced ability to dissipate heat, and overall design and construction that will live under high stress and vibration environments, such as may be found with choppy engine idle in a high-lift cam motor or a less-than-compliant suspension.
Heat is the primary killer of alternators, so these universal high-output alternators feature internal insulation and increased airflow. These characteristics make them outstanding choices for super-hot engine bay environments found in both long-idling periods and high engine load conditions encountered when climbing grades.
In those instances where you want to simplify your life in terms of reducing electrical connector hassles, the universal high-output alternators also offer a very nice additional feature: They operate as one-wire alternators. This eliminates the use of an OE wire harness connector. Instead of using an OE-type voltage regulator connection, these alternators only require using the vehicle's harness wire connection that originally attached at the L (light) terminal of the voltage regulator connection, which is spliced and connected directly to the D+ terminal on the rear of the alternator. Remaining voltage regulator wires are folded back and are not used. Power wires connect to the B+ terminal.
The universal H.O. also features a handy W terminal on the rear, which can be used for a tach connection, or in older vehicles that require a power source for an electric choke. In other words, this is a killer one-wire alternator that's perfect for any new, older, or custom build. Here's a typical installation to show you how easy it is to upgrade.
Performance Alternator Selection & InstallationSelecting and installing an alternator for a custom application traditionally represents a minor challenge if the replacement alternator isn't a direct replacement for a specific engine, which can be handled by using the appropriate mounting bracketry.
While any alternator manufacturer can produce a unit with high cold amp ratings, the trick lies in producing high amperage while making the unit live and perform its duties in the face of extreme adversity such as can be encountered in severe-duty or off-road conditions. When contamination, peak temperatures, and high mechanical stresses enter the picture, the alternator's cooling abilities are dramatically reduced, increasing the likelihood of failure.
In terms of fitments, these universal H.O. alternators will easily fit any Chevy application prior to the '85 model year - that's hefty coverage, and good news for anybody using a small- or big-block Chevy engine in a custom or restoration project). The universal alternator may also fit certain CS series applications ('85 to present), but the mounting location needs to be checked for physical clearance, as the universal unit is slightly larger in size that the original CS series unit.
As for "custom" applications, the universal H.O. is an outstanding choice in either its 95- or 120-amp version, and is suitable for any engine setup, stock or wild. Installation of the Bosch unit presents no challenges beyond using any other alternator for a custom installation. In other words, you'll go through the same amount of time to sort out your mounting regardless of the alternator you select, so you may as well pick one with vastly improved performance and durability.
BOSCH UNIVERSAL H.O. ALTERNATORS P/N AM PRATING(AMPS) REGULATED VOLTAGE CUT-IN SPEED(RPM) MAX ALT .SPEED(RPM) AL9971N 95 14.2 V 1,250 15,000 AL9972N 120 14.2 V 1,599 12,500
Bosch Alternator Accessories
Fan P/N 1 126 610 070 High-Output Fan Clockwise
Fan P/N 1 126 610 046 Counterclockwise
Screen P/N 9 121 065 504
*The alternator protection screen easily mounts onto the alternator body to provide a filtering barrier, preventing large chunks of debris such as rocks, pebbles, and so on from entering the all-important alternator heat-evacuation ports.
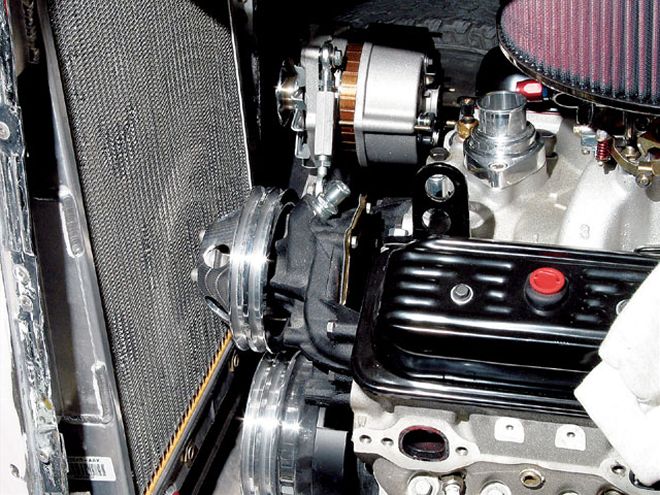
Installing the Fan/Pulley
Whether you're transferring an original fan and pulley from your previous alternator or installing aftermarket (billet aluminum and such) parts, installation is easy. The Bosch alternator rotor shaft features an 8mm female hex opening at the end of the shaft.
Use an 8mm socket bit on a torque wrench to turn the shaft and hold the nut with either a 15/16-inch or 24mm box or open-end wrench. Tighten the nut to 40-50 lb-ft. Since you're holding the nut stationary with an open-end or box wrench and turning the shaft, you'll need to turn the shaft counterclockwise. This is not a problem if you're using a beam-type torque wrench.
If you're using a ratchet (click-type) torque wrench, however, make sure the wrench is rated for counterclockwise operation. If it isn't, not only might you achieve an incorrect reading, but you might damage the torque wrench as well. If you're not sure, use a beam-type wrench to play it safe.
Pay attention to your chosen fan for operating direction. While most fans are designed for clockwise rotation, counterclockwise fans do exist (as viewed from the front of the motor). Many OE steel fans are marked for rotation direction. If you happen to install a counterclockwise fan on a system that calls for a clockwise rotation, you won't pull enough air through the alternator body for adequate cooling.
Custom Alternator Mounting Details
When installing any alternator on a custom application, it's not at all uncommon to be somewhat inventive with regard to mounting in order to position the alternator and to achieve proper belt alignment. Since each case will present its own challenges, we can only speak in general terms. However, you need to make sure the alternator is solidly mounted to avoid unwanted movement.
The Bosch universal H.O. alternator features two mounting ears positioned 180 degrees apart. The mounting ear that features the longer body section is intended to serve as your anchoring/pivoting point, while the smaller (threaded) ear serves as the opposite-end anchor and as the adjusting end. This smaller ear features 8x1.25mm female threads, so an 8x1.25mm bolt will be required to attach this ear to your adjuster bracket. Bolt length will vary depending on the thickness of your bracket, but typically a shank length of 25mm should work in most situations (longer if the mounting bracket is appreciably thicker).
In terms of bracket mounting, you have several choices, depending on your application, including OE steel brackets, aftermarket steel brackets, or aftermarket aluminum brackets. While the pivot point bracket requirement may involve only an adapter plate (to allow attaching the alternator to the block or head), a common adjuster bracket might involve a sliding-type bracket that features a long arm with a slot opening to allow adjusting the alternator for belt length and tension.
A very nice alternative to this type of common adjuster bracket is an adjustable rod-end-type fixture. This features a center body (made from either round or hex stock) and a pair of spherical ball rod ends (Heim joints). The center body features female threads at each end, typically 3/8x24 inches, with a right-hand thread in one end and a left-hand thread at the opposite end. The rod ends, featuring male thread studs, attach to each end of the center body (again, one rod end uses right-hand thread while the other uses left-hand thread).
In basic operation, this setup is similar to a steering rod linkage that features a right-hand thread rod end on one side and a left-hand thread rod end on the opposite side. With both rod ends inserted an equal distance into the center body, the length of the assembly is easily adjustable by rotating the center body to either shorten or lengthen the assembly. One rod end's ball is attached to a convenient anchoring point, such as a threaded boss on a water pump, while the opposite ball is attached to the threaded ear on the alternator body. This provides both an easy belt adjustment approach, and provides a "custom" and clean appearance.
The threaded centers are available in paintable steel, chrome-plated steel, bare aluminum, polished aluminum, color-anodized aluminum, and polished stainless steel. Likewise, the rod ends can be obtained in dull or bright zinc (silver color), gold iridite zinc, polished stainless steel, and color-anodized aluminum.
The common size for all rod ends used in alternator applications is 3/8 inch (this provides a 3/8-inch hole in the ball and a 3/8x24-inch stud thread). When attaching a 3/8-inch Heim ball end to the alternator's 8mm bolt, a spacer sleeve is required to accommodate the difference in ball hole inside diameter and bolt shank diameter. This spacer is usually supplied when you purchase a rod-end-type kit.
Individual Component Amp Draw
(These numbers represent generalizations only. Refer to your specific individual system requirements)
IGNITION SYSTEM (AFTERMARKET HIGH-OUTPUT) 10 AMPS RADIATOR ELECTRIC FAN 6-22 AMPS EACH AIR-CONDITIONING SYSTEM 30-33 AMPS WINDSHIELD WIPERS 4 AMPS DEFROSTER 8 AMPS POWER WINDOWS 15 AMPS REMOTE DOOR LOCKS/ALARM 2 AMPS HEADLIGHTS 15 AMPS PARKING/RUNNING LIGHTS 5 AMPS BRAKE LIGHTS 5 AMPS SOUND SYSTEM (THIS CAN VARY WIDELY) 5-30 AMPS (TYPICAL) (complex high-power systems can draw as much as 100 amps or more)
Bear in mind that not all of the above-listed amperage draws will occur at the same time. The goal is to choose an alternator with adequate output to handle all the amperage draw that may typically occur at the same time.
Upgrade Replacement For '85-to-Present GM CS-Series Alternator
The '85-to-present Delco CS-series alternator, by design, is compact in size and is subjected to considerable amperage demands due to the equipment provided on modern vehicles under normal driving conditions. For sport truck enthusiasts who put their machines under even more stress, the alternators may pose a reliability issue.
Bosch released a direct bolt-in replacement for the original CS alternator that was designed to thrive in the harsh environs of a truck's engine bay. The new high-performance Bosch replacement reportedly provides high durability and consistent amperage output even when subjected to excessive heat and high electrical loads and engine bay vibrations.
According to Bosch, the high heat created in the original-equipment CS environment breaks down the varnish and insulation between stator windings, leading to all sorts of annoyances, such as shorts and failures. The Bosch CS replacement units feature high-quality stators, winding, and insulation materials to provide maximum output and long-term reliability. Bosch also employs a space-shuttle-grade high-heat transfer compound between the rectifier and casting to quickly dissipate heat, which the company asserts, is twice as efficient as the compound used in the original-equipment design. As an added insurance, Bosch uses this same high-efficiency heat dissipation compound between the rear bearing tolerance ring and the casting to remove additional heat away from the bearing cavity.
And since repeated exposure to extremes of heat is a sure-fire way to reduce the lifespan of the diodes and insulation in any rectifier, the new Bosch units use high-quality rectifiers to provide maximum life and dependability. In addition, these new Bosch replacement alternators use a larger-diameter 6303 bearing to handle the strain imposed by a serpentine belt and to provide longer life; they use 10mm-wide bearings to replace the stock 8mm-wide rear bears. These changes help the alternator survive high-rpm applications.
The new Bosch alternators are no-hassle direct-replacement bolt-ins for a range of '85-to-present GM applications. No wiring mods are needed, and no custom mounting is required. Simply unbolt the OE alternator, remove the OE fan and pulley, install the fan and pulley onto the new Bosch unit, bolt it on, and plug it in. Output for the Bosch unit is real-world-rated at 100 amps, compared with the OE CS alternators, which are paper-rated at 85-100 amps. For Chevy/GMC trucks that feature the CS-series alternators as original equipment, this is an outstanding new replacement that not only cures any existing alternator ills, but prevents failures in the future. This alternator cures your ills and allows you to get on with your life.
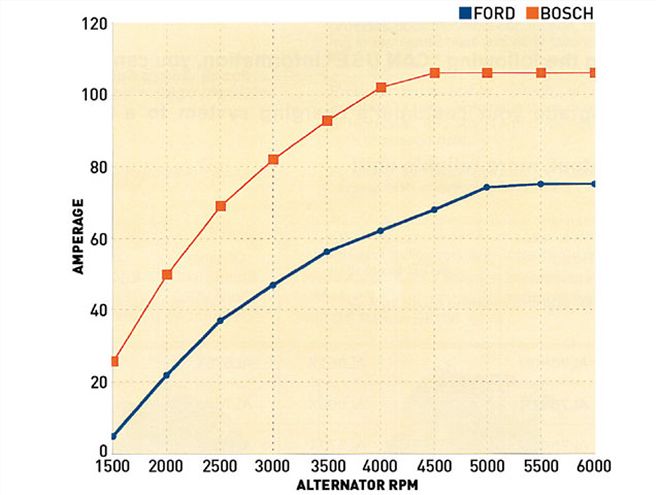 | Here's an output chart comparing the Bosch replacement for the Ford AIR to the OE Ford AIR alternator.
How to Replace Your Ford IAR Alternator
| Here's an output chart comparing the Bosch replacement for the Ford AIR to the OE Ford AIR alternator.
How to Replace Your Ford IAR Alternator
As we all should know, heat is the major cause of alternator failure, and the original Ford IAR alternator is no exception. It's also equipped with a less-than-ideal power connector, which is prone to intermittent problems and shorts - a fire hazard, and a decidedly inconvenient scenario when bouncing in the backwoods. In short, the original IAR alternator overheats, undercharges, and provides a poorly designed power connection. Fortunately, Bosch now offers a high-performance replacement that not only provides enhanced performance and durability, but corrects the power connection problem once and for all.
The new Bosch alternator, part number AL7580N, offers an easy direct-replacement fit in place of the original Ford IAR alternator on a host of '84-'93 Ford 302- and 460-cid truck engines. The only modification needed is to cut the original B+ three-wire connector from its harness and to install a pair of loop terminals (eyelet type) to two of the existing wires. This is a super-easy mod that anyone can handle, requiring neither special tools nor a master's degree in electrical engineering.
The AL7580N unit features a larger Bosch-designed rectifier and high-quality Bosch diodes that are strategically located in areas of maximum airflow, providing much better heat dissipation than the OE setup. In fact, the overall alternator design makes use of maximum internal cooling/heat dissipation and dust/contamination protection. This is truly a high-performance alternator, suitable for any truck's build, including OE stock engines, high-horsepower engine swaps, and everything in between.
The Bosch alternator produces an honest 90-amp-rated output, providing higher amperage output at both low and high rpm; in contrast, the OE unit produces 60 amps. Higher output at low rpm is especially critical to maintaining the state of battery charge, which in turn increases battery and alternator life.
The Bosch replacement unit also uses a manly threaded B+ stud terminal, eliminating the OE connector. This is a solid, no-excuses connection, as is used in pro race car applications where reliability is key.
In addition, a high-quality Bosch-designed voltage regulator provides stable voltage and is far more resistant to heat, which translates into greater consistency under high-rpm and high-heat conditions and no amperage fade as operating temperature increases.
The Bosch alternator rotor shaft diameter, length, and threads are a match to the Ford spec, so swapping the original alternator fan and pulley is a no-brainer.
PART NUMBERS: BOSCH P/N OE FORD IAR REPLACEMENT AL7580N AL562X, AL578X AL7581N AL563X, AL7502X AL7582N AL570X, AL576X, AL577X AL5783N AL564X, AL7502X
ALTERNATOR PERFORMANCE
BOSCH ALT VERSUS FORD IAR: ENGINE SPEED FORD IAR BOSCH 1,500 RPM @5 AMPS @25 AMPS 2,000 RPM @21 AMPS @51 AMPS 2,500 RPM @38 AMPS @69 AMPS 3,000 RPM @46 AMPS @84 AMPS 3,500 RPM @55 AMPS @93 AMPS 4,000 RPM @{{{62}}} AMPS @102 AMPS 4,500 RPM @68 AMPS @105 AMPS 5,000 RPM @72 AMPS @104 AMPS 5,500 RPM @73 AMPS @104 AMPS 6,000 RPM @73 AMPS @104 AMPS
How to Determine Alternator Pulley Size and Speed
When selecting pulleys, we need to consider how fast the alternator should spin in order to make the alternator live, and also to take advantage of the alternator's amperage output, based on the alternator maker's recommendations. This rate of spin will be dictated by the size of the alternator pulley diameter, in relation to the crank pulley diameter (pulley ratio). Here's an easy way to calculate pulley ratio, which will help you to choose the correct pulley diameter combination.
Formula:
Crank Pulley Diameter / Alternator Pulley Diameter = Pulley Ratio
For example:If the crank pulley is 6.5 inches in diameter and the alternator pulley is 2.75 inches in diameter: 6.5 / 2.75 = 2.3636:1 PULLEY RATIO
Next, multiply the calculated pulley ratio by the anticipated highest engine speed (the routinely highest engine speed you expect to see). The result represents alternator speed.
For example:2.3636 Pulley Ratio X 6,000 Engine Rpm = 14,160 Alternator Rpm
In this case, if the alternator maker recommends the highest efficiency or maximum speed of its alternator at 18,000 rpm, by using this formula and plugging in different alternator pulley diameters, you can find that by changing to a 2.25-inch-diameter alternator pulley, you will achieve an alternator speed of 17,328 rpm, which would be a safe maximum. Again, by using the formula, you would find that it would not be acceptable to move to a 2-inch alternator pulley, since the alternator speed would be 19,500 rpm, which is beyond the alternator's rating.
By keeping the crank pulley diameter constant but changing the alternator pulley, alternator speed will increase as you move to a smaller-diameter alternator pulley, and will decrease as you move to larger-diameter alternator pulleys. Pay attention to the alternator's rpm recommendations for optimum alternator output and longevity.
Examples Of Alternator Speeds Based On Pulley Sizes And Engine Speed:
(6,000 rpm engine speed is used here only as an example)
ENGINE CRANK ALT. PULLEY PULLEY ALT SPEED(RPM) PULLEY DIA. DIA. RATIO SPEED(RPM) 6,000 6.5" 3.00" 2.1666:1 12,999 6,000 6.5" 2.75" 2.3636:1 14,160 6,000 6.5" 2.50" 2.{{{6000}}}:1 5,{{{600}}} 6,000 6.5" 2.25" 2.8888:1 17,328 6,000 6.5" 2.00" 3.2500:1 19,500 6,000 7.0" 3.00" 2.3333:1 13,999 6,000 7.0" 2.75" 2.5454:1 15,272 6,000 7.0" 2.50" 2.8000:1 16,800 6,000 7.0" 2.25" 3.1111:1 18,666


