There's a growing trend among millennials toward crafting, DIY projects and tinkering with inventions. This "Maker Movement" seems more focused on technology than car repair, however; information is scarce on whether millennials' DIY passion extends to working on their cars. Our 2007 Dodge Charger SRT8 had some minor repair and maintenance needs, and we approached them as we thought the typical millennial DIYer would.
Used cars are never in perfect condition. Even a clean, one-owner car like our Charger SRT8 will have a list of items that need attention. As the new owner, your job is to triage these issues and address them as time and finances allow. We envisioned our millennial owner as someone who would search for solutions online, give the manageable ones a shot and defer any specialized tasks to a dealer or independent mechanic.
DIY Projects
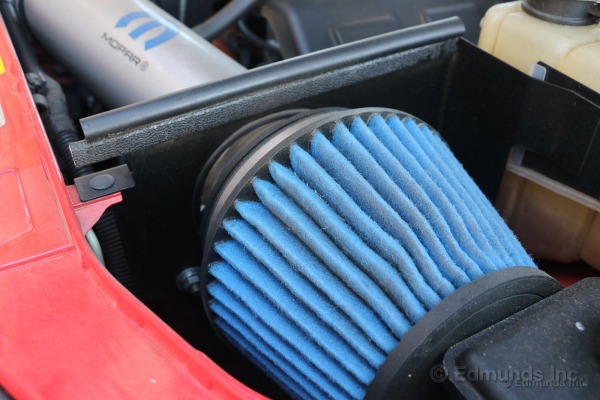
Cleaning the Air Filter: Edmunds Senior Editor Brent Romans played the role of our millennial owner when he had the Charger for a few days and noted that its air filter was dirty. Our Charger had a modified air filter when we bought it. If it had been the factory air filter, we would have just popped in a new one and called it a day. But our car has a dealer-installed Mopar cold-air intake with a reusable air filter that needs periodic cleaning. Trouble was, the car didn't come with any maintenance instructions for the filter.
Romans scoured the Charger owner forums and found a few posts on the subject. The advice varied, but the consensus opinion boiled down to taking off the filter and gently washing it with water and soap.
Removing the air filter was a matter of loosening the screwed-on hose clamp and slightly flexing the air filter (its supporting structure is rubber) to pull it off. After spotting some oily residue on the inside of the filter and the intake tube, Romans determined that the Charger's previous owner had applied oil to the filter. Some aftermarket air filters do require oil after a cleaning, but as was indicated on the outer base of our filter, this one does not.
Maybe the previous owner didn't see the warning, or perhaps he ignored it, based on having oiled other filters. Who knows? In any case, cleaning the filter was more important now than ever.
Romans soaked the filter in a bucket of water with mild detergent. Next he used a toothbrush to remove the small leaves and stems that had lodged between the pleats or gotten stuck in the fibrous foam. He quickly learned that the brush was too abrasive. He rubbed the filter with his fingers to get it clean.
Finally, Romans let the filter dry in the sun. It took all day, despite it being 90 degrees outside. He left the filter out overnight to make sure it was completely dry and reinstalled it the following morning.
New Trunk Struts: Initially, the Charger's trunk lid slammed down rapidly when it was being closed. This was hard on the car and potentially harder on unsuspecting fingers.
The culprit: worn trunk struts. We had some experience with this type of repair, having replaced the hood struts on our 1996 Lexus ES 300, also known as the "Debt-Free Car."
It was a fairly easy repair then and even easier in the case of our Charger.
The trunk strut needed to be strong enough to hold up both the trunk lid and the added weight of the car's rear spoiler. Some of the aftermarket struts we saw online didn't specify whether they were built to handle a spoiler, so we decided to go with factory parts. Our local Dodge dealership ran the Charger's VIN and ordered the correct parts. We paid about $25 per strut.
We removed the old struts by wedging a flathead screwdriver under the metal clamp that holds each strut in place. The clamp popped right out with minimal pressure. Next we pulled on the strut, popping it out of its socket on the top and bottom. The new strut popped right into the socket. There was no need to move the clamp. We repeated the process for the other side and were done with the job within 10 minutes.
Updating the Stereo Firmware: Firmware updates are an inevitable part of modern technology in cars, and our Charger's aftermarket Pioneer head unit is no exception. 'We discovered our firmware update by accident, while searching the Pioneer website for an article. There was a tab on the site labeled "Firmware and Software," and it contained a link to a file for updating the firmware of our head unit to version 1.03. Normally, we'd have registered the head unit ourselves and thus been apprised of any updates automatically, but the registration card must have gotten lost in the install process, and the Pioneer website wasn't cooperating with us to set up an account.
In any event, here's what the update entailed, according to Pioneer:
The first bullet point caught our attention. Deputy Managing Editor Caroline Pardilla, one of the few Edmunds editors who has an Android phone, said the head unit would not recognize her phone. Our hope was that this update would fix that.
We downloaded the file to a FAT32-formatted USB drive. Pioneer requires the drive to have at least 2GB of storage space. After verifying that our car's unit was running version 1.0, we pressed the "firmware update" button in the Settings menu. It prompts you to plug the thumb drive into the USB1 port of the receiver. Luckily, we have a cord with a female plug, so there was no need to locate it on the back of the head unit.
Once we hit "Start," the firmware update began and we got a DOS-looking screen. It took roughly eight minutes to complete the update. Once we saw the "Update Complete!" screen, it was safe to remove the USB drive. The last step was to press the Home button to reboot the stereo and finalize the update.
The update wasn't a complete success, because it ultimately didn't solve the Android issue for us. One of our readers theorized that the USB wires at the rear of the head unit were plugged in the wrong way. This may require a trip back to PCH Auto, where the stereo was installed. We'll look into this sometime soon.
Dealer Maintenance and Repair
Brake Shoes: Soon after we purchased our Charger, we started to notice that the parking brake wasn't holding the car in place as well as it should. After a while, you'd press the pedal to the floor and it would do nothing.
Director of Vehicle Testing Dan Edmunds recommended that a mechanic take a look. "You don't want the transmission bearing the weight of this car," he said.
We took the Charger to our local Dodge dealer and the mechanic confirmed that the parking brake needed new shoes. For those unfamiliar with this setup, our Charger's parking brake relies on a set of drum brakes, located behind the rear rotors. The brake shoes within the drums had worn out and needed to be replaced. This repair looked fairly complicated, so we thought it best to have it performed at the dealership's service department.
The $138 shoe kit was not in stock, so we ordered it and paid in full, a fairly common practice for dealers who prefer not to be on the hook for an expensive part, just in case the customer later decides to buy it elsewhere. The kit arrived the following day. Our Dodge dealership billed us for two hours of labor to replace the shoes, at a cost of $230. Total cost on this repair was $368 plus tax.
Oil Change: Before we dropped off the Charger at the dealer, we noticed that it was almost time for an oil change. The owner's manual calls for one every 6,000 miles under a normal service schedule. It had been about 5,500 miles since the last oil change and given that we'd driven the Charger hard for standard testing and a comparison test, taking care of it early wasn't a bad idea.
An oil change on the Charger calls for seven quarts of synthetic oil, which the dealer priced at $9.70 per quart. The oil filter cost about $12. The oil change totaled about $111.40 after the 0.3 hour of labor.
After picking up the car, we saw a familiar sight: a window sticker reminding us to get an oil change in 3,000 miles. Guess old habits are hard to break.
Related Articles:
Chapter 1: Busting Millennial Myths and Shopping for a Used Car
Chapter 2: Buying a Car Under Recall and What It Took To Fix It
Chapter 3: Chapter 3: Adding Apple CarPlay, Android Auto and a Back-up Camera
Chapter 4: Minor Maintenance and DIY Repairs