It is essential that the front brake rotors on the 1994 Ford Explorer be in good condition in order for the brakes to work properly. The front brakes on your vehicle will wear much faster than the rear, and you have to pay particular attention to the rotors every time you inspect the front brakes. They tend to wear faster because they are in constant contact with the rotors, while the rear brakes make use of springs to pull the shoes away from the drums. Changing the brake pads in a timely manner can prevent damage to the rotors. Changing the rotors is not difficult, and you can save some money by doing the job yourself.
Place the wheel chocks behind the rear wheels and raise up the vehicle with the jack. Place the jack stand under the vehicle and raise it up to the frame.
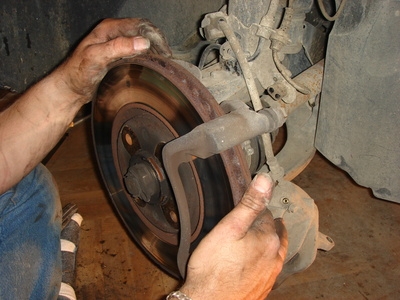
Remove the wheel from the vehicle using the lug wrench. Remove the brake caliper using a socket and ratchet to remove the bolts. You can access the retaining bolts from the back of the caliper. Secure the caliper to the strut using a wire tie to prevent damage to it.
Remove the grease cap from the hub using the screwdriver. Pry it off carefully to avoid causing damage to it. Remove the cotter pin by pulling it out with the pliers. Remove the retaining nut from the shaft using a wrench and then remove the spindle nut in the same manner. Remove the bearing retainer ring with the screwdriver. Pull the wheel bearing off. Pull the rotor off by hand. If you encounter difficulty pulling it off, hit it several times with the rubber mallet until it breaks free.
Put the new rotor on and then install the wheel bearing. Put the bearing retainer ring on the assembly and then replace the spindle nut. Tighten the spindle nut with the wrench and then put on the retaining nut and tighten it as well. Put a new cotter pin in the shaft and spread it apart. Fill the grease cap with fresh grease and then tap it carefully into place with the rubber mallet.
Put the wheel back on the vehicle and tighten the lug nuts with the lug wrench. Remove the jack stand from underneath the vehicle and lower it to the ground. Repeat the process on the next wheel.