Checking your scooter brakes regularly helps prevent stopping problems later when riding your scooter; knowing how to identify the cause of a problem helps with repairs once an issue occurs. Most brake repairs on a scooter can be performed by the owner with a little bit of work and getting greasy, so no one should feel intimidated by a brake problem once it manifests. Follow these quick steps to troubleshoot a scooter brake problem you may experience.
Examine the front and rear brake cables by activating them with the hand lever or foot pedal. Let the scooter roll while sitting on it then apply the brake. If the scooter does not stop right away, use a crescent wrench to adjust the cable tightness for the respective brake. Test the stopping again by rolling the scooter forward and applying the brakes.
Check the electrical system if the braking stops without any problems. Use a screwdriver to unscrew the headset and examine the front brake electrical switch. Replace the switch if the brake works, but the switch doesn't turn on the brake taillight. Bend down underneath the scooter and use a socket wrench or crescent wrench to open up the rear brake cable. Perform a similar examination of the rear brake switch.
Use a socket wrench to remove the wheels and wheel hubs to expose the brake shoes. Press the lever by hand normally activated by the brake cable on the other side of the wheel axle. Observe if the brake shoes move. Replace the brake shoes by removing the old ones with a flathead screwdriver and installing new ones. Secure them with a circlip tool and circlips included with the brakes. Re-install the hubs and wheels with the socket wrench.
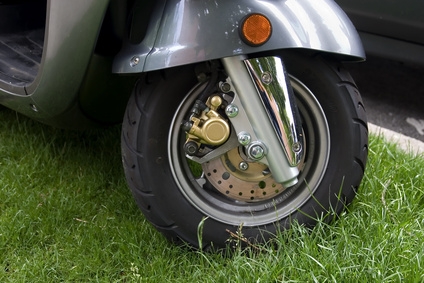
Sit on the scooter and let it roll forward. Apply the hand brake to test the hydraulic system, usually installed on the front wheel of scooters. Note what the brakes feel like if the scooter does not stop right away, whether if feels spongy, resistance or no pressure at all.
Use a crescent wrench and release the bottom of the brake fluid line going to the brake caliper. Let the fluid drain into a plastic container. Avoid touching the fluid with bare skin. Open up the fluid reservoir either higher up on the fork or headset handlebar. Pour new fluid in and use the brake bleeding kit or pump the hand brake lever to draw the fluid until all air is gone in the hose and only fluid comes out, note that brake pressure will get hard. Re-attach the hose to the caliper.
Ride the scooter to observe if the front hydraulic brake applies, but does so with a wobbling feeling. Park the scooter in a work space and remove the wheel and hub with a socket wrench. Spin the brake rotor while sitting in front of it to observe if it is warped. Use a crescent wrench to remove the bolts holding the rotor onto the inner hub and replace it if it wobbles while spinning. Re-install the wheel and hub with the socket wrench after replacing the brake rotor.