In 2003, Ford Motor Company introduced the Ford Freestar as the successor to the popular Ford Windstar minivan. Characterized with multiple styling upgrades, a variety of new storage options and sleeker body lines, the Freestar easily filled the void left by the Windstar. The Freestar, as with many Ford models introduced in the early 21st century, is equipped with four-wheel disc brakes.
Before you dig into your rear brake job, make sure you have everything on hand you will need to complete the repair. This includes quality pads and rotors.
With automotive parts, you get what you pay for every time. Cheap pads wear faster, create far more brake dust and are prone to chatter. As the rotor moves across the pad face, the pad vibrates at a very high rate of speed. This vibration is known as chattering. Unless you are fond of a high-pitched squeal when stopping, avoid cheap pads that are prone to chattering and buy high-quality pads that meet OEM standards.
Cheap rotors are made with cheap steel. Cheap steel rotors not only wear out faster, they are far more susceptible to warpage than rotors of higher quality. There are places on your vehicle you may choose to skimp in order to save a few dollars, but doing so on your brakes can put you and your loved ones in a dangerous situation.
In addition to quality parts, make sure you have a good jack and jack stands, a socket set, brake clean, a drip pan and some white lithium grease on hand before you begin. It’s also a good idea to wear safety glasses while working on brakes. A shot of brake clean in the eye, or worse, a sliver of metal, can make a relaxing day of auto repair turn into a trip to the emergency room.
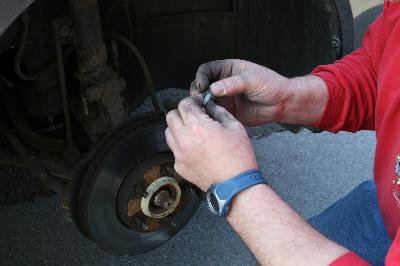
Clean the brakes thoroughly with brake clean before you take them apart. It is best to put a drain pan under the brakes to catch the drippings, which are a mixture of brake clean and brake dust. Let
that hit your garage floor, and you will have a permanent reminder of your rear brake job.
Once the brakes are clean, you can remove the brake caliper bolts with the socket wrench. In extreme cases, you might need a breaker bar to loosen the bolts, but if you have a long socket wrench and some reserve elbow grease, you should be able to get the bolts out without any further assistance.
The caliper slides up and away from the rotor, once the caliper bolts have been removed, you can slide the rotor off the spindle. Take the retaining clip off the back of the caliper to release the old pads, and then put it back on after you have installed the new ones. When you have the pads out, make sure to clean and lubricate the caliper slides, using brake clean and white lithium grease.
Slip the new rotor back onto the spindle and hold it in place by threading one lug nut onto a stud until it is hand tight. You can now slide the caliper back on and bolt it back in place. Take the lug nut back off, put the wheel back on and reinstall the lug nuts.