A radiator thermostat controls when coolant is sent to the engine for heat management during operation. Reasons to change a radiator thermostat include replacement of worn parts or the addition of a low temperature performance 180 degree thermostat. For repair, maintenance, or for performance gains, the radiator thermostat is located at the end of the water coolant pipe coming from the back of the radiator and is an easy task to complete if you don't make the job too complicated. The easy way is the direct way using the right tools to get the job done quickly.
Drain the radiator until the fluid level is lower than the position of the radiator thermostat. Use the petcock located at the bottom of the radiator to drain enough fluid so that you can remove the thermostat without losing fluid through the opening. Follow the main engine coolant supply line that comes off the back of the radiator near the top. Follow the hose until it ends at the engine. The radiator thermostat is seated into the engine in between a thermostat neck that the radiator supply hose is connected to. To avoid losing coolant, you must drain enough of the existing cooling fluid to below the location of the radiator thermostat on the engine.
Loosen the hose clamp that is securing the radiator supply hose to the thermostat neck. Here is the first difficult to reach fasteners that have many home mechanics giving up before starting. The right tools and screwdriver lengths make this job easy. Using a long enough screwdriver allows for easy access to difficult to reach screws and fasteners. Loosen the hose clamp holding the coolant supply line and pull free the hose from the radiator thermostat neck. Use pliers or screwdriver to separate the top of the coolant supply hose from the radiator by loosening the hose clamp and put off to the side during the thermostat installation.
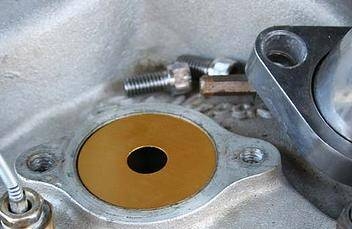
Reach the thermostat neck fasteners with a ratchet wrench and socket on the end of an extension bar that matches the ratchet wrench and socket. Common ratchet wrench extensions, like the 3-inch, 6-inch, and 12-inch, can be attached to the wrench to reach these fasteners depending on the location of the radiator thermostat. Turn counter clockwise to loosen one at a time then remove completely after getting the fasteners loose first. Remove the radiator thermostat neck to expose the radiator thermostat. Remove the old thermostat and gasket from the engine seat. Clean the gasket surface until a debris-free surface is available to receive the new thermostat gasket prior to securing back in place.d thermostat and gasket from the engine seat. Clean the gasket surface until a debris-free surface is available to receive the new thermostat gasket prior to securing back in place.
Seat the new thermostat into its mount with the "front" tab of the radiator thermostat pointed toward the front of the engine. Place the new thermostat gasket over the opening and position the radiator thermostat neck over the opening. Secure the thermostat back in place using the ratchet wrench and extension with socket to tighten the bolts in place. Replace the engine end of the coolant supply hose to the thermostat neck and tighten the hose clamp using the long screwdriver to reach around and down to the hose clamp location near the engine.
Connect the radiator end of the coolant supply hose to the rear of the radiator, securing it with the factory hose clamp. Pliers open to the wide adjustment is capable of reaching around pressure clamps or a screwdriver can be used to loosen a screw-type hose clamp. After connecting the top end of the hose clamp, the drain petcock can be tightened and the radiator refilled with coolant. Fill the radiator with ½ distilled water and ½ coolant until the radiator is full. Start the engine and while it comes to operational temperatures, check for leaks around the radiator thermostat neck, the drain petcock, and the top of the coolant supply hose at the top rear of the radiator. Check the fluid level after warming the engine and fill the radiator until filled again.