Chevy models are highly regarded for their power, performance and user friendliness. When routine maintenance requires the replacement of worn parts and fluids, a Chevy owner can do the job with the help of a few simple shop tools common in most garages. Jobs such as fluid change, shock exchange, exhaust repair and brake replacement is within the abilities of those inclined to do it yourself. Chevrolet cars and trucks have a loyal base of owners and fans that enjoy a good Chevy more than any other American-made car.
They know they can easily replace Chevrolet brakes to remove worn brake pads for fresh ones that can stop a Chevy on a dime.
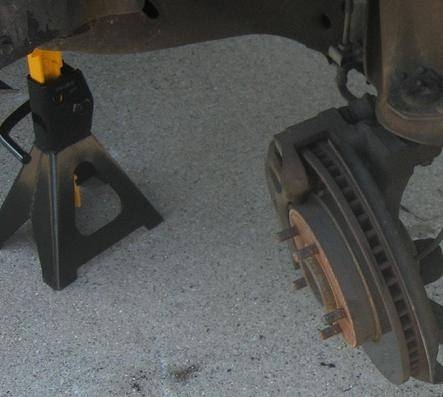
Move the car to a flat, well-lit work area, and park it in place. Loosen the wheel lugs before raising the car onto the jack stands. Use a floor jack to lift the front or rear of the vehicle high enough for jack stands to be placed under the frame and the weight lowered onto them. Raise the car high enough for the wheel to be removed. The weight of the vehicle will allow the lug nuts to break free from being tightened onto the wheel. After the car is raised and supported by the stands, remove all the lug nuts completely, and pull the wheel off the wheel lugs and free from the vehicle.
Clean the disc brake rotor and caliper with a brush. Use brake cleaner to spray behind the caliper where the caliper fasteners are. Cleaning this area allows for easy removal and installation of new parts when you replace your Chevrolet brakes, either for better performance or routine maintenance. Brake cleaner works great. Spray and wipe away all the brake dust and buildup that is left after many miles of road travel, before moving on.
Loosen the brake pad caliper with an Allen wrench. The bolts are facing away from you on the back side of the caliper. Screwed through a caliper mounting bracket attached to the axle, the calipers center the brake pads on the rotating rotor and engage or disengage using hydraulic pressure. When inserted, the Allen wrench will need to be turned clockwise to loosen the retaining caliper bolts. Remove both bolts to free the caliper for removal.
Pull the caliper free from the rotor by grasping both sides of the caliper and pulling up at an angle. If the fit is tight because of worn pads or expanded caliper plungers, attempt to wiggle the caliper off the rotor or use a screwdriver to depress the plungers some. Use the tip of the screwdriver to push the brake pad back toward the caliper walls. After some twisting, the pads will be separated far enough to get the caliper off. Remove the caliper and keep it supported.
Replace Chevrolet brakes from the calipers if they are worn. Disc brake pads have a metal armature that clips into the plungers of a brake caliper. This clip centers the pad in the caliper. When inserted, the distance between the pads is the space that needs to go around the brake rotor. If the space is too small to fit after the new pads are inserted, remove the pads and use a C-clamp to depress the caliper plungers enough to create the needed room to fit on the rotor. Use a worn brake pad inserted in the plunger for the C-clamp to press down on. Tighten the clamp until the plunger is depressed enough to have the new pads inserted and still fit around the brake rotor.
Replace the brake caliper with the new brake pads installed. Reverse the operation to secure and attach all the parts that make up the wheel and disc brake assembly on a Chevrolet car or truck. Tighten the lug nuts of the wheel after the car has been lowered, and retighten after testing the brakes. Because disc brakes are a closed system, the brakes may not need to be bled of any air in the lines. If you need to bleed your brakes, use the bleeder valves that come out of each caliper to push all air out of the system. Use a hose that fits over the valve and is long enough to be put at the bottom of a clear container with brake fluid in it. Press the brake pedal and see fluid pushed into the container the hose is in. When only fluid and no air come from the bleeder valve, tighten the valve and test the system again.