
 Verne Simons
Senior Editor, Jp
Verne Simons
Senior Editor, Jp
Working on a Jeep’s A/C system is sometimes a daunting task because, well, it seems like a very complex and sensitive mechanical system filled with strangely colored substances at high pressures. Our primitive brains struggle to understand how a few mechanical parts filled with these unknown fluids can yield comforting cool air. It seems complex and scary, but all in all, it really isn’t. Your Jeep’s A/C system is fairly simple, and while it does have some sensitive parts, they are no more sensitive than other parts you regularly abuse on your Jeep. One Jeep with an A/C system that has fought us frequently since we bought it a few years back is our ’01 WJ Laredo Grand Cherokee. For years we’ve been tracking small leaks and repairing them, borrowing our friend’s A/C gauges more times than we care to admit, and nickel and diming our A/C system in hopes that it would stay cool in the Arizona desert. Our adventures with the WJ’s A/C even cost us a windshield—more on that later. It always seemed like little stuff that was causing the whole system to go poof, and since we live in Arizona, the A/C is not really optional.
That is until one particularly warm day last August. On this day, we innocently jumped into the WJ to move it a few feet out of the way of one of our other projects. When the engine fired up, nearly instantly, a cloud of smoke poured out from under the hood, and the distinctive smell of r134A filled the air. What happened was a massive failure of the A/C system that basically emptied its guts in a few seconds under the hood through the safety pressure valve. Alrighty then! Thanks for nothing, WJ A/C.
 The main components of an A/C system are the compressor, condenser, receiver dryer, expansion valve (or orifice tube), evaporator, a couple of electronic switches, and a high- and low-side tap. Alright, there are a few more parts that can fail, like metal tubes and rubber hoses, Shrader valves, o-rings, gaskets, and so on, but it’s still fairly simple. This diagram from “Jeep A/C Repair Made E-Z” (Sept ’10) shows both the high-pressure (red) and low-pressure (blue) sides of the A/C system, as well as each component’s location in the system, although this is apparently somewhat variable between vehicles.
Since it was 110 degrees plus in the shade and we still had to drive the Jeep, we relied on open windows and running the HVAC blower at full boogie with the vents aimed at our faces (for a few days, that is) until the HVAC system defaulted to defrost only. Ugg! First it was hot, and then it was hotter.
Now what? Well, we parked the Jeep and found comfort in other Jeeps with functional A/C, removable doors, or functioning vent systems, in the least. Fast-forward several months; the weather threatening to get hot again and the WJ’s A/C is still broken. Time to rectify the situation! So what did we do? What was wrong? How did we diagnose and repair it? Follow along to see all the adventures as we learn about A/C and finally feel the cool breeze. Almost all of these components are shared with any Jeep with A/C, so just because you have a JK and not a WJ does not mean this article doesn’t apply to you. If your A/C has ever been on the fritz and you’ve wondered if you can fix it, then read on, reader, because you can!
 Our A/C system also has a high-pressure safety valve (arrow) that popped and released all of the refrigerant on that hot day last summer. That means that somehow the pressure in the system became dangerously high. That’s most likely the result of junk blocking the small passages within our A/C system. How did junk get into the system? Well, over time and with the few leaks we fought over the past few years, either some water got into the system or enough of the lubricating oil got out of the system to allow internal damage to occur. One way or another, junk or trash in the system was the problem, and just replacing the blocked part is not really a solution since more junk could be trapped in the system and could move around even after you’ve replaced the clogged part. This means replacing lots of the parts of your A/C system.
 So replacing almost all of the parts in our A/C system sounds expensive, huh? If you’ve taken a Jeep to a repair shop for A/C work like us, you’d probably guess at least $1,000 to $1,500. Or maybe $2,000, right? Well, luckily for us, and you, that’s not necessarily true. We went to RockAuto and got a new A/C compressor, new orifice tube, new condenser, refrigerant line, and new receiver dryer for our WJ. The price for all these parts was $346.25 before shipping. Add in the evaporator (it is buried in the dash and we decided not to replace it) and you are at a total of $394.24. The two 12-ounce cans r134A required for our WJ was $25.98.
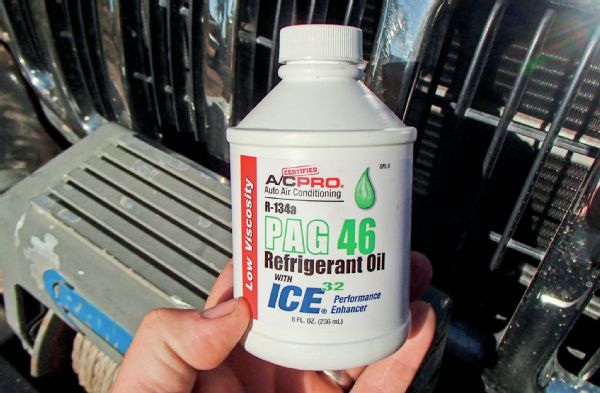 The first step when working on your Jeep’s A/C system is to have the refrigerant from the system recovered or removed. You’ll need to take your Jeep to a shop to have this done properly using a machine that captures the r134A. This was not necessary for us since our system had voluntarily evacuated itself that hot summer day several months ago. This meant we could start tearing out the components we were going to replace. We pulled the grille, winch, bumper, and upper radiator support. If you are a decent shade-tree mechanic and you don’t want to deal with any of the chemicals you can probably get a local shop to recover your r134A, and then once the repairs have been made get them to vacuum and refill the system. However, you will have to add PAG oil to the system when replacing certain parts. Be sure to avoid PAG oil with any A/C system leak sealer mixed in. That stuff generally only helps to clog up the inner workings of your A/C system and rarely, if ever, actually seals a leak.
 If your once fully functioning A/C system slowly warms up over a few days or weeks, chances are you have a small leak somewhere in the system where the r134A is escaping. You can use soapy water and a spray bottle to look for a leak on the system, or internally add some r134A with a specially die and use this funky little light and these yellow glasses to find the leak. The dye works its way out of the leak and the light and glasses make the area where the leak is light up like Tide detergent under a black light. In theory, this will make finding the leak easy. Again, be sure to avoid any leak dye with any A/C system leak sealer mixed in.
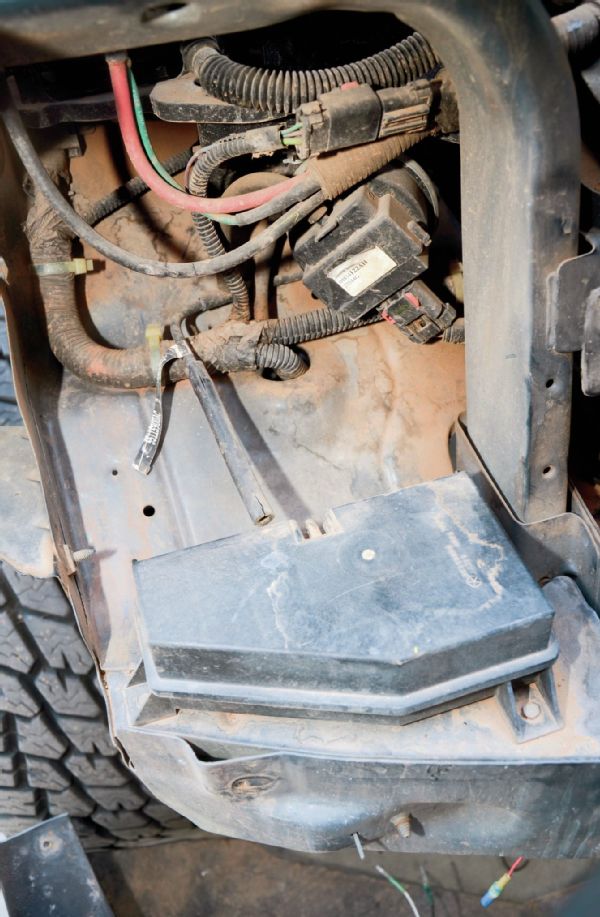 Our WJ actually had two problems that were making us very hot. One was the A/C system in self-destruct mode. The other was caused by a simple vacuum leak. Like many modern Jeeps, our Laredo WJ has manual climate controls. Vacuum pressure opens and closes doors in the dash to direct the air being pushed by the blower motor. With the vacuum leak in our WJ, it defaulted to directing any and all air to the defrost openings. Simple as the problem was, we had no idea where the vacuum leak was, as it could’ve either been under the hood or deep within vacuum lines under the dash. We started blowing the dash apart but couldn’t find anything out of the norm. We then switched gears to pulling the grill and headlights while following an under-hood vacuum line to a vacuum canister under the passenger-side headlight when we found the problem. This rubber fitting had dried, cracked, and popped off its home. Some new vacuum hose fixed the leak. and we can at least direct warm or hot air where we want. If the source of the va
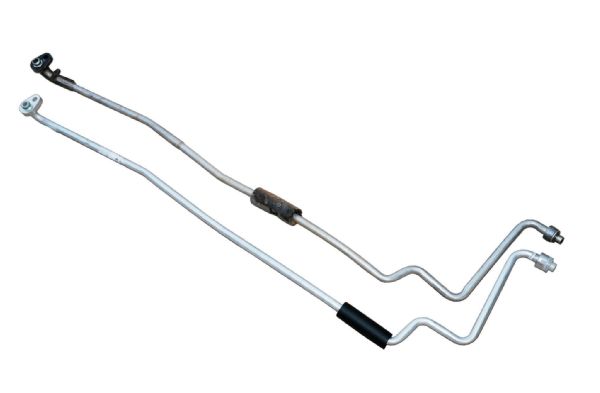 Getting to why the A/C system was not cooling air meant pulling all the easily accessible parts of the A/C system and replacing them with new versions. We started by replacing the liquid line with the orifice tube shown here on the right (bottom unit). The old liquid line with the orifice tube was likely one of the components that got filled with junk and caused the extreme pressure buildup that caused the ultimate failure of the A/C system. Newer Jeeps have an orifice tube while older Jeeps with A/C may have an expansion valve. In our WJ the only major component we did not replace was the evaporator, which is just downstream of the liquid line with orifice tube. We did not replace the evaporator because it is hard to get at (requiring pulling the dash from the vehicle) and is far downstream from the compressor which we are assuming is coming apart and is thus the source of the junk in the system. It was a calculated gamble that will hopefully pay off. If not, we could trash all of our new components. An expe
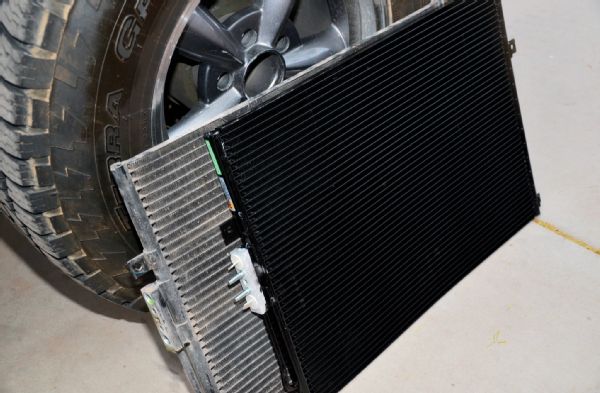 Next we replaced the condenser with a new one from RockAuto. It usually has several versions of the parts you need made by different manufacturers, so you can pick and choose which parts you end up with based on price and brand names you recognize. The condenser is an important component to replace if there is junk in your A/C system because it is just downstream of the compressor. Basically, the condenser condenses the vapors in the system to a fluid with help from heat exchange as air passes into the engine compartment of your Jeep. As mentioned, it’s bad if your condenser gets clogged with junk from within. Also, if the condenser does not get adequate airflow from outside (like if a fan fails or trail debris obstructs air flow), pressures can rise dangerously high.
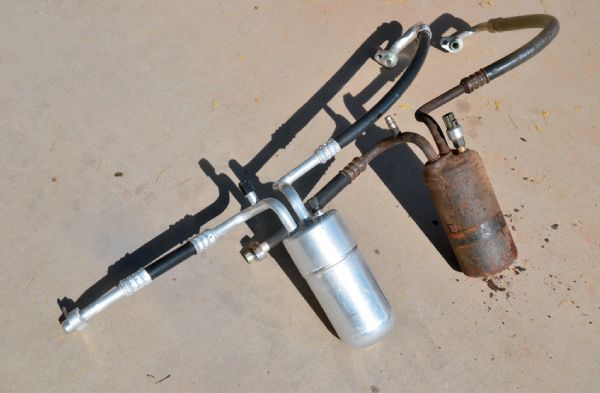 Here we see the receiver dryer on the right. This component of the A/C system contains a desiccant that helps remove any moisture from the system. Moisture is the enemy of your sealed A/C system, and the receiver dryer is sealed from the factory. You want to install this component last, breaking this seal just before torqueing the fittings to spec and applying vacuum to the system to check for leaks. It’s a good idea to replace the receiver dryer every time your system has been opened to the outside elements. We are guilty of not doing that in the past using our dry Arizona locale as an excuse. The multiple leaks our system has suffered and our refusal to replace the receiver dryer previously could be part of what caused the failure to begin with. Also, see all that rust. This part sees extreme temperature changes that attract moisture from the environment. Our Arizona WJ literally had no rust other than what you see here. We also added some PAG oil to the receiver dryer so the system would be properly lubric
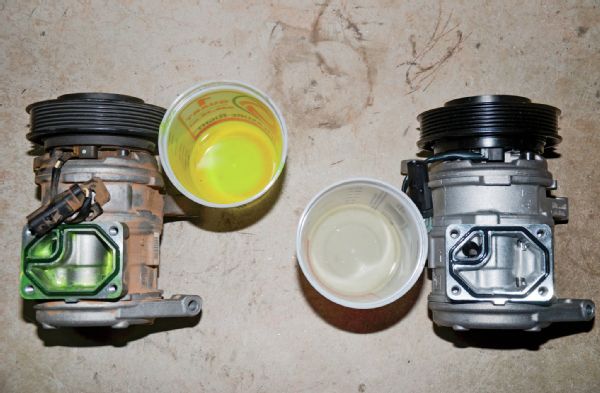 The A/C compressor shown here has the most moving parts out of any of the A/C systems components. Not surprisingly, the compressor is likely the most expensive part of the system, and its slow internal self-destruction is most likely what caused the pressure valve to blow. The instructions supplied with our new compressor from RockAuto said we needed to drain the old compressor and add the same amount of oil to the new compressor before installing it. You can see the yellow die in the PAG oil from our old compressor.
 Replacing o-rings and seals on your A/C system is very important. You want the system to be totally leak free. This rubber-impregnated washer had some damage so we replaced it with a new version from our local auto parts store. The old one may have worked, but now’s the time to address stuff like this rather than after adding in several dollars worth of r134A. New seals will ensure a leak-free system.
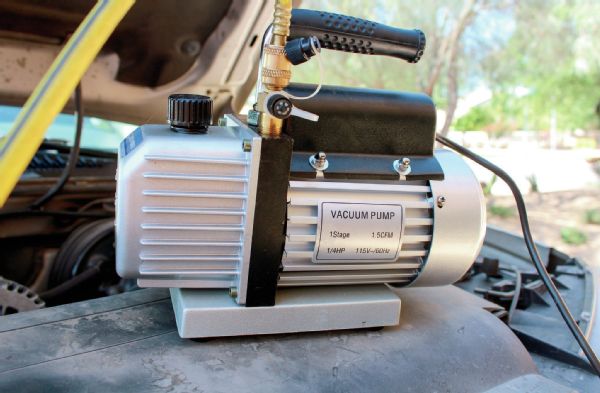 One thing that is critical to a well functioning A/C system is to use a vacuum pump to check a newly re-assembled system for leaks. To do this, run the pump for 20-30 minutes and then let the system sit under negative pressure. If the gauge on the blue side goes up as the system sits, there is probably a leak. You can try to track the leak down using smoke (like for the vacuum leaks) when the system is under vacuum. Or if the leak seems small, you can add dye and run the system for a while to locate the leak using the aforementioned light and glasses. However, by doing that, you may be throwing away your r134A and receiver dryer if the system has to be drained and opened to fix the leak. Our WJ sat over night with the gauges on it, and the reading on the gauge did not change, if at all, if any over nearly 20 hours.
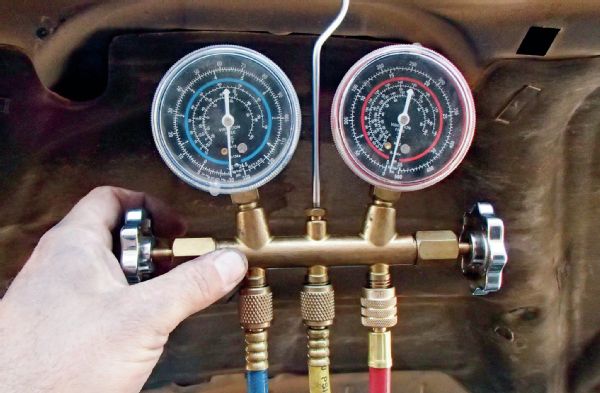 The two major pieces of equipment that you will need if you plan on rebuilding the A/C system in a Jeep are a set of gauges (sometimes called A/C manifolds) and a vacuum pump. Our friend (an Arizona native) owns both and knows how to use them. That saves us time and money since we can ask him over, ply him with beer, and say yes and no when he does whatever mumbo-jumbo he does with them. In truth, these A/C gauges have been on this WJ enough that we probably should have paid for them, and try as we might to ignore him, we have still picked up on part of how to use them. One thing that is critical when filling the system is to have the red valve fully closed, otherwise the high pressure-side of the system can unintentionally fill the r134A can with huge amounts of pressure. That means that can in your hand—not the beer can—could become a bomb. Only fill the system through the low-pressure side.
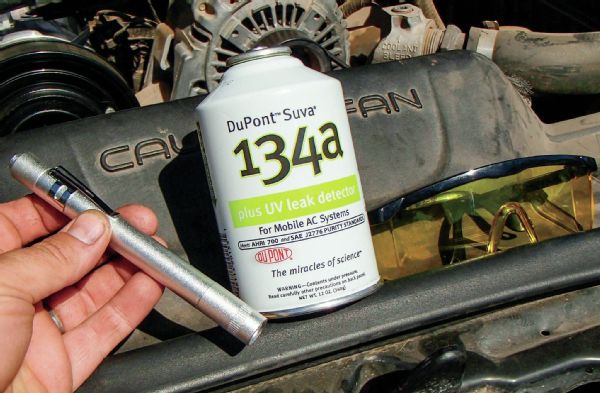
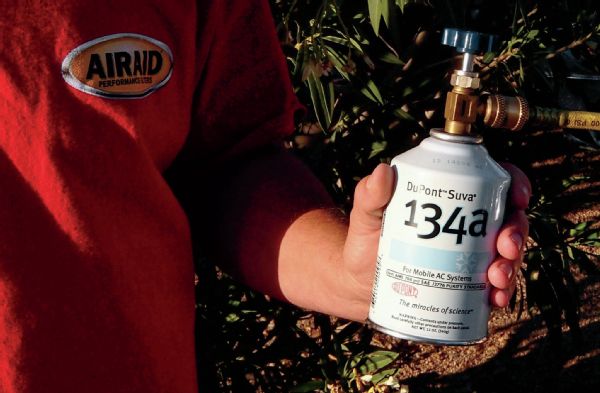 After placing your newly rebuilt A/C system under vacuum, you can start the engine and switch the A/C to its highest setting and refill the system. Again, you want to only use r134A without any type of leak sealer because the leak sealer can cause unnecessary damage by gumming up the internals of the system. It’s also important to agitate the can by rocking the can back and forth lightly. You never want to turn the can completely upside-down as this can cause liquid r134A to enter the system too quickly, which can slug (basically hydrolock) your compressor. Also, to just touch on the r134A can bomb thing, don’t worry too much. The cans have a c-shaped safety cut in the bottom, so if too much pressure back feeds into the can, it will blow out the bottom. This relief cut can also cause a brand-new can of r134A to fire out of a WJ’s cup holder like a rocket, and soar right into the windshield when left unattended during a 115 degree Arizona day. Ask us how we know.