Speedy Auto > Car Tech > 4x4 > Engine

1991 Chevy Truck Transfer Case - 4Wheel & Off-Road Magazine

1991 Chevy Truck Transfer Case - Trans-Action Fred Williams Brand Manager, Petersen’s 4Wheel & Off Road

As time moves on, technology gets...well, more technical. In the good old days when you wanted to shift the gears in your truck all you had to do was push in the clutch, pull a lever, and let out the clutch. But eventually that seemed too difficult so someone invented the automatic transmission filled with fluid, clutches, bands, valves, pumps, and planetary gearsets all designed to shift gears more smoothly and quicker than a manual. And then when that seemed too simple they added a computer to help it work even better. Don't get us wrong, automatics are great when they are working right, but they can also be a giant headache when they act up, especially when you're buried in the mud miles from home.

1991 Chevy Truck front View Photo 9235333

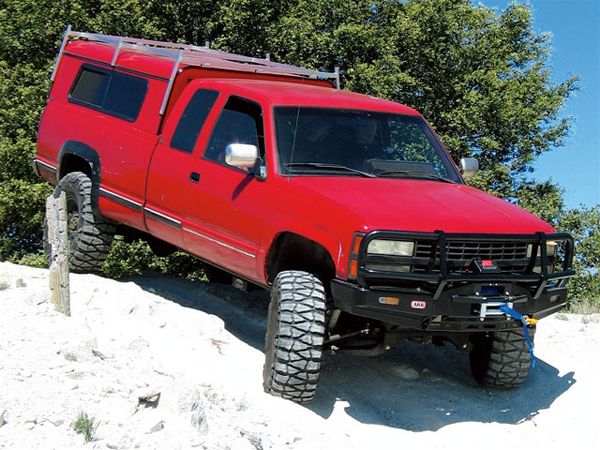
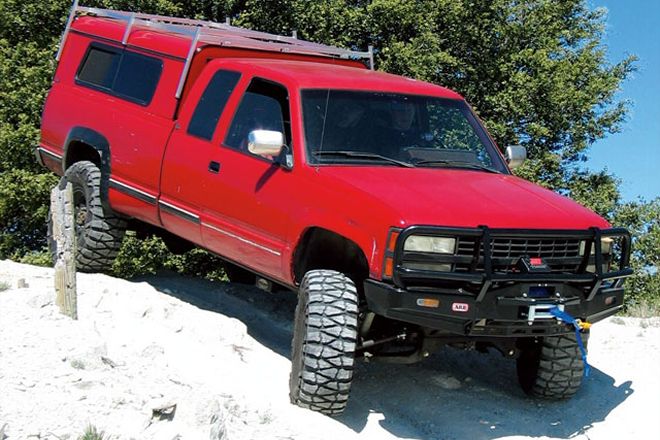
For example, we've been working on a '91 3/4-ton Chevy truck that we've christened the Red Sled (it turns like a toboggan) with the goal of testing some hard-core Independent Front Suspension (IFS) components. We got this truck for a song because it was missing an engine, but it's been an uphill project from the start. To make a long story short, we stuffed an engine in, lifted the truck, upgraded the steering, and took it wheeling. Then the electronic automatic transmission died, so we rebuilt the tranny and it died again. At this point we were really considering installing a manual transmission, but we already had that swap in motion for another project, so we decided to explore the options of keeping the auto, but making it better.

Since this truck is a work, camping, and wheeling truck it needs a reliable gearbox, a way to keep track of and control the heat the tranny is making (heat kills automatics), and better low-range gearing to help move this 7,000+ pound behemoth off road. The Sled came from the factory with a 4L80E automatic and an NV241 transfer case. The 4L80 is similar in strength to the venerable TH400 but with the added benefit of an overdrive Fourth gear-both great aspects-but it is also computer controlled, which 99 percent of the time isn't a problem. However, it can create additional dilemmas when changing tire size and gearing, or if you wanted to swap this transmission into another vehicle. To get the most of our 4L80 we headed to Off Road Unlimited where we pulled the 4L80E out and then took it to B&M Racing for a rebuild and an external controller, which would allow us to have greater control and diagnostic management of the trans.

Since the NV241 only has a 2.72:1 low range we decided an upgrade had to be made in the transfer-case arena. Our choice was a STAK three-speed Monster Box transfer case, which replaced our strong chaindrive 241 with massive geardriven internals, both a 3.05:1 and 5.44:1 low range, and the ability to run low range from either front or rear output individually. What we ended up with is a greater range of gearing off road, and a more user-friendly transmission management system on road. Plus the ability to get our Red Sled back on the trail, and once there, really test the strengths of an independent front suspension. Stay tuned to find out what happens when big-block power, super-low gearing, extremely obese curb weight, and big tires are applied to an independent front suspension in the rocks.

PhotosView Slideshow The first step of any tranny swap is to remove the driveshafts, transfer case, and transmission. Word to the wise: Get a transmission jack. Whether you buy, borrow, or steal one you'll be glad you have it when 100-plus pounds of automatic transmission comes out or needs to go back in. The first time we wrenched on this transmission was on the floor of a friend's shop; the second time was up on a lift at ORU. With the electronic 4L80E automatic out, we hauled it over to B&M to be gone through, beefed up, and diagnosed. There was a wasted seal in the torque converter, which seems to have been the culprit, maybe due to installation error on our part. Nonetheless, B&M tech Steve Macias tore it down and made it better than stock with high-performance clutches, a new dual-cage heavy-duty 36-sprag assembly, a set of Sonix 1-2 and 3-4 shift spring calibration, and a full set of gaskets and seals. Unlike other automatics, these electronically controlled units have solenoids and wired control panels that can fail. Since we had it this far apart, all electronics were replaced-even the simple harness running to the exterior of the case, plus a new pressure-control system was installed. Always be careful that the wiring is safely routed and not caught when installing the pan. B&M installed a shift improver kit to give the truck more positive, solid shifts. The kit allows for greater control of the transmission and is calculated for greater shift feel. This upgrade can be done quickly and easily even if you're not rebuilding your entire transmission. If you can pull the pan you can install one of these kits. One problem we were having with the trans was a leaking pan. We ditched the aftermarket cork gasket and headed straight for the GM dealership to get a factory metal O-ring gasket. Reusable and less likely to leak, it's worth the extra coin, especially since we are running B&M's synthetic Trick Shift fluid and we don't want to worry that it's dripping out onto the trail or street. Additionally we used a B&M aluminum pan to better dissipate heat and hold more fluid. One of the biggest threats to automatic transmissions is heat. To help the factory cooler we added a second external B&M cooler in front of the radiator. Be sure to thoroughly flush out the factory cooler and lines prior to installing your new trans. Additionally we added a B&M temp gauge to the return line to keep track of the temps from the driver's seat. When rebuilding your transmission it is required that you either rebuild or replace your torque converter to ensure that any previous contaminates don't get run back into the new transmission. We had ours rebuilt to B&M Traveler Package spec. These are designed to help heavy motorhomes or tow rigs by raising the stall speed approximately 300 rpm, assuming that will assist in initial acceleration. We took the rebuilt 4L80E over to Race Trans, a small shop known for its truck and diesel transmissions. The tranny was run on a dyno to make sure all line pressures and shifting was correct. Additionally, the torque-converter lockup was verified as working since we didn't want to be pulling this transmission out again any time soon if it could be helped. One problem we had with the transmission prior to the rebuild was keeping track of what gear we were really in, and whether or not the torque converter was locking up due to soft shifts and failing solenoids. These two aspects of the transmission, plus greater diagnosis and adjustability, convinced us to try out B&M's offering of a Compushift controller. The Compushift is a stand-alone computer designed to run an electronic automatic transmission whether it is in a factory or custom vehicle, and it quickly installs under the driver's or passenger's seat for a safe, protected control location. PhotosView Slideshow The Compushift controller is super easy to install and hook up. All the wiring is labeled and any questions can be answered by the knowledgeable staff just a phone call away. To run you simply need a clean, keyed 12-volt power supply, a throttle position sensor (TPS) signal, an output speed-sensor signal, and the main transmission plug attached. This '91 GM truck has a Powertrain Control Module (PCM) that runs the fuel injection on our TBI 454, and controls the 4L80E transmission. Since we were swapping to the Compushift controller from B&M we no longer were going to be plugging the PCM into our transmission. However, we did need to get a signal from the TPS to help tell the transmission when to shift. If your 4x4 is carbureted you can use Compushift's cable-activated TPS. We, on the other hand, simply tapped into the TPS wires that plug into the PCM. Our Red Sled project is a wiring nightmare. It's old enough that no dealership still has a full harness for it, yet new enough that no one is restoring them so the aftermarket hasn't started making the harnesses. We got this used but priceless (to us) factory wiring diagram book on eBay and have found it helpful when hooking up the Compushift controller to the factory truck PCM and harness. Another option is Helm Inc., which sells many different service manuals. 1991 Chevy Truck speed Sensor Photo 9271317

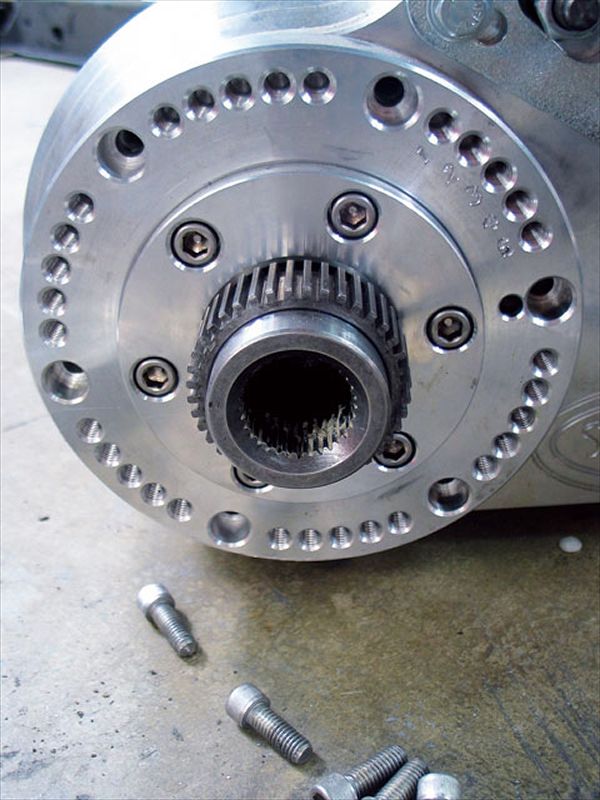
For a speed-sensor signal you have a few options. Some automatics have a transmission output speed sensor (TOSS) and others rely on an output speed sensor (OSS) in the transfer case. We had our transmission rebuilt and made sure it had a TOSS installed, and we also installed this Advance Adapters' speed sensor onto the input of the STAK case. 3 The AA piece has the pickup threaded into the transmission-to-transfer-case adapter, so all speed-sensor signals are recorded prior to transfer-case low-range gearing. Thus the tranny always shifts like it is in two-wheel drive. At first we assumed we would need the TOSS to run the Compushift and the AA unit for the factory speedometer, but we found that the Compushift has a reproduced TOSS signal that can be wired into the factory harness to control the speedo.

PhotosView Slideshow This truck came with an NV241 chaindrive transfer case (left) from the factory. It's plenty strong but only has a 2.72 low range and we wanted more. We haven't had a chance to test the new STAK 4x4 Monster Box (right) yet so we ordered one up. The STAK is a 150-pound brute of a case with dual low ranges and front or rear low-range capabilities, which should make for some interesting abusive testing of the front end when the time comes. Ours came with a driver-side front output and 1350 yokes front and rear. Though roughly the same length and width as the NV241, the STAK is a bit larger in height. To deal with this we had to lay a beating onto the truck's floorboard with our biggest hammer. This allowed for about 1/2 inch of clearance. In addition to the floor massage, we also trimmed the factory crossmember and lowered it about an inch, welded in a new plate, and bolted on a new transmission mount from Daystar Products. We were able to then bolt back on the factory transfer-case skidplate. Even though we were told that the transfer case would be fine bolted to the back of the 4L80, we opted for the additional transfer-case mount from STAK to assure that the 150-pound three-speed doesn't break the tailhousing off the tranny. The mount comes with a slotted half-moon bracket and a bushing with tabs. We mounted the tabs as close to the Daystar tranny mount as possible to keep the drivetrain mounting points in somewhat of a triangle. We then welded a short tube to the bushing to hold the back of the case in place. This also reduced the shifter vibration in-cab as a bonus. With the swapping of transfer cases, we also had to address driveshaft length. We decided to upgrade to all 1350 1-ton U-joints both front and rear and headed to JE Reel to have the upgrades done. JE built us an entirely new front shaft and lengthened and rebuilt our two-piece rear shaft with new joints, a fresh carrier bearing, and a longer front section to reach the STAK case. If you own a Jeep you should check out JE Reel's waterproof U-joints made for deep mud and water use, but sorry to say they're not yet available for the big-truck crowd yet. The display/programmer is where all trans data is displayed and adjusted with easy pushbutton steps. This controller tells you what gear you're in, tranny temp, battery voltage, engine rpm (when tach wire is installed), speed, line pressure, throttle position, and when the torque converter is locked up. Additionally it can be used for all types of performance testing such as accelerometer, dynamometer, and stopwatch. 1991 Chevy Truck interior Shifter Photo 9235387

Here is the new view from the cockpit. There is a B&M temp gauge on the dash keeping track of the 4L80E, the new three sticks controlling the STAK coming up through the floor. The left shifter is for the front output. Push it forward and you have low range, middle is neutral, and back is high. The middle shifter chooses between 5:1 or 3:1 low range, and the right shifter engages the rear output. Unfortunately we got a little excited when cutting the hole for the shifters and had to then go back in and plate over the giant opening we cut. Finally we added a new triple-shifter boot from JB Custom Fab that greatly eliminates heat and noise intrusion to the cab. Also on the floor there is the Compushift display programmer within easy reach and in sight to keep track of the data arriving from the fresh tranny. The red knob on the dash below the gauge is the front axle Posi-Lok activator; see the complete install of that elsewhere in this issue.

PhotosView Slideshow We also returned to Race Trans to make sure we had all the settings perfect on our programmer. This controller allows quick and easy adjustment of shift speed, line pressure, gearing and tire size figures, and when the torque converter will lock up. This ability to adjust numbers is a bonus the factory PCM never offered and great whether you're using it in the factory application like us or swapping an electronically controlled overdrive auto into any of your 4x4 projects. Here is one problem we encountered that we hadn't considered. Because we lowered the transfer case slightly from stock (maybe an inch or two) the front of the engine was rotated upwards just a hair. Though it ran fine, when in a hard turn or under throttle, the engine mounts would flex a little and send the fan clattering into the fan shroud. We pulled the shroud, trimmed an inch off, and haven't had a problem since.