 Pete Trasborg
Brand Manager, Jp
Pete Trasborg
Brand Manager, Jp
It went down like this: With Hazel moving over to Four Wheeler, Jp magazine’s ’07 JK became an orphan, because you can’t take Jp’s Jeep over to another magazine. Aside from a blown-up transmission and some nasty oil consumption habits, it seemed to be in OK shape. With around 98,000 miles on the clock and only being seven years old, it was by far the newest and least-travelled Jeep I had access to. So, I happily adopted it and brought it home.
The drive home revealed that while, yes, there were throwout bearing and transmission issues, it was drivable (at least for a short time). However, there was something wrong in the suspension. On even the slightest bumps on the highway, it would bounce off the front and rear bumpstops. Forget about going off-road at anything other than first gear or low range, as you’d lose it and go off the trail. Then there was the clunking coming from the rear. Oh, and let’s not forget the clunk from up front when turning the steering wheel while stationary.
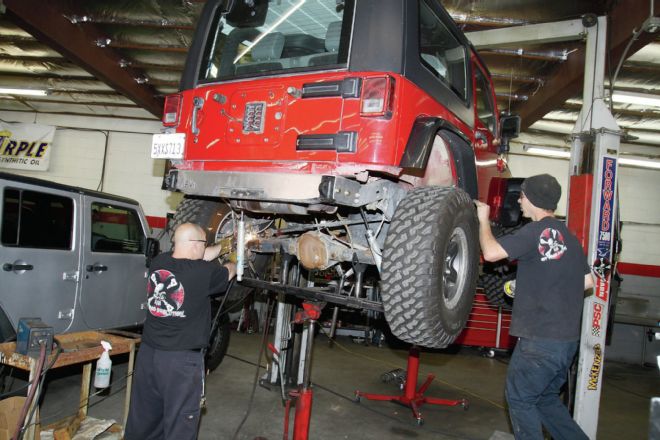
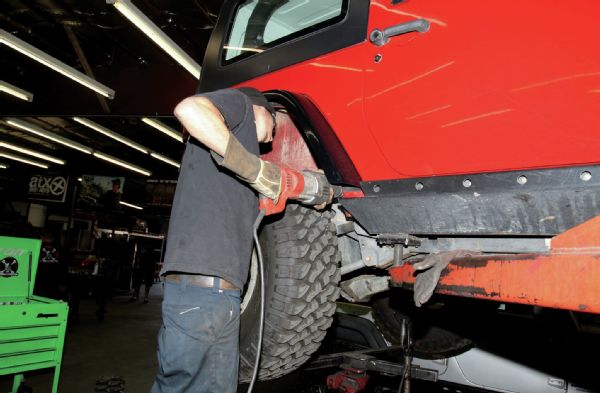
The Jeep trickled down to me through three other magazine guys, so who knows who did what when. After a couple of days of driving it, I decided that the suspension just wasn’t right and wanted a second opinion on what I thought was wrong with the transmission. So, I went to Off Road Evolution and asked the owner, Mel Wade to drive the thing and tell me what he thought.
Well, we got as far as the end of the parking lot before we turned back into the other entrance. Like a shot, Mel was out of the Jeep and yanking the rear bumpstops, solving the ass-end pogo-stick effect. However, now the clunking in the rear was worse, and the front was still all messed up. I had no idea what kind of suspension was under the Jeep. Mel was able to identify several different manufacturers’ parts. Over seven years of magazine servitude, it was really easy to believe that a Jeep like this could end up with all kinds of parts under it as stuff broke or manufacturers needed a test mule.
So, we decided to take the Jeep in, put it on a rack, and figure out what was wrong with the suspension and hopefully find an inexpensive way to fix it. At least, until I got that little transmission and throwout bearing issue sorted out. Here’s some of the fun stuff that was going on under our ’07 Wrangler that you might want to look out for on your own Jeep.
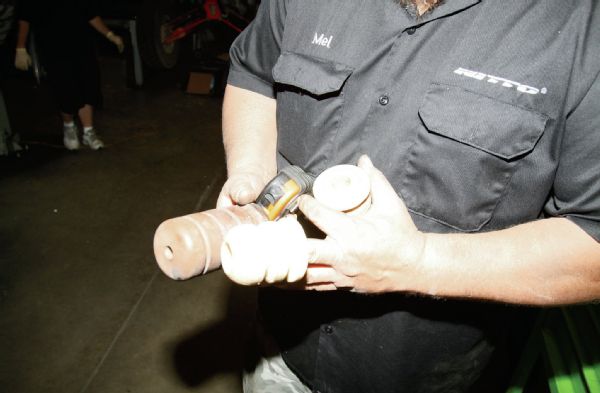
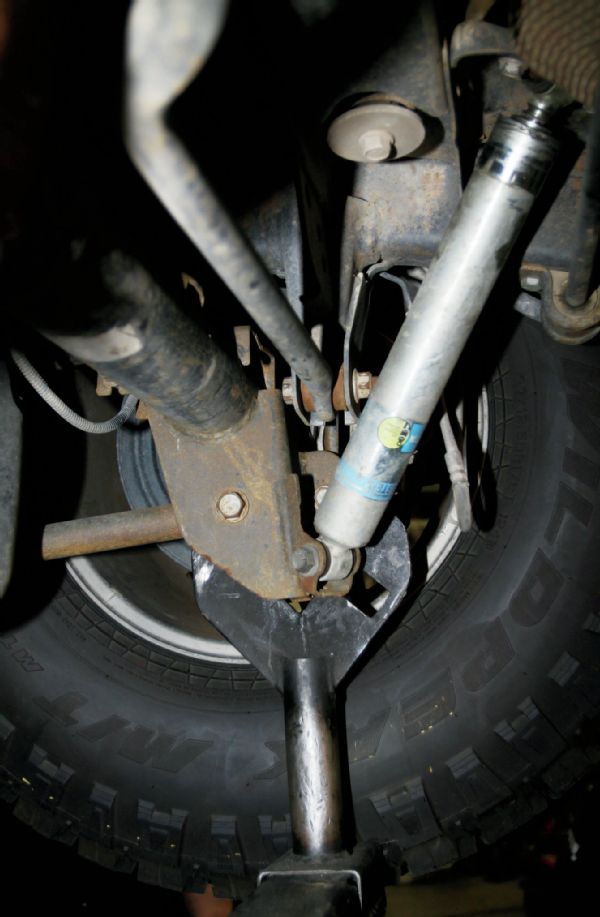
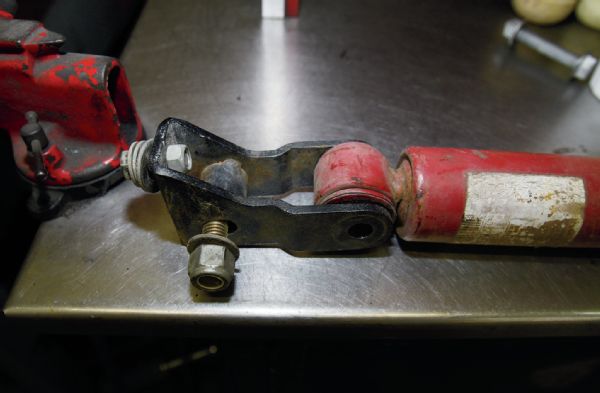
The bumpstop on the left is an aftermarket part of unknown origin. It is about 41⁄2-inches long and has a very hard durometric rating—as in, doesn’t give at all, which is where our pogo-sticking came from. It was set about 11⁄2 inches from the pad on the axle side, which meant that even on-road, we only had that much uptravel. The bumpstop on the right is a factory part that is about 2 inches shorter than the aftermarket one.
Here the spring is removed from the Jeep for some measurements. This is at full bump with the longer bumpstops in it. The tires aren’t anywhere near the body, and there is still almost 2 inches of shock length left. The axle could go up almost two more inches before the tires get into the body. That means that as the Jeep was set up, the rear shocks and bumpstops were too long. But then again, we knew that from driving the Jeep.
We pulled the bumpstops to gain a before and after measurement. With the tire nipping the corners of the wheel opening, we ended up with about 2 inches more up travel, but we still weren’t using all of the shock. Now our shocks were our bumpstops. Perfect! Exactly what we were hoping for! (That’s sarcasm, by the way.)
If that weren’t enough, now the trackbar and shock mount wanted to share real estate, and our shock body was into the adjacent crossmember. Well, that might not be good. We aren’t sure how it was happening with the other bumpstops, but we could see marks on the shock body where it was coming into contact before as well. We suspect that the axle walking side to side had to do with that as well.
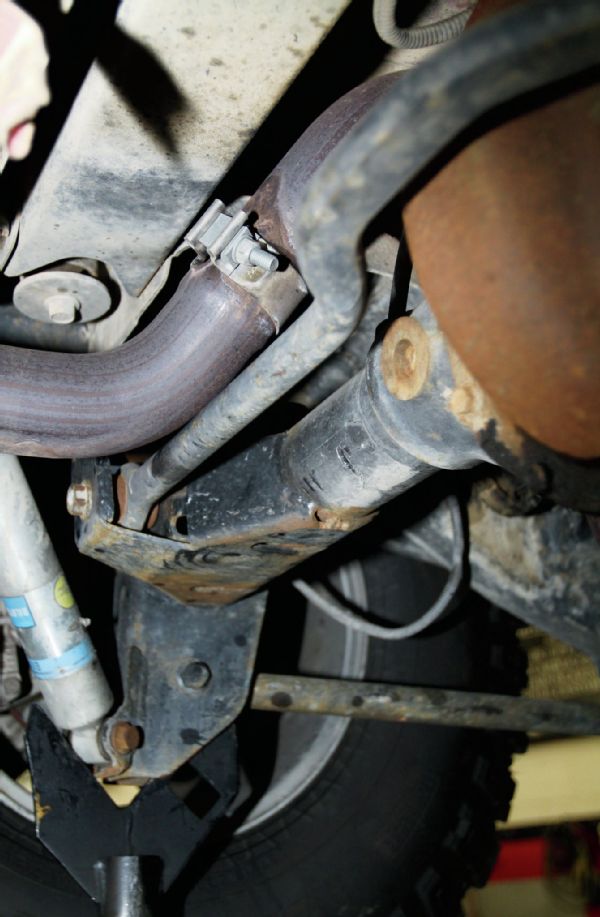
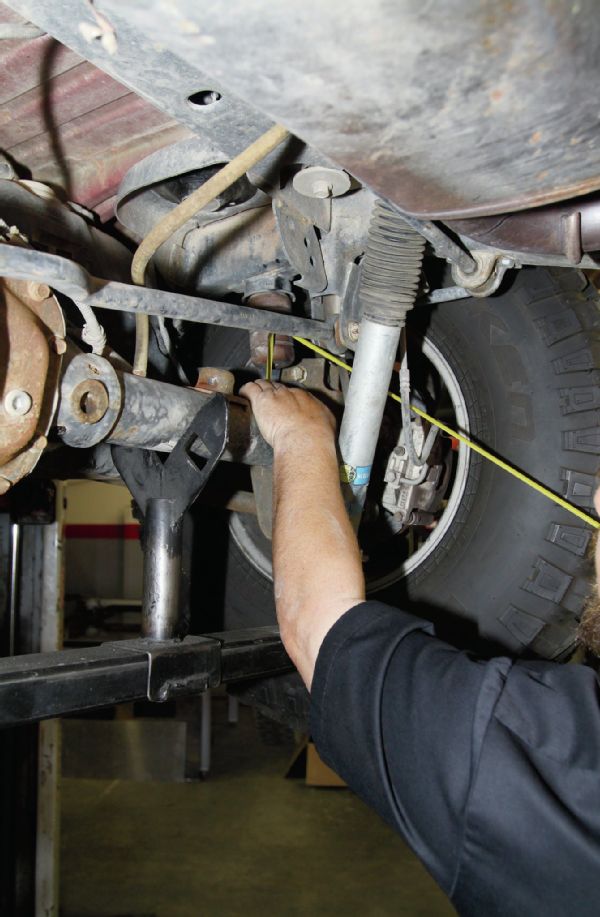
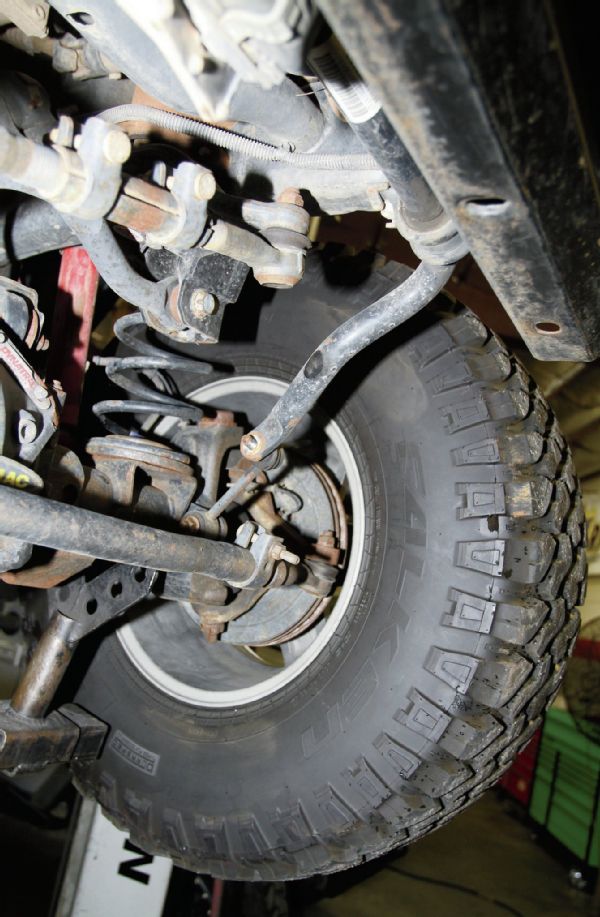
On the other side, our lower trackbar mount had been getting jiggy with the exhaust for quite a while, which was pushing the exhaust into the frame. That, in turn, loosened a couple of the exhaust clamps. We had two that weren’t even hand tightened, and we could spin ‘em like hula-hoops. Also, our trackbar was at too much of an angle with 3 inches of lift. With the factory mounts, we saw about 11⁄2 inches of side-to-side axle movement, which put our tires into our frame. We were actually wearing out the inside sidewall of the tire by rubbing it on the frame.
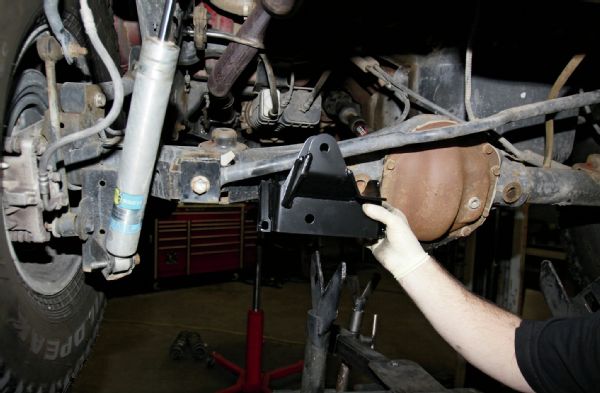
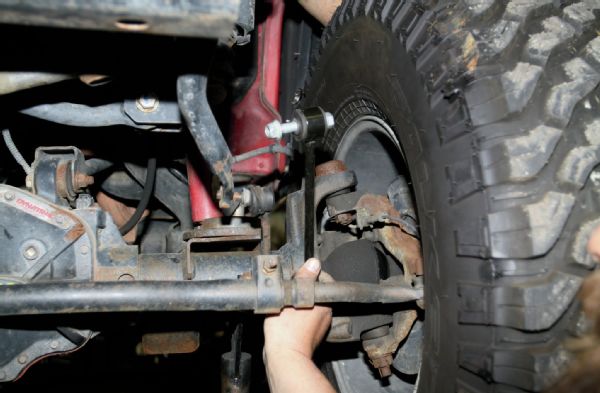
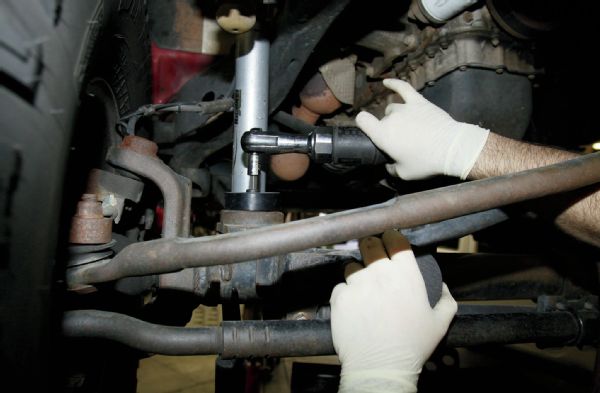
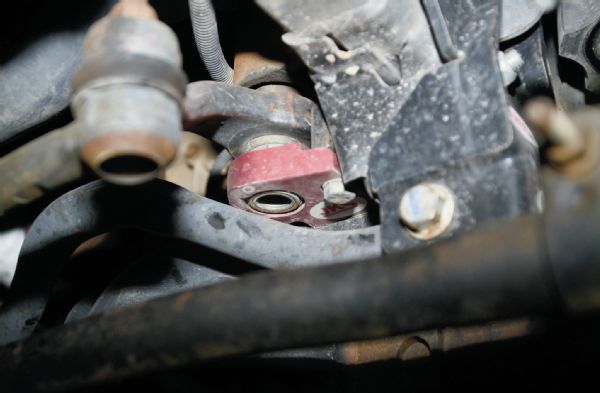
One of the many clunks we had in the rear had to do with wallowed-out holes on our axle-side trackbar mount. We tried tightening the bolt (a whole lot), but it didn’t stop the side-to-side movement of the bolt. One way to fix the axle moving side to side when articulating is to make the trackbar more parallel to the axle. In a two-birds-with-one-stone kind of deal, we used this 3⁄16-inch-thick bracket from EVO Manufacturing. It solved the wallowed-out hole and axle walking issue, and we ended up with a much stronger mount, which can put up with our 37-inch-tall tires. We also swapped the shock brackets to solve some of the body interference issues too. See “Whipped Differentials” on page 32.
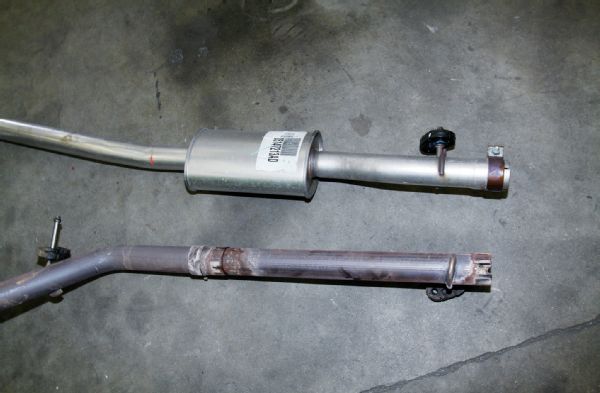
“But wait!” you say. “What about the exhaust?!” Good call, intrepid reader. We just cut that off in front of the axle. Once we got the Jeep back together, we started thinking about it and went wandering around the Mel’s junkyard. Long story short, the exhaust from a ’12-’14 four-door Wrangler (top) was almost a slam-dunk for our ’07 two-door. By cutting the pipe about two feet past the resonator, using a turn-down tip, and welding on a couple of new hangers, it bolts right in. It isn’t too loud and doesn’t reverb in the cab even with a hardtop, but it does have a nice note from outside the Jeep.
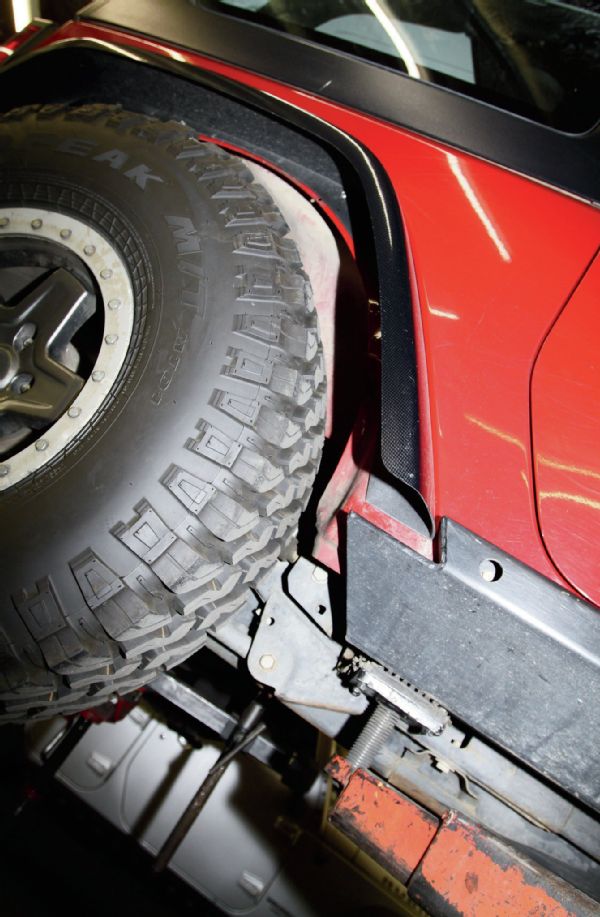
Now that we were able to use all of our shocks and nothing was hitting anything else, it was time to put the tires back on and find something else that hit. Sure enough, our 37s got into the sheetmetal at both the front and the rear of the fender opening. So, out came the reciprocating saw to make space until the tires fit without rubbing.
Up front, we found even more curiosities. The Jeep still had the factory shocks on it, in spite of 4 inches of lift and 37-inch tires. No wonder the front felt a little soft. These 3-inch extenders are an inexpensive way to get a spacer lift to work with factory shocks in a JK, but the short shocks meant we had no droop up front. So, once again we dove into the junkyard and found a set of used Rancho shocks to put on it for the time being. That stiffened up the front and gave us more droop.
Once we had the shocks off the Jeep, we found almost 5 more inches of down travel. We also found this: Now the sway bar is our limiting strap. And, if that wasn’t bad enough, when the axle goes back up, the sway bar tries to invert itself. Maybe that’s the reason for the super-short front shocks in the Jeep all this time? Even if it was, how much are used shocks and end links? Cheap or free from a buddy who upgraded?
In this case, they were free. In addition to the used shocks no one wanted, we were able to replace the short sway-bar end-links with factory rear take-offs no one wanted. The key here to choosing the length isn’t to have the sway bar parallel with the ground at ride height, but rather to make sure it doesn’t invert like ours was before. These end links are right about on the border of it, but we haven’t had any problems so far.
It is important to extend your bumpstops whenever you lift a Jeep. However, this Jeep had a six-inch-long extension on the frame side up front and nothing on the axle side. That resulted in the bumpstop cup actually rubbing the spring. It also made it so only a fraction of the actual rubber was contacting the pad. It is always better to extend both sides, so that the bumpstop hits more in the middle and the extension is less likely to hit. We removed the goofy long upper extension and added some extensions on the axle side of things until the tire didn’t eat the fender. Fortunately, Off Road Evolution had these in stock.
Even with the munchkin shocks and tall-boy bumpstop cans, the track bar was hitting this steering brace and had been for some time. There was lots of wear in the aluminum. But this is the 21st century, isn’t it? Shouldn’t we be able to drive a Jeep down the road and keep our fillings? We left the bumpstops where we set them and just removed the aluminum piece for now to allow for our newfound uptravel.
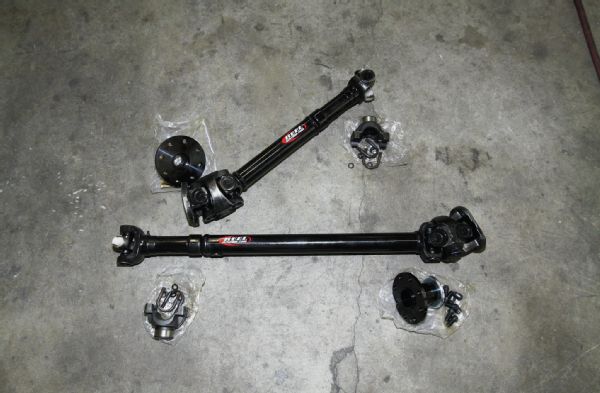
This whole thing took us about two days of playing around with stuff. Between the first and second day, we drove the Jeep both on- and off-road to test out what we’d done. Well, that little bit was enough to eat the factory-style constant velocity joint in the factory front driveshaft. Also, with our newfound travel, we were getting really close to driveshafts binding. With a quick call to JE Reel, we had new ‘shafts and yokes the next day.
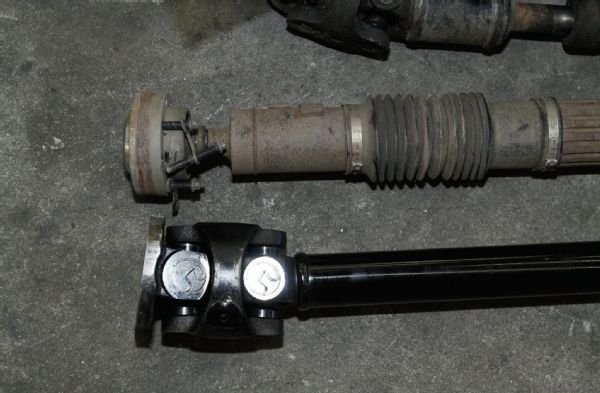
Ever used a peppermill? That is what the top joint felt like when we articulated it. The rear driveshaft was already a JE Reel part, but it was an older part and used longer older-style yokes. The new yokes are much shorter and allowed for a longer driveshaft. A longer driveshaft, especially in the rear of a short two-door, means less angularity, which usually translates into longer life for the driveline.
Can of Worms
Yes, we did open a can of worms with this. But with all the clunks and weird handling traits, there was no way we could let this stuff go. Short of just throwing a new lift kit at the Jeep (and who’s to say it might not have had issues too), what’s a Jeeper to do? Granted, we did this at a shop, but all of these things can be checked in your own driveway. Doing it like we did at the shop let us pass along expert knowledge to you guys and took what could have been a several weekend project down to just two days. The bottom line is flex it, compress it, find what hits, fix that, and then move on.