Icon Toyota FJ Cruiser Stage 5 Suspension - Four Wheeler Magazine

If you are like us, you can exhaust the capabilities of your stock suspension within a matter of weeks. Off-road junkies have a tendency to drive hard, and we often find the limits of our vehicles before we've had the chance to improve their abilities. Over the past five years, the Toyota FJ Cruiser has become a force in the four-wheel community, spawning hundreds of clubs and numerous websites, and it has been the inspiration for several new Toyota-based magazines. Out of the box, you can take your FJ Cruiser through just about any terrain-just as you could with its predecessor, the J-40, back in the '60s.
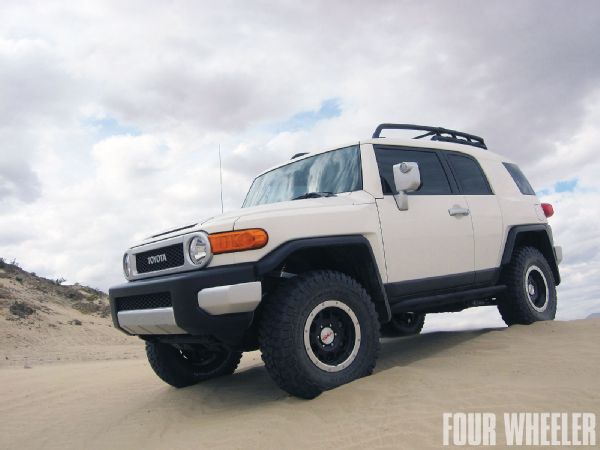
129 1101 Icon Fj Stage 5 Suspension toyota Fj Cruiser Front Three Quarter Photo 31288852

Additional ground clearance and increased high-speed off-road drivability are two common desires among most four-wheelers in the dirt. More clearance allows us larger tires, making traversing trails much easier; a beefed-up suspension gives us the peace of mind needed to blast through the desert, day after day, and still make it home safe and sound. This is where Icon Vehicle Dynamics out of Riverside, California, makes its play. The company's FJC Stage suspension systems range from an entry-level Stage 1 kit all the way up to a race-inspired Stage-5 setup. For this story, we'll install the top-line Stage 5 kit with billet upper control arms and lower links, and remote-reservoir shocks.

How It Works
We can't speak highly enough for how great our FJ Cruiser has been treating us. Our suspension, wheels, and tires went on the truck over six months ago and are still going strong. The Icon suspension has been nothing short of flawless. During one of our many Ocotillo Wells, California, trips, we spent countless hours blasting through the open desert at speeds ranging from 30 to 60 mph with total confidence behind the wheel. The suspension soaked up whoops and rocks, and even landed us safely on the ground after a few "oops" moments. The Payette Draw Trail in Payson, Arizona, was also no match for our Cruiser and its new setup. The increased vehicle height and BFG tires made light work climbing up and over everything in its path. On top of its off-road performance, the FJ still rides as smooth on the road as it did when stock. We can't wait for our big cross-country trip we have planned next year for the truck. A well-built four-wheel drive vehicle reminds us why we love our chosen sport.

PhotosView Slideshow The front of our Icon Stage 5 setup includes 2.5 coilovers with reservoirs, billet upper control arms, reservoir mounts, billet sway-bar relocation brackets, and all necessary hardware. We completed our install using a vehicle lift as well as a combination of floor jacks. Be sure to consult your included instructions and practice common sense. Working under a vehicle supported by a lift or jackstands can be dangerous. Our first order of business was the removal of the front skidplate. This allowed us access to the sway bar. The sway bar is mounted to the frame in two locations on each side by two 14mm bolts. We suggest you completely remove the sway bar before you complete the rest of your install, and then choose to reinstall it afterward or leave it out. Sway-bar relocation brackets are provided to accommodate for the new ride height. They are mounted between each frame rail and the sway bar. New longer bolts are provided. 
Next, we removed the tie rod from the knuckle by removing the cotter pin and nut from the spindle. Removing the tie rod will allow us better access to remove the stock coilover from the coil bucket. You may need to use a hammer and tap on the side of the spindle where the ball joint taper is helping to break it free. We disconnected the stock coilover by removing the three nuts securing the upper coil seat to the frame perch. Do not loosen or remove the larger center nut securing the spring seat to the shock shaft. This can result in the stock coil assembly coming apart violently, causing damage to components and possible injury. With the top loose, we removed the bolt holding the lower shock eye to the lower control arm. Remember the bolt orientation, as this bolt will be reused. Before removing the upper control arm, unbolt the ball joint cotter pin and nut from the spindle. Using a hammer, tap on the outside of the spindle where the ball joint taper is to release the taper. Using a pair of wrenches, we carefully removed the upper control arm bolt and arm from the truck. Toyota uses a very long bolt that runs through the entire coil bucket and which is tricky to remove. On the passenger side of our truck, we had to remove the battery and battery tray to give us enough room. We then installed the new billet upper control arm with the long side facing the front of the truck, and the four bolt holes for the uniball cover facing up. You may need to push the lower control arm down until you seat the Icon misalignment spacer into the lower uniball on the upper control arm. Next, seat the small upper space cap into the uniball and torque to 50 ft-lb using red Loctite. When installing the new billet arm, make sure to run the Heim spacers with the short side inboard on the pivot points. Be sure to install the misalignment spacer properly into the upper control arm and into the spindle. With the upper arm in, we slid the new coilover into place, securing it to the coil bucket with the new provided hardware. Make sure the reservoir is pointing towards the front of the vehicle. With the top secure, install the lower shock mount to the lower control arm. The lower shock mount uses one long and one short spacer. Make sure the long spacer is towards the front of the vehicle. This will push the shock further to the rear of the control arm to ensure adequate sway-bar clearance. With the spacers in place, we reinstalled the factory shock bolt. With the new coilover in place, you can reattach the tie rod to the spindle. Out of the box, Icon ships the kit ready to lift the vehicle two inches, although can you dial in up to 3.5 inches of lift if you install the Icon billet upper control arms. Just one of the many small touches that make this kit stand out from its competition is the sealed uniball. The dust cover installs simply with four Allen bolts and ensures that our uniball stays protected from all the dirt and water we plan on throwing at it. The reservoir mount needs to be installed between the frame rail and the billet sway-bar relocation bracket. We chose to ditch our sway bar in favor of a more independent suspension feel, so our bracket installed by itself in the same location. To mount the reservoir, we slid the hose clamps through the bracket and around the can. Make sure to position the reservoir can so the clamp bands are in the recessed groove on the can and secure. The rear of our Stage 5 setup is missing one item, the Icon VS-series rear piggyback reservoir shocks. For now, we opted for the 2-inch Icon rear monotube shocks as we will be upgrading to bypass shocks in the future. Along with the shocks, we installed the 2-inch rear coil spring kit and billet aluminum lower rear trailing arm kit. Icon also offers a billet upper link arm kit and adjustable track bar for the rear of the FJ. The FJ Cruiser uses a four-link rear suspension design, allowing the suspension to flex safely at extreme angles. With the vehicle safely on our lift, we disconnected the sway-bar links and shocks from the rear axle. We also removed all clips holding the ABS wires and brake lines to the axle. This will help you gain plenty of access to install the new, longer springs. Before tackling the rear suspension, we suggest you call a friend over to give you a hand. In order to remove the stock springs, you may need to pull down on the rear axle. This is much easier with a second set of hands. The cone-shaped rubber isolator will need to be installed into the new spring. Reinstall the new springs with the pigtail in the same orientation as the factory springs. Be sure to reinstall the brake lines. The new, longer springs not only lift the vehicle but also increase the coil rate, providing a much nicer ride quality combined with the new shock valving. Say goodbye to your weak factory trailing arms and say hello to a new set of light and strong billet arms. The arms are made of billet aluminum using 16T rod ends with a load rating of over 40,000 pounds of pressure. They also include a rebuildable Johnny Joint on the axle side for extreme articulation and minimal deflection. The underside of each arm has a replaceable nylon rock slider that protects the link from rock damage and which helps the vehicle slide over terrain when necessary. We installed one arm at a time, mounting the short spacer on each arm towards the inside of the vehicle and the pinch bolt facing out. This moves the front link pivot points closer together on the frame and helps correct roll-steer geometry. Without letting the bar turn, we adjusted the length by turning the silver hex collar. You will notice the collar and rod end will move equal amounts. Adjust until the rear holes line up and insert the bolt. You can then adjust the collar to take up the slack in the arm length. With both arms in place, adjust them to the factory length (26.75 inches). Next, we tightened down the pinch bolts, carefully going between them multiple times to secure them properly. The pinch bolts should be tightened down to 40 ft-lbs of torque. We then installed our new shocks in the factory location. If you are the type of four-wheeler who loves getting into the rocks, these 12-gauge 304 stainless-steel lower shock shin guards are a necessity. Icon made these specifically to prevent debris from damaging the shock shafts. The hardened stainless steel will not rust and won't corrode like common steel skids. They are TIG welded, will work with numerous aftermarket rear shocks and are 100-percent made in the U.S. Day one off the lot and we quickly found some local dirt to throw at our FJ. We fell in love with the FJ Cruiser's prowess in stock trim, but now our FJC is a whole new beast you'd have to fight us to part with. Since adding the suspension to our truck, we have also gone with a set of 285/75R16 BFGoodrich M/T tires and a set of 16-inch TRD Trail Teams Edition wheels. Over the past six months, our truck has seen dirt in California, Nevada, Arizona, Oregon, and New Mexico.