Jeep Cherokee BDS Long Arm Lift Kit - Jp Magazine

Verne Simons Senior Editor, Jp

Jeep Cherokees are without a doubt the unsung heroes of the Jeep brand. These vehicles are generally thought of as grocery getters, soccer-mom mobiles, and mall-cruising monsters. The fact of the matter is t hat these Jeeps offer a well-designed platform that can easily become a weekend trail slayer, and may be the best platform for a daily driver/wheeler out there. And while the old boxy XJ hasn't been built since 2001, there are still plenty of these Unitbody vehicles cruising our nation's highways. As a buyer, you can expect to find a nice XJ for half the price of a comparable TJ that has many of the same parts underneath. XJs also have more wheelbase, more doors, more seats, and more interior space.

jeep Cherokee Long Arm Suspension front Close Up Photo 26694794

Cherokees, built between 1984 and 2001, offer a mixed bag of parts ranging from the anemic 2.8L GM V-6, weak Dana 35 rear axle, and the boat-anchor Peugeot BA10/5 manual transmission, to the venerable 4.0L HO inline-six, the darn-near-bulletproof Aisin AW4 overdrive automatic transmission, the stout high-pinion post-'96 Dana 30 front axle with 297-sized U-joints, and the highly-desirable, yet somewhat-rare XJ Dana 44 rear axle (for more info on the best XJ model to start with check out "Cheap Cherokees", Jan. '09). If the XJ has any weaknesses, they would almost certainly revolve around the relatively small wheelwells, smallish stock tires, and low factory stance. Luckily there is a world of info and products available to correct these and other XJ shortcomings.

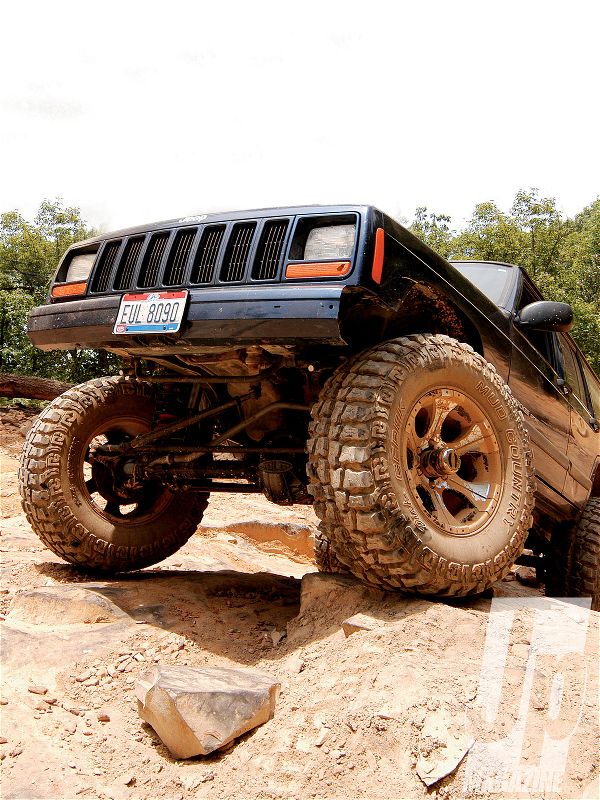
We wanted to assemble a relatively inexpensive, stable, and low-slung XJ with plenty of room for larger tires to keep even the most aggressive weekend wheelers happy both on- and off-road, so we picked up a 4 1/2-inch BDS XJ long-arm kit and went to work on the wheelwells with the cut-and-fold fender trim method. You'll need a few more tools, including an air saw, a hammer, pliers and some paint. Here's what we hacked and the frontend portion of our lift kit install. Next issue we'll finish out the suspension and trimming at the back end of our XJ and bolt up the 35-inch Dick Cepek tires and wheels.

PhotosView Slideshow We started with an '01 XJ Sport, which was the last year the Cherokee was sold. Our XJ has around 100,000 miles, which in Cherokee terms means it's just broken in. The Jeep is equipped with the 4.0L I-6, AW4 four-speed automatic, and the venerable NP231 transfer case. We wanted to keep the XJ low and stable, but also run some reasonably large tires.

The 4 1/2-inch BDS long-arm suspension system includes all of the parts you will need to lift your XJ, including swaybar disconnects, new brake lines, U-bolts, a beefy crossmember, necessary hardware, arms, bushings, and so on. You can also add the optional transfer case skidplate and tailshaft conversion, which is recommended by BDS and is a must in our opinion.
The front BDS XJ long-arm suspension is only a bit more complex to install than a standard short-arm lift, but it involves some serious commitment. If you have never installed a lift kit, you may want to enlist some experienced buddies to help out. The first step in lifting our XJ was to attach BDS's beefy crossmember (top), which replaces the factory transmission crossmember (bottom), and will become the attachment point for the upper and lower long arms of the new suspension system.

PhotosView Slideshow The crossmember is held in place with six XJ factory crossmember locations, two sleeved bolts, and a couple of extra nuts and bolts to keep this vital component of the Jeep in place come hell or high water. It requires drilling out a few holes and chasing threads in some of the original mounting locations with a tap. Don't forget the threadlock when assembling these parts.

We recommend replacing the stock control arms one at a time with the long arms. You may need to open up the control arm mounts a bit with an adjustable wrench to get the arms in place. Creative use of prybars and ratchet straps is helpful in moving the front axle around enough to get all the suspension link holes lined up. If this still does not work, try cycling the suspension up or down with a floor jack with the coils removed.

Once the crossmember is firmly in place and the beefy BDS arms are holding the front axle, we reach the point of commitment: cutting the factory XJ lower control arm mounts off of the Unitbody. We used a reciprocating saw and cleaned up the edges with a 4 1/2-inch angle grinder with a flapwheel. However, a torch, a plasma cutter, or even a grinder with a cut off wheel can get the job done cleanly.
PhotosView Slideshow So far, we have been successfully running about 1 1/2 to 2 inches of space between the top of the Prothane coil insert and the factory bump stop by cutting the 10-inch inserts to about  6 inches. These inserts compress quite a bit as the Jeep traverses whoops and rocks. To adjust the suspension, you can cut down the Prothane inserts and/or drill holes through the sides in order to soften its compression a bit. How much air gap you run between the Prothane and stock bumpstop will depend on what you are doing with the Jeep and how much weight you have up front.
This fender trim method frees up 2-3 inches of extra wheelwell room. You can do the same trimming with tin snips, a reciprocating saw, or a jigsaw. It's just a bit butch. We chose to use an Ingersoll Rand Super Duty Reciprocating air aw (PN IRT4429). It cuts through XJ sheetmetal like budda!

To allow the use of 35s up front and limit up travel and tire rub we fabricated some bolt-on brackets to install poor man's air bumps. The Prothane coil inserts come in 10-inch (PN 19-1704) and 7-inch (PN 19-1705) versions. The inserts slip on to a small piece of tubing that bolts to the front axle's spring pad. The BDS 4 1/2-inch coil then goes around the insert. For the top of the Prothane part, we fabricated a bit of tubing welded to some plate to give the factory bumpstop a flat place to hit when the suspension compresses.
PhotosView Slideshow Trimming the front is relatively easy because most of what you are trimming is part of the replaceable front fenders. We used some masking tape to make the line where our cut would go. There is a small runner of metal that runs from the fenderwell to the sheetmetal of the fender. We cut, drilled, and re-attached this runner with rivets.
We also cut and folded the pinch weld within the wheelwell to open up more space and give the tire a smooth surface to rub should it hit... ...Make cuts perpendicular to the pinch seem, and avoid cutting though pinch welds.  The pinch welds look like little dimples in the metal. The flaps can be pounded flush with a hammer. This is a good place to practice for the rear fender trimming which will be a similar operation.