As racing safety has continually improved over the past decade, one word that keeps popping up is “containment.”
Containment doesn’t mean you want to keep everything in the car—although that isn’t a bad idea—it is about keeping the driver’s body in a sort of cocoon so that movement is allowed only in the directions and distances you want it. When you boil it all down to the fundamentals, that’s the purpose of a head-and-neck restraint, shoulder and knee brace attachments to your racing seat, belts, and even the seat itself. The more the body is allowed to move before you bring it to a stop, the more that body can accelerate. And that means more damaging force the driver must absorb when he or she is brought to a stop.
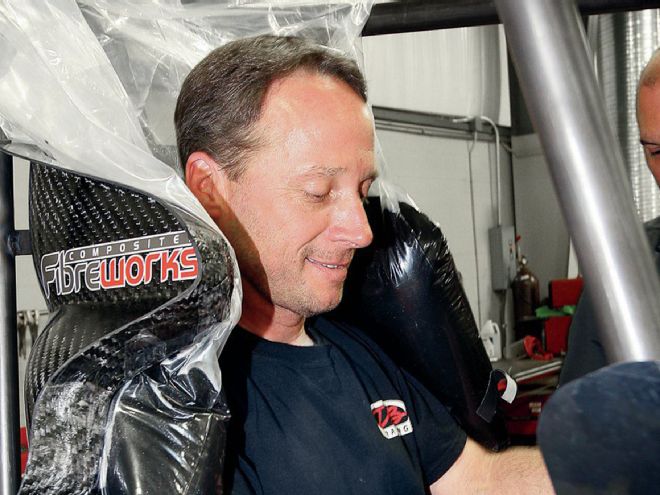
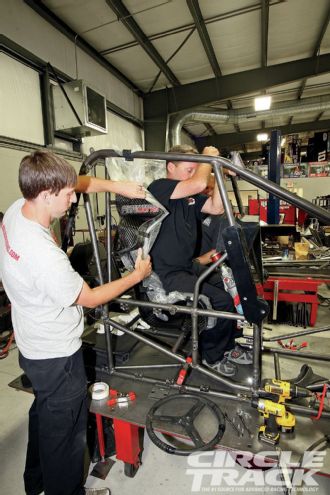
1 This is a pour BSCI is doing for Dave Blaney Racing for a 410 Sprint Car Blaney is building. Before doing anything else BSCI’s Matt Ray and Scott Zurawski had Blaney sit in his seat with both his helmet and head-and-neck restraint on to make sure there was enough clearance. The insert will typically raise the driver in the seat 1/4- to 1/2-inch, so you need to make sure the driver’s head won’t be raised to the point where it can come into contact with the rollcage.">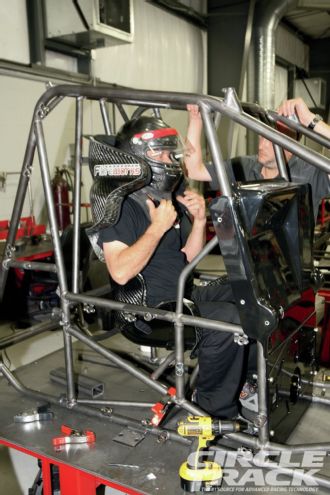 <strong>1</strong> This is a pour BSCI is doing for Dave Blaney Racing for a 410 Sprint Car Blaney is building. Before doing anything else BSCI’s Matt Ray and Scott Zurawski had Blaney sit in his seat with both his helmet and head-and-neck restraint on to make sure there was enough clearance. The insert will typically raise the driver in the seat 1/4- to 1/2-inch, so you need to make sure the driver’s head won’t be raised to the point where it can come into contact with the rollcage.
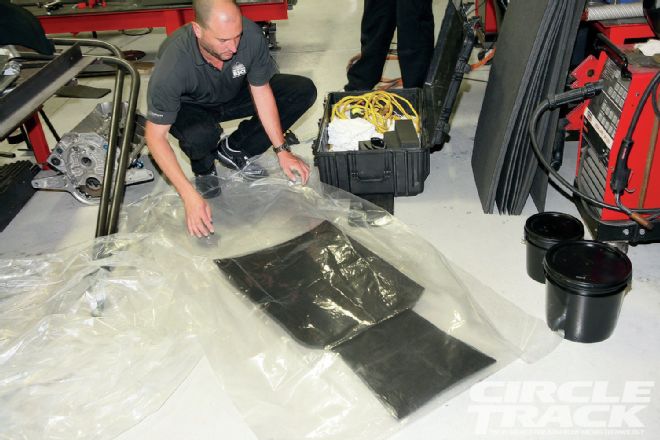
2 The foam is poured into a plastic bag to keep it contained, so double-sided tape is placed in several places across the seat. Once everything is positioned, the tape’s backing will be removed and the bag secured. Notice that Blaney is using a carbon fiber seat, but the Ray says the only step that’s different is to use strips of duct tape across the front of the seat to close off the cavity of the box section (this will make it easier to remove the foam insert). If the seat has any sharp edges, they should be covered with duct tape.">
<strong>1</strong> This is a pour BSCI is doing for Dave Blaney Racing for a 410 Sprint Car Blaney is building. Before doing anything else BSCI’s Matt Ray and Scott Zurawski had Blaney sit in his seat with both his helmet and head-and-neck restraint on to make sure there was enough clearance. The insert will typically raise the driver in the seat 1/4- to 1/2-inch, so you need to make sure the driver’s head won’t be raised to the point where it can come into contact with the rollcage.
2 The foam is poured into a plastic bag to keep it contained, so double-sided tape is placed in several places across the seat. Once everything is positioned, the tape’s backing will be removed and the bag secured. Notice that Blaney is using a carbon fiber seat, but the Ray says the only step that’s different is to use strips of duct tape across the front of the seat to close off the cavity of the box section (this will make it easier to remove the foam insert). If the seat has any sharp edges, they should be covered with duct tape.">
 <strong>2</strong> The foam is poured into a plastic bag to keep it contained, so double-sided tape is placed in several places across the seat. Once everything is positioned, the tape’s backing will be removed and the bag secured. Notice that Blaney is using a carbon fiber seat, but the Ray says the only step that’s different is to use strips of duct tape across the front of the seat to close off the cavity of the box section (this will make it easier to remove the foam insert). If the seat has any sharp edges, they should be covered with duct tape.
3 Sheets of foam are used to ensure a minimum thickness between the driver’s back and buttocks and the seat. The foam provides protection because if you don’t use it, the foam can flow around the driver’s body where it contacts the seat and leave a void. The foam can also be used to raise the driver in the seat, if you need to use multiple layers to get it thick enough you can use spray adhesive to secure the layers together. Here, Ray makes rough cuts so that the sections will fit in the seat.">
<strong>2</strong> The foam is poured into a plastic bag to keep it contained, so double-sided tape is placed in several places across the seat. Once everything is positioned, the tape’s backing will be removed and the bag secured. Notice that Blaney is using a carbon fiber seat, but the Ray says the only step that’s different is to use strips of duct tape across the front of the seat to close off the cavity of the box section (this will make it easier to remove the foam insert). If the seat has any sharp edges, they should be covered with duct tape.
3 Sheets of foam are used to ensure a minimum thickness between the driver’s back and buttocks and the seat. The foam provides protection because if you don’t use it, the foam can flow around the driver’s body where it contacts the seat and leave a void. The foam can also be used to raise the driver in the seat, if you need to use multiple layers to get it thick enough you can use spray adhesive to secure the layers together. Here, Ray makes rough cuts so that the sections will fit in the seat.">
 <strong>3</strong> Sheets of foam are used to ensure a minimum thickness between the driver’s back and buttocks and the seat. The foam provides protection because if you don’t use it, the foam can flow around the driver’s body where it contacts the seat and leave a void. The foam can also be used to raise the driver in the seat, if you need to use multiple layers to get it thick enough you can use spray adhesive to secure the layers together. Here, Ray makes rough cuts so that the sections will fit in the seat.
4 Ray marks and cuts the sheet foam to fit the bottom and back of the seat making sure there is at least 1/4-inch of clearance between the edges of the foam and the sides of the seat. This is to make sure the poured foam can completely surround the layer of foam.">
<strong>4</strong> Ray marks and cuts the sheet foam to fit the bottom and back of the seat making sure there is at least 1/4-inch of clearance between the edges of the foam and the sides of the seat. This is to make sure the poured foam can completely surround the layer of foam.
5 Lay the containment bag flat on the floor and insert the sheet foam into the bag with the seat portion toward the bottom and the back portion toward the bag’s opening. Make sure the foam is centered in the bag and fold the bag over the foam.">
<strong>3</strong> Sheets of foam are used to ensure a minimum thickness between the driver’s back and buttocks and the seat. The foam provides protection because if you don’t use it, the foam can flow around the driver’s body where it contacts the seat and leave a void. The foam can also be used to raise the driver in the seat, if you need to use multiple layers to get it thick enough you can use spray adhesive to secure the layers together. Here, Ray makes rough cuts so that the sections will fit in the seat.
4 Ray marks and cuts the sheet foam to fit the bottom and back of the seat making sure there is at least 1/4-inch of clearance between the edges of the foam and the sides of the seat. This is to make sure the poured foam can completely surround the layer of foam.">
<strong>4</strong> Ray marks and cuts the sheet foam to fit the bottom and back of the seat making sure there is at least 1/4-inch of clearance between the edges of the foam and the sides of the seat. This is to make sure the poured foam can completely surround the layer of foam.
5 Lay the containment bag flat on the floor and insert the sheet foam into the bag with the seat portion toward the bottom and the back portion toward the bag’s opening. Make sure the foam is centered in the bag and fold the bag over the foam.">
 <strong>5</strong> Lay the containment bag flat on the floor and insert the sheet foam into the bag with the seat portion toward the bottom and the back portion toward the bag’s opening. Make sure the foam is centered in the bag and fold the bag over the foam.
6 The bag and foam is now repositioned in the racing seat and the bag is unfolded.">
<strong>5</strong> Lay the containment bag flat on the floor and insert the sheet foam into the bag with the seat portion toward the bottom and the back portion toward the bag’s opening. Make sure the foam is centered in the bag and fold the bag over the foam.
6 The bag and foam is now repositioned in the racing seat and the bag is unfolded.">
 <strong>6</strong> The bag and foam is now repositioned in the racing seat and the bag is unfolded.
7 Lay the containment bag out against the seat making sure that there are no air pockets between the bag and the seat. Once Ray is certain the back is in the right spot he pulls the backing off of the double-sided tape and secures the bag to the seat.">
<strong>6</strong> The bag and foam is now repositioned in the racing seat and the bag is unfolded.
7 Lay the containment bag out against the seat making sure that there are no air pockets between the bag and the seat. Once Ray is certain the back is in the right spot he pulls the backing off of the double-sided tape and secures the bag to the seat.">
 <strong>7</strong> Lay the containment bag out against the seat making sure that there are no air pockets between the bag and the seat. Once Ray is certain the back is in the right spot he pulls the backing off of the double-sided tape and secures the bag to the seat.
So it is critical not only to have a quality racing seat installed in your race car that is strong enough so that it won’t flex too much under impact, it must also fit your body well. In a hard impact, even small movements inside the seat can help contribute to injury.
That’s why moldable seat foam is becoming more and more popular in racing. No matter what your body shape, a well-done foam seat insert can make your racing seat fit you like a well tailored suit. It can help mold the seat to your body in place so that you, or your driver, is held more securely in place, which not only keeps you safer but also help your driving because you aren’t sliding around in your seat. Finally, there’s the added benefit of just being more comfortable.
Many hobby-level racers feel that a custom-poured seat is the domain of NASCAR Cup racers and fancy European open wheel racers with names like “Jacque” or “Reynauld.” But that’s simply not the case. BSCI is a company that has done molded foam seat inserts for the previously mentioned Cup guys and open wheel racers, but they are also more and more often doing inserts for Saturday-night racers at all levels.
BSCI will do the inserts themselves but they have also created a do-it-yourself kit so that racers can pour their own inserts. BSCI’s Matt Ray says that they have a kit to cover the entire seat, but the most popular kit they sell is the small size designed for just the hips and lower back. That’s not only easier to do, but it also is the most helpful area for locking the driver in place so that he or she won’t slide inside the seat.
To get a better idea of how to properly pour a foam seat insert, we met up with Ray and Scott Zurawski at NASCAR Cup veteran Dave Blaney’s shop where they were doing a complete seat pour for a 410 Sprint Car he was building. Ray and Zurawski used the same components provided in BSCI’s kits, and even if you are doing the partial pour the process is the same. Follow along to see if how it’s done if you are thinking of upgrading your own racing seat.
8 The stiffness of the sheet foam can sometimes cause it to pull away from the bag and the seat back. Ray uses spray adhesive to stick the foam to the bag where necessary.">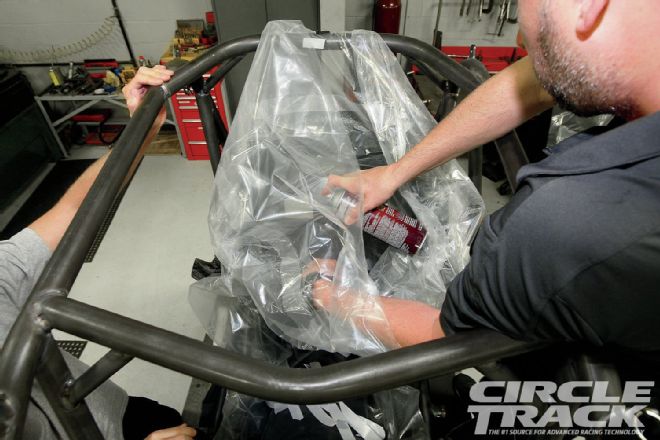 <strong>8</strong> The stiffness of the sheet foam can sometimes cause it to pull away from the bag and the seat back. Ray uses spray adhesive to stick the foam to the bag where necessary.
9 Ray also uses a section of the sheet foam to build up the shoulder support. Again, he uses spray adhesive to stick the section of foam to the bag in the right spot.">
<strong>8</strong> The stiffness of the sheet foam can sometimes cause it to pull away from the bag and the seat back. Ray uses spray adhesive to stick the foam to the bag where necessary.
9 Ray also uses a section of the sheet foam to build up the shoulder support. Again, he uses spray adhesive to stick the section of foam to the bag in the right spot.">
 <strong>9</strong> Ray also uses a section of the sheet foam to build up the shoulder support. Again, he uses spray adhesive to stick the section of foam to the bag in the right spot.
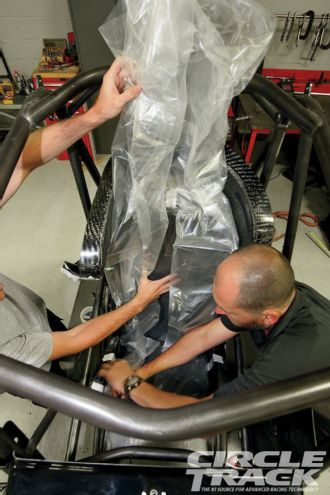
10 Once everything is in place, roll sides of the bag out and tape the edges to the seat so that they won’t get caught underneath the driver. If possible, tape the bag opening to the halo bar like you see here to make it easier to pour the chemical foam into the bag without spilling any of it.">
<strong>9</strong> Ray also uses a section of the sheet foam to build up the shoulder support. Again, he uses spray adhesive to stick the section of foam to the bag in the right spot.
10 Once everything is in place, roll sides of the bag out and tape the edges to the seat so that they won’t get caught underneath the driver. If possible, tape the bag opening to the halo bar like you see here to make it easier to pour the chemical foam into the bag without spilling any of it.">
 <strong>10</strong> Once everything is in place, roll sides of the bag out and tape the edges to the seat so that they won’t get caught underneath the driver. If possible, tape the bag opening to the halo bar like you see here to make it easier to pour the chemical foam into the bag without spilling any of it.
11 Have the driver get into the seat, being careful not to puncture the bag or twist it up so that foam will not be able to move freely within the bag. Make sure he or she isn’t wearing a belt and has nothing in their pockets. If they can be wearing their driving suit, that’s also preferable but not critical.">
<strong>10</strong> Once everything is in place, roll sides of the bag out and tape the edges to the seat so that they won’t get caught underneath the driver. If possible, tape the bag opening to the halo bar like you see here to make it easier to pour the chemical foam into the bag without spilling any of it.
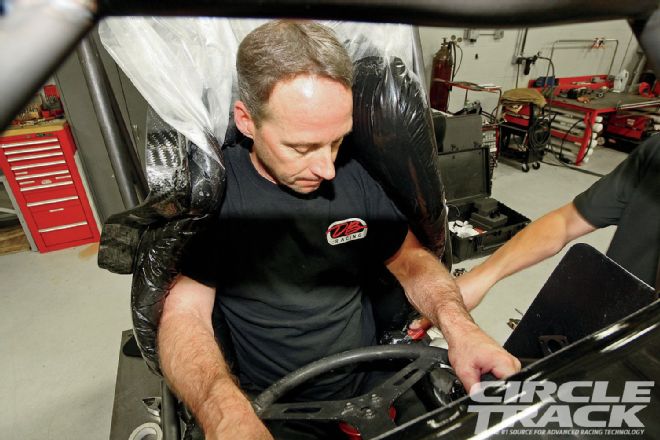
11 Have the driver get into the seat, being careful not to puncture the bag or twist it up so that foam will not be able to move freely within the bag. Make sure he or she isn’t wearing a belt and has nothing in their pockets. If they can be wearing their driving suit, that’s also preferable but not critical.">
 <strong>11</strong> Have the driver get into the seat, being careful not to puncture the bag or twist it up so that foam will not be able to move freely within the bag. Make sure he or she isn’t wearing a belt and has nothing in their pockets. If they can be wearing their driving suit, that’s also preferable but not critical.
12 The chemical foam has an activator that is mixed with a stirrer on an electric drill. This must be done quickly. Ray mixes the chemicals for 10 to 12 seconds. Before you get to this stage you must make absolutely sure that everything is ready because once the two chemicals are mixed the expanding foam reaction cannot be stopped.">
<strong>11</strong> Have the driver get into the seat, being careful not to puncture the bag or twist it up so that foam will not be able to move freely within the bag. Make sure he or she isn’t wearing a belt and has nothing in their pockets. If they can be wearing their driving suit, that’s also preferable but not critical.
12 The chemical foam has an activator that is mixed with a stirrer on an electric drill. This must be done quickly. Ray mixes the chemicals for 10 to 12 seconds. Before you get to this stage you must make absolutely sure that everything is ready because once the two chemicals are mixed the expanding foam reaction cannot be stopped.">
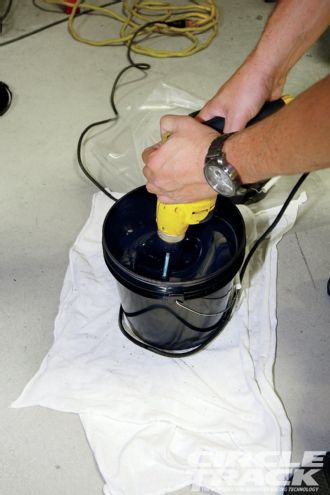 <strong>12</strong> The chemical foam has an activator that is mixed with a stirrer on an electric drill. This must be done quickly. Ray mixes the chemicals for 10 to 12 seconds. Before you get to this stage you must make absolutely sure that everything is ready because once the two chemicals are mixed the expanding foam reaction cannot be stopped.
13 Pour the chemical into the bag as quickly as possible after mixing is complete. BSCI says it isn’t important to try to pour the chemical into certain areas, just dump it in and the foam will force it’s way into all areas as it expands. Have your driver lean forward so that it flows past his back and into the bottom of the seat area. Also, be careful not to get any on your driver’s skin.">
<strong>12</strong> The chemical foam has an activator that is mixed with a stirrer on an electric drill. This must be done quickly. Ray mixes the chemicals for 10 to 12 seconds. Before you get to this stage you must make absolutely sure that everything is ready because once the two chemicals are mixed the expanding foam reaction cannot be stopped.
13 Pour the chemical into the bag as quickly as possible after mixing is complete. BSCI says it isn’t important to try to pour the chemical into certain areas, just dump it in and the foam will force it’s way into all areas as it expands. Have your driver lean forward so that it flows past his back and into the bottom of the seat area. Also, be careful not to get any on your driver’s skin.">
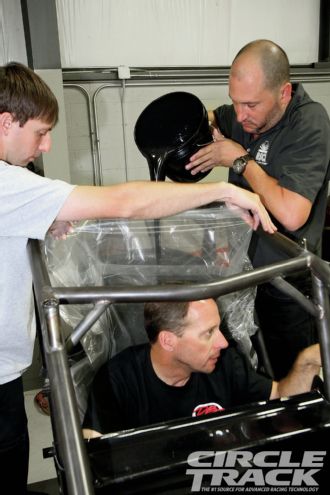 <strong>13</strong> Pour the chemical into the bag as quickly as possible after mixing is complete. BSCI says it isn’t important to try to pour the chemical into certain areas, just dump it in and the foam will force it’s way into all areas as it expands. Have your driver lean forward so that it flows past his back and into the bottom of the seat area. Also, be careful not to get any on your driver’s skin.
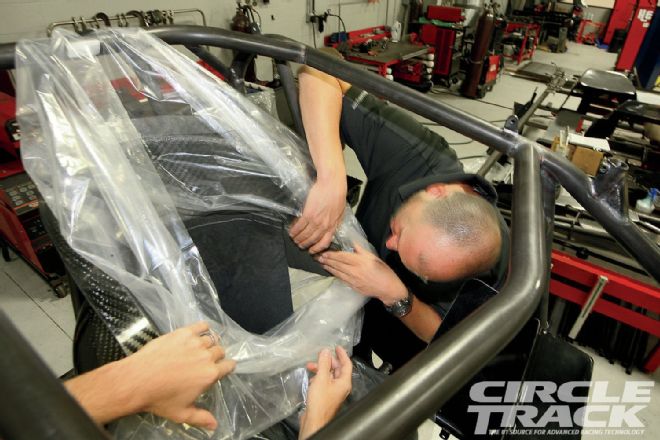
14 Make sure the driver stays in a comfortable driving position with hands on the steering wheel and feet on the pedals. Have him or her raise their hips up so that the foam can flow under their buttocks, then have them lean forward a bit so the foam can expand behind their back. Now they can sit comfortably in the seat again. The foam expands a lot, but don’t worry if it is restricting movement. Foam can be cut away later. Also, be aware that the chemical reaction creating the foam also creates heat. It’s going to get warm for a bit but not hot enough to burn. The driver needs to wait five to seven minutes to allow the foam to set before getting out.">It is critical not only to have a quality racing seat installed in your race car that's strong enough that it won’t flex too much under impact, it must also fit you body.
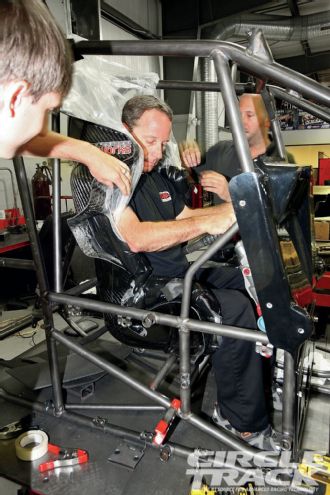 <strong>14</strong> Make sure the driver stays in a comfortable driving position with hands on the steering wheel and feet on the pedals. Have him or her raise their hips up so that the foam can flow under their buttocks, then have them lean forward a bit so the foam can expand behind their back. Now they can sit comfortably in the seat again. The foam expands a lot, but don’t worry if it is restricting movement. Foam can be cut away later. Also, be aware that the chemical reaction creating the foam also creates heat. It’s going to get warm for a bit but not hot enough to burn. The driver needs to wait five to seven minutes to allow the foam to set before getting out.
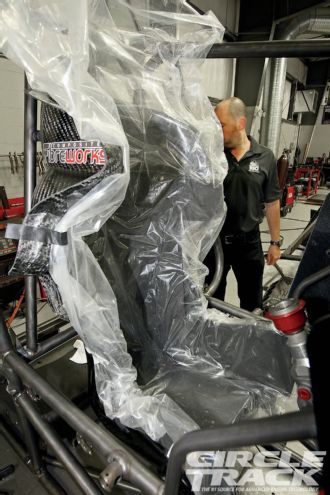
15 Again, don’t be surprised with just how much the foam expands. As you can see here with the full seat pour, there is plenty that is going to have to be cut away for it to be usable for Blaney. Once the foam is no longer liquid, you can cut slits in the bag to relieve some of the pressure.">
<strong>14</strong> Make sure the driver stays in a comfortable driving position with hands on the steering wheel and feet on the pedals. Have him or her raise their hips up so that the foam can flow under their buttocks, then have them lean forward a bit so the foam can expand behind their back. Now they can sit comfortably in the seat again. The foam expands a lot, but don’t worry if it is restricting movement. Foam can be cut away later. Also, be aware that the chemical reaction creating the foam also creates heat. It’s going to get warm for a bit but not hot enough to burn. The driver needs to wait five to seven minutes to allow the foam to set before getting out.
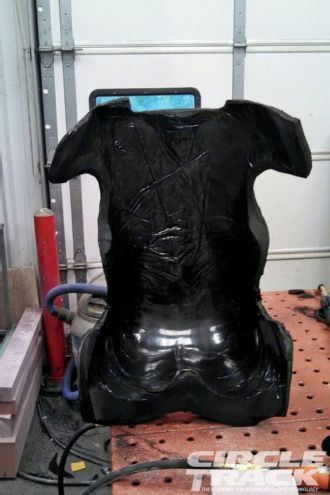
15 Again, don’t be surprised with just how much the foam expands. As you can see here with the full seat pour, there is plenty that is going to have to be cut away for it to be usable for Blaney. Once the foam is no longer liquid, you can cut slits in the bag to relieve some of the pressure.">
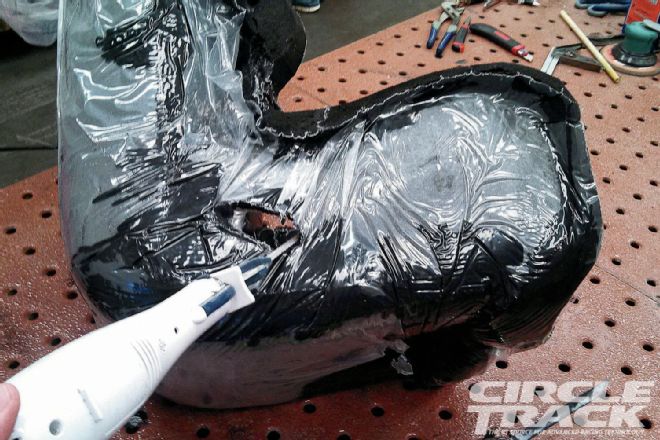
 <strong>15</strong> Again, don’t be surprised with just how much the foam expands. As you can see here with the full seat pour, there is plenty that is going to have to be cut away for it to be usable for Blaney. Once the foam is no longer liquid, you can cut slits in the bag to relieve some of the pressure.
16 After the driver is out of the seat, wait at least another five minutes before removing the insert from the seat. Zurawski uses this time to mark all the seat openings and the outline of the seat where the foam will need to be cut. Be careful when removing the insert from the seat for the first time since you still have the double-sided tape holding it in place. If the foam does tear it can be repaired with spray adhesive.">
<strong>15</strong> Again, don’t be surprised with just how much the foam expands. As you can see here with the full seat pour, there is plenty that is going to have to be cut away for it to be usable for Blaney. Once the foam is no longer liquid, you can cut slits in the bag to relieve some of the pressure.
16 After the driver is out of the seat, wait at least another five minutes before removing the insert from the seat. Zurawski uses this time to mark all the seat openings and the outline of the seat where the foam will need to be cut. Be careful when removing the insert from the seat for the first time since you still have the double-sided tape holding it in place. If the foam does tear it can be repaired with spray adhesive.">
 <strong>16</strong> After the driver is out of the seat, wait at least another five minutes before removing the insert from the seat. Zurawski uses this time to mark all the seat openings and the outline of the seat where the foam will need to be cut. Be careful when removing the insert from the seat for the first time since you still have the double-sided tape holding it in place. If the foam does tear it can be repaired with spray adhesive.
17 Here is the rough seat insert removed from the seat. It doesn’t look like much yet. If you have ever dreamed of becoming a sculptor, this is your time to shine.">
<strong>16</strong> After the driver is out of the seat, wait at least another five minutes before removing the insert from the seat. Zurawski uses this time to mark all the seat openings and the outline of the seat where the foam will need to be cut. Be careful when removing the insert from the seat for the first time since you still have the double-sided tape holding it in place. If the foam does tear it can be repaired with spray adhesive.
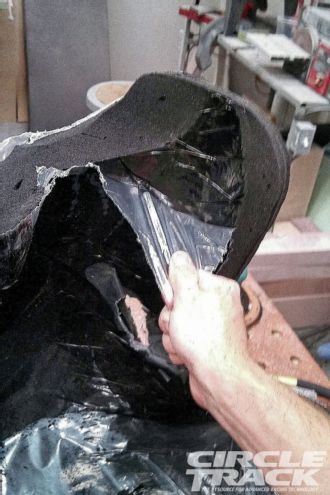
17 Here is the rough seat insert removed from the seat. It doesn’t look like much yet. If you have ever dreamed of becoming a sculptor, this is your time to shine.">
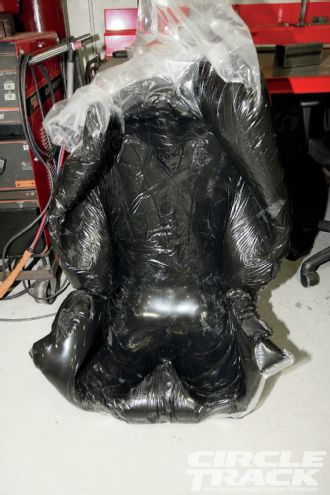 <strong>17</strong> Here is the rough seat insert removed from the seat. It doesn’t look like much yet. If you have ever dreamed of becoming a sculptor, this is your time to shine.
18 Ray and Zurawski use the same electric carving knife that your grandma uses every Thanksgiving to shape the seat insert. When shaping your insert, begin by carving away the obvious overflow, then slowly remove foam until the driver is comfortable. Don’t forget to cut openings in the insert for belt pass-throughs. This is the part of the process where it pays to take your time. It’s always better to make many small cuts and slowly work your way to the desired fit than cut too much. You will probably need to fit the insert in the seat and have your driving make multiple fittings as you slowly carve away foam each time. Cut around the edges until the insert fits completely within the seat and your driver has sufficient arm and leg movement so that the insert doesn’t restrict their ability to drive the race car.">
<strong>17</strong> Here is the rough seat insert removed from the seat. It doesn’t look like much yet. If you have ever dreamed of becoming a sculptor, this is your time to shine.
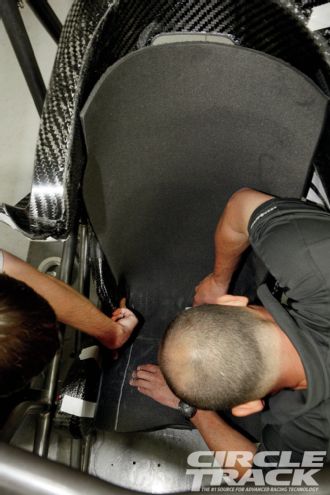
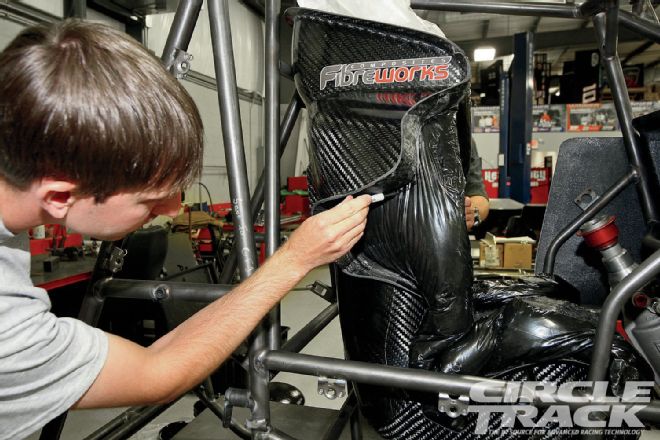
18 Ray and Zurawski use the same electric carving knife that your grandma uses every Thanksgiving to shape the seat insert. When shaping your insert, begin by carving away the obvious overflow, then slowly remove foam until the driver is comfortable. Don’t forget to cut openings in the insert for belt pass-throughs. This is the part of the process where it pays to take your time. It’s always better to make many small cuts and slowly work your way to the desired fit than cut too much. You will probably need to fit the insert in the seat and have your driving make multiple fittings as you slowly carve away foam each time. Cut around the edges until the insert fits completely within the seat and your driver has sufficient arm and leg movement so that the insert doesn’t restrict their ability to drive the race car.">
 <strong>18</strong> Ray and Zurawski use the same electric carving knife that your grandma uses every Thanksgiving to shape the seat insert. When shaping your insert, begin by carving away the obvious overflow, then slowly remove foam until the driver is comfortable. Don’t forget to cut openings in the insert for belt pass-throughs. This is the part of the process where it pays to take your time. It’s always better to make many small cuts and slowly work your way to the desired fit than cut too much. You will probably need to fit the insert in the seat and have your driving make multiple fittings as you slowly carve away foam each time. Cut around the edges until the insert fits completely within the seat and your driver has sufficient arm and leg movement so that the insert doesn’t restrict their ability to drive the race car.
19 Slowly pull away any remaining pieces of the plastic bag.">
<strong>18</strong> Ray and Zurawski use the same electric carving knife that your grandma uses every Thanksgiving to shape the seat insert. When shaping your insert, begin by carving away the obvious overflow, then slowly remove foam until the driver is comfortable. Don’t forget to cut openings in the insert for belt pass-throughs. This is the part of the process where it pays to take your time. It’s always better to make many small cuts and slowly work your way to the desired fit than cut too much. You will probably need to fit the insert in the seat and have your driving make multiple fittings as you slowly carve away foam each time. Cut around the edges until the insert fits completely within the seat and your driver has sufficient arm and leg movement so that the insert doesn’t restrict their ability to drive the race car.
19 Slowly pull away any remaining pieces of the plastic bag.">
 <strong>19</strong> Slowly pull away any remaining pieces of the plastic bag.
20 Here’s the insert after all the excess foam has been cut away.">
<strong>19</strong> Slowly pull away any remaining pieces of the plastic bag.
20 Here’s the insert after all the excess foam has been cut away.">
 <strong>20</strong> Here’s the insert after all the excess foam has been cut away.
21 BSCI provides flame-retardant CarbonX cloth to cover the insert. Slowly stretch it over the seat and secure it with spray adhesive.">
<strong>20</strong> Here’s the insert after all the excess foam has been cut away.
21 BSCI provides flame-retardant CarbonX cloth to cover the insert. Slowly stretch it over the seat and secure it with spray adhesive.">
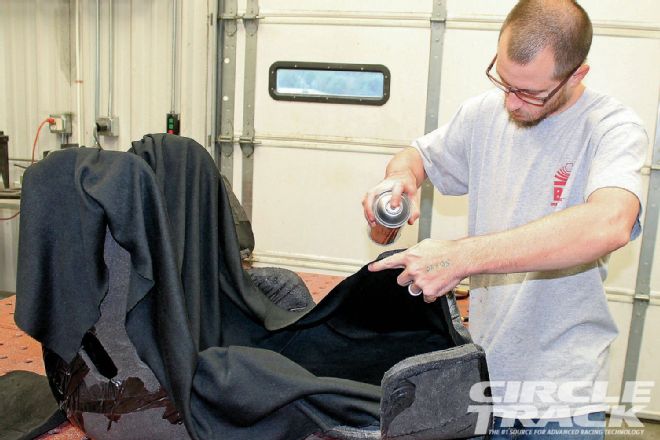 <strong>21</strong> BSCI provides flame-retardant CarbonX cloth to cover the insert. Slowly stretch it over the seat and secure it with spray adhesive.
22 Back in the racing seat, the expanded foam insert looks great and should make Blaney both more comfortable and a bit safer over many nights of Sprint Car racing. ">
<strong>21</strong> BSCI provides flame-retardant CarbonX cloth to cover the insert. Slowly stretch it over the seat and secure it with spray adhesive.
22 Back in the racing seat, the expanded foam insert looks great and should make Blaney both more comfortable and a bit safer over many nights of Sprint Car racing. ">
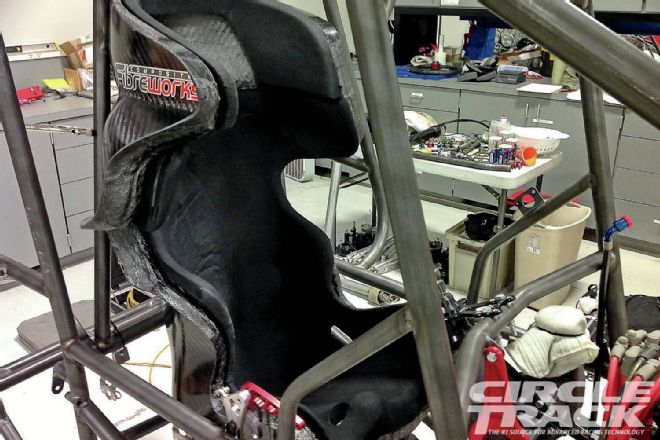 <strong>22</strong> Back in the racing seat, the expanded foam insert looks great and should make Blaney both more comfortable and a bit safer over many nights of Sprint Car racing.