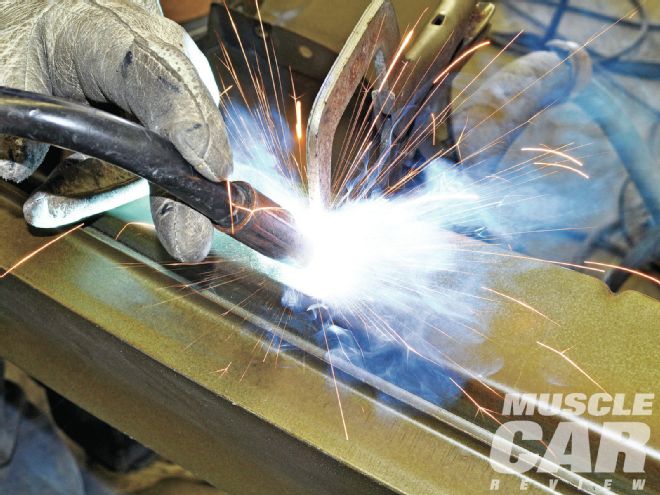
There are only a few tools that can take your car-building capability to a significantly higher level. A new set of sockets? Nice. Torque wrench? Must have. Dial calipers? Fancy. But more than any other tool we can think of, a MIG welder opens the door for a hobbyist bolt-on restorer to become a fabricator. It makes sheetmetal repairs possible. It allows you to create something from a pile of steel. You can even use a MIG welder to repair cracks in your riding lawn mower's deck. In fact, you may become the most popular neighbor on the block.
MIG stands for metal inert gas, and it describes an arc welding process where the filler is used as the electrode and the welding arc is shielded with an inert gas. The filler wire is fed though the gun as you weld, making welding easier. All you have to do is prep the surface and adjust the power output and wire speed on the welder.
The transition from handtool mechanic to fabricator can be a bit intimidating, though. It may seem more difficult to sort through all of the specifications and claims to choose the best welder than it will be to actually start welding. The first thing you should understand is that the best welder for you will be different from the one for the shop down the street, and it may even be different from what's best for your muscle car buddies. That's because the perfect machine for you is the one that does everything you need at a price that makes sense for you.
There are lots of specifications to wade through when it comes to selecting a welder: power output, duty cycle, amperage range, and a variety of others depending on the manufacturer. A pro can sort through the numbers, but for your first MIG welder, the key is the thickness of mild steel the manufacturer claims the machine can weld. Believe what it says, and make sure your intended uses fall within that range. If you're right at the limit, the machine usually won't perform optimally at that point and you should go up or down accordingly.
In addition to sharing our own experiences, we polled the professionals at Eastwood, HTP America, Lincoln Electric, and Miller Electric Manufacturing to see what advice they have for first-time MIG welders. The message we heard over and over again was to buy the right tool for the job. Be realistic about what you'll be doing—and what you won't be doing. Bells and whistles are nice, but only if they are features you will use.
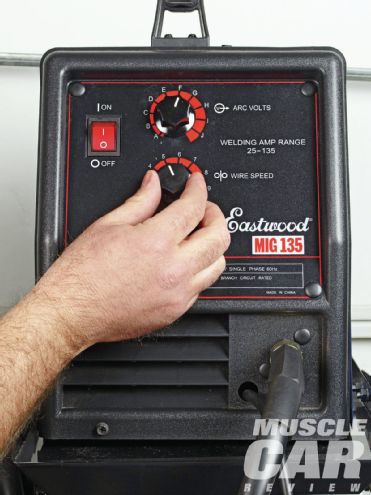
1. The newest player in the MIG welder arena is Eastwood. We tried the MIG135, a 120V-powered machine that is extremely affordable. Eastwood also offers a MIG175 requiring 220V input. This welder is available by itself or as a kit that comes with a welding cart, an automatic-dimming helmet, a gas regulator, 0.023-inch steel welding wire, and an extra 0.023-inch contact tip. The only other things you will need before you start welding are welding gloves, gas, and a pair of side cutters.">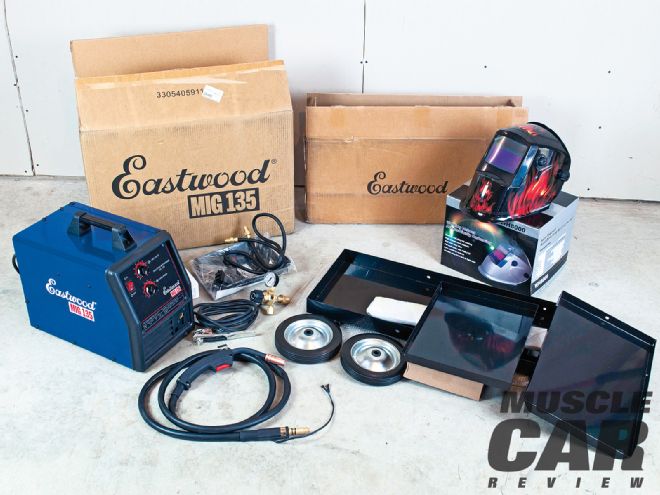 <strong>1</strong>. The newest player in the MIG welder arena is Eastwood. We tried the MIG135, a 120V-powered machine that is extremely affordable. Eastwood also offers a MIG175 requiring 220V input. This welder is available by itself or as a kit that comes with a welding cart, an automatic-dimming helmet, a gas regulator, 0.023-inch steel welding wire, and an extra 0.023-inch contact tip. The only other things you will need before you start welding are welding gloves, gas, and a pair of side cutters.
2. From Miller Electric we used a Millermatic 211 Auto-Set with MVP. This machine has two unique features. First, it can run on either 120V or 220V input power. Second, it has an auto-set feature that automatically sets the power output and wire speed based on the thickness of the mild steel you’re welding. The welder comes with a gas regulator, 0.030-inch wire, two 0.030-inch contact tips, two 0.035-inch tips, and a material thickness gauge. It is also available with a cart. ">
<strong>1</strong>. The newest player in the MIG welder arena is Eastwood. We tried the MIG135, a 120V-powered machine that is extremely affordable. Eastwood also offers a MIG175 requiring 220V input. This welder is available by itself or as a kit that comes with a welding cart, an automatic-dimming helmet, a gas regulator, 0.023-inch steel welding wire, and an extra 0.023-inch contact tip. The only other things you will need before you start welding are welding gloves, gas, and a pair of side cutters.
2. From Miller Electric we used a Millermatic 211 Auto-Set with MVP. This machine has two unique features. First, it can run on either 120V or 220V input power. Second, it has an auto-set feature that automatically sets the power output and wire speed based on the thickness of the mild steel you’re welding. The welder comes with a gas regulator, 0.030-inch wire, two 0.030-inch contact tips, two 0.035-inch tips, and a material thickness gauge. It is also available with a cart. ">
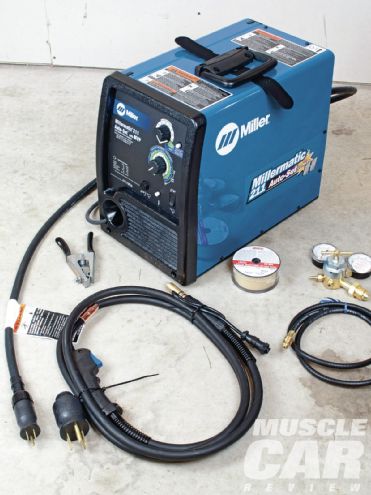 <strong>2</strong>. From Miller Electric we used a Millermatic 211 Auto-Set with MVP. This machine has two unique features. First, it can run on either 120V or 220V input power. Second, it has an auto-set feature that automatically sets the power output and wire speed based on the thickness of the mild steel you’re welding. The welder comes with a gas regulator, 0.030-inch wire, two 0.030-inch contact tips, two 0.035-inch tips, and a material thickness gauge. It is also available with a cart.
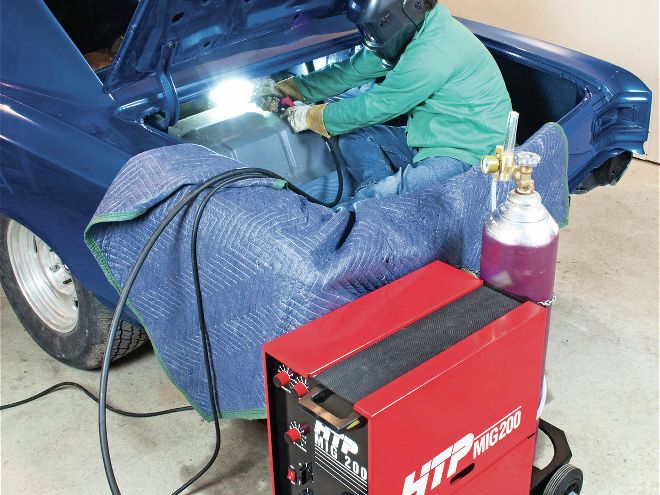
3. The MIG welder with the highest output we looked at for this article is the HTP MIG200. This workhorse is capable of welding 26-gauge sheetmetal through 3/8-inch-thick steel. It features a fine power switch to fine-tune the power setting. It also has pause time and weld time controls for spot and stitch-mode welding. It was the only welder we tested that came with an integrated welding cart, which is convenient and saves about $100 compared to welders with a separate cart. ">
<strong>2</strong>. From Miller Electric we used a Millermatic 211 Auto-Set with MVP. This machine has two unique features. First, it can run on either 120V or 220V input power. Second, it has an auto-set feature that automatically sets the power output and wire speed based on the thickness of the mild steel you’re welding. The welder comes with a gas regulator, 0.030-inch wire, two 0.030-inch contact tips, two 0.035-inch tips, and a material thickness gauge. It is also available with a cart.
3. The MIG welder with the highest output we looked at for this article is the HTP MIG200. This workhorse is capable of welding 26-gauge sheetmetal through 3/8-inch-thick steel. It features a fine power switch to fine-tune the power setting. It also has pause time and weld time controls for spot and stitch-mode welding. It was the only welder we tested that came with an integrated welding cart, which is convenient and saves about $100 compared to welders with a separate cart. ">
 <strong>3</strong>. The MIG welder with the highest output we looked at for this article is the HTP MIG200. This workhorse is capable of welding 26-gauge sheetmetal through 3/8-inch-thick steel. It features a fine power switch to fine-tune the power setting. It also has pause time and weld time controls for spot and stitch-mode welding. It was the only welder we tested that came with an integrated welding cart, which is convenient and saves about $100 compared to welders with a separate cart.
4. Most 120V machines come with the power cord already assembled, while 220V machines commonly come with a cord but no plug. This is because 30- and 50-amp outlets are different. You’ll need to purchase a plug locally and wire it to your machine. Because of the unique quick-disconnect plug on the Miller 211 MVP, it comes with a 50-amp plug. ">
<strong>3</strong>. The MIG welder with the highest output we looked at for this article is the HTP MIG200. This workhorse is capable of welding 26-gauge sheetmetal through 3/8-inch-thick steel. It features a fine power switch to fine-tune the power setting. It also has pause time and weld time controls for spot and stitch-mode welding. It was the only welder we tested that came with an integrated welding cart, which is convenient and saves about $100 compared to welders with a separate cart.
4. Most 120V machines come with the power cord already assembled, while 220V machines commonly come with a cord but no plug. This is because 30- and 50-amp outlets are different. You’ll need to purchase a plug locally and wire it to your machine. Because of the unique quick-disconnect plug on the Miller 211 MVP, it comes with a 50-amp plug. ">
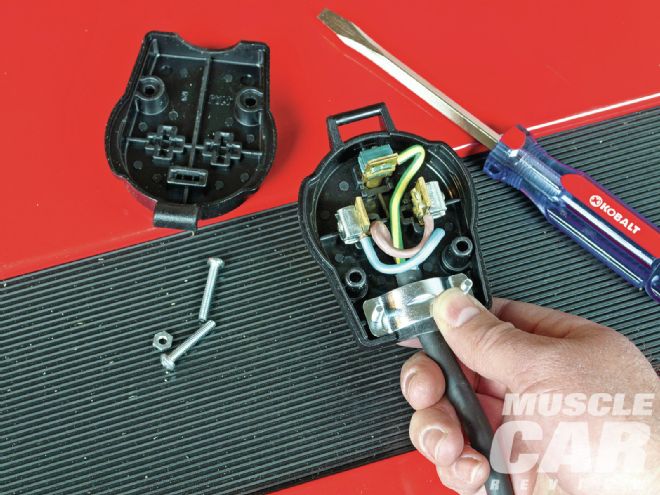 <strong>4</strong>. Most 120V machines come with the power cord already assembled, while 220V machines commonly come with a cord but no plug. This is because 30- and 50-amp outlets are different. You’ll need to purchase a plug locally and wire it to your machine. Because of the unique quick-disconnect plug on the Miller 211 MVP, it comes with a 50-amp plug.
5. The HTP and Miller machines both use welding wire that comes on either 4- or 8-inch spools, while the Eastwood only accepts the 4-inch spool. The larger spool is a better value, but the small spool is good for a hobbyist who doesn’t do a lot of welding. We also find it handy to have spools of 0.023-, 0.030-, and 0.035-inch wire on hand so that we can weld from about 24-gauge steel all the way up to 3/8-inch by switching the spool and the contact tip. ">
<strong>4</strong>. Most 120V machines come with the power cord already assembled, while 220V machines commonly come with a cord but no plug. This is because 30- and 50-amp outlets are different. You’ll need to purchase a plug locally and wire it to your machine. Because of the unique quick-disconnect plug on the Miller 211 MVP, it comes with a 50-amp plug.
5. The HTP and Miller machines both use welding wire that comes on either 4- or 8-inch spools, while the Eastwood only accepts the 4-inch spool. The larger spool is a better value, but the small spool is good for a hobbyist who doesn’t do a lot of welding. We also find it handy to have spools of 0.023-, 0.030-, and 0.035-inch wire on hand so that we can weld from about 24-gauge steel all the way up to 3/8-inch by switching the spool and the contact tip. ">
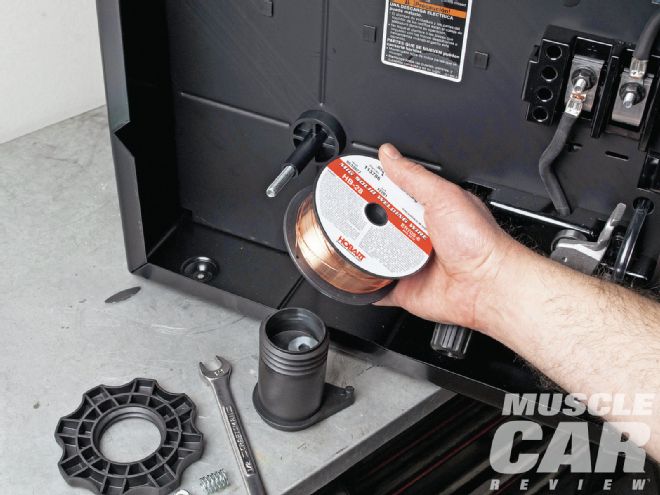 <strong>5</strong>. The HTP and Miller machines both use welding wire that comes on either 4- or 8-inch spools, while the Eastwood only accepts the 4-inch spool. The larger spool is a better value, but the small spool is good for a hobbyist who doesn’t do a lot of welding. We also find it handy to have spools of 0.023-, 0.030-, and 0.035-inch wire on hand so that we can weld from about 24-gauge steel all the way up to 3/8-inch by switching the spool and the contact tip.
6. Inside the side cover of just about every MIG welder is a chart that recommends wire diameter, power setting, and wire speed for the thickness of steel you’re welding. There are ranges for each of these settings, and you may find that slight variations work better with your style of welding, but these are a great place to start. It’s typical for someone new to MIG welding to forget about the wire diameter and focus on the power and wire feed settings. Follow the chart in your machine, and 90 percent of the time you’ll be spot on.">
<strong>5</strong>. The HTP and Miller machines both use welding wire that comes on either 4- or 8-inch spools, while the Eastwood only accepts the 4-inch spool. The larger spool is a better value, but the small spool is good for a hobbyist who doesn’t do a lot of welding. We also find it handy to have spools of 0.023-, 0.030-, and 0.035-inch wire on hand so that we can weld from about 24-gauge steel all the way up to 3/8-inch by switching the spool and the contact tip.
6. Inside the side cover of just about every MIG welder is a chart that recommends wire diameter, power setting, and wire speed for the thickness of steel you’re welding. There are ranges for each of these settings, and you may find that slight variations work better with your style of welding, but these are a great place to start. It’s typical for someone new to MIG welding to forget about the wire diameter and focus on the power and wire feed settings. Follow the chart in your machine, and 90 percent of the time you’ll be spot on.">
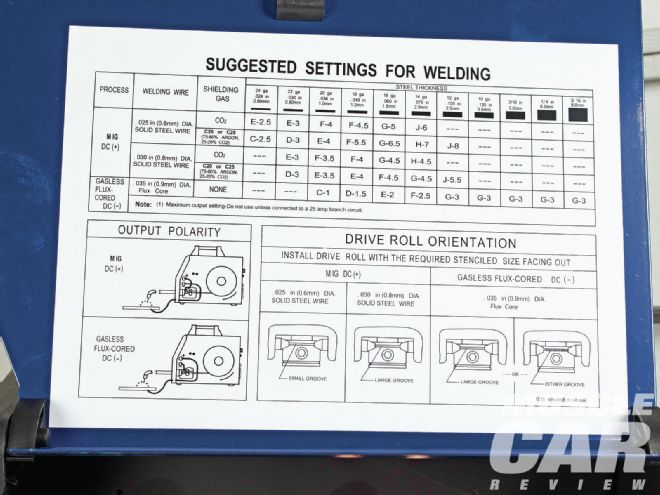 <strong>6</strong>. Inside the side cover of just about every MIG welder is a chart that recommends wire diameter, power setting, and wire speed for the thickness of steel you’re welding. There are ranges for each of these settings, and you may find that slight variations work better with your style of welding, but these are a great place to start. It’s typical for someone new to MIG welding to forget about the wire diameter and focus on the power and wire feed settings. Follow the chart in your machine, and 90 percent of the time you’ll be spot on.
7. The wire drive system is a critical part of a MIG welder. HTP prides itself in a completely metal assembly for precision and durability on all of its MIG welders. The Miller 211 Auto-Set also has a metal drive system, as do all of the company’s mid- and high-level MIG welders. The drive system feeds the wire to the gun, and precise, consistent wire feed is critical for high-quality welds. When changing wire diameter, you’ll also need to change the drive wheels. Many welders have multiple grooves in the wheels, so you can simply turn them over and have the proper-sized groove for the wire you’re using. ">
<strong>6</strong>. Inside the side cover of just about every MIG welder is a chart that recommends wire diameter, power setting, and wire speed for the thickness of steel you’re welding. There are ranges for each of these settings, and you may find that slight variations work better with your style of welding, but these are a great place to start. It’s typical for someone new to MIG welding to forget about the wire diameter and focus on the power and wire feed settings. Follow the chart in your machine, and 90 percent of the time you’ll be spot on.
7. The wire drive system is a critical part of a MIG welder. HTP prides itself in a completely metal assembly for precision and durability on all of its MIG welders. The Miller 211 Auto-Set also has a metal drive system, as do all of the company’s mid- and high-level MIG welders. The drive system feeds the wire to the gun, and precise, consistent wire feed is critical for high-quality welds. When changing wire diameter, you’ll also need to change the drive wheels. Many welders have multiple grooves in the wheels, so you can simply turn them over and have the proper-sized groove for the wire you’re using. ">
 <strong>7</strong>. The wire drive system is a critical part of a MIG welder. HTP prides itself in a completely metal assembly for precision and durability on all of its MIG welders. The Miller 211 Auto-Set also has a metal drive system, as do all of the company’s mid- and high-level MIG welders. The drive system feeds the wire to the gun, and precise, consistent wire feed is critical for high-quality welds. When changing wire diameter, you’ll also need to change the drive wheels. Many welders have multiple grooves in the wheels, so you can simply turn them over and have the proper-sized groove for the wire you’re using.
8. The torch may look like a simple cable attached to the welder, but it is a complex combination of tubing and wiring. There are electrodes that tell the welder when you have pulled the trigger on the gun to start welding, a high-amperage electrode that carries the welding current, and a tube for the inert gas. The Eastwood welder torch is hard-wired to the machine, while the HTP (shown) and Miller torches are quick-release setups. ">
<strong>7</strong>. The wire drive system is a critical part of a MIG welder. HTP prides itself in a completely metal assembly for precision and durability on all of its MIG welders. The Miller 211 Auto-Set also has a metal drive system, as do all of the company’s mid- and high-level MIG welders. The drive system feeds the wire to the gun, and precise, consistent wire feed is critical for high-quality welds. When changing wire diameter, you’ll also need to change the drive wheels. Many welders have multiple grooves in the wheels, so you can simply turn them over and have the proper-sized groove for the wire you’re using.
8. The torch may look like a simple cable attached to the welder, but it is a complex combination of tubing and wiring. There are electrodes that tell the welder when you have pulled the trigger on the gun to start welding, a high-amperage electrode that carries the welding current, and a tube for the inert gas. The Eastwood welder torch is hard-wired to the machine, while the HTP (shown) and Miller torches are quick-release setups. ">
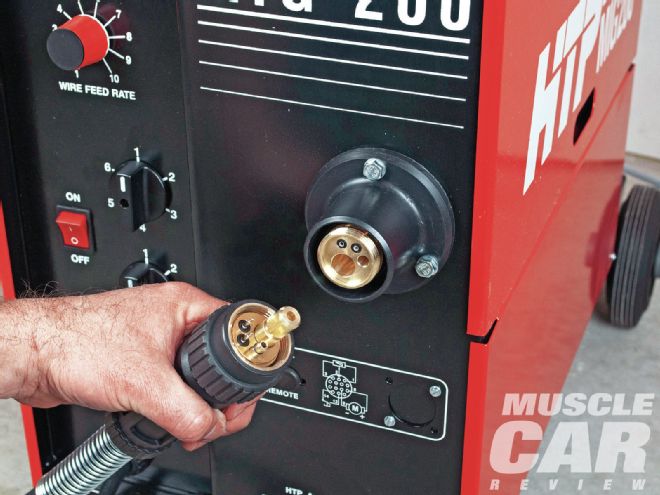 <strong>8</strong>. The torch may look like a simple cable attached to the welder, but it is a complex combination of tubing and wiring. There are electrodes that tell the welder when you have pulled the trigger on the gun to start welding, a high-amperage electrode that carries the welding current, and a tube for the inert gas. The Eastwood welder torch is hard-wired to the machine, while the HTP (shown) and Miller torches are quick-release setups.
9. If you’ve been around people who weld, you’ve probably heard them talk about a Tweco gun. Tweco is brand of gun, and the name has become synonymous with quality, comfort, and durability. Each welder company has its own gun, and Miller and HTP offer specialty guns for special purposes. The HTP Flexible Swan Neck shown lets you position the tip in tight places or to relieve an awkward welding position. It can flex a little more than 90 degrees in any direction or be made straight.">
<strong>8</strong>. The torch may look like a simple cable attached to the welder, but it is a complex combination of tubing and wiring. There are electrodes that tell the welder when you have pulled the trigger on the gun to start welding, a high-amperage electrode that carries the welding current, and a tube for the inert gas. The Eastwood welder torch is hard-wired to the machine, while the HTP (shown) and Miller torches are quick-release setups.
9. If you’ve been around people who weld, you’ve probably heard them talk about a Tweco gun. Tweco is brand of gun, and the name has become synonymous with quality, comfort, and durability. Each welder company has its own gun, and Miller and HTP offer specialty guns for special purposes. The HTP Flexible Swan Neck shown lets you position the tip in tight places or to relieve an awkward welding position. It can flex a little more than 90 degrees in any direction or be made straight.">
 <strong>9</strong>. If you’ve been around people who weld, you’ve probably heard them talk about a Tweco gun. Tweco is brand of gun, and the name has become synonymous with quality, comfort, and durability. Each welder company has its own gun, and Miller and HTP offer specialty guns for special purposes. The HTP Flexible Swan Neck shown lets you position the tip in tight places or to relieve an awkward welding position. It can flex a little more than 90 degrees in any direction or be made straight.
10. Whatever welding gun your MIG comes with, you’ll want extra parts commonly referred to as consumables. Almost every torch will have contact tips and a nozzle, as this Eastwood gun has. The tip transfers the electric current to the wire; it must match the wire diameter you’re using, so have a variety on hand to match the wire sizes you commonly use. The nozzle directs the inert gas around the welding area. Both of these pieces get buggered up with use, especially as you’re learning how to weld. You should protect these parts with antispatter spray, but ultimately they will have to be replaced, and you’ll want extras on hand when that happens.">
<strong>9</strong>. If you’ve been around people who weld, you’ve probably heard them talk about a Tweco gun. Tweco is brand of gun, and the name has become synonymous with quality, comfort, and durability. Each welder company has its own gun, and Miller and HTP offer specialty guns for special purposes. The HTP Flexible Swan Neck shown lets you position the tip in tight places or to relieve an awkward welding position. It can flex a little more than 90 degrees in any direction or be made straight.
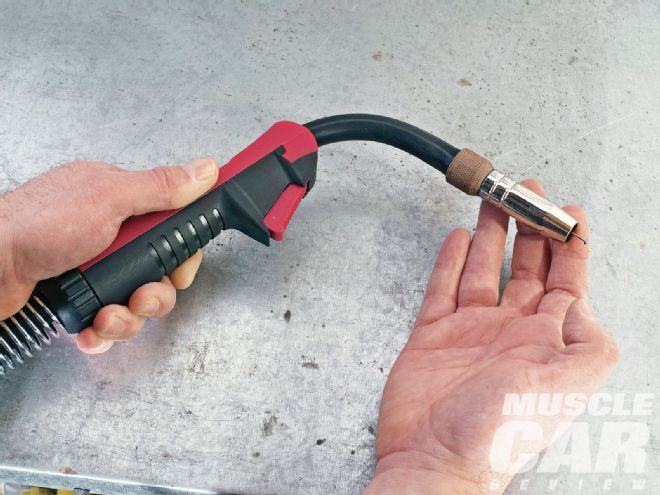
10. Whatever welding gun your MIG comes with, you’ll want extra parts commonly referred to as consumables. Almost every torch will have contact tips and a nozzle, as this Eastwood gun has. The tip transfers the electric current to the wire; it must match the wire diameter you’re using, so have a variety on hand to match the wire sizes you commonly use. The nozzle directs the inert gas around the welding area. Both of these pieces get buggered up with use, especially as you’re learning how to weld. You should protect these parts with antispatter spray, but ultimately they will have to be replaced, and you’ll want extras on hand when that happens.">
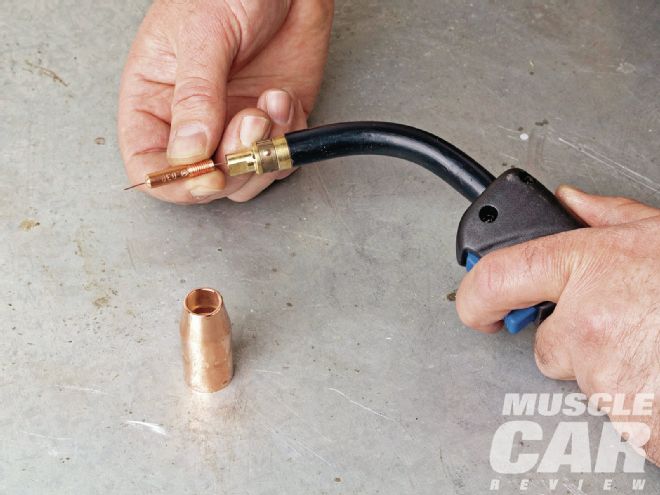 <strong>10</strong>. Whatever welding gun your MIG comes with, you’ll want extra parts commonly referred to as consumables. Almost every torch will have contact tips and a nozzle, as this Eastwood gun has. The tip transfers the electric current to the wire; it must match the wire diameter you’re using, so have a variety on hand to match the wire sizes you commonly use. The nozzle directs the inert gas around the welding area. Both of these pieces get buggered up with use, especially as you’re learning how to weld. You should protect these parts with antispatter spray, but ultimately they will have to be replaced, and you’ll want extras on hand when that happens.
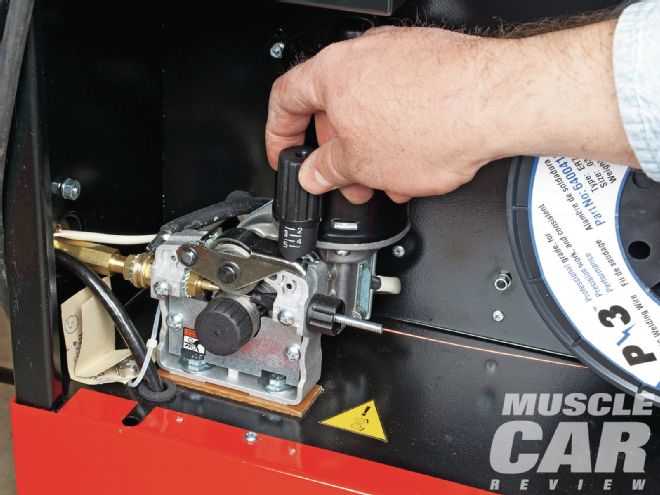
11. The Eastwood and Miller MIG welders shown here come with a gas regulator; the regulator is sold separately with the HTP machine. You’ll also need a cylinder of gas from your local welding supply store. Some stores sell you the cylinder, while others rent or loan the cylinder as part of the price of the gas. For mild steel, you’ll want a 75/25-percent mix of Argon/CO2. All of the MIG welders shown here can also weld aluminum, which requires 100-percent Argon. There are usually three sizes of cylinders available: 40, 75, and 100 pounds. A larger tank means fewer trips to the welding supply store. Make sure your welder or welding cart can securely hold the size tank you are interested in. Most welders want the gas flow at around 20 inches, but check the instructions that came with your machine. You have to set the flow with the machine on and the trigger pulled to get an accurate reading.">
<strong>10</strong>. Whatever welding gun your MIG comes with, you’ll want extra parts commonly referred to as consumables. Almost every torch will have contact tips and a nozzle, as this Eastwood gun has. The tip transfers the electric current to the wire; it must match the wire diameter you’re using, so have a variety on hand to match the wire sizes you commonly use. The nozzle directs the inert gas around the welding area. Both of these pieces get buggered up with use, especially as you’re learning how to weld. You should protect these parts with antispatter spray, but ultimately they will have to be replaced, and you’ll want extras on hand when that happens.
11. The Eastwood and Miller MIG welders shown here come with a gas regulator; the regulator is sold separately with the HTP machine. You’ll also need a cylinder of gas from your local welding supply store. Some stores sell you the cylinder, while others rent or loan the cylinder as part of the price of the gas. For mild steel, you’ll want a 75/25-percent mix of Argon/CO2. All of the MIG welders shown here can also weld aluminum, which requires 100-percent Argon. There are usually three sizes of cylinders available: 40, 75, and 100 pounds. A larger tank means fewer trips to the welding supply store. Make sure your welder or welding cart can securely hold the size tank you are interested in. Most welders want the gas flow at around 20 inches, but check the instructions that came with your machine. You have to set the flow with the machine on and the trigger pulled to get an accurate reading.">
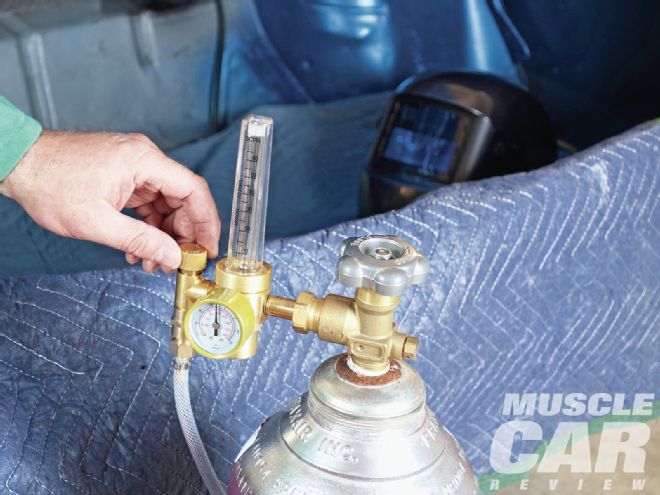 <strong>11</strong>. The Eastwood and Miller MIG welders shown here come with a gas regulator; the regulator is sold separately with the HTP machine. You’ll also need a cylinder of gas from your local welding supply store. Some stores sell you the cylinder, while others rent or loan the cylinder as part of the price of the gas. For mild steel, you’ll want a 75/25-percent mix of Argon/CO2. All of the MIG welders shown here can also weld aluminum, which requires 100-percent Argon. There are usually three sizes of cylinders available: 40, 75, and 100 pounds. A larger tank means fewer trips to the welding supply store. Make sure your welder or welding cart can securely hold the size tank you are interested in. Most welders want the gas flow at around 20 inches, but check the instructions that came with your machine. You have to set the flow with the machine on and the trigger pulled to get an accurate reading.
12. You’ll need a welding helmet to protect your eyes and face from the UV rays produced by the MIG welding process, leather gloves to protect your hands against burns but still let you easily move your fingers, and a long-sleeve welding shirt to protect your arms and shirt from burns. Auto-darkening helmets were exotic a decade ago but are the standard now. This one from HTP allows you to adjust how dark it gets during welding and how quickly. A side cutter is needed to trim the wire at the tip periodically. A wire brush and spatter hammer are nice to clean up the welds when you’re finished. ">
<strong>11</strong>. The Eastwood and Miller MIG welders shown here come with a gas regulator; the regulator is sold separately with the HTP machine. You’ll also need a cylinder of gas from your local welding supply store. Some stores sell you the cylinder, while others rent or loan the cylinder as part of the price of the gas. For mild steel, you’ll want a 75/25-percent mix of Argon/CO2. All of the MIG welders shown here can also weld aluminum, which requires 100-percent Argon. There are usually three sizes of cylinders available: 40, 75, and 100 pounds. A larger tank means fewer trips to the welding supply store. Make sure your welder or welding cart can securely hold the size tank you are interested in. Most welders want the gas flow at around 20 inches, but check the instructions that came with your machine. You have to set the flow with the machine on and the trigger pulled to get an accurate reading.
12. You’ll need a welding helmet to protect your eyes and face from the UV rays produced by the MIG welding process, leather gloves to protect your hands against burns but still let you easily move your fingers, and a long-sleeve welding shirt to protect your arms and shirt from burns. Auto-darkening helmets were exotic a decade ago but are the standard now. This one from HTP allows you to adjust how dark it gets during welding and how quickly. A side cutter is needed to trim the wire at the tip periodically. A wire brush and spatter hammer are nice to clean up the welds when you’re finished. ">
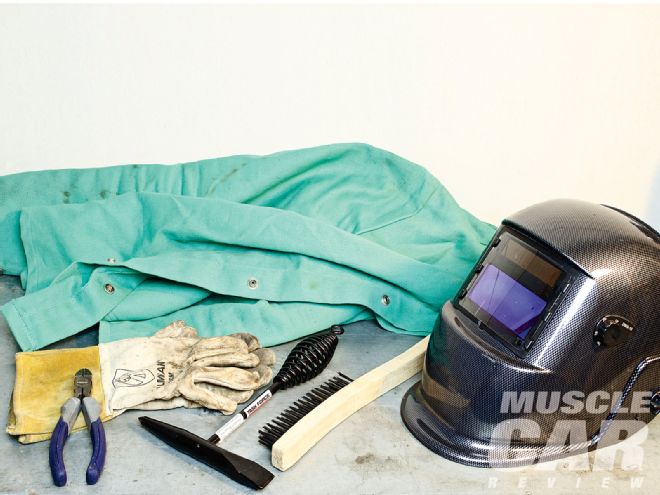 <strong>12</strong>. You’ll need a welding helmet to protect your eyes and face from the UV rays produced by the MIG welding process, leather gloves to protect your hands against burns but still let you easily move your fingers, and a long-sleeve welding shirt to protect your arms and shirt from burns. Auto-darkening helmets were exotic a decade ago but are the standard now. This one from HTP allows you to adjust how dark it gets during welding and how quickly. A side cutter is needed to trim the wire at the tip periodically. A wire brush and spatter hammer are nice to clean up the welds when you’re finished.
13. When you are ready to start welding, clean the metal you’ll work on so there is no rust, dirt, or grease, and attach the welder’s ground clamp to it. Consulting the chart on the inside cover of the welder, make sure you have the proper wire diameter for the thickness of metal you’re welding, and set the wire speed and power on the machine. The Eastwood (shown) and Miller machines have infinitely variable controls for this, so you can make very small adjustments. The HTP MIG200 has detents on the power control, but has a fine power switch that gives you four positions within each power setting for fine tuning.">
<strong>12</strong>. You’ll need a welding helmet to protect your eyes and face from the UV rays produced by the MIG welding process, leather gloves to protect your hands against burns but still let you easily move your fingers, and a long-sleeve welding shirt to protect your arms and shirt from burns. Auto-darkening helmets were exotic a decade ago but are the standard now. This one from HTP allows you to adjust how dark it gets during welding and how quickly. A side cutter is needed to trim the wire at the tip periodically. A wire brush and spatter hammer are nice to clean up the welds when you’re finished.
13. When you are ready to start welding, clean the metal you’ll work on so there is no rust, dirt, or grease, and attach the welder’s ground clamp to it. Consulting the chart on the inside cover of the welder, make sure you have the proper wire diameter for the thickness of metal you’re welding, and set the wire speed and power on the machine. The Eastwood (shown) and Miller machines have infinitely variable controls for this, so you can make very small adjustments. The HTP MIG200 has detents on the power control, but has a fine power switch that gives you four positions within each power setting for fine tuning.">
 <strong>13</strong>. When you are ready to start welding, clean the metal you’ll work on so there is no rust, dirt, or grease, and attach the welder’s ground clamp to it. Consulting the chart on the inside cover of the welder, make sure you have the proper wire diameter for the thickness of metal you’re welding, and set the wire speed and power on the machine. The Eastwood (shown) and Miller machines have infinitely variable controls for this, so you can make very small adjustments. The HTP MIG200 has detents on the power control, but has a fine power switch that gives you four positions within each power setting for fine tuning.
14. On the Millermatic 211 Auto-Set, you can set the power and wire speed manually or let the machine set it for you. Turn the wire speed dial to the color code for the size of wire you are using, and then rotate the power knob to the corresponding material thickness. You can adjust up or down, but the machine will change both power and wire speed when in Auto-Set mode. Regardless of the machine you have, it’s best to do a test weld on a piece of similar metal before starting on your real work to make sure you are happy with the penetration and material fill. In addition to the settings on the machine, how fast you move the gun along the weld affects penetration and fill.">
<strong>13</strong>. When you are ready to start welding, clean the metal you’ll work on so there is no rust, dirt, or grease, and attach the welder’s ground clamp to it. Consulting the chart on the inside cover of the welder, make sure you have the proper wire diameter for the thickness of metal you’re welding, and set the wire speed and power on the machine. The Eastwood (shown) and Miller machines have infinitely variable controls for this, so you can make very small adjustments. The HTP MIG200 has detents on the power control, but has a fine power switch that gives you four positions within each power setting for fine tuning.
14. On the Millermatic 211 Auto-Set, you can set the power and wire speed manually or let the machine set it for you. Turn the wire speed dial to the color code for the size of wire you are using, and then rotate the power knob to the corresponding material thickness. You can adjust up or down, but the machine will change both power and wire speed when in Auto-Set mode. Regardless of the machine you have, it’s best to do a test weld on a piece of similar metal before starting on your real work to make sure you are happy with the penetration and material fill. In addition to the settings on the machine, how fast you move the gun along the weld affects penetration and fill.">
 <strong>14</strong>. On the Millermatic 211 Auto-Set, you can set the power and wire speed manually or let the machine set it for you. Turn the wire speed dial to the color code for the size of wire you are using, and then rotate the power knob to the corresponding material thickness. You can adjust up or down, but the machine will change both power and wire speed when in Auto-Set mode. Regardless of the machine you have, it’s best to do a test weld on a piece of similar metal before starting on your real work to make sure you are happy with the penetration and material fill. In addition to the settings on the machine, how fast you move the gun along the weld affects penetration and fill.
15. Lay down some practice beads to get a feel for how to set your machine. Typically, you will hold the gun firmly with one hand and rest the neck on your other hand for steadiness. Most of the time you’ll want to do a single pass. When you have the power and speed set properly, welding should sound like bacon frying in a pan. If you hear quick popping, the wire speed is too fast. Slow popping means the wire speed is too slow. You can adjust wire speed while welding, but the power setting should not be adjusted while the trigger is pulled. Power and wire speed are related: the higher the power setting, the faster the wire speed. ">
<strong>14</strong>. On the Millermatic 211 Auto-Set, you can set the power and wire speed manually or let the machine set it for you. Turn the wire speed dial to the color code for the size of wire you are using, and then rotate the power knob to the corresponding material thickness. You can adjust up or down, but the machine will change both power and wire speed when in Auto-Set mode. Regardless of the machine you have, it’s best to do a test weld on a piece of similar metal before starting on your real work to make sure you are happy with the penetration and material fill. In addition to the settings on the machine, how fast you move the gun along the weld affects penetration and fill.
15. Lay down some practice beads to get a feel for how to set your machine. Typically, you will hold the gun firmly with one hand and rest the neck on your other hand for steadiness. Most of the time you’ll want to do a single pass. When you have the power and speed set properly, welding should sound like bacon frying in a pan. If you hear quick popping, the wire speed is too fast. Slow popping means the wire speed is too slow. You can adjust wire speed while welding, but the power setting should not be adjusted while the trigger is pulled. Power and wire speed are related: the higher the power setting, the faster the wire speed. ">
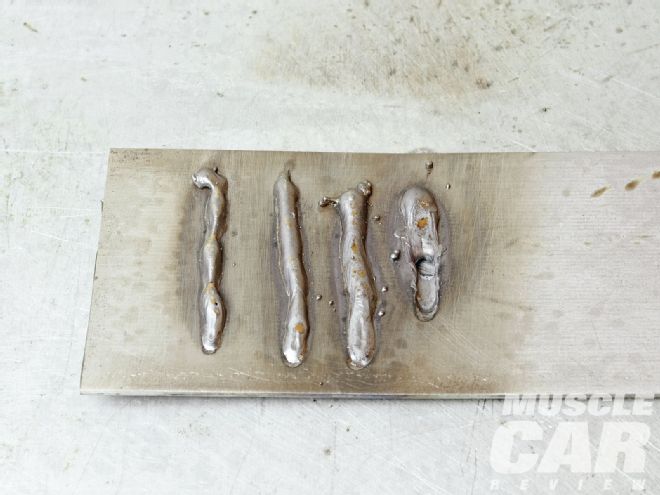 <strong>15</strong>. Lay down some practice beads to get a feel for how to set your machine. Typically, you will hold the gun firmly with one hand and rest the neck on your other hand for steadiness. Most of the time you’ll want to do a single pass. When you have the power and speed set properly, welding should sound like bacon frying in a pan. If you hear quick popping, the wire speed is too fast. Slow popping means the wire speed is too slow. You can adjust wire speed while welding, but the power setting should not be adjusted while the trigger is pulled. Power and wire speed are related: the higher the power setting, the faster the wire speed.
16. There are several things to look for in your test weld. First is the penetration. Is the bead consistent? If not, you probably heard popping along with sizzle while you were welding, telling you that the wire speed was not set correctly. Is the weld puddle recessed into the material or is it sitting on top? You want good penetration, typically with the weld puddle extending halfway into the material. Look at the back of the material. The surface should not be disrupted, which would indicate that you’re burning through it, but in most cases there should be a generous area where the heat has changed the color of the metal. The splatter on the bottom of this test piece is from burning through the steel stock and into the stainless steel tabletop. Spend some time practicing so you get the hang of how to adjust the power and wire speed to get the results you’re looking for. ">
<strong>15</strong>. Lay down some practice beads to get a feel for how to set your machine. Typically, you will hold the gun firmly with one hand and rest the neck on your other hand for steadiness. Most of the time you’ll want to do a single pass. When you have the power and speed set properly, welding should sound like bacon frying in a pan. If you hear quick popping, the wire speed is too fast. Slow popping means the wire speed is too slow. You can adjust wire speed while welding, but the power setting should not be adjusted while the trigger is pulled. Power and wire speed are related: the higher the power setting, the faster the wire speed.
16. There are several things to look for in your test weld. First is the penetration. Is the bead consistent? If not, you probably heard popping along with sizzle while you were welding, telling you that the wire speed was not set correctly. Is the weld puddle recessed into the material or is it sitting on top? You want good penetration, typically with the weld puddle extending halfway into the material. Look at the back of the material. The surface should not be disrupted, which would indicate that you’re burning through it, but in most cases there should be a generous area where the heat has changed the color of the metal. The splatter on the bottom of this test piece is from burning through the steel stock and into the stainless steel tabletop. Spend some time practicing so you get the hang of how to adjust the power and wire speed to get the results you’re looking for. ">
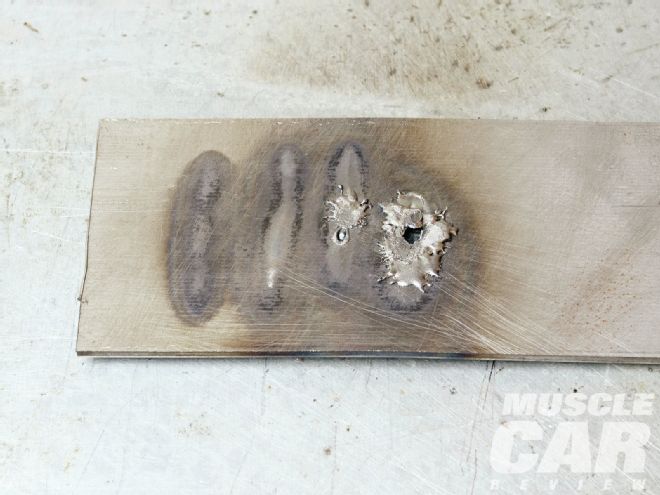 <strong>16</strong>. There are several things to look for in your test weld. First is the penetration. Is the bead consistent? If not, you probably heard popping along with sizzle while you were welding, telling you that the wire speed was not set correctly. Is the weld puddle recessed into the material or is it sitting on top? You want good penetration, typically with the weld puddle extending halfway into the material. Look at the back of the material. The surface should not be disrupted, which would indicate that you’re burning through it, but in most cases there should be a generous area where the heat has changed the color of the metal. The splatter on the bottom of this test piece is from burning through the steel stock and into the stainless steel tabletop. Spend some time practicing so you get the hang of how to adjust the power and wire speed to get the results you’re looking for.
17. Now you’re ready to start welding. MIG welding is something that you can pick up with practice, but there are also some very good educational pieces available. Both HTP and Miller offer DVDs that show you the basics and techniques that can help you become a competent welder very quickly. In addition, most vocational colleges offer welding classes. ">
<strong>16</strong>. There are several things to look for in your test weld. First is the penetration. Is the bead consistent? If not, you probably heard popping along with sizzle while you were welding, telling you that the wire speed was not set correctly. Is the weld puddle recessed into the material or is it sitting on top? You want good penetration, typically with the weld puddle extending halfway into the material. Look at the back of the material. The surface should not be disrupted, which would indicate that you’re burning through it, but in most cases there should be a generous area where the heat has changed the color of the metal. The splatter on the bottom of this test piece is from burning through the steel stock and into the stainless steel tabletop. Spend some time practicing so you get the hang of how to adjust the power and wire speed to get the results you’re looking for.
17. Now you’re ready to start welding. MIG welding is something that you can pick up with practice, but there are also some very good educational pieces available. Both HTP and Miller offer DVDs that show you the basics and techniques that can help you become a competent welder very quickly. In addition, most vocational colleges offer welding classes. ">
 <strong>17</strong>. Now you’re ready to start welding. MIG welding is something that you can pick up with practice, but there are also some very good educational pieces available. Both HTP and Miller offer DVDs that show you the basics and techniques that can help you become a competent welder very quickly. In addition, most vocational colleges offer welding classes.
The other type of welder you'll see in automotive shops is a TIG welder. These use a nonconsumable tungsten electrode that heats the metal to a liquid state within a shielded gas area. Filler rod is supplied by hand. The process offers more control but is much more difficult to learn and master. TIG welding is the preferred method for aluminum and stainless work, and is required on chromoly for safety cages and race-car chassis work. For a muscle car enthusiast, a TIG machine is useful when doing external body sheetmetal repairs. The weld bead is smaller and more controlled, and there is no splatter, which is desirable in this type of work.
Most people do not recommend diving into TIG welding without first having MIG welding experience. And unlike MIG, professional instruction is just about required for TIG welding.
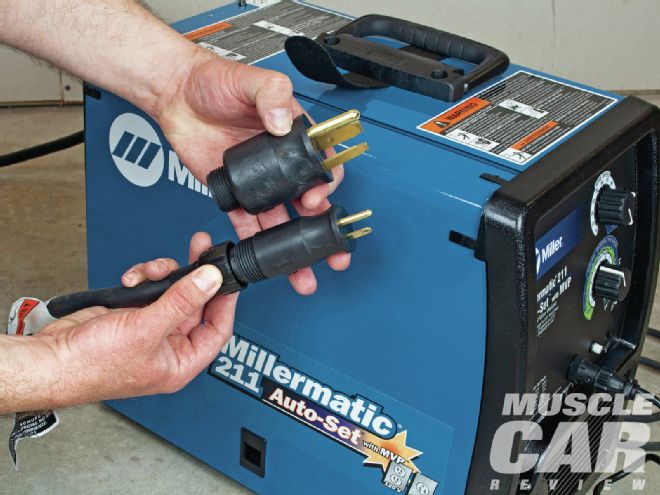 The Millermatic 211 Auto-Set can run on either voltage by simply changing the plug on the end of the power cord. This is handy if you will be operating the welder in a variety of locations and won’t always have access to 220V power, or if you only have 120V service now and want to upgrade after buying a MIG welder. Naturally, when it is connected to a 120V source the Millermatic is limited in its power output just like any other 120V machine.
Do not choose your welder based on the electrical service in your garage. If the work you want to do requires a 220V machine and you only have 120 in your garage, upgrade your garage. You're better off spending the money to add 220V power (or going to a pro for your welding) than compromising and either not being able to do the work or doing a poor job with an underpowered welder.
Not everyone needs a 220V machine. If all you plan to weld is 1/8-inch or thinner metal, then a 120V machine is fine. But if much of what you want to do is between 1/8 and ¼ inch, you'll be frustrated and disappointed with a 120V welder. Of course, adding 220V service to your garage can cost several hundred dollars, so you need to factor this into the overall budget of adding a welder to your collection.
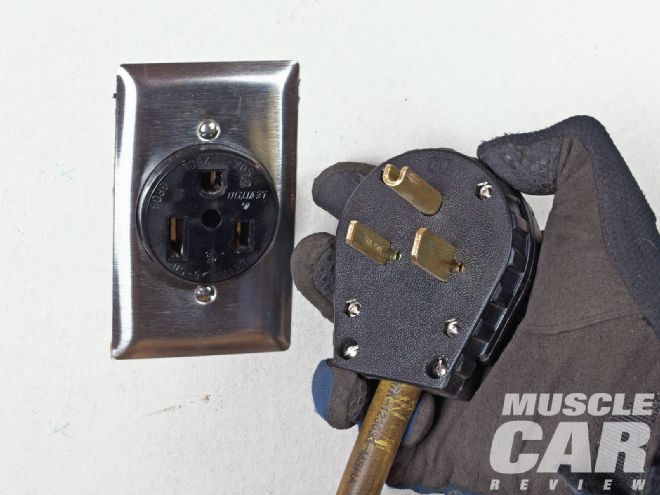 All of the machines shown in this article run on 220 volts except for the Eastwood MIG135. You will typically need 30-amp service, but some machines require 50 amps. Having the proper electrical service lets you run a more powerful MIG welder, which greatly expands your welding capabilities.