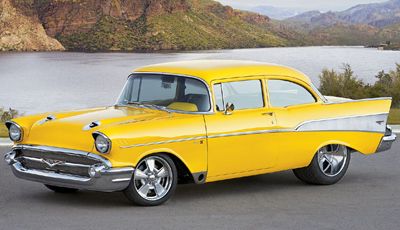
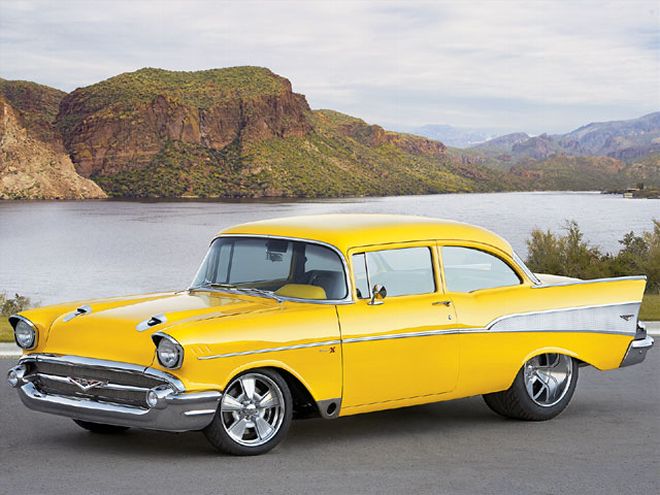
Project X
When the teams at GM Performance Division and GM Performance Parts offered us the chance of a lifetime for our beloved Project X, we jumped at the opportunity to have our car return to the same company that gave birth to it 50 years ago. Now, months into the project, the bright yellow hot rod icon is starting to round the corner toward a completed car once again. We knew that GM would be able to offer this build a level of expertise that no speed shop in the world could match. The grafting of a current-production C6 front suspension, the re-engineering of a 50-year-old frame, and the one-off triangulated four-link rear suspension that tucks 16-inch-wide tires were all done to current-production car specs from the original manufacturer. While it all took our breath away when we saw it in math data, we had actually hoped that Project X would be treated to just such a rebirth.
So, while the advanced production-level engineering was great, what impressed us the most about this latest build was the decades of hot rod expertise that we ran into when we met the team of GM employees that put the finishing touches to "X." During the build, there were literally thousands of loving hours that were poured over our long-term 1957 Chevy project car in a form of craftsmanship and artistry that you just don't expect to see from the company that sells more cars in the world than anyone else.
In this article, we've tried to break down the details of just 10 of these custom areas on Project X. There are literally thousands of subtle and not-so-subtle changes on this car since the day we dropped it off with GM, so please understand if your favorite area isn't featured here. If there is something specific that you want to know "how they did that," drop us a note ([email protected]), and we'll see if we can get the folks at GM to share their secrets with us. With that as an introduction, let's take a look at 10 areas of Project X that have pushed the legend of this project car to new heights.
Functional Ram-Air Hood
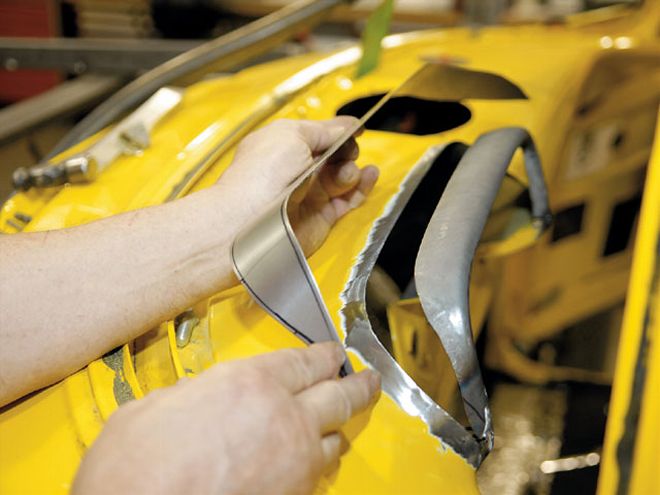
Like many parts of the '57 Chevy, the hood is one of the most sculpted (and re-sculpted) pieces of automotive art ever created. It's a massive piece of steel that comes ramping down to meet the grille while carrying twin hood decorations (often referred to as "front sites" or "bullets") that some still use to "line up" the car when driving. The aggressive uphill rake of the hood also serves as the perfect place for that timeless, scripted Chevrolet logo to announce your arrival. Of course, about as soon as these cars came out, hot rodders have looked for ways to use those bullets to get more fresh air into the hungry engine under the hood. The problem with homemade ram-air kits on these cars is that they usually leave quite a bit to be desired in the fit-and-finish department-think gutted hood ornaments with "custom" clothes dryer ductwork here.
The GM team had a better idea. They wanted to add a functional ram-air hood to the one and only prototype Anniversary Edition 427 big-block, but they wanted to treat the concept as if it had been designed into the car. And, since these are the same folks who are designing and engineering the cars that you'll be driving in the next five to 10 years, they were just the team to take on such a task.
Working from an original Dave Ross design, the team widened the hood area that surrounds the bullets by 25 mm on each side, and then built this amazing substructure into the underside of the hood. The idea was to capture the air filter in the hood itself. When the hood is down, the air goes through the holes in the hood, gets filtered, and all works as normal. With the hood up, the air filter gets lifted off, exposing that gorgeous, all-aluminum 427-inch big-block underneath.
For additional functionality, the GM team also replaced the hood latch with a pair of Solstice trunk latches. This got rid of the huge (and sometimes dangerous) stock single latch that hung down in the middle. The hood hinges were replaced with deck lid hinges from a Cadillac STS. That's right, we no longer have to worry about the hood coming down and smashing the back of our heads while attending to the engine.
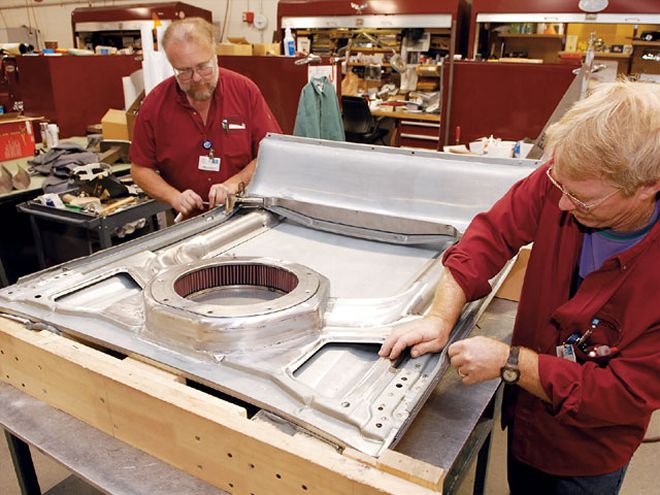
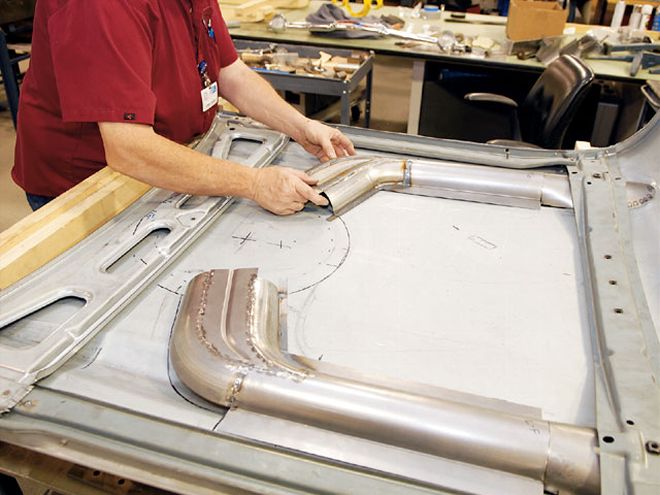
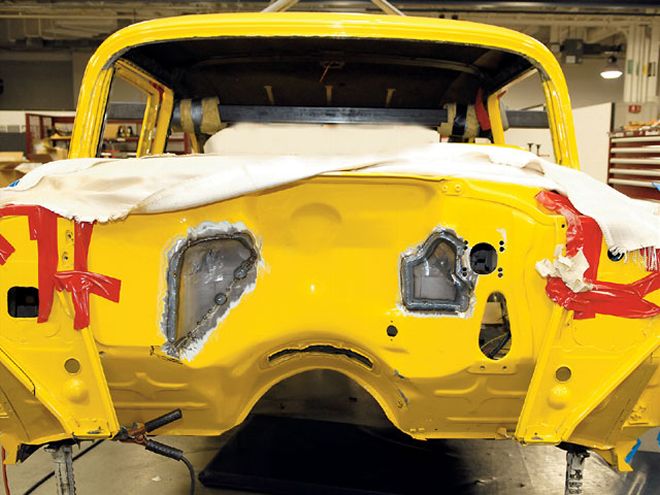
Custom Firewall
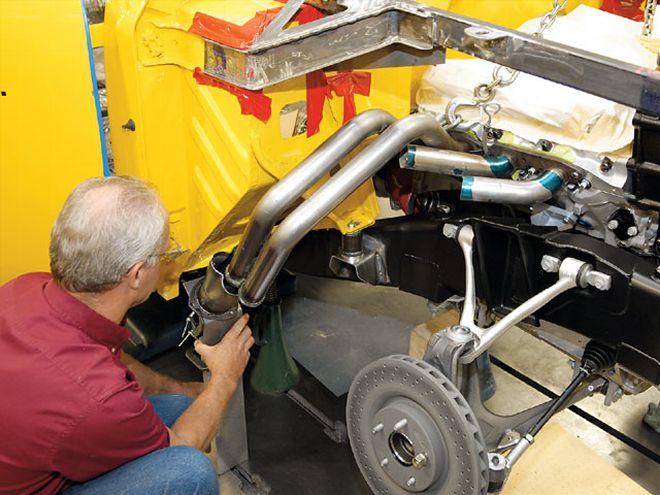
In 1955, the shoebox Chevy came loaded for bear with a 265-inch small-block V-8-the first of many. And while Project X came from the factory packing a six-shooter, the hot iron for '57 was the 283-inch small-block Chevy. The small-block grew in size steadily over the next 50 years, however, the amount of space provided for the engine in a '57 Chevy was still designed for a small-block. So when car builders try to stuff a blown small-block with big headers, or as in our case, a big-block under the hood, you suddenly start looking for areas to grow the engine compartment. The width is there, but with a longer engine, you run into problems.
Taking into consideration the size of the aluminum Anniversary Edition 427 big-block, plus the super-trick exhaust that was in the works (side-exit exhaust is detailed later), the GM team knew that they'd have to get into the firewall. Project leader Mike Copeland leaned on his math data team hard for this one. He had them scan our original Ram Jet 502 crate engine to use as a reference guide for the shape of the Anniversary Edition 427 big-block. The Ram Jet got the GM team close, but they still had to get back into the initial build once the 427 showed up and the distributor was a different size.
Still, the firewall conforms to every line of the 427. When you look over this car, you might actually miss the hours of work poured into the firewall, but then you start to see that it frames the 427 like a velvet-lined jewelry box drawing your eye to the engine.
Time to build: Six weeks
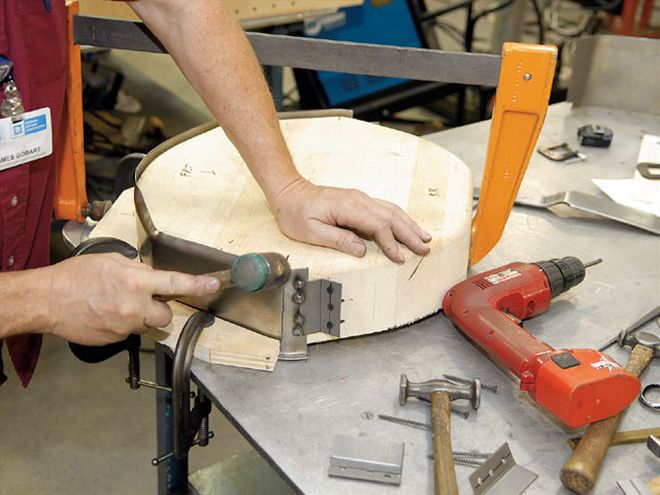
Hardest part: The real art to this project is that every piece of the substructure had to be hand-fabricated. Starting with a wood form (hand-carved of course), the team shaped, welded, and hammered this factory-appearing piece into the underside of the hood.
Pro's tip: After removing the inner structure of the hood, a wood frame was built to support the hood while it was being modified. The fixture is built from 2x6-inch pieces of pine. The original metal was reformed to expand the openings. Aside from making the openings larger, there was no cutting or welding on the outer surface of the hood.
GM employees: Jim Gobart took the lead on the hood, and Michael Hair did the hood hinge and latch mechanism.

Cold Air Spears
As if a functional ram-air hood wasn't cool enough, the artisans at GM Performance Division wanted to go one step further, adding the crowning touch to the craziest '57 Chevy hood ever built. They turned to GM Design to come up with an updated "bullet" design to act as the jewelry that pulls attention to their craftsmanship on the hood. Design studied the original hood ornamentation, used the math data for the new hood design as a reference point, and then drew up new "spears" to fill the ram-air opening on each side. Again, this design strategy holds true to the timeless '57 design, but it brings it up to date with the ram-air technology-and it just looks so trick!
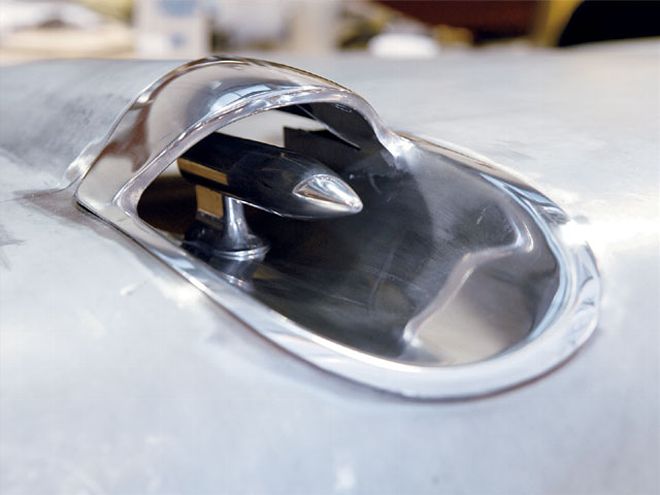
Time to build: Two weeks
Hardest part: Hand-forming metal in a hood that was already custom
Pro's tip: Don't be afraid to trial fit and repeat.
GM employee: Brian Alfonsi
Time to build: Six weeks
Hardest part: Changing distributors mid project
Pro's tip: Make sure that you have your engine complete with all accessories before you start cutting. If you decide to change valve covers or distributor, then it could lead to disaster-or just a lot of extra work.
GM employees: Mario Orlando, Jim Ostrand, Kevin Schultz, and Jim Gobart
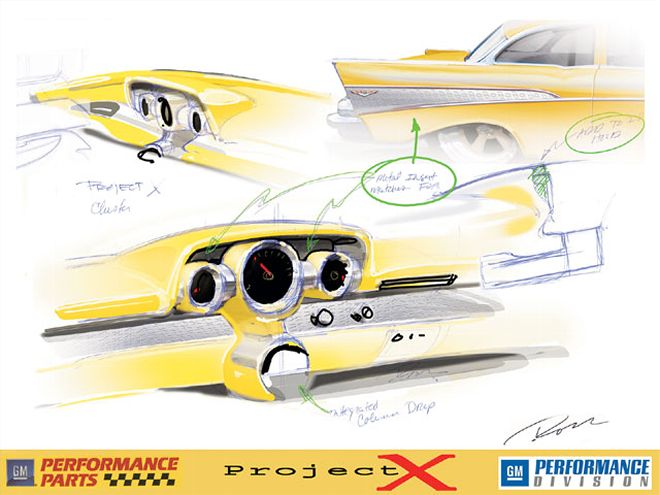
Gauge Pod
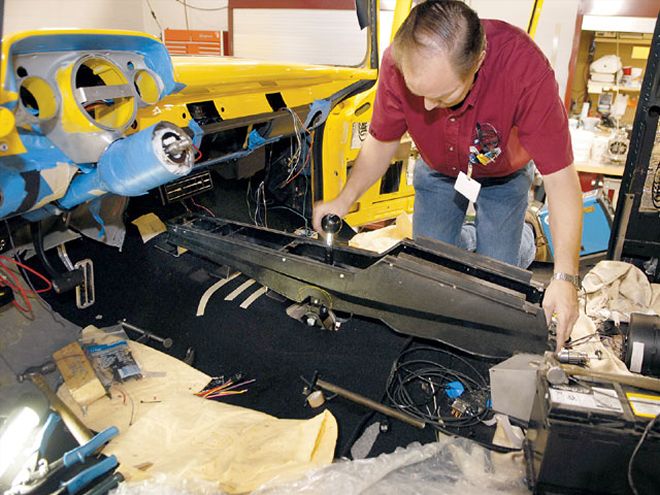
The instrument panel (or IP) has come a long way in 50 years. With GM design leading the way on today's production vehicles, GM Performance Division wanted to bring today's state-of-the-art GM interiors inside Project X. One problem that they faced was that the stock '57 dash has the gauges mounted in an upward-facing position-that is, the gauges are not protected from sunlight as they rest in the stock dash. The GM team wanted to mount the gauges in a more shaded area with a better angle for reading. What they ended up doing was adding material to the stock dash eyebrow. Within that hand-crafted area now resides a full set of electronic gauges.
The gauge pod is just the start of the modernization that took place on the interior of the '57. The GM team also added air conditioning, a tilt wheel out of a '64 Impala, and a Hurst shifter for the Richmond five-speed. After a full analysis of driver positioning (yes, just like a current production Chevy Malibu), all of the creature comforts were positioned for optimal use.
Time to build: Three weeks
Hardest part: Integrating a Kenwood XM radio and navigation system into a 50-year-old dash. (Are these guys nuts?) The car has a complete Kenwood audio system, with a touch screen built into the roof above the mirror. This touch screen also controls opening the headers, opening the deck lid, and turning the foglights on.
Pro's tip: Like all aspects of this car, a little bit of planning will go a long way. Just like any exterior changes to the car, it makes sense to map out what you want on the interior. This is especially true if you are mixing and matching several advanced electronic systems as they did on Project X. Plan your work and work your plan.
GM employees: Jim Gobart, Jim Holcomb, and Mike Hair
Mustache Bar and Bumper
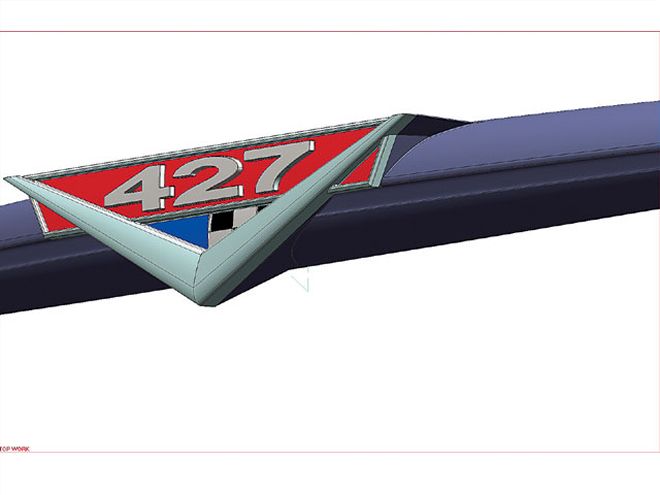
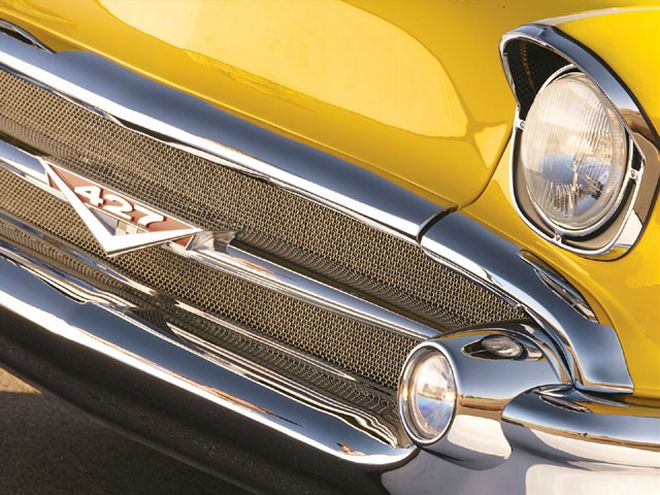
The distinctive front end (and the chromed-to-the-max front grille in particular) is one of the most defining features of the '57 Chevy. The GM team certainly didn't want to take away from the original design, but they did want to bring it up to date. Plus, a distinctive grille would make the perfect place to announce the arrival of the Anniversary Edition 427 big-block crate engine.
The custom "427" logo was drawn by Dave Ross, and the team was off and running. Using that as a starting point, they drew (in math of course) a blended "mustache bar" that would incorporate the "427." The result is an incredible interpretation of how an American icon would have come from the factory with a 427 under the hood.
Also, the front bumper was stripped of all its chrome, refined to fit together like a glove, and the bullet bumperettes were modified to hold foglights. The whole bumper is so subtle, it almost looks like it should have back in '57.
Of course, you don't just order any of these pieces from your favorite '57 Chevy restoration shop, but you can build them if you have the type of blueprint that the GM team was working from. They started with a production grille and bumper, then worked it into the designed pattern. Once the metalwork on the spear was done, it was off to the chrome shop, and then back to Warren to have the "427" logo installed. That logo, like all of them on the car, was CNC-cut out of aluminum, and hand-painted by GM employees.
Time to build: Four weeks
Hardest part: Incorporating the new GM Performance Parts Anniversary Edition 427 logo into a one-off front grille
Pro's tip: With projects like this, it makes sense to draw out the original area that you want modified, and then draw gradually differing versions. Eventually, you get to a point that makes sense for the car. Most original designs can be made better with an eye towards aerodynamics or just fashion. It's your hot rod-you make the choice.
GM employees: Dave Ross did the design, Ira Holcomb did the mind-numbing detail work, and Matt Furness took care of the CNC components.
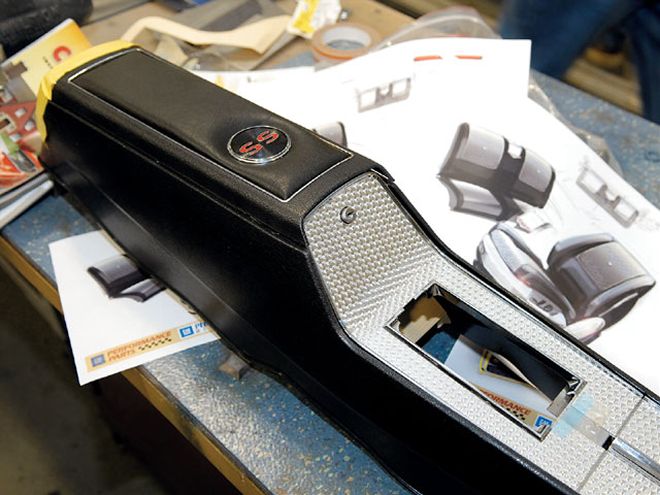
Center Console
Continuing with the interior, Copeland had his gang order some Cadillac STS bucket seats to use in the Chevy. They removed the headrest, cut them down 2 1/4 inches, and had them upholstered with period-patterned material. GM used the skills of Pat Russell (www.pjstrimshop.com) to round up the upholstery and materials. Pat also finished the carpeting and most of the interior, but what do you put between those big, beautiful seats? Ross, Copeland, and crew put their heads together and came up with the full-length center console out of a '64 Impala. It offers the correct look for the job, and the GM team shaped it to fit into the desired location. Again, the exterior pattern was extended through the console for a perfect, finished look.
Time to build: Two weeks
Hardest part: Bringing the timeless '57 Chevy exterior trim pattern into the interior without making it look too overdone
Pro's tip: Don't be afraid to try chrome trim and textured patterns on the inside of your hot rod.
GM employees: Thomas Houck, Stephan Fancher, and Tom Seefried

Rear Seat WaterfallM
This could just be labeled "interior," but there are so many aspects of the interior that we wanted to draw attention to just one area in particular. When GM got Project X, it had racing buckets, a tacked-in 'cage, and a flat factory dash with aftermarket gauging. Then Dave Ross and Mike Copeland got involved. With the dash and console brought up to speed, they started focusing on the transition of the exterior of the car into the interior. Think of it as a continuation of the experience the driver has as they walk to the car, open the door, and get in. GM wanted it to work together seamlessly (with a consistent look and feel) just like today's production cars from General Motors.
Part of this transition experience was to continue the lines of the dash through the console, and then cap it off in between the back seats with a "waterfall" reminiscent of higher-end Chevy models of that period.

Time to build: Four weeks
Hardest part: Picking modern-day materials that match the look of a 50-year-old hot rod with the feel of today's new interiors
Pro's tip: Take a look at what GM's new interiors have to offer. Pay particular attention to the materials, and fit and finish. Now go back to your car and see if there are any interior parts that you'd like to have in your car. Put all of that together in one design and you'll come close to having what Project X has here.
GM employees: Dave Ross (design), Jim Ostrand built a wooden form to use as a guide to metalwork the sheetmetal for the waterfall.
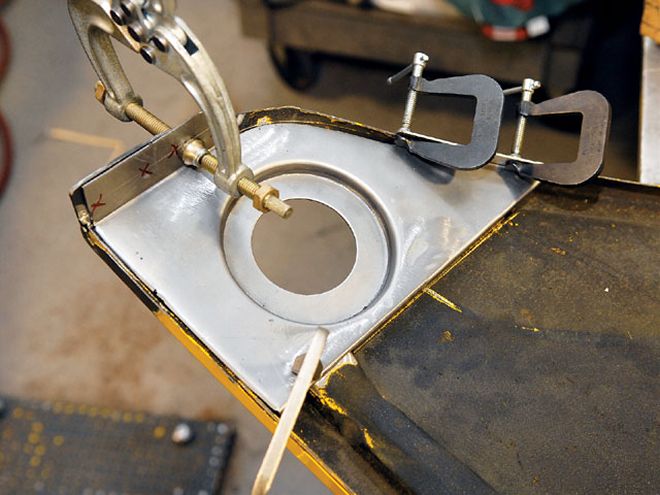
Side-Exit Exhaust
"It has to have side exhaust," said Mike Copeland in one of the initial meetings on this car. His love for Project X clearly gushing, we waited to see what the GM team had in mind. Fitting to this modern build, they came back with a subtle stainless- steel plate that would house the quick-exit exhaust coming off of custom-bent long-tube headers. The build included routing each pipe into a collector that surrounded an open exhaust valve that was integrated into a stainless-steel panel. That panel was then worked into the front fender for a perfect fit.
In the end, the side exhaust has become the crowning jewel of this car. Cruise the street in style, but when it's time to ruffle some feathers, hit the button that says "open," and all hell breaks loose as the 427-inch big-block screams for all it's worth.
Time to build: Four weeks
Hardest part: Integrating the electronic controls for the exhaust valve into the onboard navigation system. We still don't know how they did this one.
Pro's tip: Go slow on this one. Double and triple check every bend and every final point of attachment for the header primaries. If you mess up at the header flange, it only gets worse at the collector.
GM employees: Derin White and Tom Seefried learned how to thread the needle with exhaust tubes!
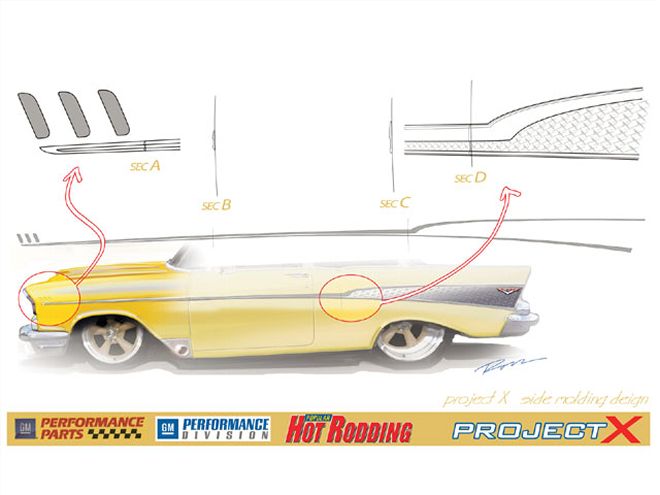
"X" Etched Details
We knew that Project X was going to retain its 210 trim level-a requirement from our editorial staff. Among the early Dave Ross designs was one that caught our eye because it had a distinctive "X" pattern laser etched into the metal that was then surrounded by fresh trim. Ross drew in oh-so-subtle changes to the path of the chrome trim, then filled them in with this custom "X" pattern. As it turned out, the GM team ended up creating math data for all the trim, putting that into a CNC machine, and then custom-cutting one-off Project X trim out of polished billet aluminum. Meanwhile, the fill trim with the "X" pattern was being laser etched to match trim panels and complimenting the rear quarter-panels to perfection. The end result is pure automotive artistry.
Time to build: Three weeks
Hardest part: CNC-machining one-off billet aluminum trim panels that are seven feet long
Pro's tip: This one is not for the do-it-yourselfer, but we've had limited success with our local waterjet shop, which does laser etching on a smaller scale. Check your local yellow pages-you'll be surprised at what you might find.
GM employees: This one was all in the wild mind of Dave Ross, and the math data wizard, Jim Popiel. It was installed by Jim Gobart, Tom Seefried, and Jim Ostrand.
Time to build: Two weeks
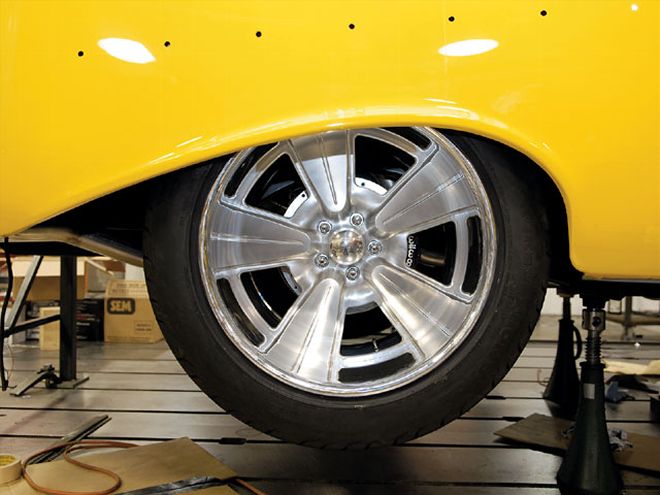
Hardest part: Taking a vintage design for a 15x7-inch rim and blowing it up to fit Mickey Thompson 31x16x20 steamrollers
Pro's tip: Want to design your own killer rim? Start looking at some 40-year-old issues of PHR-you never know where inspiration will come from.
GM employees: Dave Ross and Mike Copeland
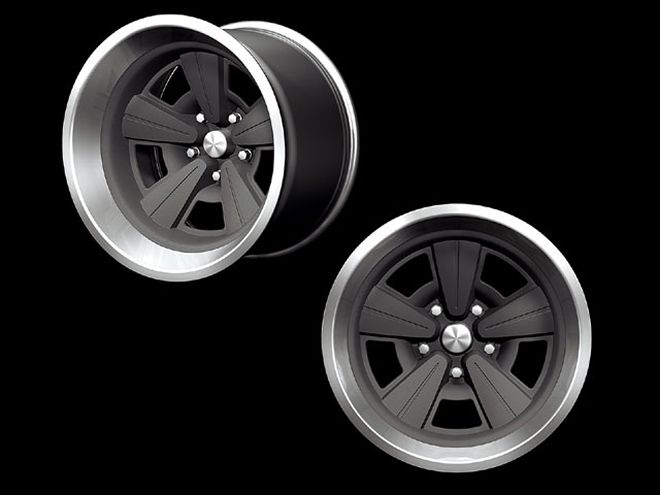
Wheel Design
Dave Ross, master vehicle designer for General Motors, has put his heart and soul into Project X, the same '57 Chevy that helped shape his life during his formative years. As the crowning jewel to what he describes as the highlight of his career, Ross went back to the original July 1965 Popular Hot Rodding issue that first featured Project X. In that issue, there was an ad for an aftermarket rim that he most assuredly had memorized as a boy. Ross took that pattern, updated it to 2008 standards, tweaked it to put his own subtle styling signature on it, and told Copeland to "print it."
Copeland had his contacts at Budnik study the design, and cut one-piece wheels off of that original Dave Ross work. Two weeks later, the 18x7-inch front and 15x20-inch rear wheels showed up at the GM Design Center in Warren, Michigan. We promise not to tattle if you call Budnik up for some copies!