
The art of hammerforming is probably one of the oldest in metalworking. It can also be time consuming, which is one of the reasons most hot rodders probably don't do it. The process involves not only being a skilled metalworker, but also a bit of a carpenter as well. In order to make a part, a buck or form of some kind must be made in order to form the metal around. This form is usually made from wood of some sort and can be more laborious than making the actual piece since the quality of the form determines the quality of the finished product. If the form is inaccurate, the piece will be inaccurate as well. But as far as fabricating parts and pieces using the hammerforming technique, the only limits are imagination and skill. Entire race car bodies were hammerformed from steel or aluminum before the days of composite materials made it simpler. Even though it's not likely you'll find too many guys knocking out an entirely hand-fabricated body out of steel or aluminum, it does still happen. Just check out SRM July 2004 for a Marcel-fabricated all-aluminum body built for Boyd Coddington dubbed the Aluma-tub. There's bound to be some hammerforming techniques that took place there. But what most builders are likely using the technique for is to fabricate on a smaller scale. Things like headlight buckets, hood scoops or blisters, replacement panels, or in this case, a taillight bucket that can be used either to raise the taillight off the body or to recess it, are being made using the hammerforming technique. We spent some time over at Don's Hot Rods with Tim Robbins and followed along as he hammerformed the piece for a '32 project they were building-take a look.
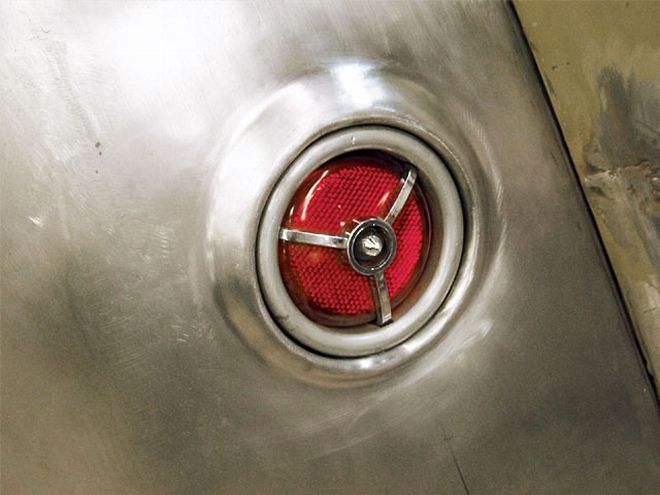
Here's an example of a finished product that was made using the hammerforming technique. The piece was hammered out using a form, then welded into the body.
Tim started out by making a pattern of the taillight using the bezel as a guide and cut it out of poster board.
He then transferred the pattern onto a piece of Melamine board and cut it out using a jigsaw. This would be the form our piece would be formed around. Tim used Melamine board because it is ideal for this process because it's lightweight, cheap, fairly strong, and the melamine coating provides a smooth, imperfection-free surface. Other wood can be used, but remember that any imperfection on the surface of the wood, such as knots or splintering, will reflect on the finished part.
The roughed piece was then cleaned up on a belt sander. This step is important because it ensures the edges are smooth and takes out any imperfections created by the sawing process. A radius can also be added to the top edge for more detail if desired.
Two holes were drilled into the top of the form and a smaller clamping block was also made and drilled to match. These holes would be used to align the form, clamping block, and work piece. The clamping block is about 1/4-inch smaller than our form.
With the form made, it's time to transfer the pattern onto a piece of steel that will eventually become the finished product. Tim uses 18-gauge steel and applies layout die to the surface before scribing his lines. The part that he wants to create calls for an 1/4-inch edge and this is determined by setting his scribe points 1/4-inch apart and then carefully tracing the pattern.
Once Tim has traced the pattern onto the steel, he's left with a gap at the bottom point. This gap is necessary because when the two edges are hammered down, the points will meet up and will be welded together.
With the part traced, it can then be cut out using a bandsaw, or in this case, a shear.
Using a transfer punch, Tim transfers the holes in the form onto the work piece and drills the piece out to the corresponding size of the dowel pins he will be using.
It is important to make sure the dowels are driven through the entire assembly.
The work piece is then sandwiched between the form and clamping block and two dowels inserted to keep everything aligned.
The whole assembly is then clamped to a hard, solid surface using C-clamps. Make sure the assembly is clamped very securely in place.
Once the assembly is clamped into place, it's time to get a-whackin'. Tim uses a plastic mallet to form the edges because it yields a cleaner side once the part is formed.
While the edges are formed, the metal wants to "pull" within the assembly, so Tim uses a finishing hammer to straighten the metal back into shape.
To define the edge, Tim uses the pick side of his body hammer and works the piece on an anvil until the edge is well defined.
The part is now formed and ready to fit to the lens and bezel. The finished piece can be used to either raise the taillight off the body or to recess it about a 1/4-inch. If we wanted to recess the taillight more, we would have added that amount when we traced the shape out onto the steel.
Now the hammerformed piece can be mocked up on the body with the complete taillight assembly. The next step would be to make another for the other side and then weld them into place. In this case, the pieces will also have to be cut in order to fit the taillight housings.
It is necessary to use both sides of the body hammer to work the piece into shape. Here he works the side smooth using the finishing end.
Don's Hot Rods
2643-B Dayton Pike
Dept. SRM
Germantown, OH 45327
(937) 855-3605
www.donshotrods.com