
Now that we have covered the goals and methodology of setups in Part 1, and caster, camber, and bumpsteer in Part 2, we now need to finalize our setup guide by examining the final phase of setting up our race cars, and that involves alignment.
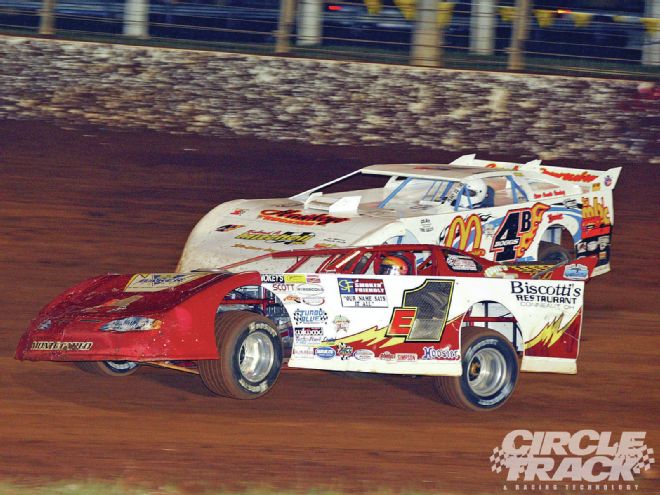 This photo shows several things about the alignment side of setup. First, it shows us that if the left front tire is off the ground, we needn’t be concerned with Ackermann or toe settings. And, if the rear is steering this much, we probably have moment center issues. In this final installment, we’ll learn how to finalize our setups.
This subject includes simple toe settings, Ackermann—which is toe change from steering geometry—rear alignment, and rear steer due to chassis movement. We can refine and perfect those items included in Parts 1 and 2, but if we don't finish out with these last items, all of our hard work will be for naught. We'll end up chasing our bad handling car like so many racers do week in and week out.
So, let's move on to alignment and as in past discussions, we'll do this in a practical order so that later routines don't interfere with our previous work. For instance, if we square the rearend perfectly and then adjust our right-side alignment, we then mess up our rear square. And, if we set toe and then adjust our Ackermann, the toe will change and we'll have to do it all over again. Here goes:
The Ackermann Effect
This effect is important because it can ruin an otherwise great setup. In this day and age, for both the dirt racers and the asphalt teams, modern setups dictate a closer look at many areas of chassis geometry and alignment. If we prioritize the various areas of concern, Ackermann would rank right up there near the top. More importantly now, modern setup trends in both dirt and asphalt racing dictate that we need to take a closer look at our Ackermann situation.
Years ago it was fairly common to see a dirt car with the left front tire up off the track in the turns or see tire temperatures on an asphalt car's left front tire that were the coolest of the four. These were the result of unbalanced setups where the rear suspension desired to roll much more than the front suspension. In those days, greater amounts of Ackermann could be desirable, or at least less harmful to our handling. If the LF tire is off the racing surface it can do no harm.
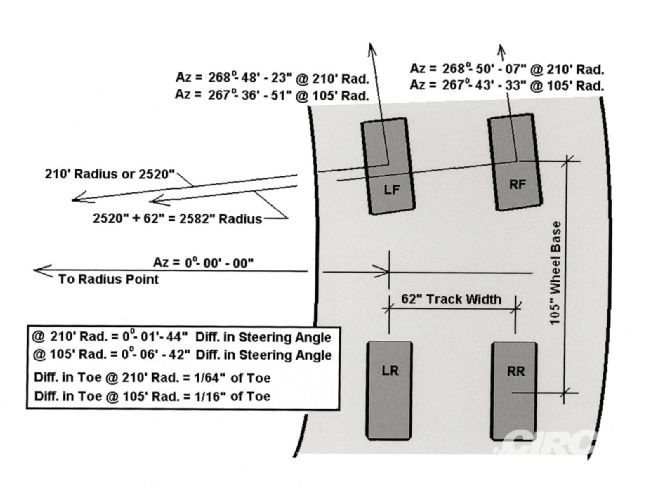 As we have shown before, a race car on a ½-mile or less sized track needs very little Ackermann so that the front wheels will track along their perspective arc. We’re talking about a fraction of a degree, not whole degrees.
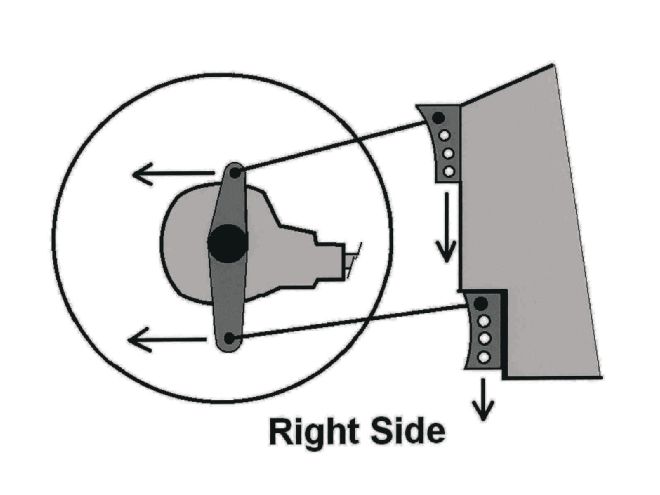
Ackermann effect is a mechanical phenomenon that is associated with an automobile's steering system. A steering design that incorporates Ackermann causes the inside wheel (closest to the radius of the turn) to turn a greater amount than the outside wheel. We do need a slight difference in steering angle between the front tires because the inside wheel runs on a smaller circle or arc than the outside wheel. The key word here is "slight."
Modern Day Trends in Setup
In today's racing world, the dirt cars are more balanced in their setups and the LF tire does much more work. This trend has made the dirt cars more consistent and faster under most conditions. With the asphalt teams, we see a move toward larger sway bars, softer springs and stiffer RR springs. This arrangement causes the LF tire to be much more in contact with the racing surface, carry more loading, and to work harder than ever before. If the front tires don't track exactly where they should, there will be problems getting the car to turn.
The truth is, we need very little Ackermann effect in most situations when racing on an oval track, be it dirt or asphalt racing. Even on very tight quarter-mile tracks, the LF wheel will only need an additional 1⁄16-inch of toe over the RF wheel to correctly follow its smaller radius arc. That is 0.112 degrees or a little more than 1⁄10 of a degree.
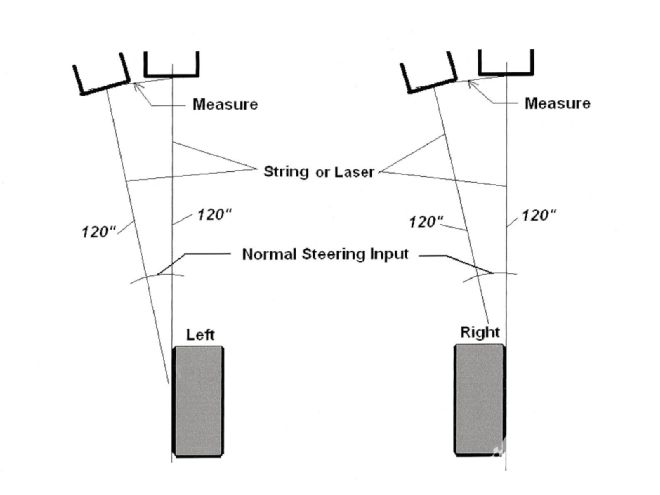 To check Ackermann, we can use laser systems or strings. The string method is just as accurate because we are multiplying the effect three or more times. This method is simple and quick, leaving no excuse for not knowing your Ackermann effect amounts.
How to Check For Ackermann Effect
There are a few ways to check for excess Ackermann in our race cars. The best way is to use a laser alignment system to measure how much each front wheel turns and compare the two. The laser system can also be used for rearend alignment, right-side tire alignment, and bumpsteer.
A less expensive, but adequately accurate method is to use strings to measure your Ackermann. I have used this method and, if done carefully, it will yield the results we're looking for. Almost everyone has used strings to align a race car. A string pulled tight is always straight, we can count on that. So, if we pull a tight string across the outside of each front tire sidewall and extend the string to the front 10 feet, we can take the measurements necessary to see how much Ackermann we have.
The procedure is as follows: 1) Put the front wheels straight ahead. 2) Pull a string across the outside of each front tire (avoid the lettering portions of the sidewall) and place a mark on the floor (on a piece of masking tape) where straight ahead is. 3) Turn the steering wheel approximately the same amount the driver would in the turns where you race. 4) Again, make a mark on the floor at 10 feet where the string extends from the outside of each front tire. 5) Measure the distance between each set of marks for each wheel and compare the left wheel with the right wheel.
The Ackermann Toe Chart shows how much toe gain relates to differences in the left and right wheel measurements for different size tires. We can average the left and right tire sizes and look at that number when finding our Ackermann on the chart. Remember that if the left wheel moves farther than the right wheel, then we have Ackermann, or toe gain. If the right wheel moves more than the left wheel then you have Reverse Ackermann or loss of toe.
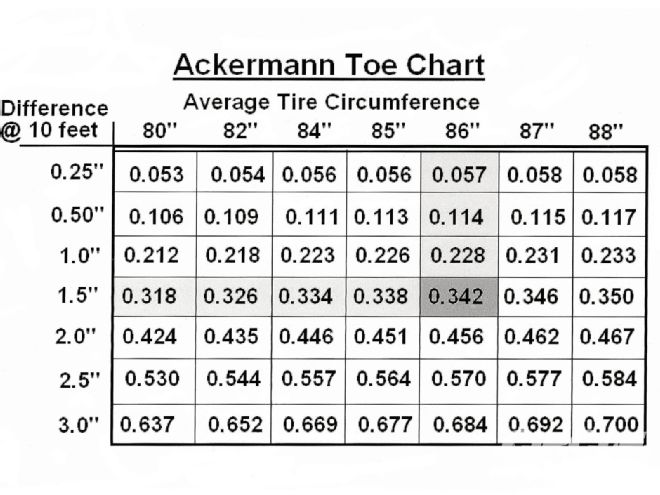 This chart will help you determine how much added toe you’re getting when you turn your steering wheel at mid-turn. This is based on measuring the steering amounts 10 feet in front of the center of the wheels and for each tire circumference. Toe gain of 0.125 or more is excessive for most tracks.
Solving the Excess Ackermann Problem
If your car gains or loses toe, there are a couple of ways to correct the situation. You can adjust the length of one or both of your steering arms to compensate for Ackermann effect. This works best for a car where the steering wheel is always turned to the left as opposed to a dirt car that sometimes has the wheels turned to the right too.
Lengthening the left steering arm, and/or shortening the right steering arm will reduce the Ackermann effect. We can also change the position of our drag link to move the inner ends of the tire rods forward to reduce Ackermann or rearward to increase it.
For a rack-and-pinion steering system, moving the rack forward in relation to the outer tie-rod ends will reduce Ackermann. Most Dirt Late Model cars use the rack systems, so we don't have the convenience of only having to improve our Ackermann effect in one direction, it must be correct for left or right turning of the wheels.
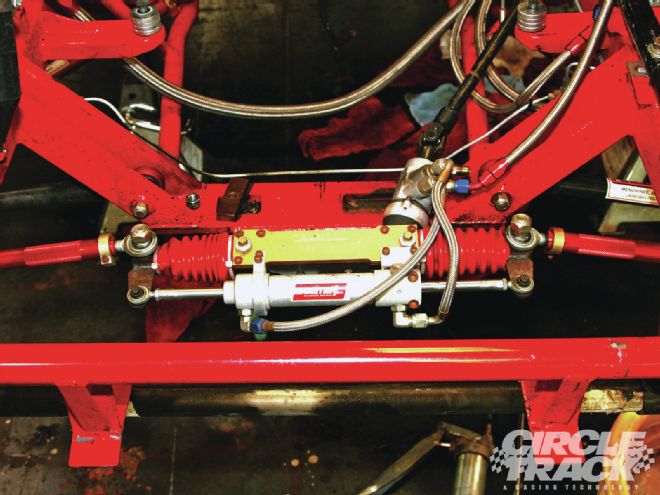 To regulate the amount of Ackermann in a rack steering system, we can move the rack fore or aft to compensate for the widening of the tie-rod ends when we steer the car right and left. When the tie rods are more parallel from a top view, there is less Ackermann. This method of adjustment works best for dirt cars that turn both right and left.
Asphalt Late Model cars are also designed with rack systems. Instead of changing the length of the steering arms, it might be best to move the rack and keep equal length steering arms when working to reduce excess Ackermann.
Make sure you know how much each of your tires are steering and reduce the Ackermann effect if needed. Then, when you balance your setup, both front tires will be working in perfect alignment to steer your car. A good steering race car is one that will have more turning power and is therefore more capable of running up front and winning races.
Adjusting Rear Steer
Before we align the entire car, we need to address the issue of rear steer. Making adjustments for rear steer will affect our alignment, so we do those first before we align the car.
How we design and place our rear trailing links has a lot to do with how our car will handle. As the car moves vertically and rolls, the rearend will most likely steer to a certain degree depending on the design. Rear steer design goals are very different between dirt cars and asphalt cars.
 Rear steer is caused by the motion of the rear portion of the chassis in dive and roll where the rear links cause movement of both the rearend, and rear wheels, to the front or back. A system can be designed for minimum rear steer, or a calculated degree of steer if that is what is desired. It’s the angles of the links that determine the degree of steer.
On asphalt, we can only tolerate a very small amount of rear steer and most of the time we are better off with close to zero rear steer. On dirt, some teams incorporate lots of rear steer to the right into the suspension. The degree of steer is directly proportional to the amount and direction of vertical movement associated with the right and left rear suspension systems.
We can simulate the degree and direction of rear steer in our race cars by duplicating the movement of the rear suspension. If we take visual reference to the position of the wheels in the wheelwells during cornering, we can get sufficiently close to replicating the suspension attitude of the car in the shop.
We could then support the chassis at levels similar to the way the car looks on the racetrack and then measure how far each rear wheel moved and in what direction. It may surprise many how far the rearend steers under some conditions.
If more or less steer is desired, changes can be made to trailing arm angles, and so on as you're simulating the rear steer and the results can be measured. This is an excellent way to learn how arm angle changes relate to rear steer magnitude.
Aligning the Car
Now that we have checked and adjusted our car for Ackermann and rear steer, the final step is to align the car. This includes the front toe settings and rear wheel alignment, which involves rear squaring and right-side tire contact patch alignment.
 The True Laser Track system was one of the first and is still a relied upon system that will help you align your race car. Alignment can be attained by several methods including using strings and by the use of laser systems. There are several good systems on the market today that will aid in the alignment of your car.
There used to be only one reliable way to align a race car and that was by using a string and either measuring to the tires at hub height or at the floor by creating right triangles on the floor to measure from. That is still a viable way to do it and necessary for the lower budget race teams.
A quicker and more accurate way to align the car in all areas is by the use of a laser system. The key to maintaining accuracy in a laser system is to be able to check the tool to make sure the beam is truly tracking at right angles or parallel to the mounting device. This must be done each and every time we use the tool to check alignment. The following are the steps we use to align the car:
Step 1, Wheel Runout Check
Check both the front wheels and the rear wheels for runout. This means that as the wheel rotates, the outer edge of the tire may wobble slightly. We must compensate for this slight distortion by finding the extreme high spot at a point equal in height to the hub height.
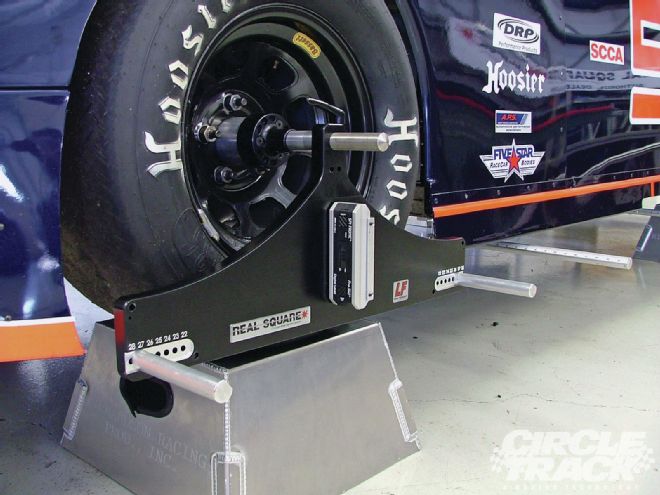 Real Square is an alignment system that has been around for a few years and the designers of this system have been continually improving it and adding features.
We can simply use a jackstand to hold the measuring tape steady and then rotate the tire noting the distance from the stand. Once we locate the high point (seen as the least distance to the offset), we mark it with an arrow and then rotate the tire (be it front or rear) so the arrow is at the top, pointing straight up.
Now, check the toe at the rearend. Use toe plates or toe bars for the "analog" method and the laser systems for a more accurate assessment. Even small amounts of toe-in or toe-out are not acceptable. Be careful how each person holds the toe plates so that the measurements are consistent. Do the measurement several times to ensure accuracy and repeatability.
When using the laser systems that attach to the hubs, remember to thoroughly clean the surface of the hub and make sure there are no protruding threads from the bolt holes. It's recommended that you go over the hub surface with a flat file to eliminate any bulges or protruding edges of metal that would cause the laser to not be aligned properly.
Follow the manufacturer's recommendations for setting up the laser systems. Remember that the accuracy of the measurements is directly related to how closely you follow the directions and how carefully you read the system. There's a logical progression to alignment and each company has put a lot of thought into the methods. The end results, if properly applied, will be the same.
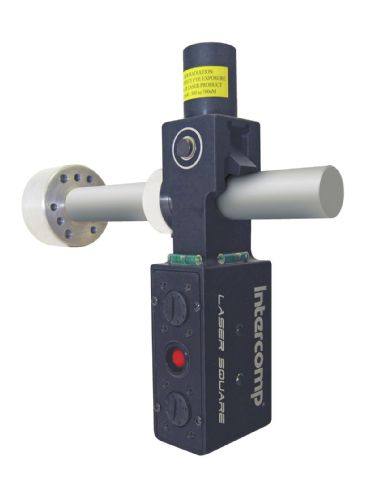 Intercomp has just completed the design of its new and comprehensive alignment system, the Laser Square Gauge and it’s available now.
Step 2, System to Frame Setup
Once the rear wheels have been toed straight ahead, square the laser system to the frame. Most car builders will align at least one framerail parallel to the intended centerline of the chassis. It may be located on the right side or as the weight box on the left side next to the driver. You can also align the laser system to the centers between the front and rear clip rails closest to the main framerails.
For the analog method, this setup can also be done using strings. We will set up a "box" with strings on each side and at the front and rear. We use plumb bobs to make marks on the floor off the outsides of the framerails or the front and rear clip rails. For perimeter cars, or ones with no offset in the chassis, we can split the measurement between the front and rear clip rails closest to the center section to find the centerline of the chassis.
For offset chassis, we'll be able to use a straight rail, or we could again split the clip rails. Measuring between the marks, we can split the distance in half and place a mark at the halfway point, or at the centerline of the car.
Step 3, Center the Steering Box/Rack
Center the front steering rack. This is done by turning the steering wheel lock to lock and back half the number of turns from full lock in either direction. Once mid-rack (or mid-box with drag link steering) is found, lock the steering shaft with two Vise-Grip–type pliers against the frame.
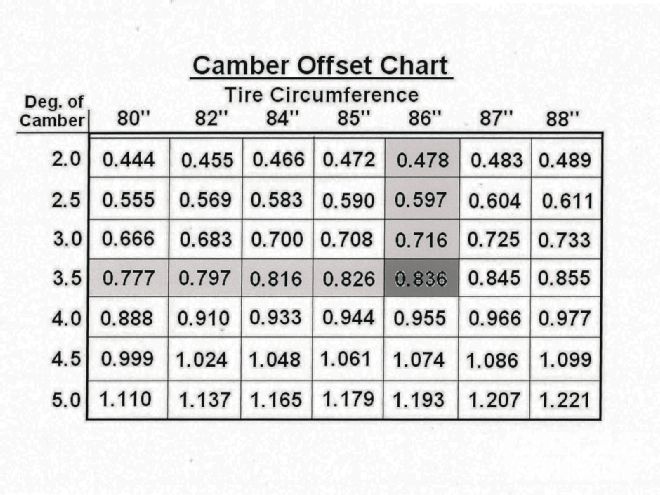 This chart will help you determine your measurements for offset to the right side tires. The cambers of the front, and sometimes rear wheel will affect the measurements needed to align the right-side tire contact patches. If stringing or using a laser at a height equal to the hub height, an offset will be needed to compensate for the cambered offset of the tire contact patch.
We want to make sure the steering is centered and the wheels are pointed straight ahead. Once the steering box has been set to center, adjust each tie rod length so that the right and left wheels are pointing straight ahead. With the laser systems, this is done quickly and accurately.
With the string method, run a string down each side of the car at hub height and parallel to the centerline you have established. Then, simply measure to the side walls or wheel rim of each front tire with the tape measure and make both front and rear measurements equal by adjusting the tie rod lengths. We can set our race toe later on after we have aligned the car.
Step 4, Right-Side Tire Contact Patch Alignment
Once the front wheels have been adjusted to point straight ahead and parallel to the centerline, we need to align the right-side tire contact patches. We do this by using our laser systems as described in the user manuals for each system.
 When aligning the wheels, you can install links equal to the shock length to hold the rearend and front hubs in a position equal to when the car is at ride height. This allows easy access to the adjustment points by allowing removal of the wheels.
Adjust the Panhard or J-bar length so that the right-side tire contact patches are inline, or if your desire is to offset these, set the desired amount. This means that we'll either have both right-side tires lined up or at least know what our offset is. For stock classes using rear suspensions that are not adjustable, you'll need to run different offset wheels to achieve right-side tire alignment.
When using the string method, we need to compensate for the camber of the wheels which moves the tire contact patches out. At the hub height, if we line up the tire sidewalls, the RF tire contact patch will be outside that line due to the negative camber present in the RF wheel. The rear wheel may also have camber due to a cambered rearend or just the stagger. Look at the chart to estimate how much to compensate for the cambers. Subtract the compensation amount from the offset read at the rear wheel, or add that number to the front measurement, to find how far from the string the wheels need to be in order to line up the right-side tire contact patches.
As we adjust the rearend side to side, there's a possibility that the rearend alignment will change as the rearend moves laterally. That's why we do the right-side alignment first. We'll now need to check to make sure the rearend is perpendicular to the chassis centerline and if not, adjust it.
Step 5, Rearend Alignment
Once the right-side tire contact patch alignment has been done, we can then square the rearend. The rearend should always be set perpendicular to the centerline of the car. We do this with the strings by creating a line that is perpendicular to the centerline we have already established. Using a simple 3-4-5 right triangle with the lengths doubled, we can measure off the centerline to establish our line to measure to the rearend.
 A quick and easy way to adjust for Ackermann is to adjust the steering arm lengths with the use of slotted holes in the steering arms. On a dirt car, you must adjust both so that your Ackermann will be equal for right and left steering.
When using the laser systems, follow the manufacturer's guidelines for doing that. The lasers will accurately measure the alignment referencing the chassis centerline.
Step 6, Setting Front Toe
The last step in the alignment process is to set the static toe at the front wheels. We can use toe plates to do this or the laser systems. Remember to be careful and accurate and do the measurements several times to be sure of the numbers. Adjusting the left side tie rod only to set your toe is a method I personally like. You can also split the toe between the left and right wheel.
Roll the car forward and back about 5 feet and recheck the toe setting. As the car settles, the overall measurements may change, but the differences should remain the same. Remember that for toe-out, the front measurement will always be more than the rear measurement on the toe plates. If you're using a string or laser to check your toe-out, the opposite is true. The front measurement from the laser/string would be less than the rear measurement. I know one crew chief/car owner who got this backwards too many times.
Conclusion
If you follow these simple but effective steps in setting up your race car, you'll be well on your way to success. Remember that it's the team and driver who must take this the rest of the way. Work on maintenance to reduce parts failures, driver training to be able to turn the fastest laps possible and endurance to make sure you finish each race.