When Chevrolet introduced the 300-horse LT1 (Gen II) fuel-injected small-block in 1992, it was a more-advanced small-block Chevrolet V-8. In fact, it was a completely redesigned small-block Chevy. The LT1 was a 350ci (5.7L) small-block, which was a cut above the Tuned Port Injection 5.0L small-block first introduced in 1985. The TPI set a new benchmark for performance when it debuted in the white-hot IROC-Z Camaro. It offered incredible performance coupled with something unheard of with high-performance V-8 engines of the era: fuel economy. Port fuel injection coupled with roller tappet technology made the TPI a quantum leap in performance.
The new Chevy Gen II LT1 took TPI to the next level with features that made it a vastly improved small-block. The objective was reduced emissions and greater amounts of power. GM did away with the belt-driven water pump and rear HEI distributor. Replaced instead with a camshaft-driven, reverse-flow water pump and something new in electronic engine control: Opti-Spark.
Opti-Spark was a pancake-style, light-triggered electronic distributor positioned beneath the cam-driven water pump. Two types of Opti-Spark ignitions were produced: unvented (1992-’94) and vented (1995-’97). Reverse-flow cooling (three water pump types) was adopted to compensate for the higher 10.5:1 compression ratio and leaner fuel mixtures.
Chevrolet’s selling point in technology would also be the Gen II LT1’s undoing. Opti-Spark was plagued with reliability problems that haunted a lot of Corvettes, Camaros, and other models throughout the 1990s. Oil leaks around the water pump drive not only spotted driveways, but Chevrolet’s great reputation for reliability and performance. Between GM’s efforts, and the aftermarket’s, these problems aren’t as bad as they used to be. However, they have to be a priority during your LT1 build.
Despite the LT1’s engineering shortcomings up front, it was a terrific factory small-block sporting a nodular iron crank, powdered metal connecting rods, and hypereutectic pistons. In 1992, the LT1 yielded 300 horsepower. By the end of production in 1997, it was making 330 factory ponies in the LT4.
The Block
GM made two types of Gen II LT1 blocks in the 1990s: two-bolt main and four-bolt main. Four-bolt main versions were factory installed in Corvettes primarily. But, expect to see a four-bolt main block in just about anything. Because they both have the same casting number, they are impossible to identify without removing the oil pan. Although most LT1 engines had aluminum heads, it is important to remember there are LT1s with iron heads found in fullsize GM sedans of the era. Caprices had similar-looking small-blocks that weren’t LT1s at all, but rather 265ci (4.3L) L99 engines. These engines are easily identified by their smaller 3.740-inch bores. Don’t accidentally pick one of these up for your LT1 build project.
When we decided to build a Gen II LT1 383ci stroker, we understood it was a significant turning point in the small-block Chevy’s 37-year history. It would also be the small-block Chevrolet’s curtain call—the end of a very successful design run that would end on a mass scale at the 42-year mark. The thing is, Chevrolet never really stopped building small-blocks because they’re still available as crate engines from Chevrolet Performance. And if you’re into numbers, Chevy has built well in excess of 90 million small-blocks since 1955. It is easily the most common V-8 engine ever produced and distributed around the world.
We decided to build a solid, reliable LT1 383ci stroker to see just how much power we could make from GM’s 5.7L engine. Mark Jeffrey of Trans Am Racing in Gardena, California, volunteered to build the LT1, with the objective being 450-plus horsepower, with a broad, stump-pulling torque curve. Mark had Air Flow Research cylinder heads in mind for our LT1 build along with an aggressive street cam package that would be good for the commute and the racetrack. However, we were thinking more along the lines of something stealthy—stock in appearance, using as many genuine GM parts as we could on the surface. We contacted Summit Racing to see what it suggested. We also called Coast High Performance, MSD Ignition, and Comp Cams for inspiration.
We contacted Summit Racing for tech support and they suggested building an LT4 with the better heads and induction package. These folks aren’t just sales people, but are real car people who spend their off time building cars. This made it easy to converse with them about the LT1.
Thanks to a 383ci stroker kit from Coast High Performance, a hot roller cam kit from Comp Cams, and custom port and bowl work from Mark Jeffrey at Trans Am Racing, we were able to take a 300-horse LT1 and turn it into a 475-horse powermeister. Though 475 horsepower doesn’t seem like much in this age of 600-1,000-horsepower Camaro/Corvette rocket ships, 475 horsepower is plenty for street use and the daily commute.
Let’s get started.
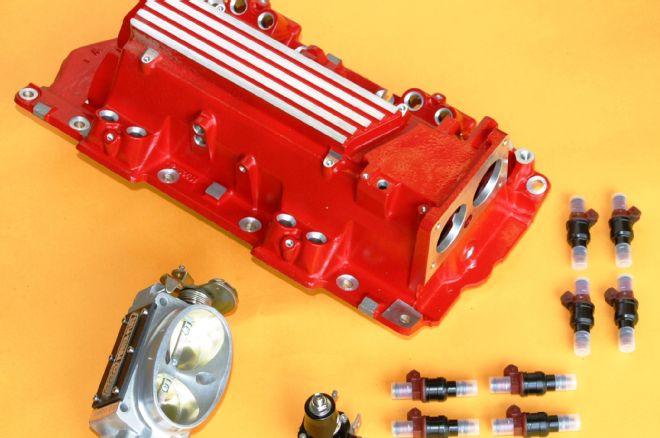
01. Because we wanted our LT1 rather stealthy on the surface and mighty underneath, Summit suggested the Chevrolet Performance LT4 package for our LT1. This is the LT4 induction system with red powdercoating. Because we are building a 383ci stroker, Summit suggested 30 lb/hr Ford Racing fuel injectors. A larger BBK 58mm throttle body increases airflow and is compatible with the LT4 intake. An Aeromotive adjustable fuel pressure regulator arrived with the rest of the induction system. Tuning the regulator will happen when we go to the dyno. Three LT1 manifolds were produced over the course of Gen II production: the 1992-’93, the 1994-’97, and the 1996-’97 LT4. The LT4 manifold is clearly different with raised ports matched to the LT4 cylinder head with a different gasket.
LT1/LT4 Cylinder Heads
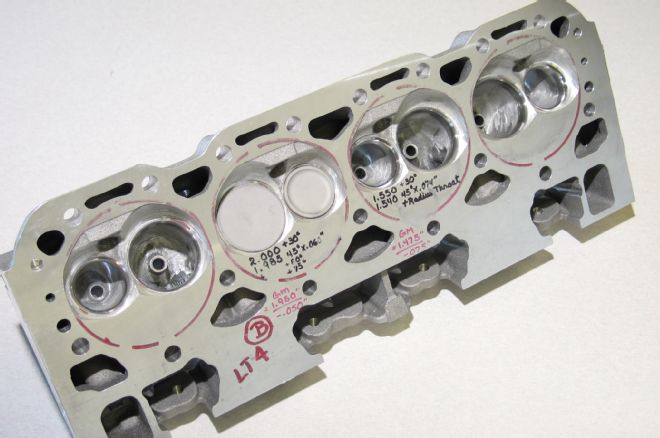
There are a total of 14 different Gen II cylinder head castings out there to choose from. Six are cast iron and eight are aluminum. Ideally, you will score a pair of LT4 cylinder heads—casting numbers (CN) 10239902 or 12555690—both 1996-’97 model year castings. There are six LT1 aluminum head castings, with all basically being the same with no real clear advantage from one over another. It is suggested you opt for the 1996-’97 LT1 casting if you can find it: CN 12551561.
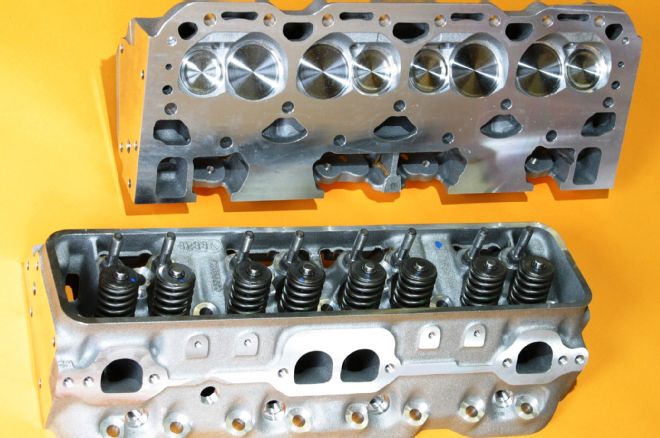
02. Externally, the Chevrolet Performance LT4 aluminum cylinder heads look the same as the LT1 castings. However, inside they yield sizable improvements—like larger sodium-filled 2.00-inch intake and 1.55-inch exhaust valves. If you’re feeling disappointed at these valve sizes, remember what they do for torque, which is paramount here. Chamber size is 54.4 cc, which works quite well with our 383-inch stroker kit with dished pistons. This puts the compression ratio around 10.8:1. Other improvements include larger ports with raised ceilings for better flow.
Hot Comp Cams LT4 Performance
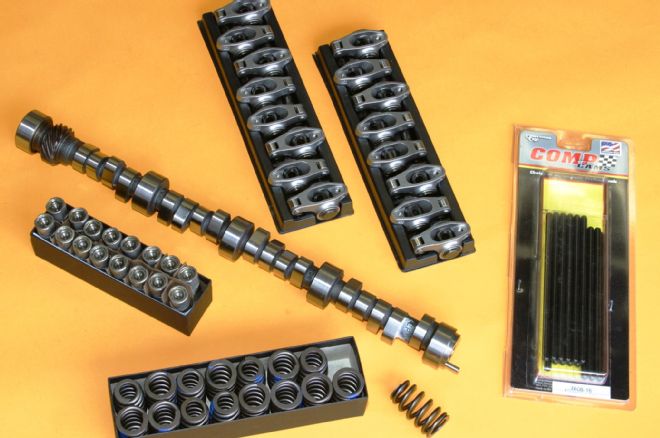
03. Mark Jeffrey suggested to go with a custom-grind hydraulic roller camshaft, using a Comp Cams core (PN 07-000-8) with Grind Number LT1 3192S / 3192S HR110.0 for our LT4 conversion. He wanted something that would give our LT4 a broader torque curve beginning right off idle through 5,500 rpm. This cam gives the LT4 a tolerable lope at idle for a street engine that comes on like stink when the throttle is pinned. Mark also specified Comp Cams’ beehive valvesprings, which will allow us to rev the LT4 up to 6,500 rpm. Because we’re going to spin this thing high and are running aggressive lift, we have opted for Comp Cams’ best one-piece 0.080-inch-wall pushrods. Pro Magnum 1.6:1 roller rockers help ensure solid valvetrain reliability.
Comp Cams Part No: 07-000-8 (core) Grind Number: LT1 3192S / 3192S HR110.0 Serial Number: F-9284-05 Specifics Intake Exhaust Gross Valve Lift 0.568-inch 0.568-inch Lobe Lift 0.379-inch 0.379-inch Duration @ 0.006-inch 275-degrees 275-degrees Duration @ 0.050-inch 224-degrees 224-degrees Intake Centerline: 106.0 degrees Lobe Separation: 110.0 degrees
Machine Shop
We’re working with L&R Engine (Santa Fe Springs, California) for our machine work. These folks do an incredible job of precision machine work, presenting us with an LT1 block ready for assembly. L&R Engine also does assembly work if you’re seeking a complete engine ready to install. They also have dyno access if ever you need it.

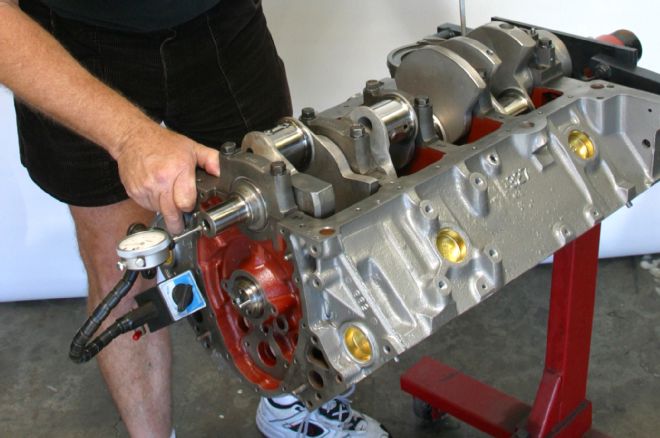
04. Machine work on the LT1 begins with measuring bores, which came in at 4.000-inches when the block arrived. L&R Engine bored the block to 4.025-inches. Another 0.005-inch was completed in the honing process. A torque plate should always be used for honing to get the block dimensionally correct. Remember, cylinder bores change dimensionally when the heads are torqued down.
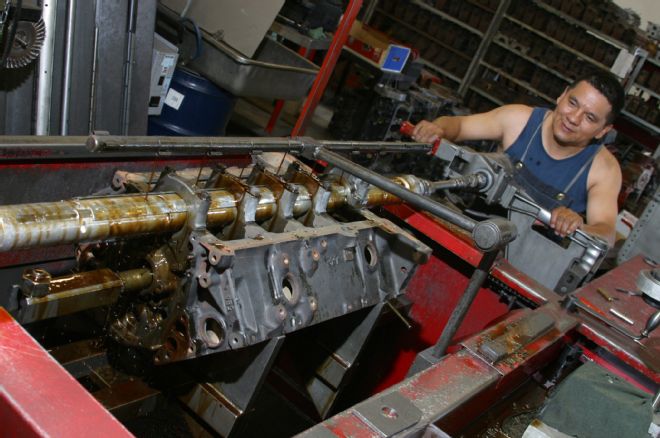
05. L&R Engine checked our line bore, which is within limits. Because we want the main bearings to seat comfortably and remain solid, we’re line-honing the saddles. This begins first with milling the main caps, then installing and torquing them to specs. Once torqued, we hone them back to size.
The Build
L&R Engine did a magnificent job on our CN 10125327 LT1 block. Trans Am Racing has performed the rest, carefully massaging the oil drain-back passages, main saddles, and other areas that could prove problematic at high revs. Mark likes to use GE’s Glyptal 1201-A red insulating enamel from The Eastwood Company on internal iron and aluminum surfaces to improve oil drain-back and keep stray metallic particles where they belong. Tiny fragments caught up in iron and aluminum castings can find their way to journals, bearings, and cylinder walls doing grave damage. And despite detailed cleanup operations, they can be missed. Oil galley passages must be chased thoroughly in the block and crank to ensure build integrity, as well.

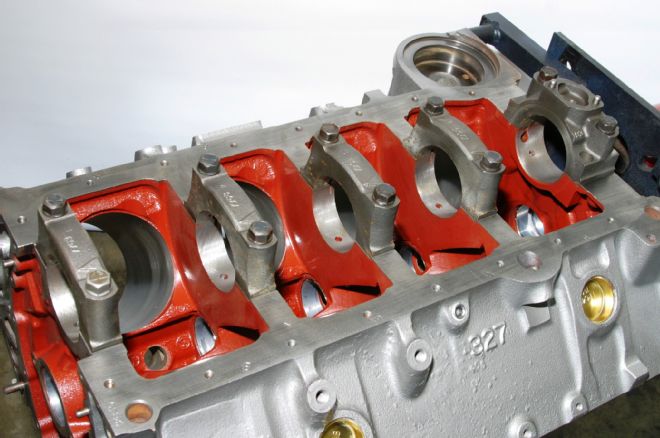
06-07. This is our machined and prepped CN 10125327 LT1 block with two-bolt mains. The LT1 redesign is what makes this block decidedly different than a conventional 350 Chevrolet. Note the front of the block, designed for the reverse-flow, cam-driven water pump and GM’s Opti-Spark geardrive.
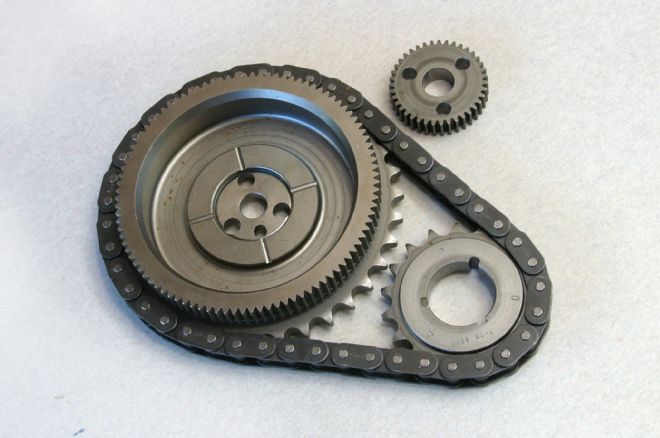
08. Here’s the LT1/LT4 timing chain/geardrive package, which is specific to the 1992-’97 LT1/LT4. Although the LT’s front timing drive and cover package was innovative it has also been quite problematic. It is leak prone even if you sweat all the important details. Take your time and be methodical during installation.
09. Our Comp hydraulic roller cam yields 0.568-inch valve lift on 110-degree lobe centers, which means tolerable idle quality, a broad torque curve, and an LT4 that comes on strong at 5,500 rpm. This means conservative high-end rpm and 475 horsepower. With some tuning and tweaking on the Westech Performance dyno, we could push this thing to over 500 horsepower. Mark gives cam journals generous amounts of Comp Cams engine assembly lube to ensure a good lubrication wedge on start-up.
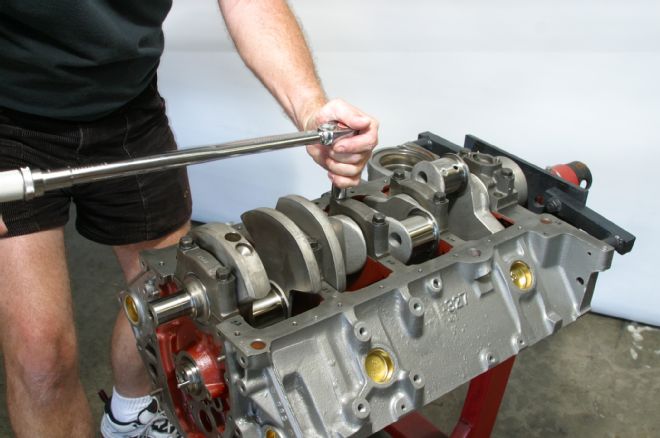
10. Bearings have been installed dry between the bearings and the block to ensure proper crush and security. You would be surprised how many builders perceive you need lube between the bearing and block, which is a huge misconception and costly if the bearing spins. Bearing to journal surfaces are lubricated with engine assembly lube when the crank is installed. Main cap bolts are lubricated, installed, and torqued to 65-75 ft-lb for a main bearing check. Mark made the decision later to go with ARP main studs instead of bolts for a more solid bottom end able to support performance upgrades down the road. The LT1/LT4 will go to 600-700 horsepower with an increased stroke, AFR heads, a hotter cam, and a higher-compression ratio.
11. Crankshaft endplay is checked next. Endplay should be between 0.004-0.007-inch.
12-13. Before Mark installs reciprocating mass, bore sizing is double-checked with a dial-bore gauge. Mark never trusts machine shop work on face value. He checks. Then, he rechecks his own work—twice. Checking twice means never having to apologize to the customer.
Quick Build Tip
Coast High Performance connecting rods are fitted with bearings, then clearances are checked before the pistons and rods are installed. Here’s a quick tip. Because connecting rod journals run considerably hotter than main journals. Mark suggests more generous clearances at 0.0017-0.003-inch for street use and 0.002-0.003-inch for high-performance use.
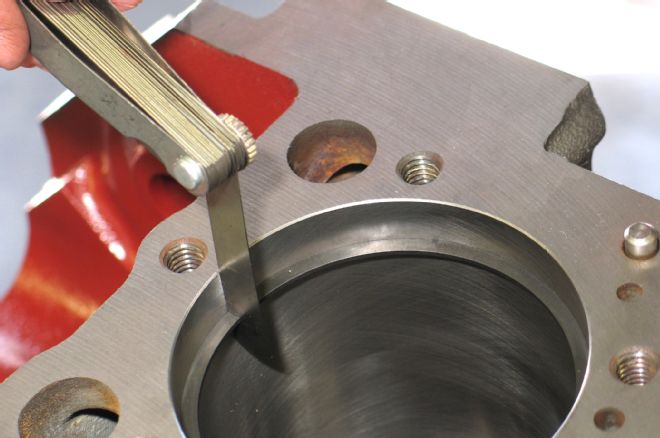
14. Mark checks the ring end gaps then works the ring edges for smooth operation and less chance of scoring. There are two ways to install pistons rings. You can roll the rings on like this or use a ring expander. A ring expander is always the better of the two.
15. In this 383ci stroker application, we have cap screws instead of conventional press-in rod bolts. Our 3/8-inch cap screws are much stronger and torqued to 45 ft-lb. Mark does a second block mock-up and clearance check to make sure the rod bolts clear the block surfaces. They must clear by a minimum of 0.060-inch. Ideally, you will have even more.
16. Mark has performed port and bowl work on our Chevrolet Performance LT4 cylinder heads. The difference between LT1 and LT4 heads is primarily valve sizing (intake 2.000-inch, exhaust 1.555-inch), but there’s more. Where the LT1 was originally equipped with stamped-steel rocker arms, the LT4 was fitted with roller rockers. The LT4 had a revised intake and exhaust port design for improved flow, improved combustion chambers, greater valvespring pressure, and composite head gaskets to handle the higher 10.8:1 compression.
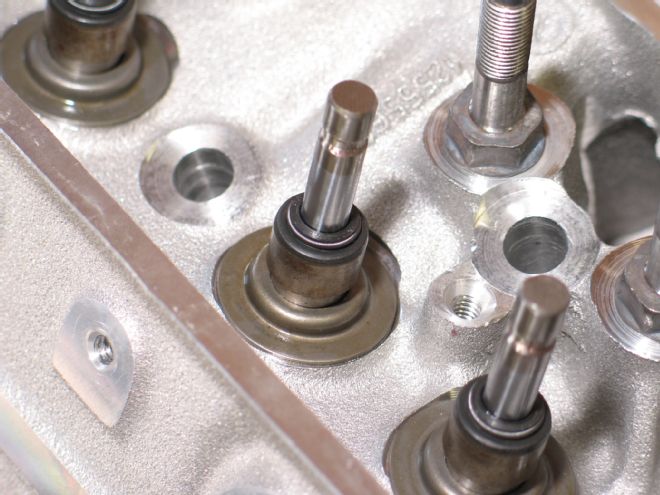
17. Improved high-performance valve seals control oil distribution around the valve stems and guides. What’s more, they yield durability compared to old-fashioned umbrella seals.
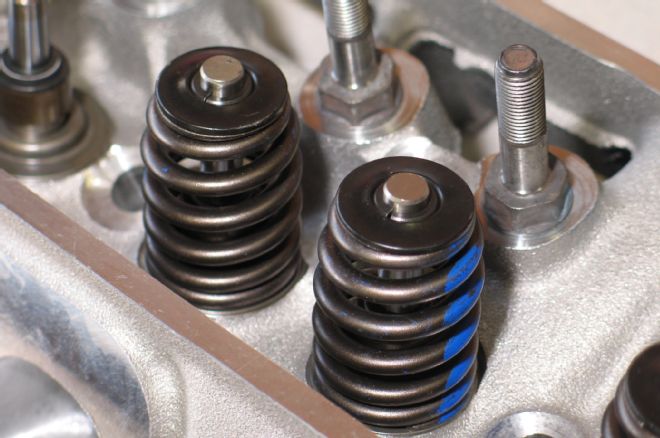
18. Mark specified Comp Cams beehive valvesprings since they complement the Comp cam, as well as the rest of the valvetrain. These springs will have no trouble accommodating the 0.568-inch lift and 6,500 rpm redline.
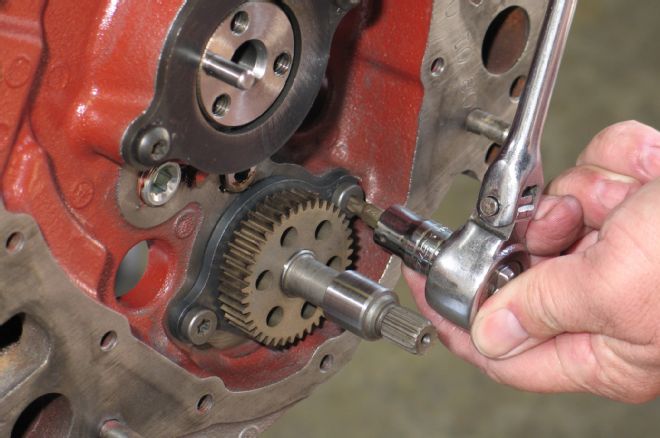
19. The water pump drivegear is installed next using Loctite 242. You will need a Torx driver for this step. The water pump drivegear assembly should be replaced during any LT1 rebuild due to seal wear in the shaft, which will cause oil leakage with the new seal. And take heart, this happens to all of them. This is an expensive item available from your Chevrolet dealer. Retail is approximately $150. If you can’t find it via the Chevrolet parts chain, check online to see who has them.
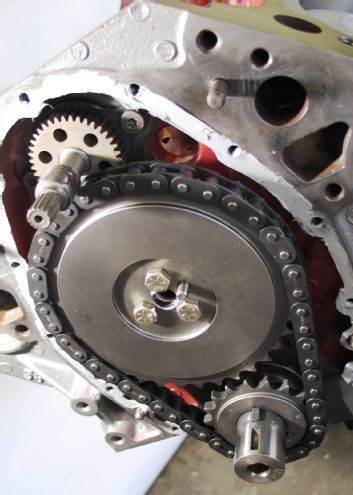
20. The LT1 has its own unique timing set with an internal gear for the water pump drivegear. Timing marks are at 6 and 12 o’clock like we see with a conventional small-block Chevy. Where our LT4 installation became challenging was with the 383 stroker crank, which made the timing set and harmonic damper installation tricky in terms of pulley alignment and damper security.
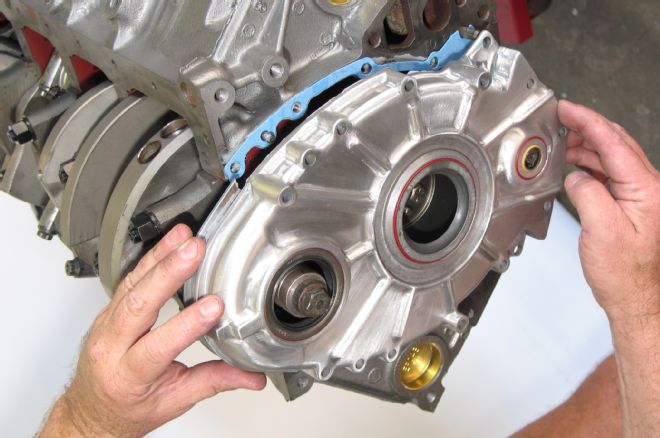
21. LT1/LT4 timing cover installation can be a slippery slope. All seals must be generously lubricated with assembly lube. When installing the timing cover use extreme caution at the water pump drive seal. All it takes is very little side loading to damage this seal. Slip the cover on square with all shafts. Again, use extreme caution when you install the Opti-Spark and the harmonic damper.
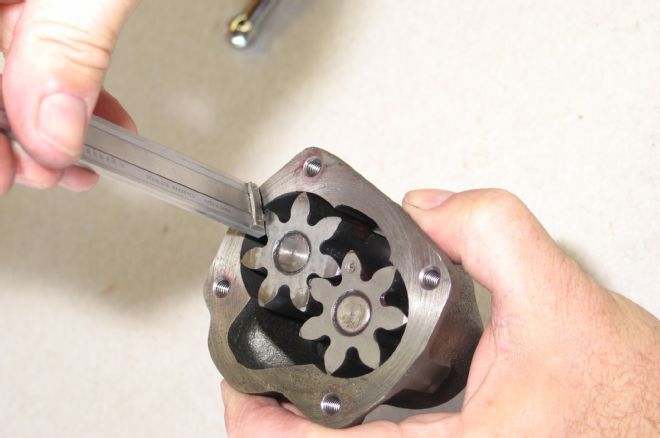
22. Mark strongly suggests to never install an oil pump right out of the box. Check pump gear side clearances and fill the pump cavity with engine assembly lube to ensure plenty of lubrication upon fire-up. Also, check the pressure relief valve movement and function.
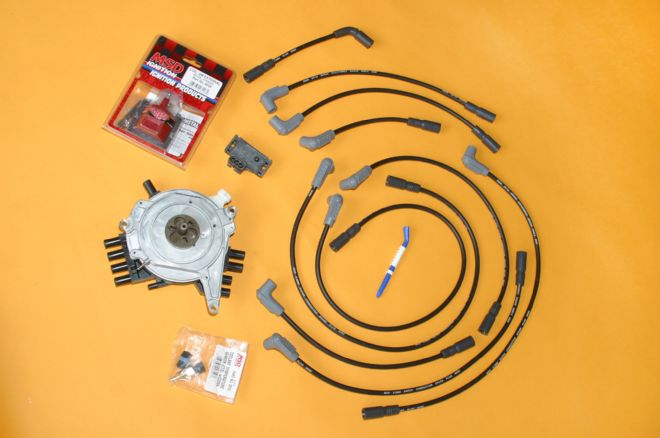
23. At the time of our LT4 build, it was challenging to get an MSD Opti-Spark distributor, which made it necessary to go with a GM unit. MSD is by far the best option for your LT1/LT4 build or tune. Its durability is second to none.
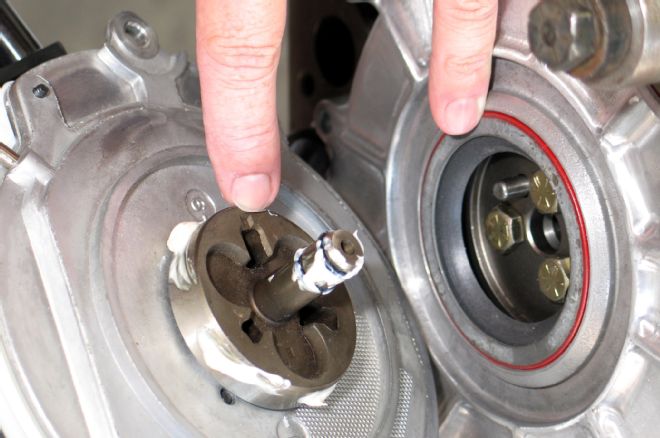
24. When you install your Opti-Spark distributor, lube both the seal and distributor shaft, then fit the distributor square with the timing cover to prevent seal damage. These timing cover seals are the weak links in an LT1/LT4. The distributor drive looks like a three-leaf clover. Follow the pattern shown here and put the pin in its place.
25. The water pump drive and pump are next. Slip the water pump shaft coupling onto the drive as shown with the reference groove (arrow) toward the timing cover. Quite frankly, we’ve seen this coupling installed both ways. Chevrolet tells us to locate the groove at the timing cover.
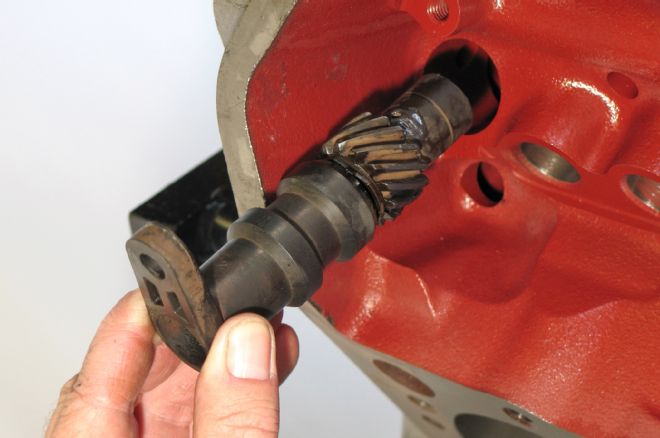
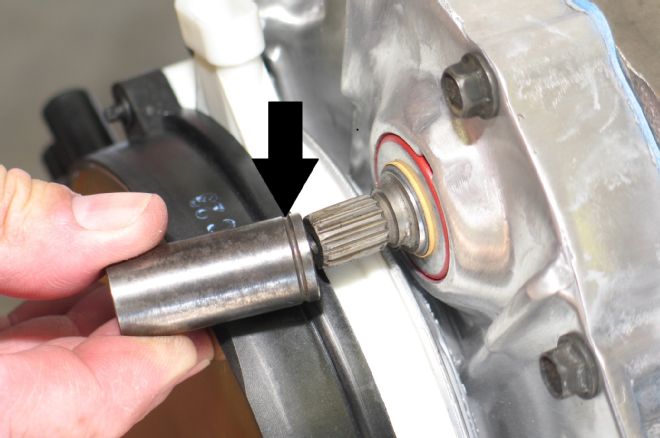
26. The oil pump drive is located at the back of the block as shown. It takes the place of a conventional distributor, connecting the cam and the oil pump.
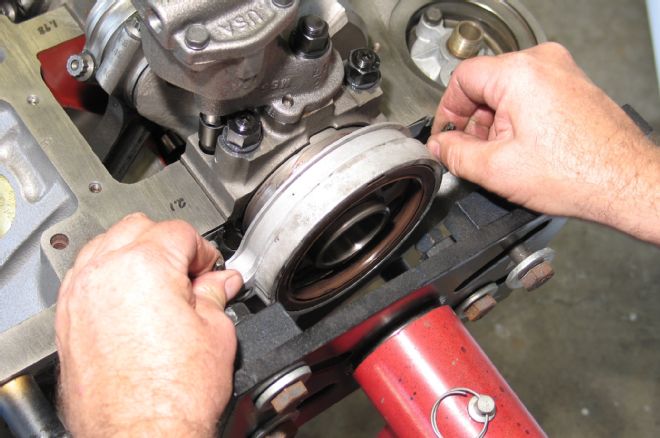
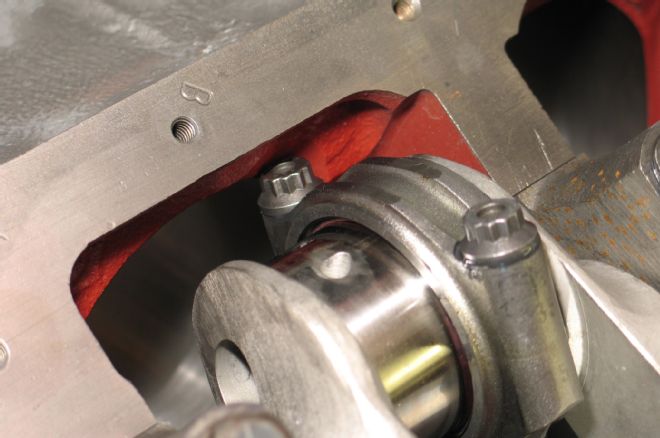
27. This rear main seal holder harbors a one-piece rear main seal. It is suggested you use a very thin film of Permatex’s The Right Stuff around the outside perimeter. Lube the inside lip with engine assembly lube. A dry seal on start-up means a damaged seal and leakage.
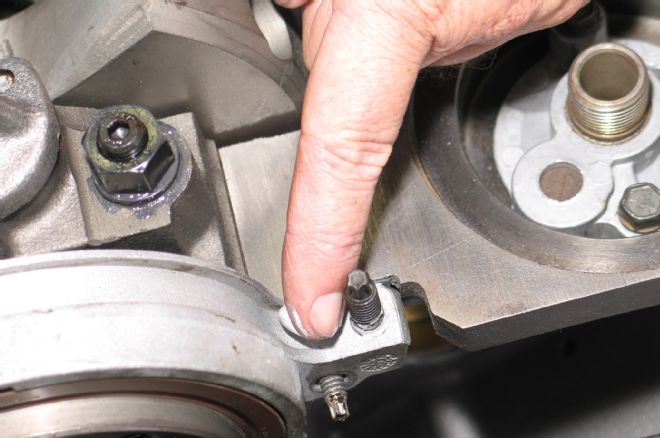

28-29. Even though we are installing a Fel-Pro one-piece reinforced oil pan gasket, it’s important to fill gaps, so to speak, in the sealing process. Use The Right Stuff or similar sealer in the corners as shown.