Hover cars, personal airplanes and self-cleaning houses! We were all promised these things in the new “Atomic Age” of the ’50s and early ’60s. Most of these great ideas didn’t materialize, but we did get the radar range. Enter MSD and the 21st Century. We all enjoy new cars. They start easily, run smoothly, are efficient, and in some cases make great power. Our old beloved Mopar muscle cars, while great fun to tinker on and drive on nice days, don’t hold a candle to the modern computer-controlled cars that roll off today’s assembly lines.
“I wish my old Mopar would run more like my new Mopar,” is something we often hear. Well, MSD has your answer. The Atomic EFI system is a stand-alone, retro-fitable EFI system that can transform your carbureted hot rod into a modern electronic fuel injected machine. The good folks at MSD have literally made a bolt-on, self-tuning system that is so easy to use there is no excuse not to convert your car to EFI.
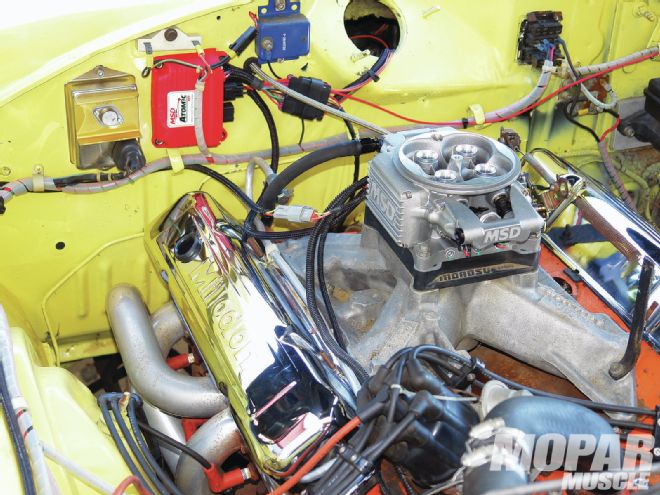
01. The engine of our test car is a pump-gas friendly 9.0:1 compression with about 400 hp. ">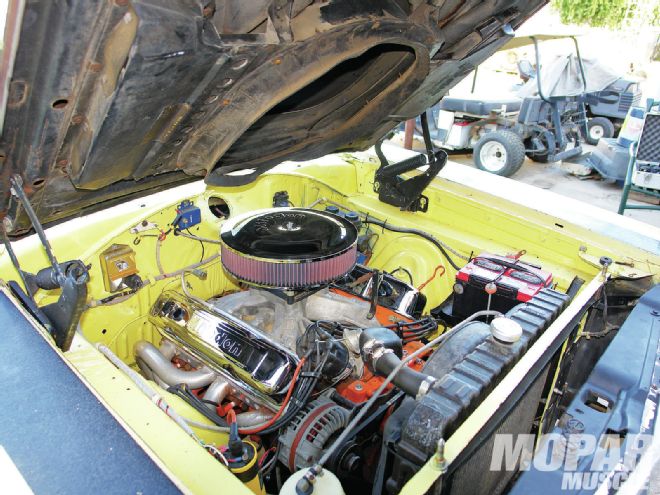 <strong>01.</strong> The engine of our test car is a pump-gas friendly 9.0:1 compression with about 400 hp.
It wasn’t that long ago, that if you wanted to convert your car to EFI, it was an expensive and daunting process. Often times you would have to manufacture your manifold and piece together an entire system of mechanical parts from other cars. Don’t even mention the programming necessary to make the system work. Creating and building fuel maps for EFI systems can take a lot of time and know-how, and each fuel map is different for each application. Recently, manufacturers have come out with kits and systems that have become progressively easier to use, enter MSD. The engineers there have made your life a lot easier.
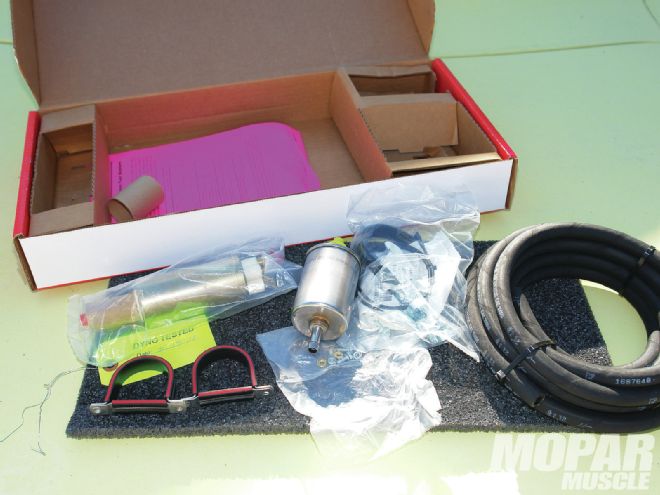
02. Upon opening the package with Atomic EFI, you’ll notice there isn’t a ton of stuff that you need to install. Your main components are the throttle body with all the internal components, power controller, the hand-held tuner and a little bag of hardware, the O2 sensor, and a wiring harness.">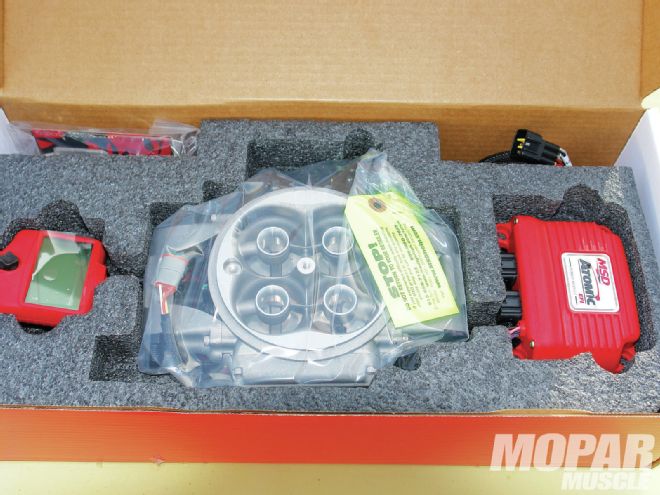 <strong>02.</strong> Upon opening the package with Atomic EFI, you’ll notice there isn’t a ton of stuff that you need to install. Your main components are the throttle body with all the internal components, power controller, the hand-held tuner and a little bag of hardware, the O2 sensor, and a wiring harness.
The Atomic EFI system bolts in place on your 4150/4160 carburetor flange, and by literally installing four bolts, you have an EFI system. It has a side linkage similar to a Holley carburetor, so your existing throttle cable and kick-down linkage attaches easily. Unlike traditional EFI with its external fuel rails, in the Atomic system all your working EFI hardware is contained within the throttle body. That way, there is zero clutter around your engine. The throttle body itself has internal fuel rails, so with their returnless fuel system, you have one fuel line—just like your carburetor.
03. Remove your fuel lines, throttle cable, throttle return springs, and the carburetor and put it in a box. Next, sell it to a friend because you won’t need it anymore.">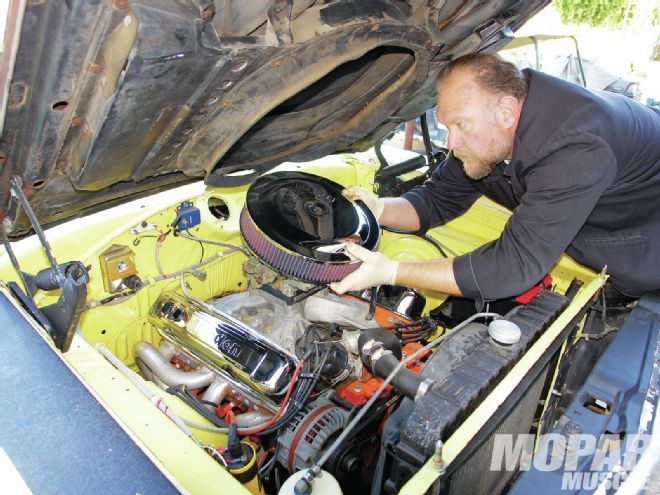 <strong>03.</strong> Remove your fuel lines, throttle cable, throttle return springs, and the carburetor and put it in a box. Next, sell it to a friend because you won’t need it anymore.
The fuel injectors on a normal EFI setup are positioned over each cylinder in the intake manifold. MSD uses 80 lb/hr injectors, which are pretty substantial. The injectors themselves have a stainless steel ball bearing and seat metering method for maximum internal sealing. The injectors are then sealed inside what would normally be the fuel bowl area of the throttle body casting. For even fuel distribution, the MSD throttle body is fitted with annular fuel rings like a carburetor, for superior fuel atomization of the incoming air charge. The result is better air/fuel atomization, as opposed to just spraying the fuel injectors into the plenum area. Another fantastic feature of the Atomic kit is that the ECU (electronic control unit) is not some bulky box that needs to be mounted somewhere with a big wiring harness that you have to hide. MSD incorporated the ECU neatly into the throttle body, i.e. no wiring harness, it’s neat and clean. Not only is the ECU in the throttle body, but all but two of the critical sensors are there as well. The TPS (throttle position sensor) is unlike TBS's used in the past. MSD came up with one that is an automatic and self-calibrating, non-contact sensor. This means you don’t have to configure the sensor when you set up the system, and being a non-contact design, it doesn’t wear out.
Instead of a cumbersome wiring harness lying all over the top of the engine, a single power cable runs from the throttle body to the power controller. The power controller is just what it sounds like—it controls all the other important functions outside of the ECU: electronic fan controls, electronic fuel pump, and the Wide Band O2 sensor. Unlike a giant wiring harness, MSD’s CAN-Bus Network plugs in with a single connection. Speaking from experience, building an EFI harness can be a time-consuming and delicate process. Often times, wiring harnesses must be built to suit the owner’s desire to hide the wires and make it not look like an EFI system.
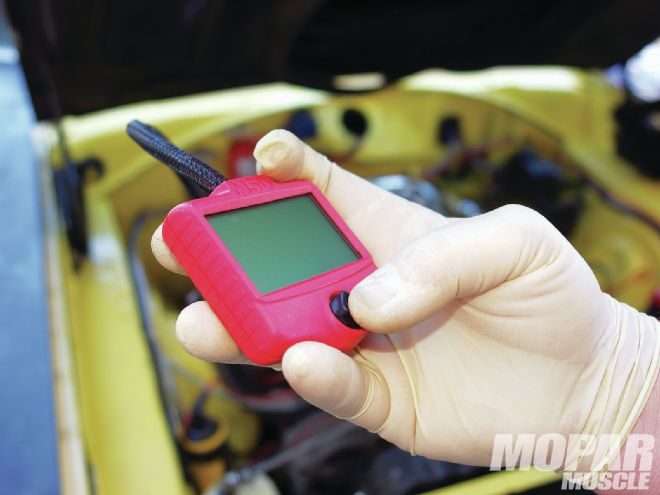
One of the greatest strengths, if not the best part of the whole system, is how you program the Atomic. You don’t need a laptop computer to create extensive fuel and ignition tables. MSD made it way too simple, with the handheld controller. When you are ready to power up your Atomic, it prompts you with simple questions about your engine. Built-in fuel maps, combined with self-learning technology inside the ECU, eliminate the need for a laptop or user tuning. Push the joystick on the handheld controller left, right, up, or down to move through all the prompts and options. Within minutes the proper setup for your engine is complete. If that isn’t enough, the handheld controller also doubles as a dash display for all that is happening inside your system.
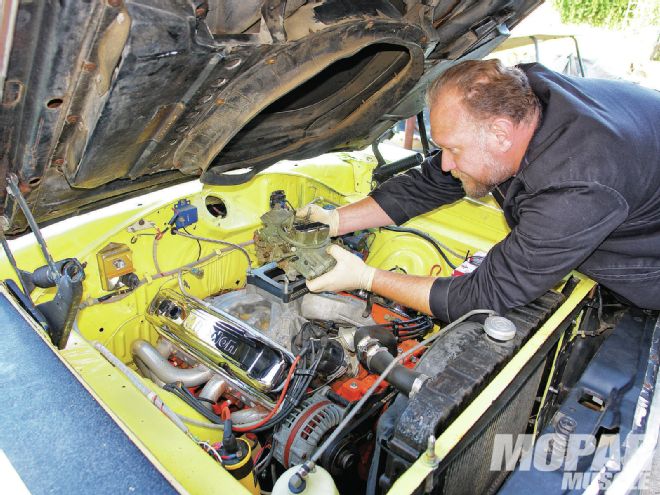
04. Carefully lower the ATOMIC EFI throttle body onto the manifold flange where the carb used to sit. Be sure to not pinch any of the wires underneath it while installing. The passenger side of the throttle body contains all the good stuff. Under the MSD logo is the brains of the system, the ECU. There’s no bulky computer to mount somewhere in the car with an equally bulky wiring harness. It is right there on the throttle body. Also take note of the single fuel inlet. No gigantic fuel rails and braided lines running all over the engine. Finally, all the wires run out of the passenger-side rear corner to aid in routing the wires and making for a cleaner installation. ">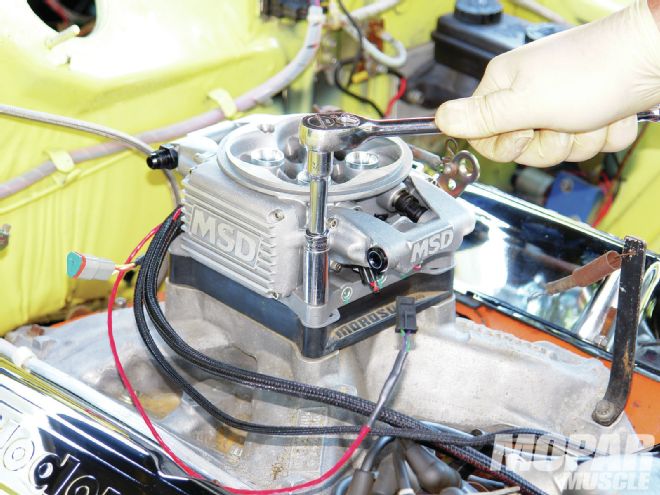 <strong>04.</strong> Carefully lower the ATOMIC EFI throttle body onto the manifold flange where the carb used to sit. Be sure to not pinch any of the wires underneath it while installing. The passenger side of the throttle body contains all the good stuff. Under the MSD logo is the brains of the system, the ECU. There’s no bulky computer to mount somewhere in the car with an equally bulky wiring harness. It is right there on the throttle body. Also take note of the single fuel inlet. No gigantic fuel rails and braided lines running all over the engine. Finally, all the wires run out of the passenger-side rear corner to aid in routing the wires and making for a cleaner installation.
05. Here is a close-up of the throttle body linkage; it’s identical to a Holley carburetor. Your cable and springs come off your old carb and bolt back up. The only adjustment to the throttle blades is right here on the driver side. Adjustment is fully detailed in the instruction manual, which, by the way, is your best friend.">
<strong>04.</strong> Carefully lower the ATOMIC EFI throttle body onto the manifold flange where the carb used to sit. Be sure to not pinch any of the wires underneath it while installing. The passenger side of the throttle body contains all the good stuff. Under the MSD logo is the brains of the system, the ECU. There’s no bulky computer to mount somewhere in the car with an equally bulky wiring harness. It is right there on the throttle body. Also take note of the single fuel inlet. No gigantic fuel rails and braided lines running all over the engine. Finally, all the wires run out of the passenger-side rear corner to aid in routing the wires and making for a cleaner installation.
05. Here is a close-up of the throttle body linkage; it’s identical to a Holley carburetor. Your cable and springs come off your old carb and bolt back up. The only adjustment to the throttle blades is right here on the driver side. Adjustment is fully detailed in the instruction manual, which, by the way, is your best friend.">
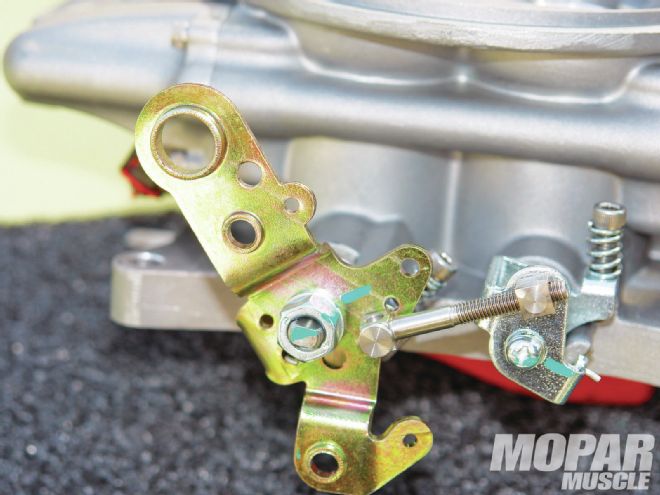 <strong>05.</strong> Here is a close-up of the throttle body linkage; it’s identical to a Holley carburetor. Your cable and springs come off your old carb and bolt back up. The only adjustment to the throttle blades is right here on the driver side. Adjustment is fully detailed in the instruction manual, which, by the way, is your best friend.
06. Since our test car doesn’t have the heater, it was easy for us to install the ECT (engine coolant temp sensor). Just make sure when installing your sensor that you use Teflon tape on the threads, and that it’s on the hot side of water flow—headed towards the radiator. You need to have the hottest temperature reading for the sensor to read and accurately tell the ECU what is going on. The wiring harness comes with specific plugs that can’t be mixed up with other plugs. ">
<strong>05.</strong> Here is a close-up of the throttle body linkage; it’s identical to a Holley carburetor. Your cable and springs come off your old carb and bolt back up. The only adjustment to the throttle blades is right here on the driver side. Adjustment is fully detailed in the instruction manual, which, by the way, is your best friend.
06. Since our test car doesn’t have the heater, it was easy for us to install the ECT (engine coolant temp sensor). Just make sure when installing your sensor that you use Teflon tape on the threads, and that it’s on the hot side of water flow—headed towards the radiator. You need to have the hottest temperature reading for the sensor to read and accurately tell the ECU what is going on. The wiring harness comes with specific plugs that can’t be mixed up with other plugs. ">
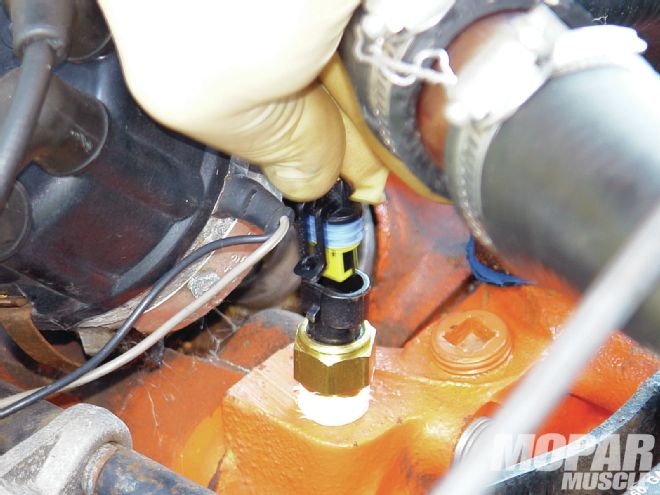 <strong>06.</strong> Since our test car doesn’t have the heater, it was easy for us to install the ECT (engine coolant temp sensor). Just make sure when installing your sensor that you use Teflon tape on the threads, and that it’s on the hot side of water flow—headed towards the radiator. You need to have the hottest temperature reading for the sensor to read and accurately tell the ECU what is going on. The wiring harness comes with specific plugs that can’t be mixed up with other plugs.
07. An O2 sensor is also provided in this kit. The bung to connect it to the exhaust must be welded into your exhaust system. It is a sensor that measures the content of the burned exhaust gasses to determine if your fuel mixture is too lean or too rich. There are detailed instructions about where and at what angle it should be installed.">
<strong>06.</strong> Since our test car doesn’t have the heater, it was easy for us to install the ECT (engine coolant temp sensor). Just make sure when installing your sensor that you use Teflon tape on the threads, and that it’s on the hot side of water flow—headed towards the radiator. You need to have the hottest temperature reading for the sensor to read and accurately tell the ECU what is going on. The wiring harness comes with specific plugs that can’t be mixed up with other plugs.
07. An O2 sensor is also provided in this kit. The bung to connect it to the exhaust must be welded into your exhaust system. It is a sensor that measures the content of the burned exhaust gasses to determine if your fuel mixture is too lean or too rich. There are detailed instructions about where and at what angle it should be installed.">
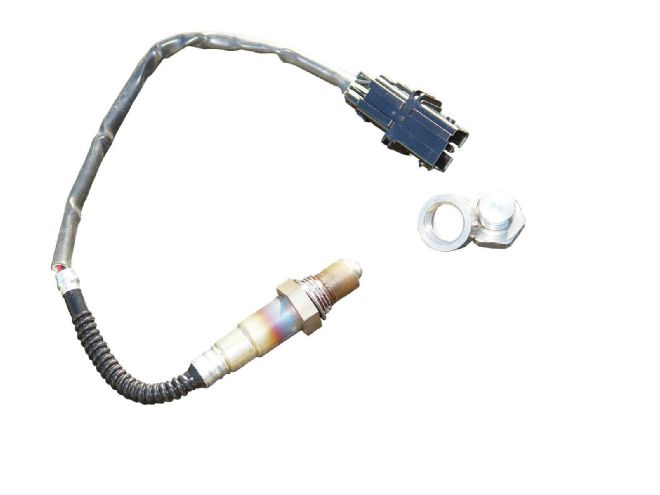 <strong>07.</strong> An O2 sensor is also provided in this kit. The bung to connect it to the exhaust must be welded into your exhaust system. It is a sensor that measures the content of the burned exhaust gasses to determine if your fuel mixture is too lean or too rich. There are detailed instructions about where and at what angle it should be installed.
08. We mounted our power controller on the firewall on the passenger side of the car. It is important to keep the controller away from extreme heat. It can also be mounted in the passenger compartment for a cleaner look if you want to hide the system. In the hardware kit are bushings that are inserted into the grommets, so you don’t crush the grommets when you tighten down the attachment screws that are provided.">
<strong>07.</strong> An O2 sensor is also provided in this kit. The bung to connect it to the exhaust must be welded into your exhaust system. It is a sensor that measures the content of the burned exhaust gasses to determine if your fuel mixture is too lean or too rich. There are detailed instructions about where and at what angle it should be installed.
08. We mounted our power controller on the firewall on the passenger side of the car. It is important to keep the controller away from extreme heat. It can also be mounted in the passenger compartment for a cleaner look if you want to hide the system. In the hardware kit are bushings that are inserted into the grommets, so you don’t crush the grommets when you tighten down the attachment screws that are provided.">
 <strong>08.</strong> We mounted our power controller on the firewall on the passenger side of the car. It is important to keep the controller away from extreme heat. It can also be mounted in the passenger compartment for a cleaner look if you want to hide the system. In the hardware kit are bushings that are inserted into the grommets, so you don’t crush the grommets when you tighten down the attachment screws that are provided.
09. Everything you need to install an externally-mounted high-pressure EFI fuel pump is in this box: high-pressure fuel lines, pump, filter, ground line, PushLok fittings, clamps, and nuts. If your car has a loud, throaty exhaust system like most muscle cars, you will never hear this fuel pump. The fuel filter is a standard NAPA part, which makes it very easy to get replacements. The kit also comes with clamps for attaching it to your existing fuel lines. It includes a ground strap for the fuel pump to ground the pump and complete the circuit. They also include plenty of high-pressure fuel line for all your connections in the kit. Two PushLok style AN fittings, a straight and a 45deg fitting, also come with it so you can use whichever one best fits your application. Please pay attention to the directional arrows on the body of the pump and the filter. They are direction specific. Please keep in mind that the pump and fuel system must be 3⁄8 inch in diameter. Any smaller than that and you coul">
<strong>08.</strong> We mounted our power controller on the firewall on the passenger side of the car. It is important to keep the controller away from extreme heat. It can also be mounted in the passenger compartment for a cleaner look if you want to hide the system. In the hardware kit are bushings that are inserted into the grommets, so you don’t crush the grommets when you tighten down the attachment screws that are provided.
09. Everything you need to install an externally-mounted high-pressure EFI fuel pump is in this box: high-pressure fuel lines, pump, filter, ground line, PushLok fittings, clamps, and nuts. If your car has a loud, throaty exhaust system like most muscle cars, you will never hear this fuel pump. The fuel filter is a standard NAPA part, which makes it very easy to get replacements. The kit also comes with clamps for attaching it to your existing fuel lines. It includes a ground strap for the fuel pump to ground the pump and complete the circuit. They also include plenty of high-pressure fuel line for all your connections in the kit. Two PushLok style AN fittings, a straight and a 45deg fitting, also come with it so you can use whichever one best fits your application. Please pay attention to the directional arrows on the body of the pump and the filter. They are direction specific. Please keep in mind that the pump and fuel system must be 3⁄8 inch in diameter. Any smaller than that and you coul">
 <strong>09.</strong> Everything you need to install an externally-mounted high-pressure EFI fuel pump is in this box: high-pressure fuel lines, pump, filter, ground line, PushLok fittings, clamps, and nuts. If your car has a loud, throaty exhaust system like most muscle cars, you will never hear this fuel pump. The fuel filter is a standard NAPA part, which makes it very easy to get replacements. The kit also comes with clamps for attaching it to your existing fuel lines. It includes a ground strap for the fuel pump to ground the pump and complete the circuit. They also include plenty of high-pressure fuel line for all your connections in the kit. Two PushLok style AN fittings, a straight and a 45deg fitting, also come with it so you can use whichever one best fits your application. Please pay attention to the directional arrows on the body of the pump and the filter. They are direction specific. Please keep in mind that the pump and fuel system must be 3⁄8 inch in diameter. Any smaller than that and you coul
Let’s take a second to talk about all the fabrication work involved with the system. If you have welding equipment, weld in the supplied O2 sensor bung. If not, go to your local muffler shop and have them weld it in for you. This must be performed for the system to operate correctly. The only other extra task is that you must run a wire to your coolant temp sensor. That’s it! Other than some wires for power and grounds, it is incredibly simple to install. A very strong point that I like about the system is that it doesn’t require heavy modification to your existing car, meaning that you can return back to a carburetor and remove the system and incur zero damage to the vehicle. You can even move the kit from one car to another. The self-tuning feature of the system is its strength. Install it, follow the prompts on the handheld controller, and you’re off to the races.
10. The ATOMIC EFI “Dash” is your means for programming your system. No laptop, no PC, no nonsense. Very simple toggle controls, and the software prompts you with the questions about your engine. Follow the easy-to-understand prompts and you will be running in no time. You can also purchase harness extensions to run your Atomic Dash in real time while you are driving so you can monitor your engine. ">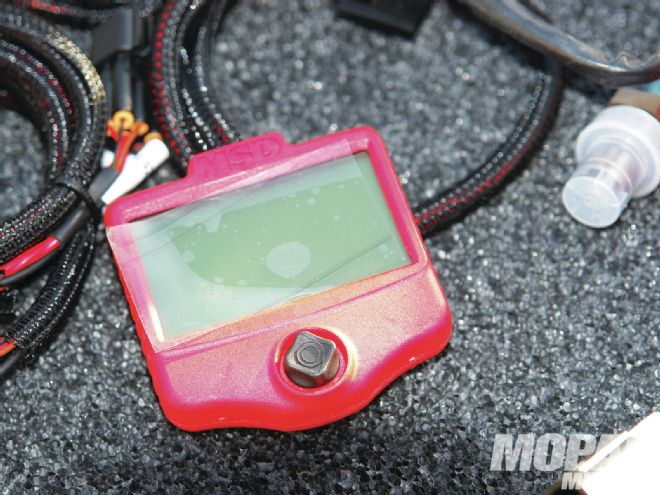 <strong>10.</strong> The ATOMIC EFI “Dash” is your means for programming your system. No laptop, no PC, no nonsense. Very simple toggle controls, and the software prompts you with the questions about your engine. Follow the easy-to-understand prompts and you will be running in no time. You can also purchase harness extensions to run your Atomic Dash in real time while you are driving so you can monitor your engine.
11. The Power Module unit serves an important function by receiving and distributing information from the “Dash” and ECU, and all the other parts like the fuel pump, fans, keyed ignition source and electric power into the power controller. ">
<strong>10.</strong> The ATOMIC EFI “Dash” is your means for programming your system. No laptop, no PC, no nonsense. Very simple toggle controls, and the software prompts you with the questions about your engine. Follow the easy-to-understand prompts and you will be running in no time. You can also purchase harness extensions to run your Atomic Dash in real time while you are driving so you can monitor your engine.
11. The Power Module unit serves an important function by receiving and distributing information from the “Dash” and ECU, and all the other parts like the fuel pump, fans, keyed ignition source and electric power into the power controller. ">
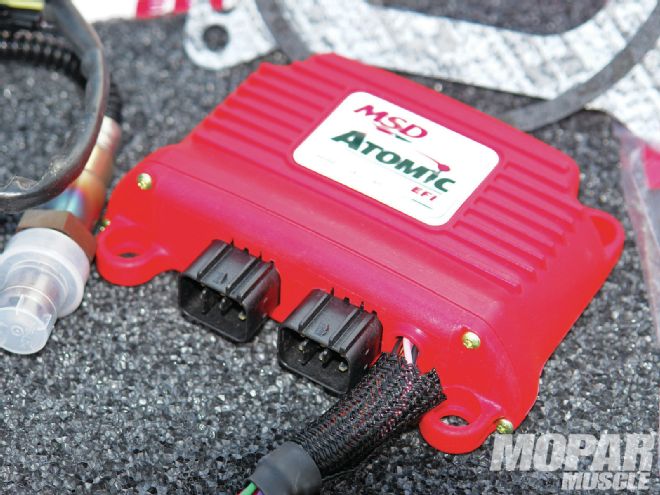 <strong>11.</strong> The Power Module unit serves an important function by receiving and distributing information from the “Dash” and ECU, and all the other parts like the fuel pump, fans, keyed ignition source and electric power into the power controller.
12. Triple check all your connections, and read the instructions before starting your car. This is it—all your programming is done with your thumb. Follow the on-screen prompts, answer some simple questions about your car and the parameters you want the system to run, such as: number of cylinders, fuel return, idle rpm target, rpm limit, timing control, and camshaft selection. It’s all very easy, and detailed in the instruction manual. ">
<strong>11.</strong> The Power Module unit serves an important function by receiving and distributing information from the “Dash” and ECU, and all the other parts like the fuel pump, fans, keyed ignition source and electric power into the power controller.
12. Triple check all your connections, and read the instructions before starting your car. This is it—all your programming is done with your thumb. Follow the on-screen prompts, answer some simple questions about your car and the parameters you want the system to run, such as: number of cylinders, fuel return, idle rpm target, rpm limit, timing control, and camshaft selection. It’s all very easy, and detailed in the instruction manual. ">
 <strong>12.</strong> Triple check all your connections, and read the instructions before starting your car. This is it—all your programming is done with your thumb. Follow the on-screen prompts, answer some simple questions about your car and the parameters you want the system to run, such as: number of cylinders, fuel return, idle rpm target, rpm limit, timing control, and camshaft selection. It’s all very easy, and detailed in the instruction manual.
The ATOMIC EFI system is rated to handle 100 to 525 horsepower in its standard configuration. If your application requires more, MSD has a fuel pump upgrade kit that takes it from 525 to 625 horsepower. Most guys can install the system in one day, with pre-preparation such as the minimal welding. A weekend’s worth of time and you’re cruising with an EFI-equipped Mopar. MSD has worked very hard to make this a system to achieve the goals that they set out to get, namely simplicity and performance. In my opinion, they knocked it out of the park. If you have been sitting on the fence about installing and living with an EFI system, your wait is over. Follow along as we install this system on a ’69 Plymouth Road Runner. This car is fairly typical in that it has a 400-horsepower 383 engine, runs on pump gas, and is primarily a driver.
13. There you have it—your car is converted to EFI. Looking at the engine, you really would hardly know it has EFI on it. Reinstall your air cleaner and no one is the wiser. So what are you waiting for? It is time for your old Mopar to run like your new Mopar. It’s time to join the Atomic Age. ">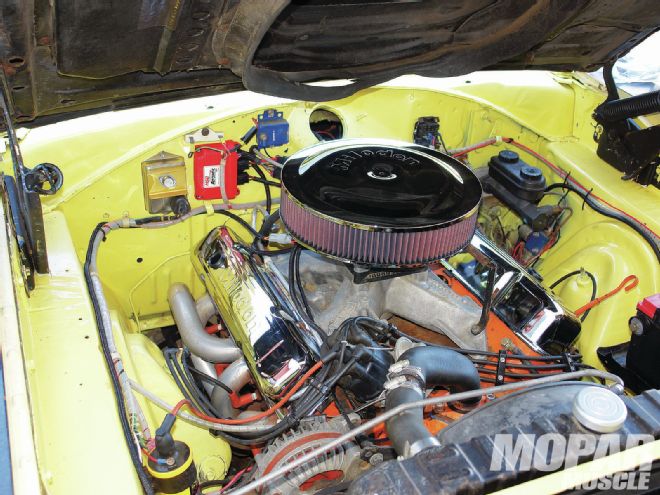 <strong>13.</strong> There you have it—your car is converted to EFI. Looking at the engine, you really would hardly know it has EFI on it. Reinstall your air cleaner and no one is the wiser. So what are you waiting for? It is time for your old Mopar to run like your new Mopar. It’s time to join the Atomic Age.
Costs for MSD Atomic Electronic Fuel Injection: $2,428.60
After the initial programming is done and you have the car running, what’s it like? Well, the engine starts a lot easier than it did with a carburetor. It was weird to feel the car tune itself. It would just keep running better and better. No timing light, vacuum gauge, or box of carburetor jets. The owner of this car wants to get electric fans, so he can run the fan option that comes with the kit. The more you drive the car, the more it self-tunes, and the better it gets. The software that MSD has developed is top-notch. We didn’t get a chance to do some mileage comparisons due to time constraints, but it feels and drives a lot more efficiently. Who would have thought that an old 383 engine from 40-plus years ago could run as smoothly as a new car? The system is even getting used to doing burnouts. If you have been on the fence about EFI, now is the time to jump in. If you have some basic tools, this can be done on a Saturday, but I recommend a weekend. It was really too much fun installing this system. We spent more time figuring out where to mount the power controller than anything else. It’s super easy and yields big results. It’s time to join the Atomic Age.