Last month we showed some options for out of the box ways of prepping for an air conditioning installation. The dash modifications turned out as we hoped and should give the impression that the vents and dashboard were arranged as such at the FoMoCo plant when the truck was built. This month we are going over the air conditioning system plumbing and layout of the rest of the parts- remember we mounted the Vintage Air Gen II Mini evaporator under the dash in the last issue.
 One of the most helpful things you can do is get yourself familiar with what you need for your custom A/C install. Using a computer like this picture or simply drawing out your planned mounting of parts and routing of plumbing can help get you up to speed. It worked for me.
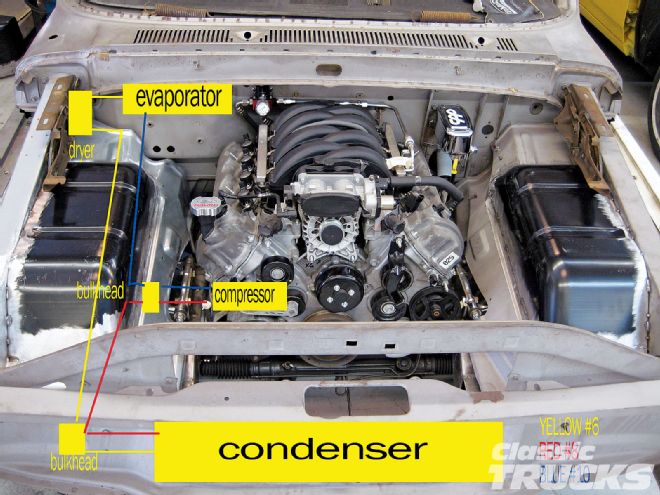
As mentioned before, there are many trucks without an A/C "kit" available to buy in the aftermarket, but this doesn't mean you are destined to a life sweating behind the wheel-you'll just have to put your thinking cap on to build one. Luckily you and I aren't alone, with the help of knowledgeable companies like Vintage Air, we can piece together an air conditioning system that will fit, look good, and work well. I have to admit that I was a little bit overwhelmed for a while going into it as this is only my second air conditioning install I've done on my own, the other was a "kit." So really, I was starting from scratch when planning out the A/C for the F-100. However, after lots of time spent with my nose in Vintage Air's comprehensive catalog and on their tech line, I was soon grasping what I needed. I started with a picture of my engine compartment that I Photoshopped where the A/C components would go (or where I hoped they would), along with my planned routing of the lines. One major thing I wanted to accomplish with the install was to have all of the plumbing hidden from plain sight except for the two lines going from a bulkhead in the inner fender panel to the A/C compressor on the engine. Another thing I wanted to do was to run hard lines from the condenser in front of the radiator to the bulkhead in the core support leading to the inner fender panel. Most people would just run hoses with fittings in a situation like this, but I wanted to have the end result a bit cleaner looking than the hose route. This proved to be just a little bit trickier than I anticipated, but those without magazine deadlines shouldn't have too much of a problem.
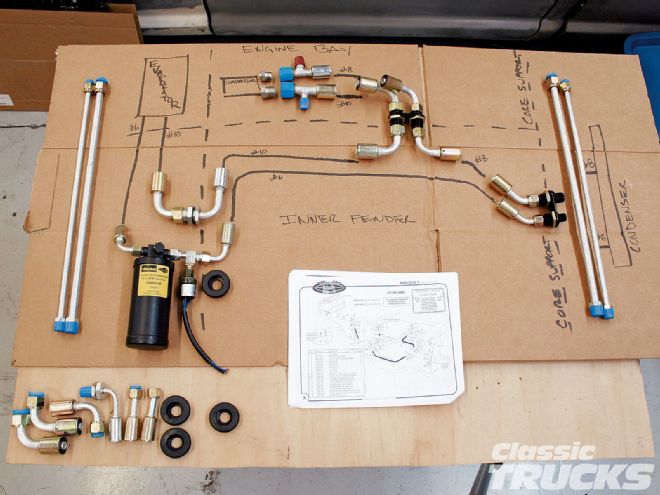 After making a list of fittings and parts I needed (besides the evaporator, vents, and controls), I drew my plan out on a piece of cardboard to not only double check my own thoughts, but to actually see it laid out. Things would be a little easier if I wasn't trying to hide 90 percent of all of this. There are some extra U-Bend-Em aluminum hard lines to the left and some extra fittings at the bottom incase minor things changed.
Follow along as we go over the custom plumbing and parts installation of the Vintage Air pieces. One of the biggest helps to this procedure is to sit down with the Vintage Air catalog and literally draw out what you need for your system as many times as it takes to complete and understand it. Not shown yet is the routing of the hot waterlines for the heater and the wiring of the system. Once I get farther along (and hopefully done with) the truck I may do a follow-up showing these two aspects, but until then Vintage Air is happy to answer any of mine and your questions!